
GATOR Dash Cam

Introduction
Thank you for purchasing the Gator HD Digital Video Recorder 349. This product is designed to provide high definition recording of your trips for security and evidence in the case of an incident. Being portable, this convenient and durable multi-vehicle driving recorder can be used in a variety of situations for video recording.
Product Overview
This product is a 1080P Digital Car driving recorder, it can record high resolution video as well as high resolution pictures, using a micro SD card as the storage device which is ultra-small, power saving, easy and convenient to carry anytime. The DVR has a recording resolution of up to 1920x1080P and it can also shoot 12 mega pixel still images. The DVR uses a Micro SD card as storage because it is compact, power-saving and easy to carry. The DVR can also use the HDMI interface to transmit your media directly to a high-definition TFT TV for high-resolution playback.
ATTENTION: Please charge the unit for 4 hours before installing.
Product Features:
- 148-degree high definition wide-angle lens.
- 1080P @ 15-25 FPS (Software Modified).
- 720P @ 30 FPS
- 2.4-inch 4:3 high-resolution TFT screen.
- Looping Recording
- G-Sensor Function
- Digital zoom 4X
- Do not put the DVR into a damp working condition; The DVR down not has any waterproof function.
- Do not try opening the shell or trying to repair the DVR by yourself. If the accessories for the DVR have any problems, please take it to an authorized repair agent for repair.
- Do not use a chemical substance, clean solvent or cleaner to clean the DVR, please use a moist soft cloth if you would like to clean the DVR.
- Do not use the DVR under conditions where dust and density is too large, to avoid affecting the video.
- Please care for the environment, do not discard this machine randomly; do not throw the DVR into a fire, as it may explode.
- Please pay attention to cleaning the lens surface, use a moist soft cloth to clean the lens before use, to avoid poor video footage.
Package Components:
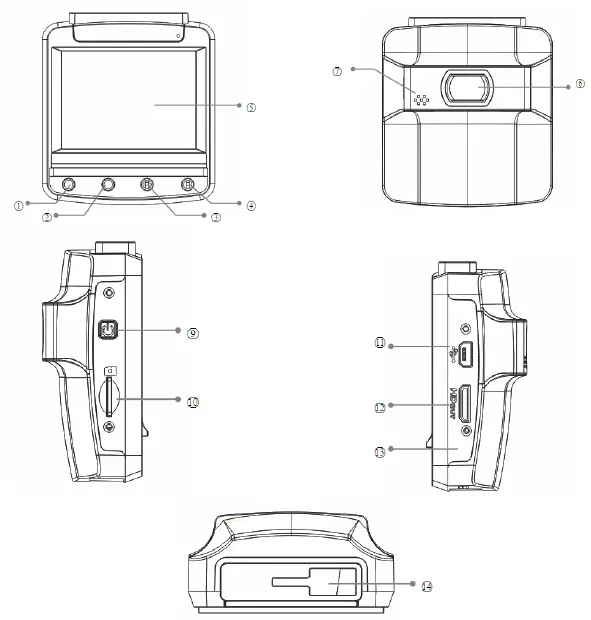
Product Structure:
- Menu/Mode
- Up
- Down
- OK Button
- LCD Screen
- Lens
- Speaker
- Mic
- Power Button
- Micro SD Slot
- Mini USB
- HDMI Out
- Reset
- Mount Slot
Button Instructions
Power Button:
When the DVR is turned off, press it once to turn it on. While the system is on, hold down the power button to turn it off.
MENU/MODE Button:
Pressing this button once will open the menu. Pressing the menu button again while in the menu will change to the second settings tab. This button is also used to change between video, photo and playback modes by holding down the button for 2 seconds then letting go. Pressing the Menu button while recording will activate the file protection (A white key symbol will be present on the top of the screen if activated).
OK Button:
The OK is used to start recording in video mode. Pressing the button again in video mode will stop the recording. In photo mode, the OK button is used to take a picture. The OK button is also used to select a setting in the menu.
Up Button:
The up button is used while in the menu to move the highlighted area for selecting. The up button can also be used to zoom in under the standby or shooting mode.
Down Button:
The down button is used while in the menu to move the highlighted area for selecting. The down button can also be used to mute the MIC on the fly when fully zoomed out, either during standby or recording.
HDMI Port:
The HDMI port provides a HD output interface using the mini HDMI to HDMI cable (Not Provided) that can be plugged into a HDMI port on a supported device.
Micro SD Slot:
Where the Micro SD card is inserted (Max size is 32GB).
USB Interface:
The USB port can be used to charge the device or be connected to a computer for data transmission.
Reset:
To hard reset the device in the case of a system jam or crash.
Power Indication Light:
When the device is turned on, a blue indicator will light up. When the device is recording, it will be flashing red. When the device is charging, the light will glow red.
Battery Charging Indication Light:
After connecting the DVR through USB, the indication lamp will glow red meaning it is charging. The light will automatically turn off after fully charged.
MIC:
Audio receiver for video recording.
Extra Functions
G-sensor Function:
The G-sensor function activates in the case of a car accident by determining the gravitational acceleration (1g = 9.8 meters/second^2). When this function activates, the DVR will save the accident footage in a non-delectable file in order to protect the footage. The G-sensor sensitivity can be adjusted to Off/High/Medium/Low in the settings menu.
SOS Function:
Press the Menu/Mode Button while recording in order to lock the currently recording video file so it is non-deletable file (A white key symbol will be present if activated).
Automatically Powers On/Off:
When power is connected to the DVR using the car charger it automatically turns on and starts recording. When the charger is disconnected, or car is turned off, the DVR will automatically save the file and shutdown.
Basic Instructions for Video and Photo Operation
Powering on and off the device:
To turn on the DVR press the power key once, the red indication lamp will be light up if it is connected to a power source. To turn it off, hold down the power button and the device will turn off.
WARNING: The device will automatically turn off once the battery hits critically low levels.
Video Mode
Hold the Menu/Mode button for 2 seconds and then let go to switch to video mode if not already. To start recording in video mode press the OK button to start the recording. You know it is recording by the red circle indicator on the top left corner of the LCD. To stop the recording, simply press the OK button again.
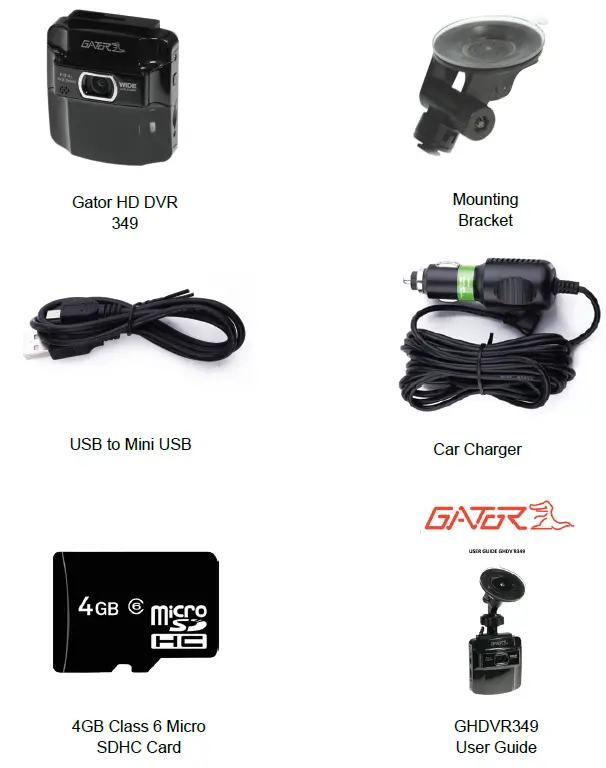
Photo Mode
Hold the Menu/Mode button for 2 seconds and then let go to switch to photo mode. There is a camera icon at the top left corner of the LCD to signify you are on photo mode. To take a photo, press the OK button. The screen will flash and make a camera sound when a picture is taken. Pressing the Menu button in photo mode will allow you to adjust the photo resolution, image quality and other photo settings.
Video/Photo Playback
Hold the Menu/Mode button for 2 seconds and then let go to switch to playback mode after photo mode. Using the arrow buttons, you can choose between all your recorded videos or photos. The protected files have a lock icon meaning they cannot be deleted until unlocked. Press the OK button to select a file for playback. Pressing the Menu/Mode button will give the option to delete the file or unlock the file. Simply hold down the Menu/Mode button for 2 seconds and then release to return to video mode.
Menu Settings
Press the Menu button to get into the menu settings. You can navigate the settings menu by using the Up/Down buttons. To change or edit a selected setting, press the OK button. Press the menu button again to get out of the menu settings.
USB Mode
When connecting a USB cable with a PC, the DVR will present two options. ‘Mass Storage’ allows you to transfer your videos and photos to your PC. The ‘PC Camera’ option allows you to use your DVR as a webcam for your computer.
Battery Instructions
Please see below illustration for battery the capacity indications.
When the DVR is charging, a red indicator on the DVR glows red. The DVR takes about 3 hours to fully charge. When the DVR hits full charge, the red indicator will turn off.
The DVR can be charged multiple ways:
- Using the provided micro USB cable to connect to a USB interface for charging.
- Using the provided car charger
Menu setting features explained
- Resolution: 1080P, 720P, WVGA, VGA.
- Loop Recording: This feature allows you to set the size of the files your DVR will record before saving and creating a new file. We recommend the DVR to be set to ‘3’ minute files.
- Exposure: This feature will change the white input. We recommend it always be set at ‘+0.0’.
- Record Audio: This Feature will allow you to turn the DVRs recording sound on or off. If you want to stop the DVR recording sound in the cab of your vehicle, set this feature to ‘off’.
- Date Stamp: This feature will stamp the date and time on all your footage produced by your DVR.
- G Sensor: This feature allows you to set the sensitivity of the Gravity sensor in the DVR. We recommend this be set to ‘Medium’ to help stop false or irrelevant readings. Press the menu button again until you see the following Spanner and screwdriver. (SETUP MENU)
- Date/Time: This feature will allow you to change the year, month, day and time. To change the date simply use the arrow keys to go up or down. Press the OK button to move onto the next section. Again, use the arrow buttons to go up or down. Once through all the section, pressing OK again will finish the setup.
- Parking Mode: When enabled, the DVR will automatically turn on and start recording when it detects an impact with your vehicle. This is mainly used when the car is parked and someone else hits your vehicle. A “P” icon on the bottom right of the screen signifies it is turned on. The user can select the sensitivity level from high, medium and low. DVR will record for 1 minute then go back into
sleep mode. The recorded file will be then overwrite protected. Note: To delete this file you must reformat the Micro SD on your computer to alleviate the cards storage being full. - Beep Sound: Allows you to turn the beeping sound on or off.
- Language: Allows you to choose from a selection of languages that include: English, Korean, Taiwanese, French, Spanish, Dutch, Italian, Simplified Chinese, Traditional Chinese, Russian and Japanese.
- TV Mode: We recommend this be set to ‘PAL’ as PAL is the Australian standard line frequency and will work on any TV when playing back your footage on TV via a HDMI cable.
- Frequency: This feature allows the best recording in conditions where street lights and ac lighting is used. The Australian standard frequency is 50HZ so it should be set to ‘50hz’.
- BackLight: This feature will turn your LCD off after 1, 3 or 5 minutes but will continue to record regardless. This feature is useful for night driving as having the LCD on could be a distraction.
- Format: This feature allows you to format/delete all the files off your micro SD card and also reinstalls your DCIM directory and DVR software on your SD card so the micro SD card can operate with your DVR free of errors.
- Default Setting: This feature will reset all your settings and return your DVR to the factory standard settings.
- Version Info: This simply shows the firmware/software employed by the DVRs hardware.
Product Specification
Frequently Asked Questions
Under normal operating conditions, if there are problems with the device, please refer to the following methods to resolve.
Cannot take pictures or record video?
Please check whether there is enough space on the micro SD card or internal storage. Stopping automatically while recording Due to the high amount of HD video data being recorded, please use a high speed micro SD card. To tell if you have the required high speed card, check if it has the ‘Micro SDHC’ logo on the SD card and the C4, C6 or C10 somewhere on the card.
Fuzzy/dirty image
Please check if the lens is filled with dirt or fingerprints and clean carefully. Please clean lens with cloth before shooting.
Horizontal stripes interference in the image
This is due to the wrong setting of light frequency error, please set the frequency to 50HZ as it is the Australian standard frequency. The DVR is jammed or not responding Please reset the device by pushing in the reset button on the underside of the DVR.
Why does battery go flat in the DVR?
The DVRs battery must be frequently charged once a week if the car is not in use.
Why does the time and date reset?
The time resets when the DVR’s battery is flat. Make sure the DVR is always charged in order to keep date and time.
Why is the battery not charging in the car?
Please check and make sure that there is power in the cigarette lighter socket of your car.
Micro SD card not recognized by DVR
Format card in the DVR’s menu setting’s before use.
Infringement of Copyright Warning
Please note that this product is for personal use only, the method of use shall not violate the goods infringe on domestic or international copyright laws. Even recorded images for personal use only, please note that in some cases to use this product to record performances, exhibitions or business activities of the images may infringe the copyright or other legal rights and interests of others.
Technical Assistance
If you need assistance setting up or using your Gator product now or in the future, call Gator Support.
Australia
TEL: 03 – 8587 8898
FAX: 03 – 8587 8866
Mon-Fri 9am – 5pm AEST
Please retain this user guide for future reference.
Version 1.0
![]()