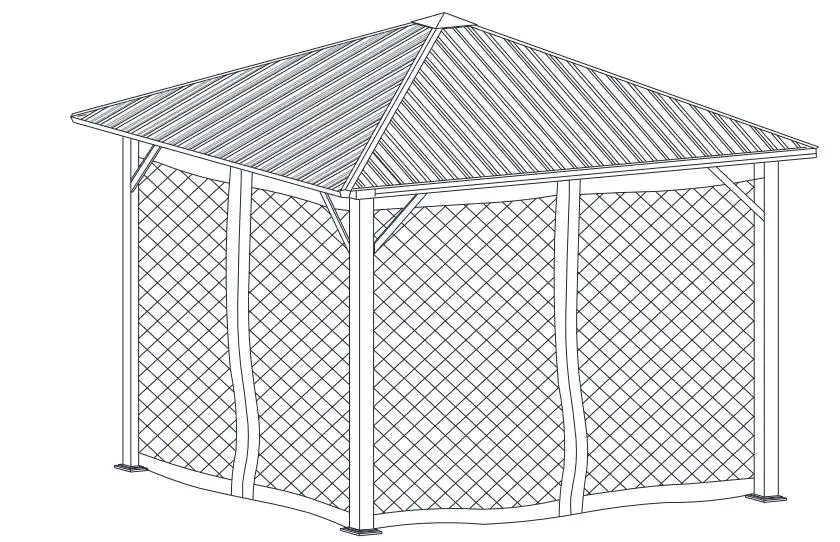
Gazebo Instruction Manual

Caution: Please read this before you proceed with assembly.
Read all instructions before assembling and using this product
- Select ideal location. Set out all parts on a clear and level surface prior to assembly. Ideally, the Gazebo should be set up in the desired location to avoid moving it after assembly.
- Team Work. We recommend 4 adults and it may require 4 hours to fully assemble the Gazebo. If possible, please use safety ladders.
- Use caution during the entire assembly process, especially when lifting large and heavy items. Also, use all safety precautions when using ladders. Keep children away from the assembly area.
- Check all available parts. Before assembling the gazebo, check to make sure you have all the parts listed in the Parts List.
- Important! Before attaching the canopy, make sure ALL BOLTS are tightened securely.
- During assembly keep children away from the work area and the parts and tools. Once assembled, do not allow children to climb on the gazebo.
- It is recommended that the Mosquito Netting be removed during strong winds, stormy and snowy conditions, and remove the accumulated snow in roof.
- Do not set this gazebo up near electric lines, trees or slanted roofs. Use safety precautions at all times.
Any questions on assembly or parts, please contact us.

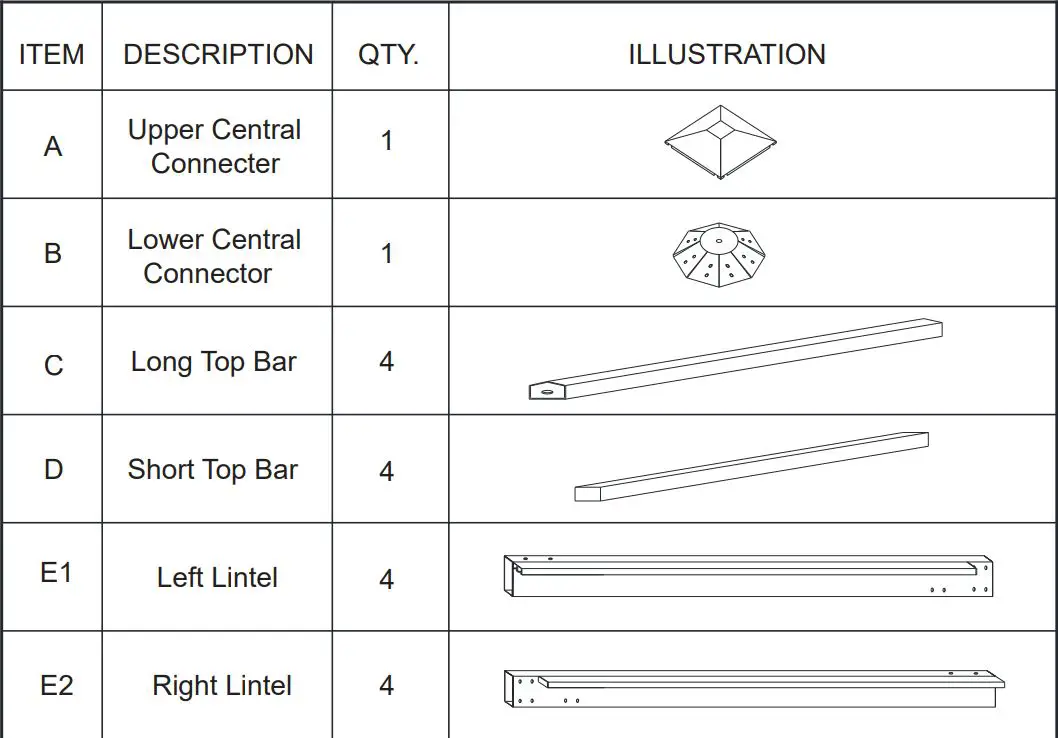
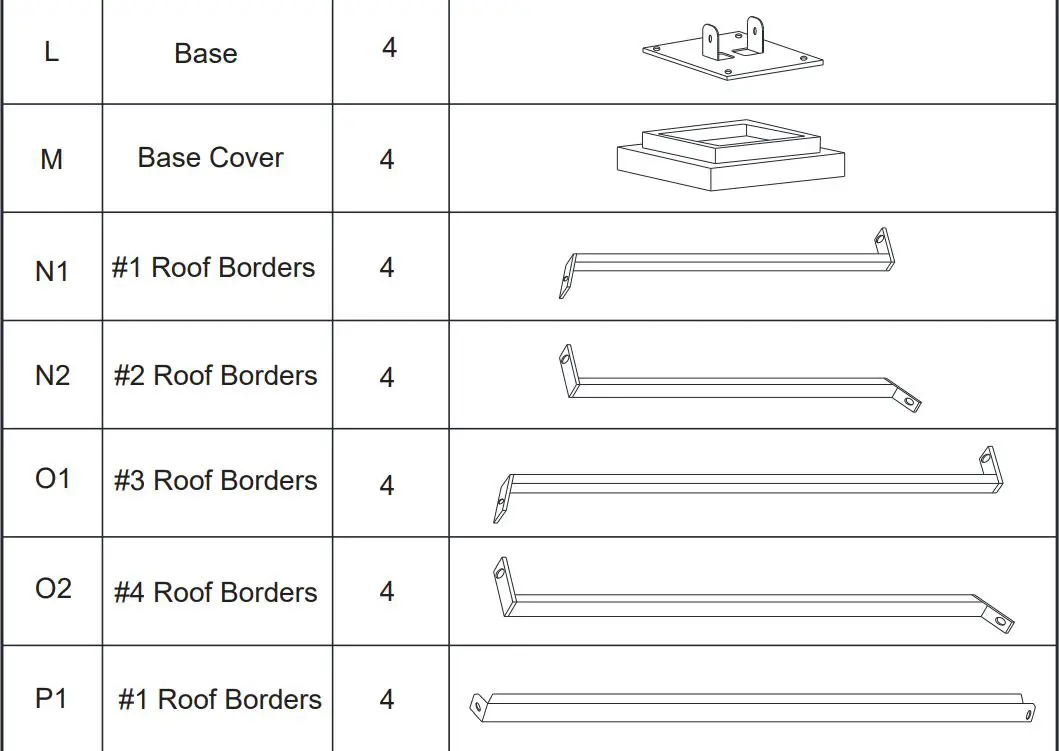

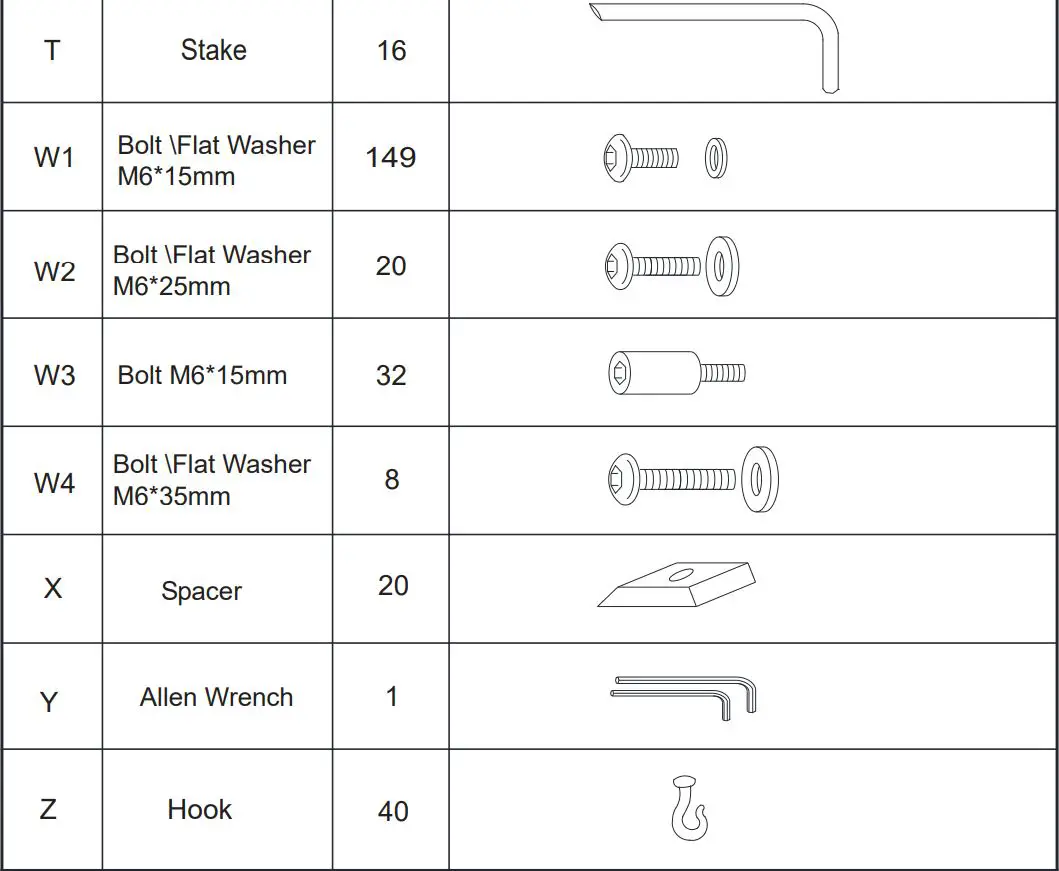
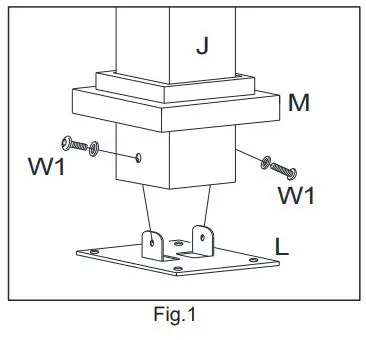
- 1. Insert the Base Cover (M) into Post (J), and then attach Post (J) to Base (L) with Bolt (W1). See Fig.1.
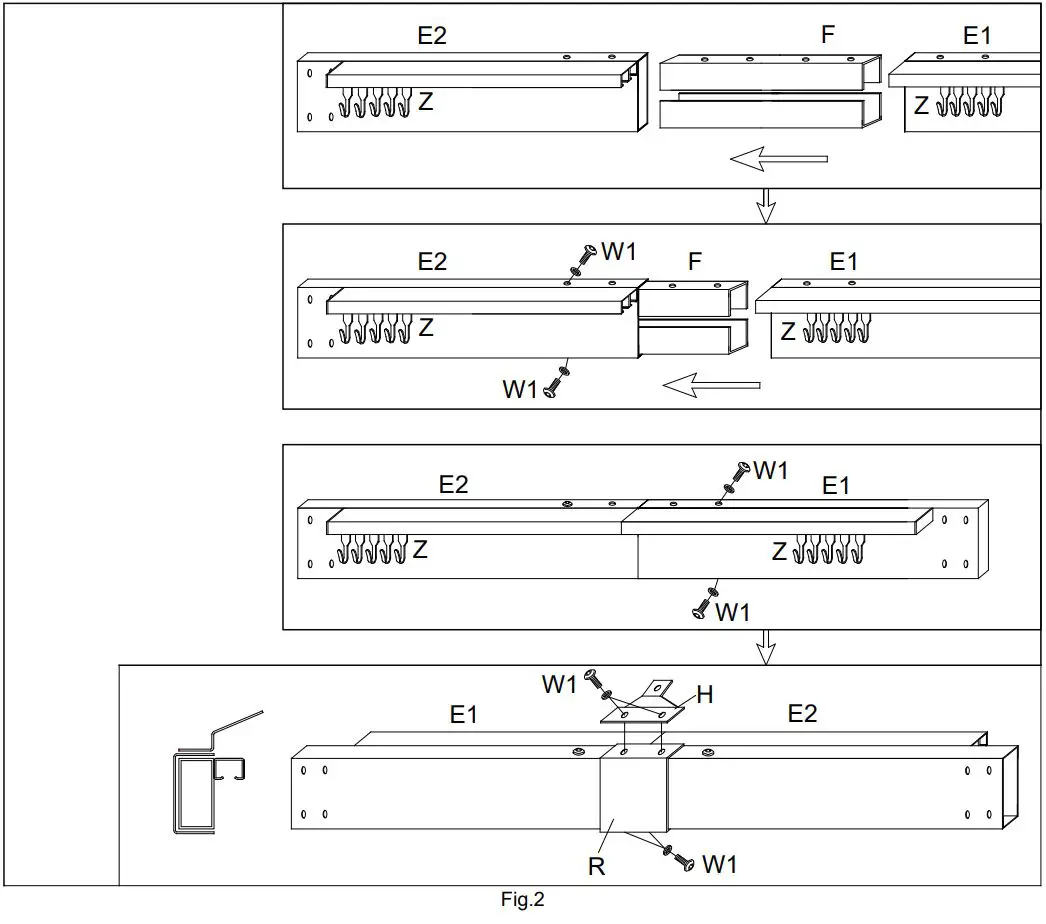
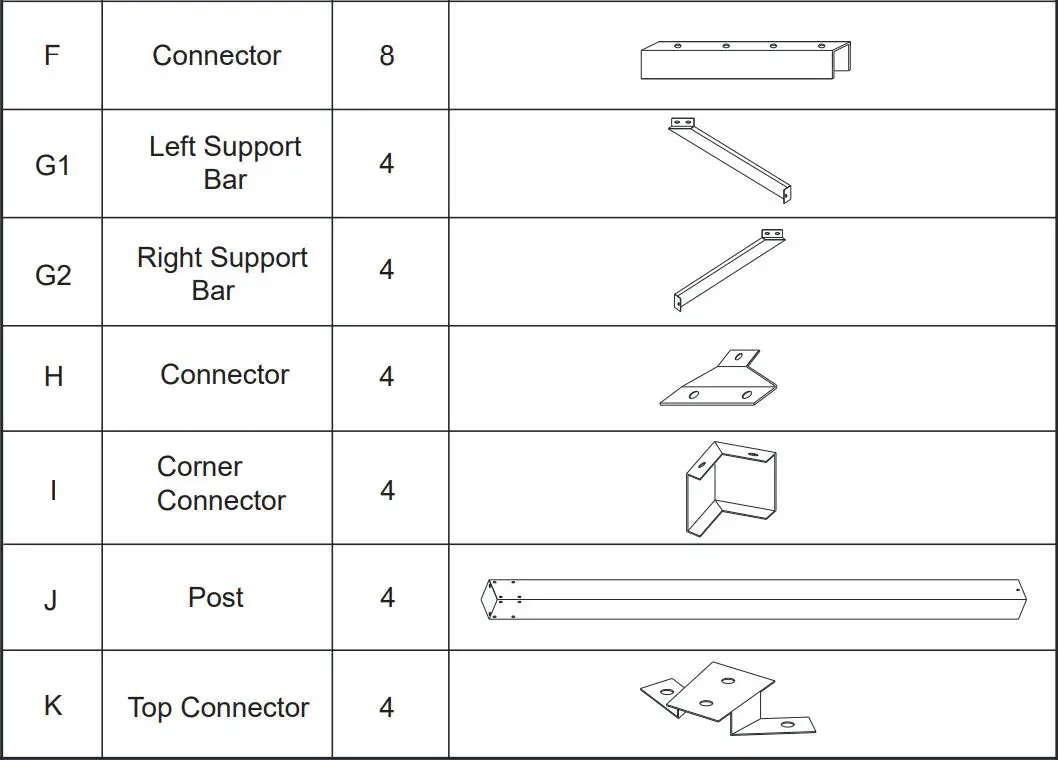
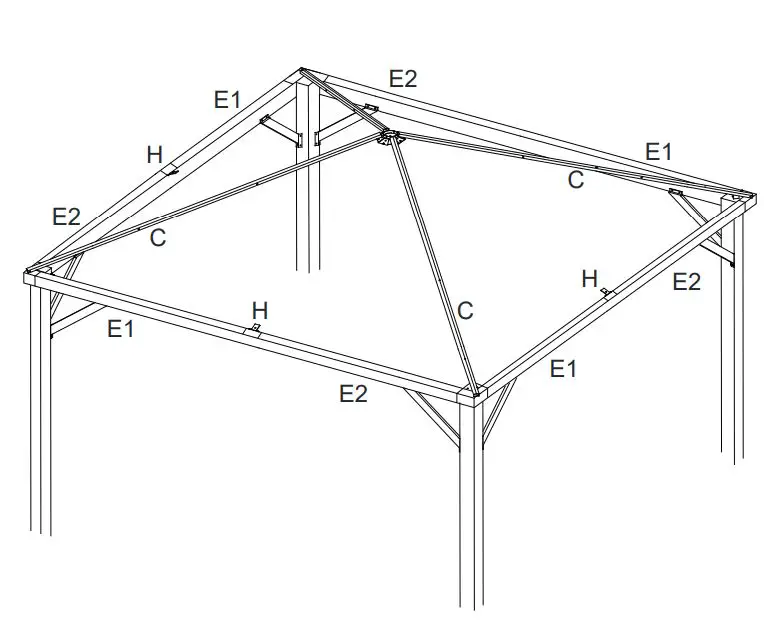
- 2.Place the Hook (Z) into the track of the Lintel (E1/E2). Insert Connector (F) to the Lintel (E1/E2), make sure the holes are aligned. Attach Left Lintel (E1) and Right Lintel (E2) to Connector (F) with Bolt (W1). At the same time, attach Connection Piece (H) to Lintel (E1/E2) with Bolt (W1). Attach the Lintel Cover (R) to Connector (F) with Bolt (W1). See Fig.2.
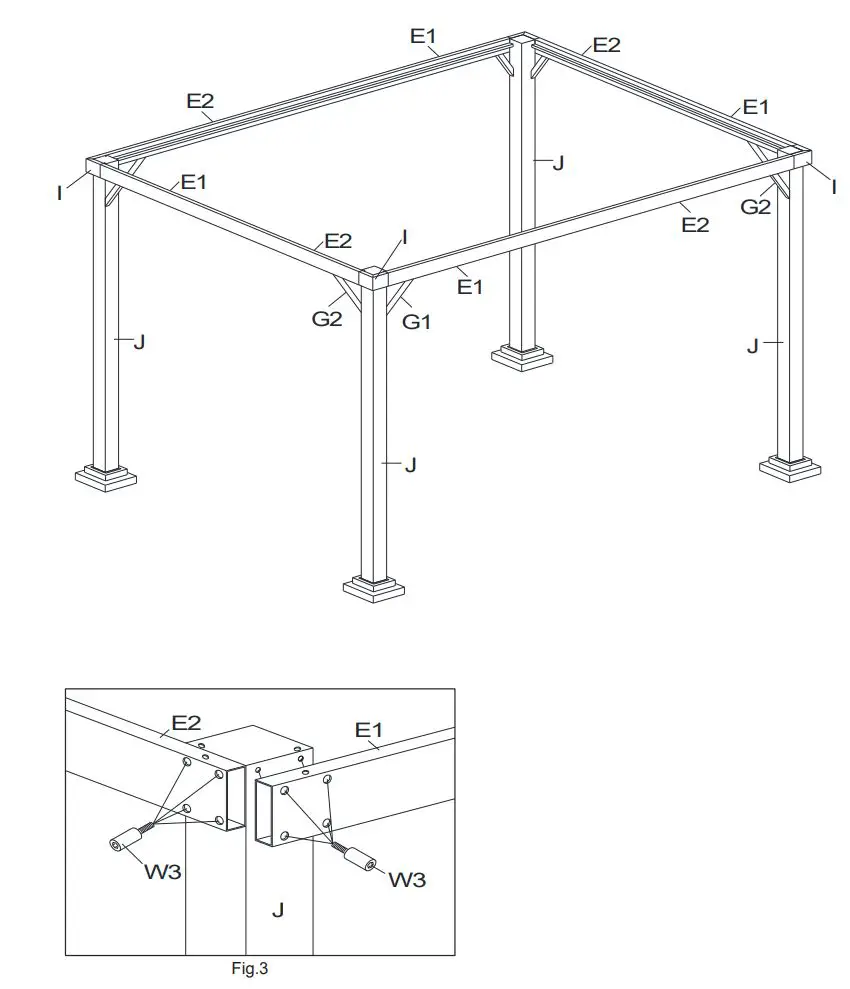
- 3. Attach the Left Lintel (E1) and Right Lintel (E2) to Post (J) with Bolt (W3). See Fig.3.
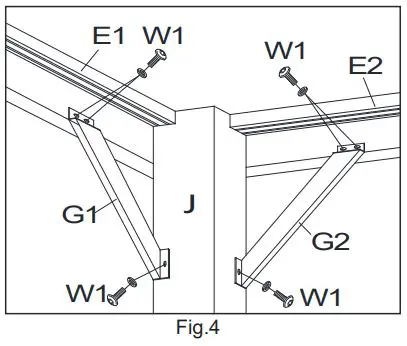
- 4. Attach the Left Support Bar (G1) to Left Lintel (E1) and Post (J) with Bolt (W1); attach the Right Support Bar (G2) to Right Lintel (E2) and Post (J) with Bolt (W1). See Fig.4.
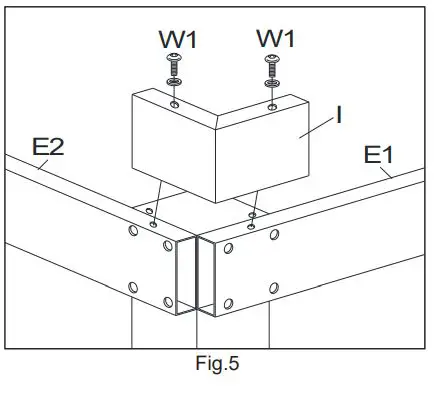
- 5. Attach the Corner Connector (I) to the Left Lintel (E1) and Right Lintel (E2) with Bolt (W1). See Fig.5.
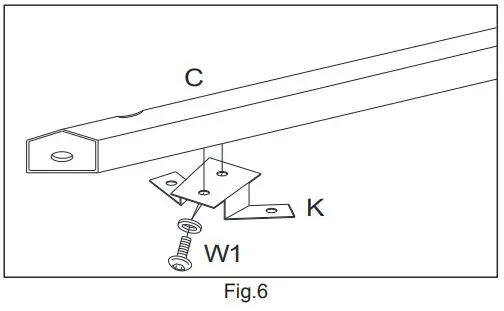
- 6. Attach Top Connector (K) to Long Top Bar (C) with Bolt (W1). See Fig.6.
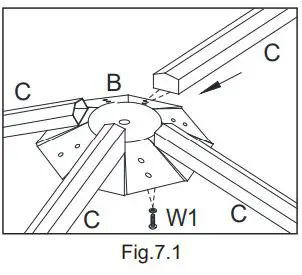
- 7.1 Connect the Long Top Bar (C) and the Lower Central Connector (B) by bolt (W1).
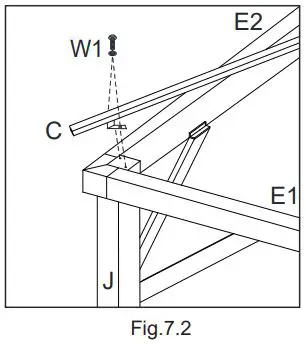
- 7.2 Connect the Long Top Bar (C) and the Post (J) by bolt (W1). See Fig.7.
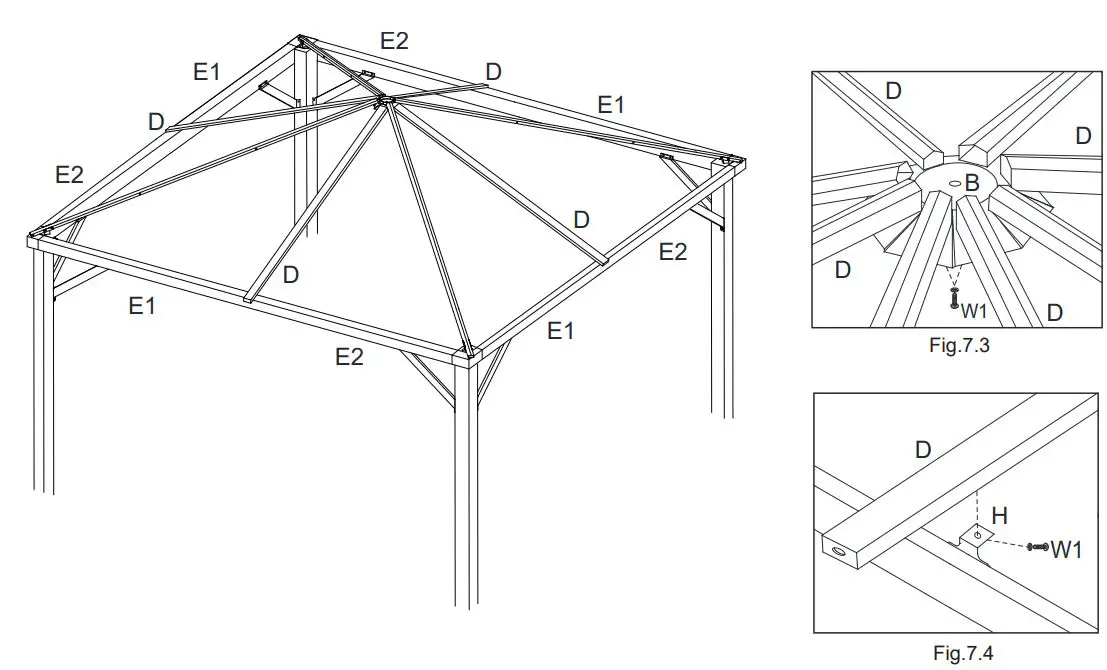
- 7.3 Connect the Short Top Bar (D) and the Lower Central Connector (B) by bolt (W1).
- 7.4 Connect the Short Top Bar (D) and the Connector (H) by bolt (W1). See Fig.7.
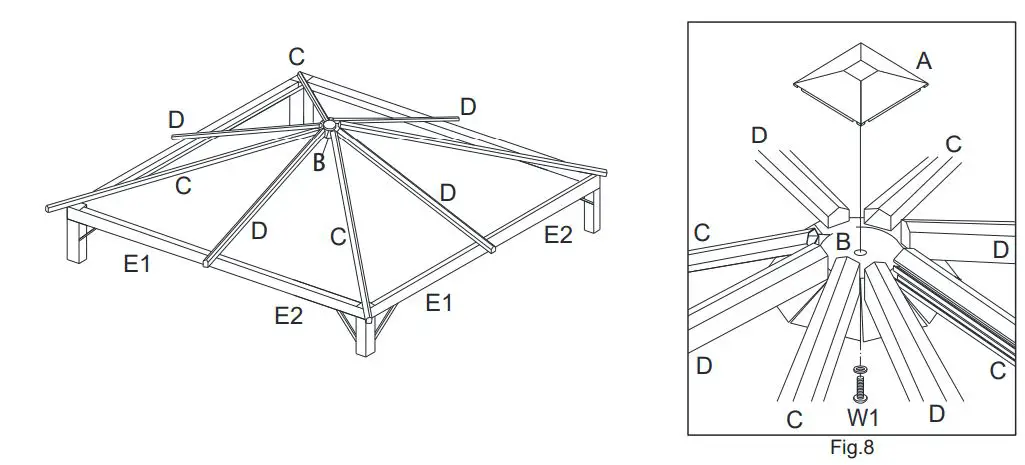 8. Attach Upper Central Connector (A) to Lower Central Connector (B) with Bolt (W1).
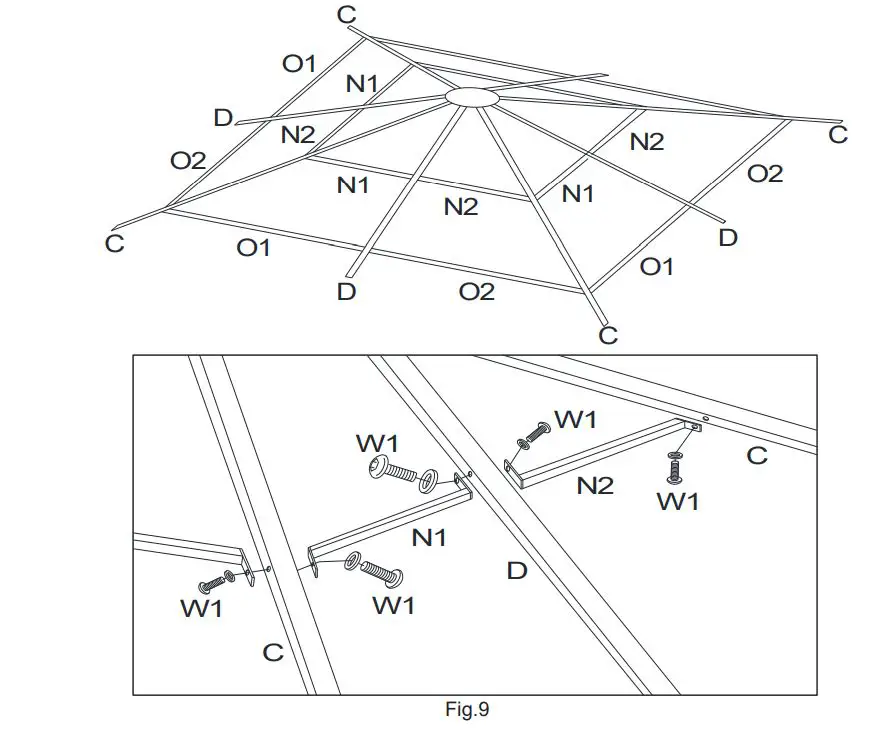
- 9. Attach #1 Roof Supports (N1) to the Long Top Bar (C) with Bolt (W1). Attach #1 Roof Supports (N1) to the Short Top Bar (D) with Bolt (W1). Attach #2 Roof Supports (N2) to the Short Top Bar (D) with Bolt (W1). Attach #2 Roof Supports (N2) to the Long Top Bar (C) with Bolt (W1). See Fig.9. Attach #3 Roof Supports (O1) and #4 Roof Supports (O2) to the Long Top Bar (C) and the Short Top Bar (D) in the same way.
IMPORTANT:
- Make sure each screw installed on this step is attached to a spacer (X).
- Wait at the end of the installation of the roof panels before tightening all screws. If you do not wait and tighten from the beginning, you will not be able to correctly install all the roof panels.
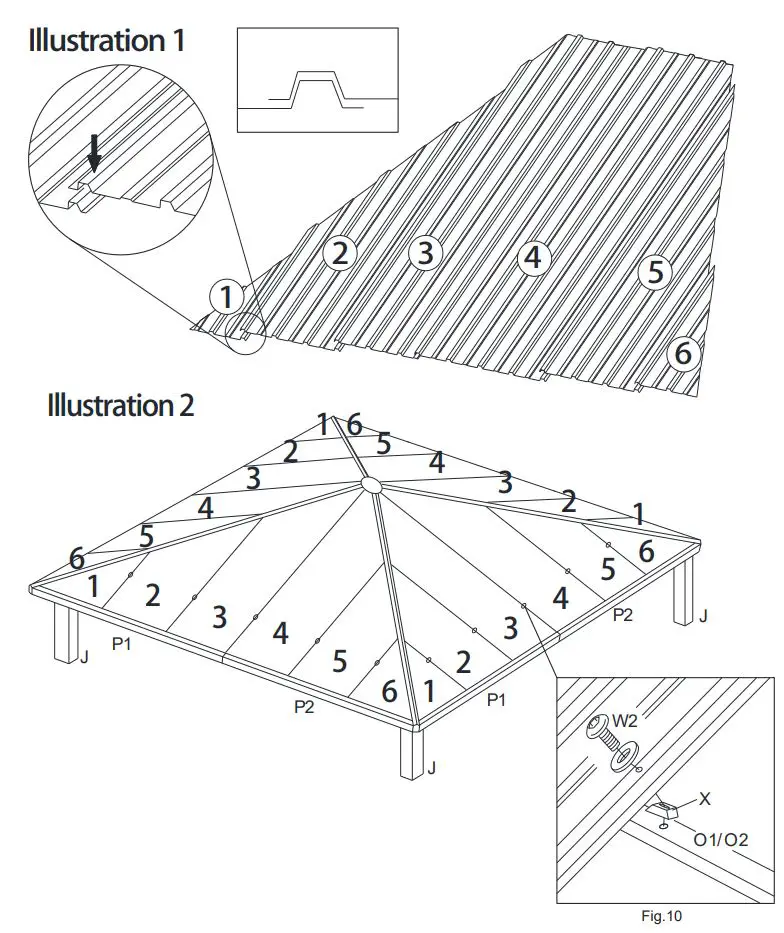
- 10. Install the Roof Panels starting from left to right.
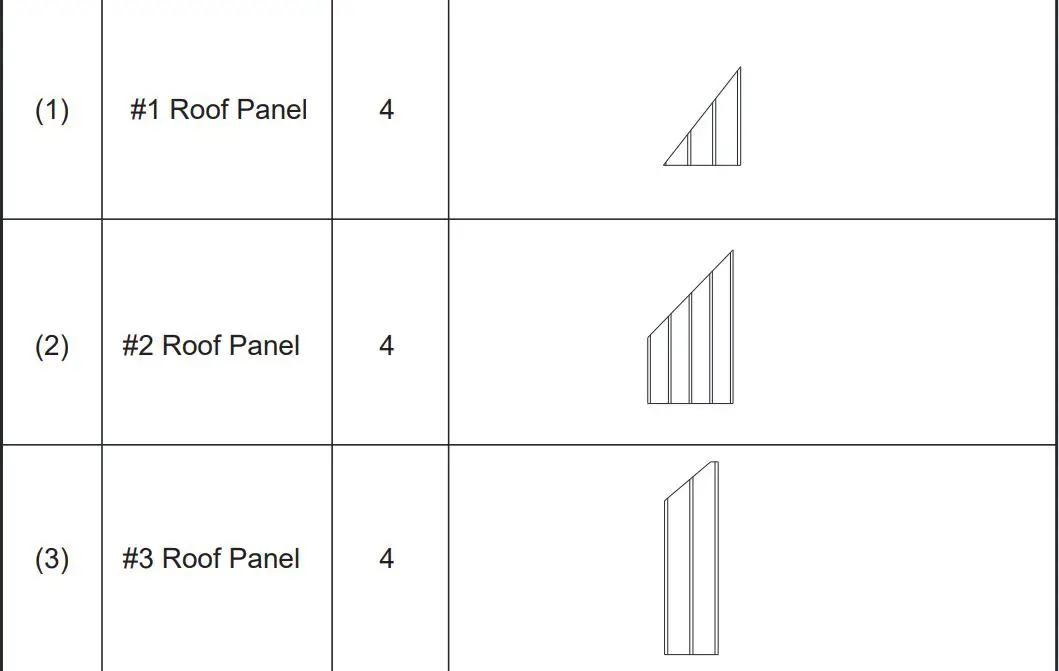
Slide #1 Roof Panel (1) into position. Then overlap #2 Roof Panel (2) as shown and slide #2 Roof Panel (2) into position.
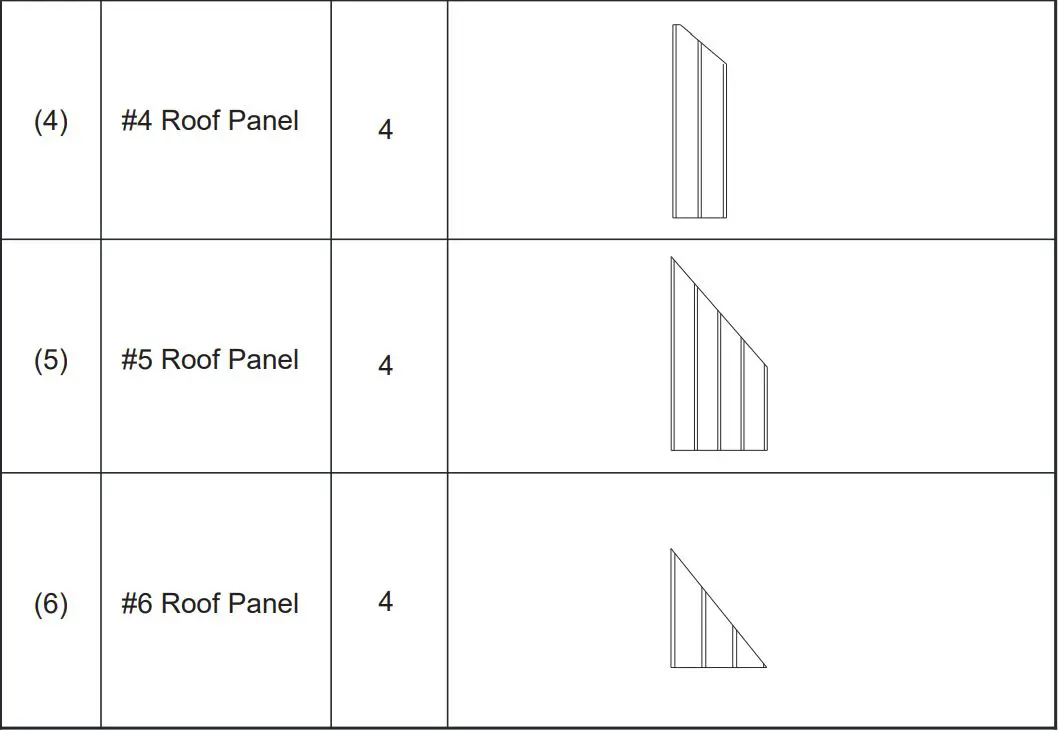
Attach #1 Roof Panel (1) and #2 Roof Panel (2) to #3 Roof Supports (O1) with a Bolt (W2) and Spacer (X). Slide #3 Roof Panel (3) into position. Attach #3 Roof Panel (3) and #2 Roof Panel (2) to #3 Roof Supports (O1) with a Bolt (W2) and Spacer (X). Slide #4 Roof Panel (4) into position. Attach #4 Roof Panel (4) and #3 Roof Panel (3) to the Short Top Bar (D) with a Bolt (W2) and Spacer (X). Slide #5 Roof Panel (5) into the position. Attach #5 Roof Panel (5) and #4 Roof Panel (4) to #4 Roof Supports (O2) with a Bolt (W2) and Spacer (X). Slide #6 Roof Panel (6) into the position. Attach #5 Roof Panel (5) and #4 Roof Panel (4) to #4 Roof Supports (O2) with a Bolt (W2) and Spacer (X). Repeat on each side. See Fig.10 Tighten all bolts (W2).
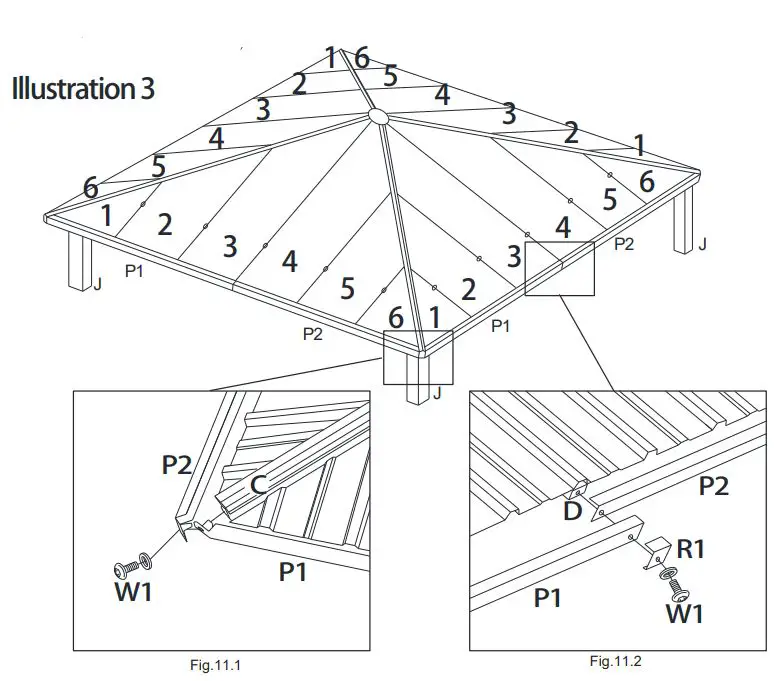
- 11. Attach #1 Roof Borders (P1) and #2 Roof Borders (P2) to the edge of the roof as shown with Bolt (W1). Attach the Short Bar Connector (R1) as shown with Bolt (W1). See Fig.11 (Fig.11.1—-Fig.11.2).
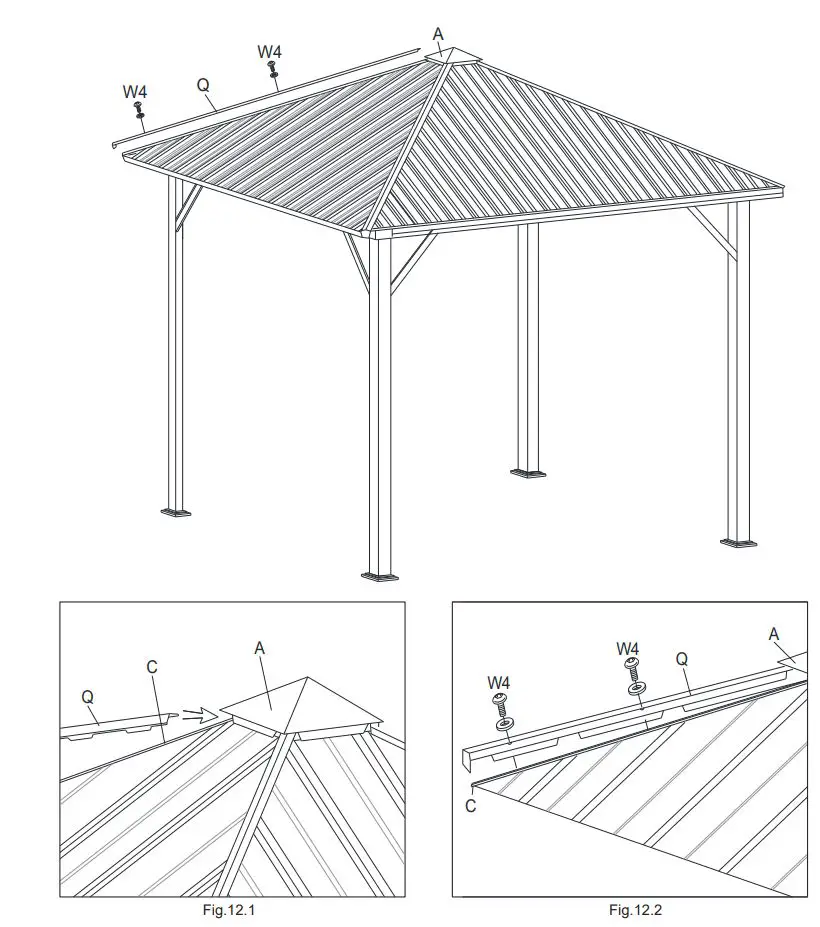
- 12. Put Top Panel Cover (Q) on the top of Long Top Bar (C) and then insert Top Panel Cover (Q) into the gap between Upper Central Connector (A) and Long Top Bar (C). Then attach Top Panel Cover(Q) to Long Top Bar (C) with Bolt (W4). See Fig.12 (Fig.12.1—-Fig.12.2).
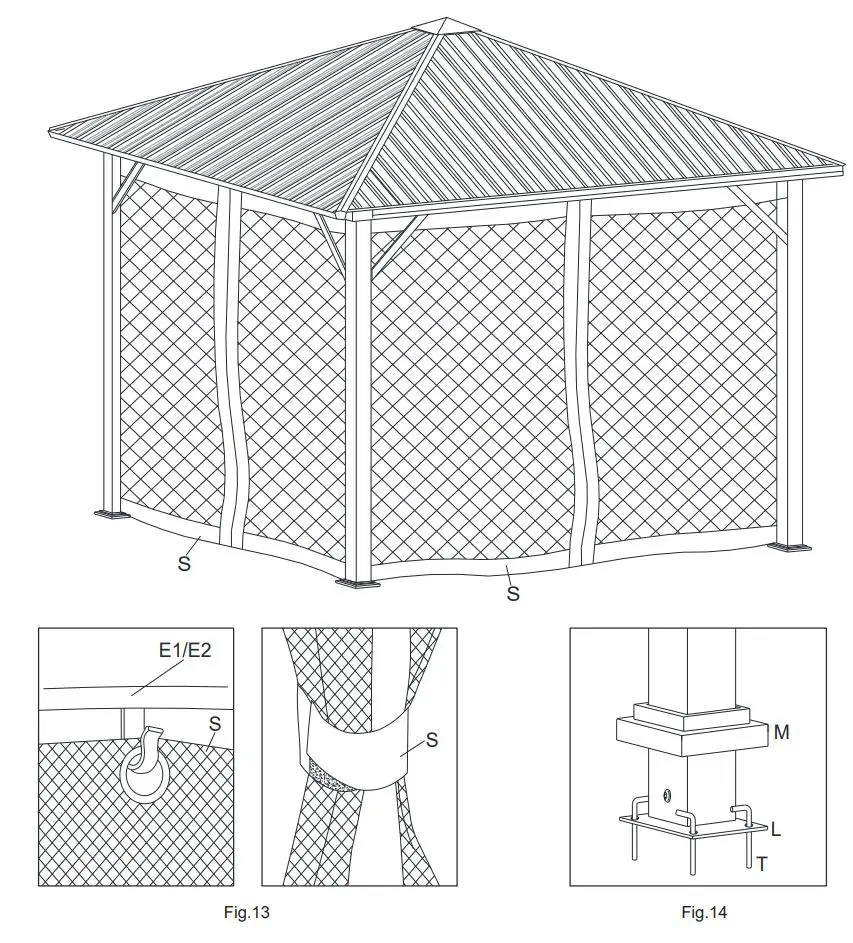
- 13. Hang Mosquito Net (S) onto the inside track of lintel. See Fig.13.
- 14. Adjust position of gazebo and anchor posts to the ground by inserting Stakes (T) into each hole in each Base Plate. See Fig.14.
Your gazebo is now completely assembled.