GoodBaby Baby Monitor

MAKE YOUR LIFT SIMPLE
Thank you for purchasing goodbaby baby monitor. Please active and extend your warranty now.
Congratulation!
Now you can take care of your babies anywhere and any time! Please read the user manual before using!
Please retain your original dated sales receipt for your to records.
For warranty service of your baby monitor, you will need to provide a copy of your dated sales receipt to confirm warranty status. Registration is not required for warranty coverage.
Before you use the product, we recommend you fully charge the battery in the parent unit, so that it continues to work if you disconnect it from the power supply to carry it to another location. Please read the safety instructions.
PACKAGE CONTENTS
Please make sure you have the following in the packing.
- Parent unit x 1
- Baby unit x 1
- Adapter x 2
- User manual x 1
SAFETY INSTRUCTIONS
CAUTION: Keep small parts away from children.
Strangulation Hazard: Children can become entangled in cords. Power cords should be kept more than 3 feet away from the crib and baby’s reach all the time.
Baby monitors and cameras with power cords should never be hung on or near the crib. This product is not a toy and should be kept out of children’s reach.
This product contains small parts. Be care when unpacking and assembling the product.
Read and keep instructions: All the safety and operating instructions should be read before the video baby monitor is operated.
This product cannot replace responsible adult supervision.
Water and moisture: This product is designed for indoor use only. The unit should not be exposed to rain, moisture, dripping or splashing. No objects filled with liquid should be placed on top of, or beside the product, such as a glass or vase. This item should not be used near water.
DO NOT: Use the appliance if the cord or plug is damaged . If your baby monitor is not operating properly or has suffered any damage, contact service center to request inspection and repair it in order to avoid any possible risk.
DO NOT: Attempt to repair or adjust any of the electrical or mechanical functions of the unit since, if you do, the guarantee will be made void.
Ventilation: This baby monitor should not be used on a bed, sofa, rug or similar surface that may block the ventilation openings, or be placed in an enclosed area, such as a bookcase or drawer that may impede air flow.
Keep away from sources of heat: This unit should not be exposed to direct heat sources such as a candle, replace, radiator, heat register, stove or other appliance that emits heat. The unit should not be left in direct sunlight.
Power source: This unit should only be used with the AC power adapters included in this package (rated 5V 700mA).
Damage requiring service: This unit should be serviced by qualified personnel .
 WARNING: IR emitted from this product. Do not stare at operating lamp !!
CAUTION: RISK OF EXPLOSION IF BATTERY IS REPLACED BY AN INCORRECT TYPE. DISPOSE OF USED BATTERIES ACCORDING TO THE INSTRUCTIONS
FCC STATEMENTS:
This device complies with part 15 of the FCC Rules. Operation is subject to the following two conditions:
(1) This device may not cause harmful interference.
(2) This device must accept any interference received, including interference that may cause undesired operation.
NOTE 1: This equipment has been tested and found to comply with the limits for a Class B digital device, pursuant to part 15 of the FCC Rules. These limits are designed to provide reasonable protection against harmful interference in a residential installation.
This equipment generates, uses and can radiate radio frequency energy and if not installed and used in accordance with the instructions, may cause harmful interference to radio communications. However, there is no guarantee that interference will not occur in a particular installation.
If this equipment does cause harmful interference to radio or television reception, which can be determined by turning the equipment off and on, the user is encouraged to try to correct the interference by one or more of the following measures:
– Reorient or relocate the receiving antenna.
– Increase the separation between the equipment and receiver.
– Connect the equipment into an outlet on a circuit different from that to which the receiver is connected.
– Consult the dealer or an experienced radio/TV technician for help.
NOTE 2: Any changes or modifications to this unit not expressly approved by the party responsible for compliance could void the user’s authority to operate the equipment.
FCC WARNING
This equipment has been tested and found to comply with the limits for a Class B digital device, pursuant to Part 15 of the FCC Rules. These limits are designed to provide reasonable protection against harmful interference in a residential installation. This equipment generates, uses and can radiate radio frequency energy and, if not installed and used in accordance with the instructions, may cause harmful interference to radio communications.
However, there is no guarantee that interference will not occur in a particular installation. If this equipment does cause harmful interference to radio or television reception, which can be determined by turning the equipment of and on, the user is encouraged to try to correct the interference by one or more of the following measures:
– Reorient or relocate the receiving antenna.
– Increase the separation between the equipment and the receiver.
– Connect the equipment into an outlet different from that to which the receiver is connected.
– Consult the dealer or an experienced radio/TV technician for help.
IC STATEMENTS:
This device complies with Industry Canada licence-exempt RSS standard(s):
Operation is subject to the following Two conditions:
(1) This device may not cause interference.
(2) This device must accept any interference, including interference that may cause undesired operation of the device.
WARRANTY TERMS
We take quality very seriously. This is why all of our products come with one year warranty from the original purchase date against defects in workmanship and materials. If you have warranty or support issues please contact the store where you purchased the product , or contact the Amazon seller.
Important guidelines for installing your baby monitor
To use your parent unit and baby unit together, you must be able to establish a radio link between them, and the range will be affected by environmental conditions.
Any large metal object, like a refrigerator, a mirror, a filling cabinet, metallic doors or reinforced concrete between the baby and parent unit may block the radio signal.
The signal strength may also be reduced by other solid structures, like walls, or by radio or electrical equipment, such as TV, computers, cordless or mobile phones, fluorescent lights or dimmer switches.
Use of other 2.4GHz product, such as wireless networks (Wi-Fi routers), Bluetooth systems, or microwave ovens, may cause interference with this product, so keep the baby monitor away at least 5ft(1.5m) from these types of products, or turn them off if they appear to be causing interference.
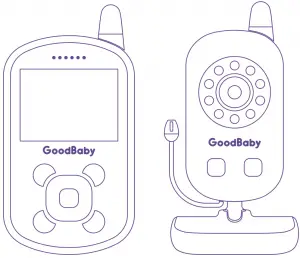
PRODUCT OVERVIEW
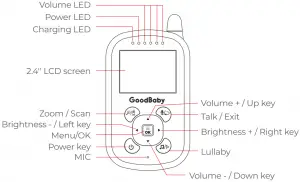
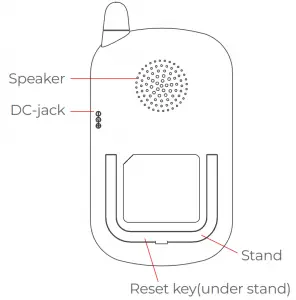
Parent unit overview
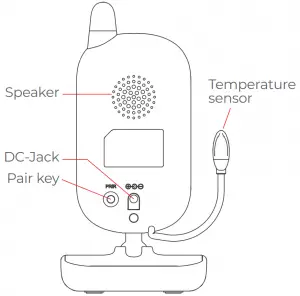
Baby unit overview

ICONS OVERVIEW
 |
Signal |  |
ECO |
 |
Alarm |  |
Battery |
 |
Lullaby |  |
Zoom |
 |
Camera |  |
Night vision |
 |
Volume |  |
Talk to baby |
 |
Volume |  |
Temperature |
PLACEMENT OF THE BABY MONITOR
Aim to provide the best viewing area: Select a location for the camera that provides a clear view of the area you want to monitor, which is free from dust, and is not in line-of-signt to a strong light source or direct sunlight.
Avoid installing the camera where there are thick walls or obstructions between the camera and the monitor.
STRANGULATION HAZARD — keep cord out of child’s reach. Never place camera or cords within 3 feet of crib or playpen. NEVER use extension cords with AC adapters. only use the AC adapters provided.
USING THE BABY MOITOR
TURN ON THE BABY UNIT:
Only use the A/C adapter included in this package (5V, 700mA);
Use the provided AC adapter to connect the wall outlet with the baby unit; Once the adapter connects then the unit will turn on automatically and the power LED will light up.
TURN ON THE PARENT UNIT:
Only use the A/C adapter included in this package (5V, 700mA).
The parent unit is supplied with a built-in rechargeable Li-ion battery. We suggest to connect the monitor to the adapter plugged into the mains whenever possible, in order to keep the battery charged.
Press and hold the power key  on the front side of the parent unit.
Once parent unit turned on , the power LED will light up and the image will display on the LCD screen.
OSD MODE OPERATION
PARENT UNIT SCREEN ON/OFF
Short press the power key to turn on / off the screen.
VOLUME ADJUSTMENT
Press the UP key  to increase the volume. Press the DOWN key
  to decrease the volume.
B
Press the Left key  to decrease the brightness. Press the Right key
  to increase the brightness.
DIGITAL ZOOM and PAN / TILT
Press and hold Zoom/CAM key  around 2 seconds to operate Zoom in / out. At the Zoom mode , press the navigation key to Pan/Tilt the image. During digital zoom mode, the zoom icon will be displayed on the top of screen.
Warm reminder: If you want to adjust the volume/Brightness, you have to exit the Zoom mode before your operate it
CAMERA VIEW / SCAN
(only have paired two or more cameras have this function)
Press Zoom/CAM key to view / scan camera.
During scan mode, the scan icon  will be displayed on the top of screen.
And each cameras’ video will be stay on the LCD around 10 seconds then change to next camera.
TALK TO BABY
To talk, press and hold the talk key  on the front of the monitor.
Release the button when you finish talking and you can listen to the sound from the baby’s room . Bear in mind that you can’t listen to your baby whilst you’re talking to them; to listen to it, you will have to stop pressing this button.
INFRARED NIGHT VISION (Automatic)
The infrared night vision function allows the camera to pick up images of your baby or the monitored area in dark or low light conditions.
In this mode, only black and white images will be displayed on the monitor , the optimum image is 6 feet distance between baby unit and object.
Lullaby playing
Press lullaby key  to start / stop lullaby
MENU OPERATION
ECO SETTING
This mode allows you to control the sound activation of your baby monitor. The ECO default setting is OFF. If there is no sound around the camera within 30 Seconds, it will stops transmitting.
The monitor screen turns off when the camera is not transmitting.
When the camera detects the sound is louder than set sensitivity level, it will start transmitting the signal to the monitor again.
To change the ECO level, please follow the next instructions:
- Press the Menu/OK key
 and the menu will pop up.
 - Press the LEFT key or RIGHT key until the the ECO icon
 is highlighted then press UP key or DOWN key to select desired level.
 - Press OK key to confirm.
ALARM SETTING
You can use the alarm to remind yourself to feed baby /change diapers /sleep, etc.
- Press the Menu/ key and the menu will pop up.
- Press the LEFT key or RIGHT key until the alarm icon
 is highlighted.
 - Press UP key to increment or press DOWN key to decrement.
- Press OK key to confirm.
Note: If the alarm is ringing and no one to answer, then the ringing will last 1 minute and then stop , after 3 minutes the ringing will start again.
The ringing will sound up three times total if no one answer.
LULLABY SETTING
You can soothe the baby to sleep by playing a gentle lullaby from baby or parent unit
Press key on baby unit to play or stop the lullaby.
According to below instruction you also can play the lullaby from parent unit
(1). Press the Menu/OK key and the menu will pop up.
(2). Press the LEFT key or RIGHT key until the lullaby icon is highlighted.
(3). Press UP key or DOWN key to select.
(4). Press OK key to confirm.
Press key  on baby unit to increase or decrease volume of the lullaby.
PAIRING THE CAMERA AND MONITOR
- Press the Menu/OK key then the menu will pop up.
- Press the LEFT key or RIGHT key until the camera icon is highlighted
then press UP key or DOWN key to select the desired camera to pair. - Press OK key to start the pairing.
- While the LED is flashing then press the PAIR button on the back of camera.
- Once paired, then the screen will display the image from the camera.
- If unsuccessful, please repeat above steps.
TEMPERATURE UNIT SETTING
- Press the Menu/OK key and the menu will pop up.
- Press the LEFT key or RIGHT key until the temperature icon
 is highlighted.
 - Press UP key or DOWN key to select between °C or °F.
- Press OK key to confirm.
TECHNICAL DATA
System General
| Frequency | 2.4GHz FHSS |
| Type of Modulation | GFSK |
| Transmitting Power | 18dBm Max |
| Operation Environment | Indoor use only; Temperature: 0-40 °C ; Humidity: 5% to 90% rh. ( relative humidity) |
| Operating Range | Up to 900 feet (straight line and open space) |
| Power adapter | Input: 100-240VAC 50 / 60Hz,200mA Max; Output: 5V, 700mA; |
| LCD | 2.4” TFT LCD |
| Rechargeable battery for monitor | Model: 503450; 3.7V, 950 mAh, 3.515Wh ; |
| Operating time with battery fully charged (parent unit) | Up to 12 hours (ECO on) |
| Image sensor type | 1/6.5’’ Color CMOS image sensor |
| IR LED Type | 940 nm |
TROUBLE SHOOTING
| No reception on the monitor | The power adapters may not be properly connected. Confirm that the camera and monitor are ON. Camera may be far away from the monitor. Camera and monitor may not be properly paired; follow PAIRING instructions. Restart Baby unit and Parent unit. Press the reset key at the back of Parent unit. |
| Interference or poor reception | Move the monitor close to the camera. The camera or monitor may be placed too close to many metal objects. Other electronic devices may be interfering with the signal. The battery power may be too low. Restart Baby unit and Parent unit. Press the reset key at the back of Parent unit. |
| Feedback (screeching, static) | The camera and monitor may be too close together. The volume on the monitor may be set too high. Press the reset key at the back of Parent unit. |
| Cannot hear the baby on the parent unit | Volume setting may be too low. Press the reset key at the back of Parent unit. |
| Image frozen | Restart the baby unit (plug out the adapter then plug it into the socket again). Press the reset key at the back of parent unit (hide behind the stand). |
MAINTENANCE
Clean the surfaces of the camera and monitor with a soft, fluff-free cloth.
Never use cleaning agents or solvents.
If the units become dirty, use a lightly dampened cloth to wipe surfaces, taking care to not allow water into any openings.
INFORMATION ON DISPOSAL OF BATTERY AND PRODUCT
Do not attempt to repair or adjust any of the electrical or mechanical functions of the unit.
Remember to dispose of the product in an environmentally responsible way.
For proper collection and processing of these products, take them to the collection points designated by local authorities. You can also contact the store where you purchased the product.

Live Chat Support
Learn more about GOODBABY, please visit us at  https://goodbaby.top