GooDee
YG600 1080P LCD Home Theater Projector
User Guide

Due to continuous improvement actual product, may differ from the manual, the manual is for reference only.
Safety Notice:
1.1. Please read the Manual carefully before you use the projector.
1.2. To ensure a stable power supply, please use the national standard power cable and power cord with grounding.
1.3. Please use the same power voltage as the projector marked.
1.4. Please do not open the projector, otherwise the supplier will not afford warranty service.
1.5. Do not look directly at the projector lens while the machine is working to avoid damaging your eyes.
1.6. To avoid clogging of the projector vent, please do not cover it with a cloth, carpet, and other materials.
1.7. This projector does not have a waterproof function, please keep it away from rain, moisture, and other items containing liquid such as vases, cups, etc.
1.8. To prevent power breakdown, please keep the projector away from rain or water, or moisture.
1.9. Turn off and cut off the power supply if do not use this project for a long time.
1.10. Use the original foam or other unit-shock material to protect the projector, if you need to transport this projector.
1.11. If you find the projector has problems, please contact the supplier, do not repair by yourself.
Maintain Indication:
1-year warranty from the factory, for more warranty information, please contact the supplier (warranty service does not include the frame, manual, package, and some subjective ideas about the video, sound, and image aspects).
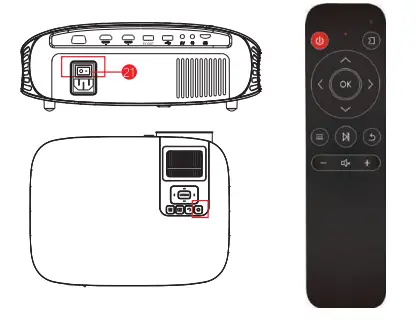
Interface introduction
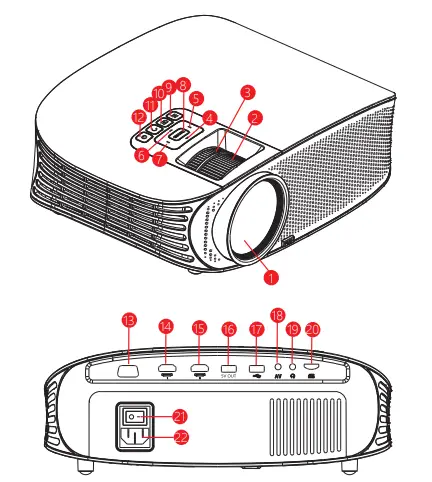
| 1. liens 3. Keystone 4. UP 5. Left 6. Down 7. Right |
8 OK 9. Menu 10. Signal Source 11. Return 12. Power switch 13. VGA 14. HD input slot 1 |
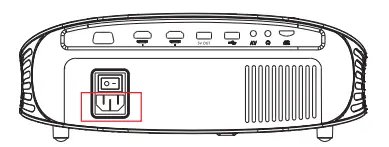
15. HD input slot 2 16.5V-OUT 17. USB input slot 18. AV input slot 19.9.Earphone slot 20.MicroSD card slot 21. Power switch 22. Power input |
Remote Control Introduction
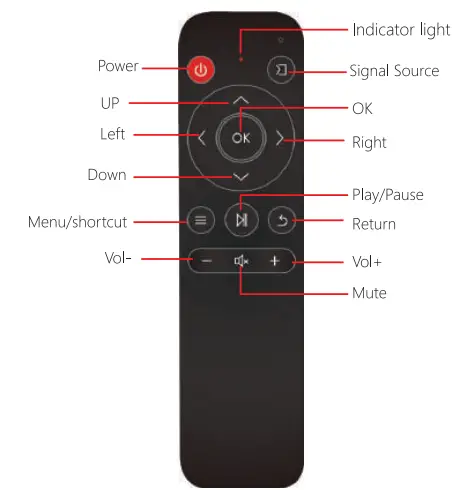 Pairing instructions:
- Press volume *+” and at the same time, the indicator light blinks for 3 seconds, and the remote control is pairing.
- If pairing is successful, the indicator light continuously flashes 3 times and then extinguishes.
- If pairing still failed for 1-minute pairing, exit pairing mode, indicator light extinguishes, and follow the steps above to pair again
- The remote control should be close to the projector.
- NOTE: 1. To autid power shortage please do not nixed use the old and new balm. 2, to amel battery leakage corrosion a do not use remote control Sze along we, please take the battery out.
Use manual
4.1 Preparation before light on
4.1.1 As the following picture, connect the power adaptor.
4.2 Power on/Power off
To start the projector, press the power button 21 “-” , and press “![]() ” in the front of the projector or press the remote control “
” in the front of the projector or press the remote control “![]() ” button.
” button.
4.3 Boot screen
As the projector start working, after the screen display 2 to 5 seconds of boot screen, then comes into the multimedia screen.
4.4 Focus&keystone
4.4.1 keystone In sometimes, the images of which the projector on the wall is a little twisted as a ladder, we could take a keystone button”(3)”to adjust it. the keystone technology is the method to get the image normalization by digital or optical technology.
Solution
Our projector provides an optical keystone function, you could turn the keystone to adjust the image.
4.4.2 Image focus
Put the projector vertical to the projector screen or white wall, adjust the keystone”, until the clearly enough, then the focus is finished. during the focusing, you could display a video on the menu to check the focus adjustment.
Solution
Our projector has no level keystone function, and if have this problem, the reason is you haven’t kept the projector vertical with the projector screen. and the solution is to adjust the projector’s position and keep the projector on the same level.
Projector connection introduce
5.1 Connection introduce
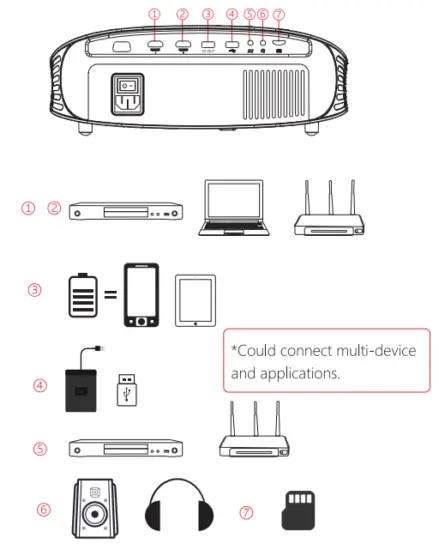
5.2 Multi-media connection
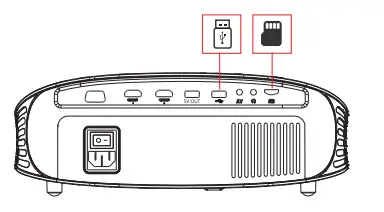
5.2.1 Insert the USB/MicroSD card into the accordingly slot. (refer to picture below)
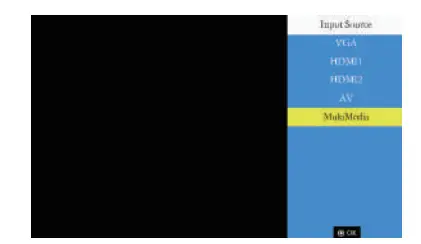
 5.2.2 Choose a multi-media signal source.
Multimedia Supported format
| Multi- media |
Audio file | MP3/WMA/OGG/AAC/FLAC/APE/WAV |
| Image file | JPEG/BMP/PNG | |
| Video file | 3GR(H.263,MPEG 4)/AVRXVID,DIVX,H264)/ MKV(XV10,1-1.264,DIVX)/FLV(FLWM0V (H.234)/MP4(MPEG4,AVQ/MPG(MPEG1)/ VOB (MPEG2)/MRG(MPG-PS )/RMV8(RV40)/ RM | |
| Text file | TXT |
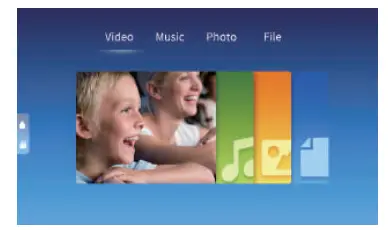
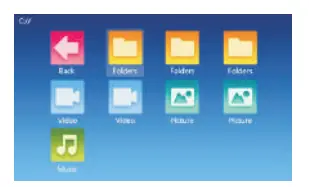
5.2.3 Choose the content which you need display: Video, Music, Photo Text.
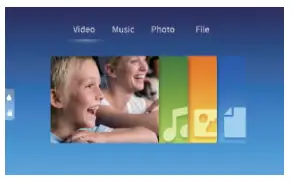 5.2.4 Choose the file which you want to display, press ”
  ” display, or stop.
 5.3 AV Video Equipment Connect
Use 3 in 1 cable video convert cable, connect projector AV slot, the connect method like the picture, as connected, choose the signal source video.
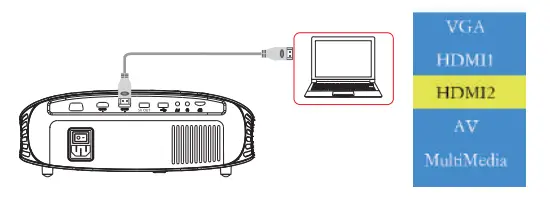
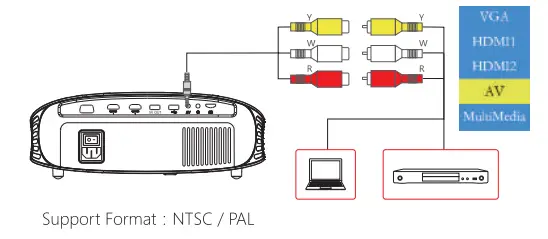 5.4. HD Equipment Connect
5.4.1 HD slot could connect to a computer and all the devices with HD slot. As connected, choose the source HD.
Support files:
576e 4801, 7201,1080e 640*480, 800’600 1024’768, 12801024, 12804720, 1440’900, 19209080, 1366.768, 12804800 14404960, 1600’1200,1680’1050
5.4.2 Our projector support HD slot and MHL cable. Use them to connect your mobile and tablet to the projector.
*Please consult your mobile’s factory or agency for this function.
*This function may be affected by device and cable.
5.5 3.5mm Audio Device Connect
5.5.1 Could connect 3.5mm earphones and speaker equipment.
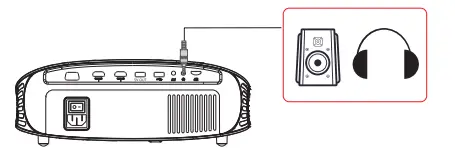
Notice: Due to Dolby copyright, this projector does not support Dolby-related decode.
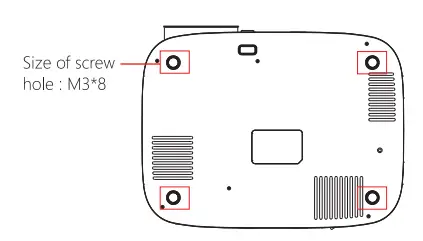
5.6 Lifting way
Remove the footpads you will see the screw holes.
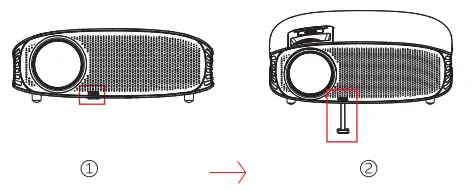
 5.7 Adjust foot pads
Lift up the projector and press the ‘PUSH” button to adjust the high-low of the footpads.
5.8 Dust removal from Anti-dust Mesh
In order to keep the air circulating, please remove the air inlet regularly to clean the dust. Note, for your safety, pls shut the power off before operation.
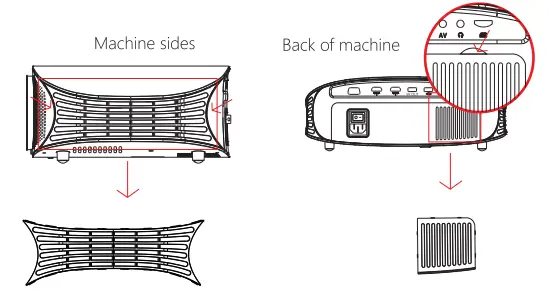
Remove both sides of the slot to disassemble it.
Menu guides
6.1 Menu setting
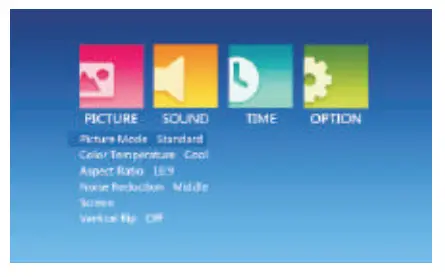
6.1.1 Image menu
Remote control use guide: press the “![]() key, then the main menu comes out. Press the “
key, then the main menu comes out. Press the “![]() key, choose to come into the image submenu. Press the “
key, choose to come into the image submenu. Press the “![]() key, and choose the program which you want to adjust. Then press the “OK” key comes into the setting.
key, and choose the program which you want to adjust. Then press the “OK” key comes into the setting.
In the image, you could set the following models, such as image mode (standard, soft, user, dynamic), color temperature (cold, hot, user standard), zoom mode (auto, 4:3, 16:9, point-to-point, panoramic, zoom1, zoom2, just scan), de-noise (close, low, middle, high, tacitly approve).
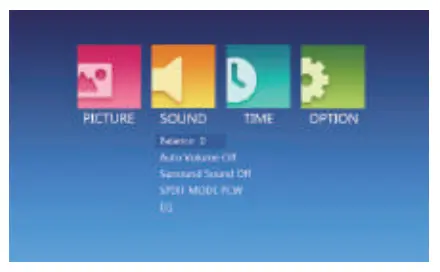
6.1.2 Audio Sub-menu
Press the” ![]() key, and then get the main menu. Press the ”
key, and then get the main menu. Press the ” ![]() key, and choose the audio submenu. Press the”
key, and choose the audio submenu. Press the” ![]() key, and choose the items which you want to adjust. Then press the “OK” key comes into the setting.
key, and choose the items which you want to adjust. Then press the “OK” key comes into the setting.
In the audio, you could set the balance (-50- +50), auto volume (open, off), surround (close, surround, SRS), and balance (120Hz, 500Hz, 1.5Hz, 5kHz, 10kHz).
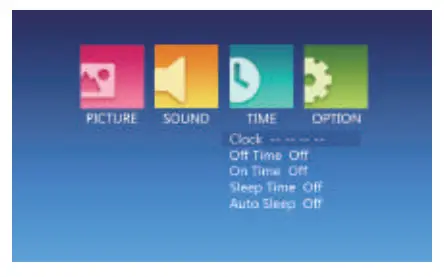
6.1.3 Set time Sub-menu
Press the” ![]() key on the remote control, and get the main menu, then press the ”
key on the remote control, and get the main menu, then press the ” ![]() key, choose the time submenu, press the”
key, choose the time submenu, press the” ![]() key, choose the items which you want to adjust, then press the “OK” key to come into set.
key, choose the items which you want to adjust, then press the “OK” key to come into set.
In the setting, you can set the language in the menu language setting, back to the factory setting, and upgrade the software.
6.1.4 Set Sub-menu
Press the “![]() key on the remote control, then press the “
key on the remote control, then press the “![]() key to set the submenu. Press the “
key to set the submenu. Press the “![]() key, choose the program which needs adjust, then press the “OK” key to come into the setting. You can set the language, back to the factory setting, and upgrade the software.
key, choose the program which needs adjust, then press the “OK” key to come into the setting. You can set the language, back to the factory setting, and upgrade the software.
6.2 Display Menu Use Guide
You can control the content by the display menu.

Technology Features
7.1 Basic parameters
| Imaging Technology | TFT LCD |
| Resolution | 1280*768RGB |
| Highest Resolution | 1920*1080 |
| Light | LED |
| LED light lifetime | 30000 hours |
| Lens | Multichip Coated Lens(F=180) |
| Operation Mode | Manual operation |
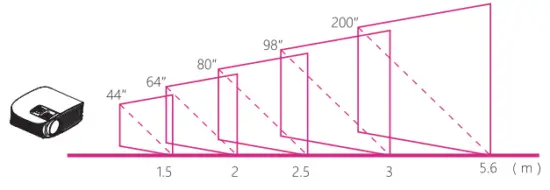
| Projection Distance | 1.5–5.6M |
| Screen Size | 44—200 inches |
| Aspect Ratio | 16:9 |
| Color temperature | 262K |
| Keystone | Manual correction±15° |
| Power Input | 100V-240V-50/60Hz |
| Integrated watt | 135W |
| Input | HD*2/US8NGA/M1croSD/AV |
| Output | Earphone |
| Speaker | 3W*2 |
| Language support | Support 23 Language |
| Unit Size | 310.7*239.3*117.6mm |
| Projection ratio | 1:4 |
| Net Weight | 2.5kg |
7.2 Projector distance & size