WiFi Configuration
Instruction
Version 1.1.1
![]() There are two options to complete Wi-Fi configuration.
There are two options to complete Wi-Fi configuration.
Option 1. Web Configuration
Section 1. Preparation:
- Power on inverter or EzLogger Pro (Wi-Fi version)
- Power on Wireless Router
- Connect the smart device to the Wi-Fi of the inverter.
Section 2. Wi-Fi Configuration
Step 1. Connect the smart device to Wi-Fi “Solar-WiFi” or “Solar-WiFi*” with password 12345678 (*refers to the last eight digits of the inverter’s SN)
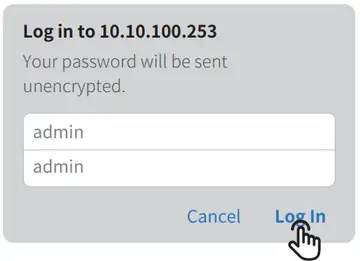
Step 2. Visit the website http//10.10.100.253

Tip: Please refresh the page if there appears “Unauthorization Login”.
Step 3. Enter username (admin) and password (admin), Click “Log In”

Step 4. Click “Start Setup”
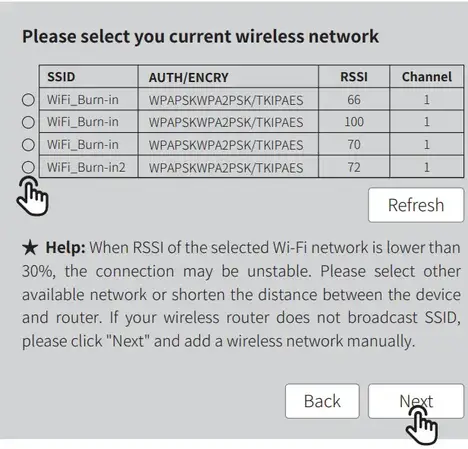
Step 5. Select available Wi-Fi and click “Next”
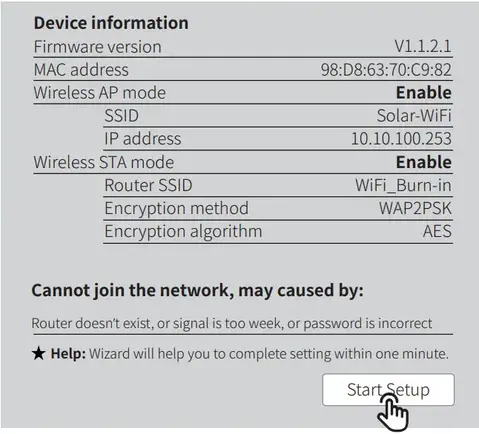
Tip: Specification of the Wi-Fi module is available on Device Information on the previous page.
Step 6. Enter the password accordingly and click “Next”.
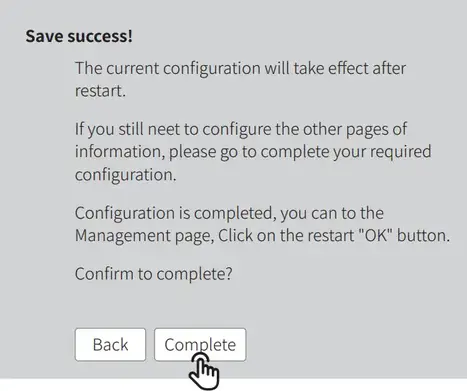
Step 7. Click “Complete” to confirm
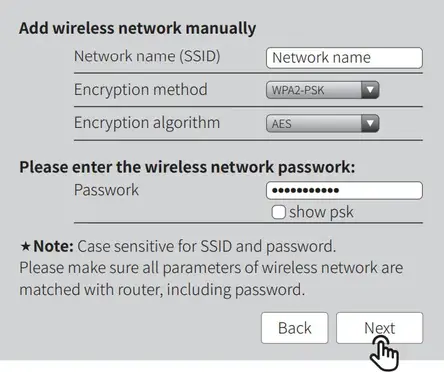
Tip: Please make sure there is no unacceptable character in the password otherwise, it may cause unsuccessful Wi-Fi configuration.
Section 3. More Information
The network name (SSID) and password of the Wi-Fi module can be modified in the advanced setting. You may give different names to the devices to differentiate.
![]() It is strongly recommended that you change the password of your “Solar-WiFi*” before or after the installation. The manufacturer will NOT be responsible for any of the privacy information leakage caused by using the default password of “Solar-WiFi*”.
It is strongly recommended that you change the password of your “Solar-WiFi*” before or after the installation. The manufacturer will NOT be responsible for any of the privacy information leakage caused by using the default password of “Solar-WiFi*”.
Option 2. App Configuration
Section 1. Preparation
- Power on inverter or EzLogger Pro (Wi-Fi version)
- Power on Wireless Router
- Download and install the latest app SEMS Portal
- The app is subject to upgrade without notification and you can always refer to the latest instruction at http://en.goodwe.com/
Section 2. Wi-Fi Configuration
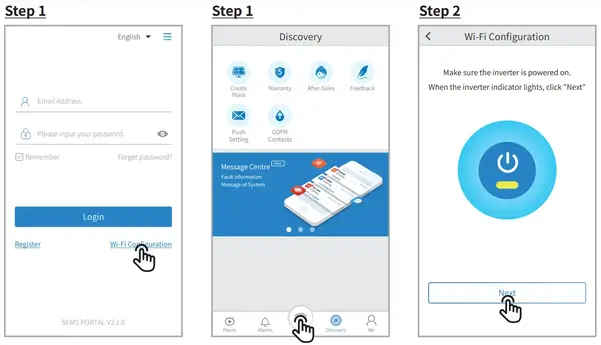
Step 1. Click “Wi-Fi Configuration” at the login page or click the Wi-Fi icon at the homepage.
Step 2. Make sure the inverter is powered on and then click “Next”.
Step 3. Click “Go into WLAN setting interface”.
Step 4. Connect the smart device to Wi-Fi “Solar-WiFi” or “Solar-WiFi*” with password 12345678 (*refers to the last eight digits of the inverter’s SN)
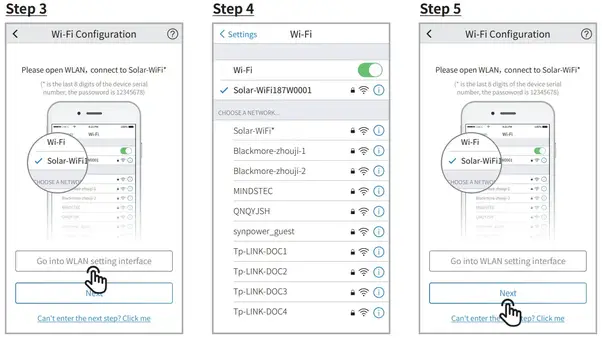
Step 5. Click “Next”.
Step 6. Enter Wi-Fi network name and password accordingly and then click “Set”. Please switch off DHCP first and input IP address if you want to change the inverter’s IP into a specific one.
Step 7. Confirm and then click “OK”.
![]() It is strongly recommended that you change the password of your “Solar-WiFi*” before or after the installation. The manufacturer will NOT be responsible for any of the privacy information leakage caused by using the default password of “Solar-WiFi*”. For how to change the password of “Solar-WiFi*”, please refer to “Section 3. More Information” of “Option 1. Web Configuration”.
It is strongly recommended that you change the password of your “Solar-WiFi*” before or after the installation. The manufacturer will NOT be responsible for any of the privacy information leakage caused by using the default password of “Solar-WiFi*”. For how to change the password of “Solar-WiFi*”, please refer to “Section 3. More Information” of “Option 1. Web Configuration”.
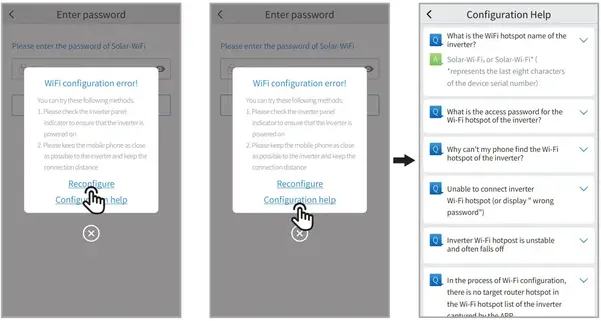
![]() You may click “Reconfigure” or follow instructions of “Configuration Help” if configuration failed.
You may click “Reconfigure” or follow instructions of “Configuration Help” if configuration failed.
Troubleshooting Advice
| No. | Problem | Troubleshooting |
| 1 | Unable to find Solar-WiFi or Solar-Wi-Fi* | 1. Check if the inverter is powered on and the Wi-Fi module is well attached. 2. Make sure your smart device is close to the inverter. 3. Restart inverter. 4. Press the “Wi-FI Reload” button to have the Wi-Fi module back to default mode and follow the above Wi-Fi configuration steps again. |
| 2 | Unable to connect to Solar-WiFi or Solar-Wi-Fi* | 1. Try password: 12345678; 2. Check there is any device connected to the Solar-Wi-Fi* already. 3. Press the “WiFi Reload” button to have the Wi-Fi module back to default mode and follow the above Wi-Fi configuration steps again. 4. Restart the inverter and try Wi-Fi configuration again. 5. Check if there is an unacceptable character in the password. |
| 3 | Unable to login website 10.10.100.253 | 1. Press the “WiFi Reload” button to have the Wi-Fi module back to default mode and follow the above Wi-Fi configuration steps again. 2. Switch to preferred browsers such as Google Chrome Firefox, IE, Safari. |
| 4 | Unable to find router SSID | 1. Move the router closer to the inverter or use a Wi-Fi repeater device; 2. Check if the channel number of the router is higher than 13. If yes, modify it into a lower number at the router configuration page. |
| 5 | Wi-Fi LED indicator blinks twice continuously with all configuration steps done | 1. Restart the inverter. 2. Check if the SSID, encryption method, encryption algorithm, and password on the Wi-Fi configuration page are the same as that of the Wireless Router and correct if different. 3. Check if the maximum amount of devices allowed to connect to the router has exceeded. If yes, please disconnect some devices or expand the limitation. 4. Restart Wireless Router. 5. Mover Wireless Router closer to the inverter or use a wireless repeater to enhance the Wi-Fi signal. |
| 6 | Wi-Fi LED indicator blinks four times continuously when all configuration steps done | 1. Connect the smart device to non-inverter Wi-Fi and access to SEMS Portal to check if the inverter is online. 2. Restart Wireless Router and the inverter. |
| 7 | Offline status of inverter on SEMS Portal with Wi-Fi LED indicator always | 1. Please wait a few minutes for data transmission and check on SEMS Portal later |
Please visit http://en.goodwe.com/ to download the latest version of this document. GOODWE reserves the right of final explanation to this document and its attachments.