![]()
Electric pressure washer replacement Gun and hose kit
 Questions
1-888-909-6757 8a.m. – 8p.m. (EST) Monday – Friday
ATTACH YOUR RECEIPT HERE
Serial Number ———————————–
Purchase Date ———————————
PACKAGE CONTENTS

PARTS
A NOZZLE
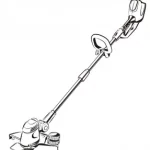
B WAND
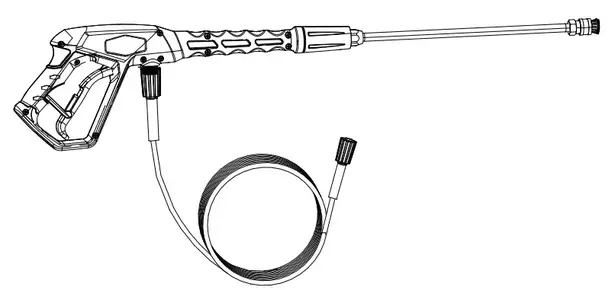
C GUN
D HOSE
Please read and understand this entire manual before attempting to assemble, operate or install the product. If you have any questions regarding the product, please call customer service at 1-888-909-6757, 8 a.m. – 8 p.m., EST, Monday – Friday.
General Use
- The Gun kit is for use with most electric pressure washers rated up to 2,000 PSI.
- Before starting the pressure washer, check for damaged parts and replace them.
- Check/clean the water strainer on the inlet side of the pump regularly to help prolong the life of the pressure washer and accessories.
- Make sure all connections are secure.
- Remove all undesirable items from your work area.
- Wear safety glasses when in the operating unit.
- Hold the gun securely when starting the pressure washer.
- When operating a pressure washer, always stand on a permanently stable surface.
- Do not stand on ladders, chairs, etc.
- Always shut down the pressure washer and water supply before removing the gun, wand, or tip prior to cleaning debris from it.
WARNING
When changing accessories, turn off the pressure washer and water supply, then depressurize the unit by squeezing the gun trigger until all of the water has drained out of the hose and gun. Never point spray nozzles or guns at humans or animals. Never place any body part in the water stream. Serious injury can result from the high-pressure discharge produced by pressure washers.
WARNING PROPOSITION 65
Some dust created by power sanding, sawing, grinding, drilling, and other construction activities contain chemicals known to cause cancer, birth defects or other reproductive harm. Some examples of these chemicals are:
- Lead from lead-based paints
- Crystalline silica from bricks and cement and other masonry products
- Arsenic and chromium from chemically treated lumber
Your risk from these exposures varies, depending on how often you do this type of work.
To reduce your exposure to these chemicals: work in a well-ventilated area, and work with approved safety equipment, such as those dust masks that are specially designed to filter out microscopic particles.
PREPARATION
Before beginning the installation of the product, make sure all parts are present. Compare parts with package contents list and hardware contents list. If any part is missing or damaged, do not attempt to assemble, install or operate the product.
Estimated Assembly Time: 3 – 5 minutes.
ASSEMBLY INSTRUCTIONS
- Follow the owner’s manual for precise and safe instructions to correctly connect the gun and hose to the pressure washer (sold separately).

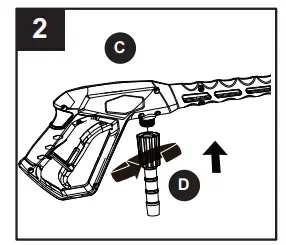
- Connect the hose (D) to the trigger handle on the gun (C).

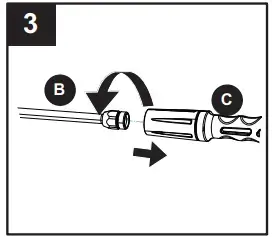
- Insert the male bayonet end of the wand (B) into the female bayonet outlet on the gun (C).
Push firmly and turn clockwise until tabs lock in place to ensure a leak-free connection.
- To attach the nozzle (A), pull back on the quick-connect collar on the wand (B) and push the nozzle (A) into place. Then push the collar on the wand (B) forward.
CARE AND MAINTENANCE
To promote longer life of the gun kit:
- Do not run over the hose with vehicles or drag it over sharp surfaces, as this could damage the hose and cause leaks.
- Run clean, fresh water through the kit, then turn off the pressure washer and water supply.
- Depressurize by squeezing the gun trigger until all of the water has been drained out of the kit.
- The kit can now be disconnected safely for storage in a cool dark area, or to remove debris from individual parts.
WARNING
Keep hose away from hot surfaces (like a muffler). If the hose develops a leak, do not try to repair it. REPLACE THE ENTIRE HOSE. The hose is for cold water pressure washers only. DO NOT use hot water or steam service. To prevent accidental discharge, always use a trigger lock when you are finished spraying.
TROUBLESHOOTING
| PROBLEM | POSSIBLE CAUSE | CORRECTIVE ACTION |
| Gun and/or hose leaks |
|
|
| Unit won’t spray |
|
|
| Wand/Nozzle | The wand/nozzle is clogged or the spraying pattern is uneven. | Turn off and depressurize the unit. Remove wand/nozzle from the gun outlet. Look through the opening in the wand: you should see light through the nozzle end. If not, then reverse flush with air or water to dislodge debris. |
| Gun | The Gun is clogged. | Turn off and depressurize the unit. Remove the wand from the gun and the gun from the hose. Reverse flush the gun with air or water to dislodge debris. |
| Hose | The hose is clogged. | Turn off and depressurize the unit. Remove the gun from hose and hose from unit. Flush the hose with air or water to dislodge debris. |
WARRANTY
![]()

GREENWORKS® hereby warranties this product, to the original purchaser with proof of purchase, for a period of three (3) years against defects in materials, parts, or workmanship. GREENWORKS®, at its own discretion, will repair or replace any and all parts found to be defective, through normal use, free of charge to the customer. This warranty is valid only for units that have been used for personal use that have not been hired or rented for industrial commercial use, and that has been maintained in accordance with the instructions in the owners’ manual supplied with the product new.
ITEMS NOT COVERED BY WARRANTY:
- Any part that has become inoperative due to misuse, abuse, neglect, accident, improper maintenance, or alteration.
- The unit, if it has not been operated and/or maintained in accordance with the owner’s manual.
- Normal wear, except as noted
- Routine maintenance items such as lubricating or sharpening.
- Normal deterioration of the exterior finish due to use or exposure.
GREENWORKS HELPLINE (1-888-90WORKS):
Warranty service is available by calling our toll-free helpline, 9 am to 5 pm EST. at 1-888-909-6757 (1-888-90WORKS).
TRANSPORTATION CHARGES:
Transportation charges for the movement of any power equipment unit or attachment are the responsibility of the purchaser. It is the purchaser’s responsibility to pay transportation charges for any part submitted for replacement under this warranty unless such return is requested in writing by GREENWORKS®.
USA address:
Greenworks Tools
P.O. Box 1238
Mooresville, NC 28115
Canadian address:
Greenworks Tools Canada, Inc.
P.O. Box 93095, Newmarket,
Ontario
L3Y 8K3