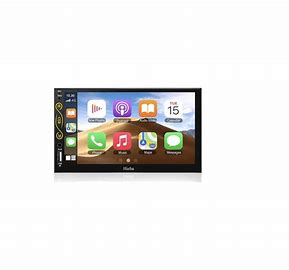
HiEHA CP7-9 Upgraded 7 Inch Standard Car
Stereo User Manual
Customer service:
We have done our best to deliver a high-quality product and we’ll continue doing so, Heehaw does not recommend to install the product yourself. We recommend having it professionally installed by a certified professional. If you decide to install the unit by yourself please do read the user manual carefully and follow the installation steps.
Do not hesitate to get in touch with us if you meet any difficulties installing the unit we are always available to answer any of your questions and more than happy to take your suggestions.
We try our best to be as responsive as possible, you can always get in touch with us through:
- Your order on Amazon, Contact Seller Service. Reply within 24 hours.
- Email Service: [email protected] Reply within 24 hours.
- Facebook Service. Visit Heian official website: www.hieha.net
Reply within 12 hours except for the weekend. Also the QA part on the product detailed page, it will include YouTube links that solves frequently asked question. 95% of the questions would resolve after checking it.
About This Manual
To entirely understand how to properly install and use your new Hieha product, it is recommended to read this entire user’s manual and keep it in a safe place for future reference.
Read the Entire Manual -Keep The Manual -Follow All Instructions
-Clean with A Dry Cloth Only -Do Not Use Or Operate Near Water -Do Not Defeat Any Safety Features
Important Tips
- Test the unit before installation.
- Use the reset hole if your car stereo malfunctions.
- Check our Contact Us info at the last page of the User’s manual.
Features of This Product:
<>Full HD LCD Touch Screen: 1024*600 Screen; Support 1920*1080 Video
<>User-friendly Digital Control Interface
<>Compatible with Apple Carplay and Android Auto (Voice Assistance)
<>HD and Night Vision Backup Camera
<>Support Phone Mirror Link Function (Update software is being developed)
<>Support Steering Wheel Controls (Does not include this accessory)
<>Bluetooth Hands Free Calling and Audio Streaming
<>Support HD Video Most of Audio and Video formats
<>Support FM/AM Radio
<>Built-in Microphone & Front 3.5mm External Mic Input
<>CVBS Signal Output
<>USB Port Playback
<>AUX IN Connectivity
<>Multiple language Settings
<>EQ Audio Setting
<>Date and Time Setting
<>Support LOGO Selection
<>7 Colors Backlight Buttons
<>Pre-Amp and Subwoofer Output
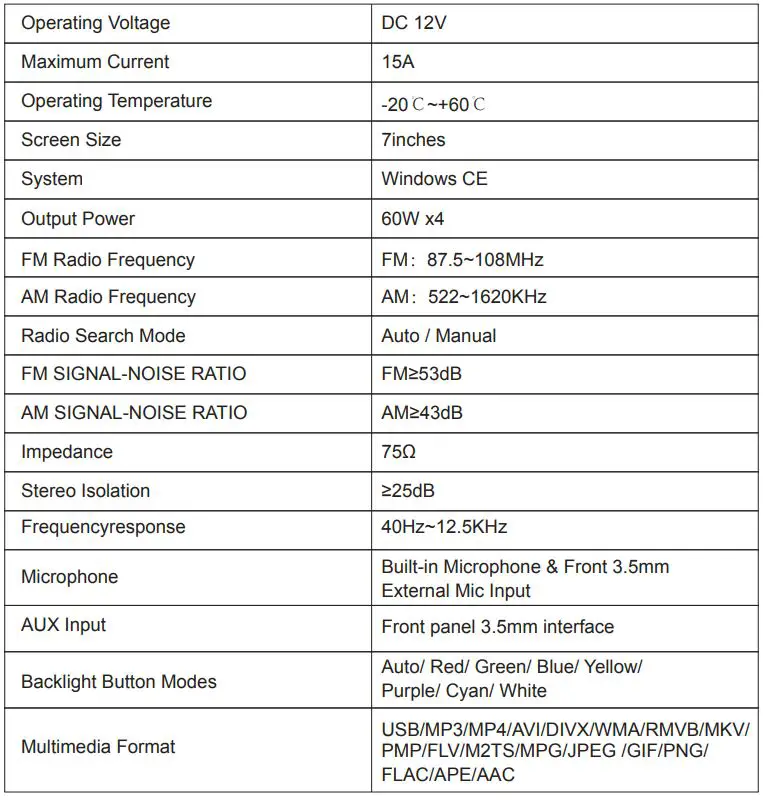
BASIC PARAMETERS
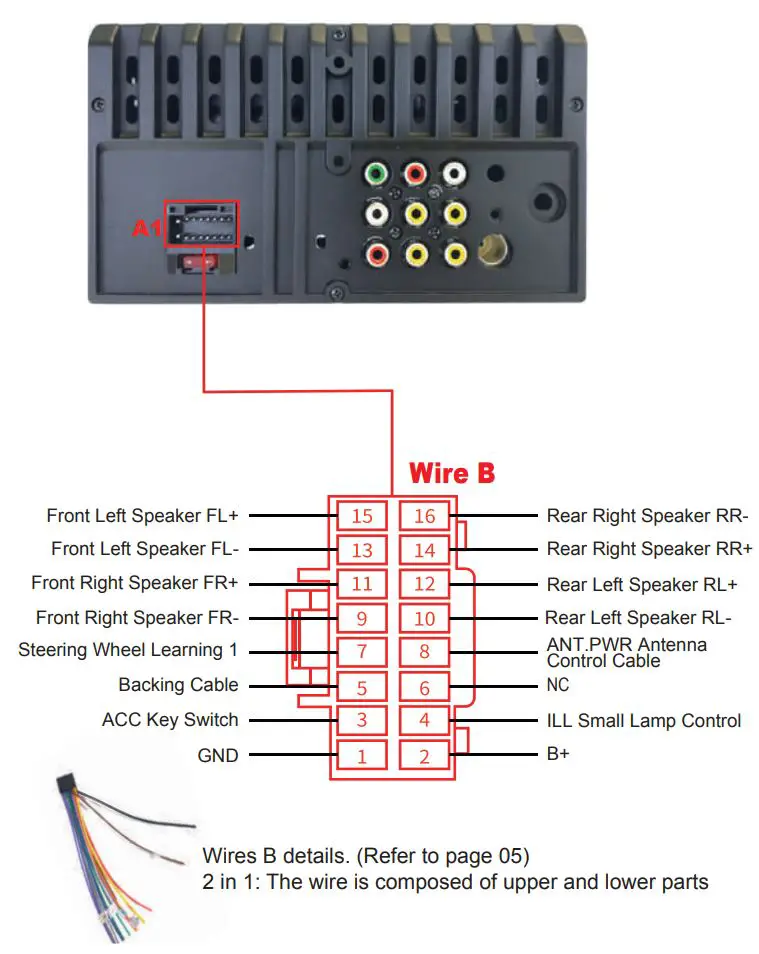
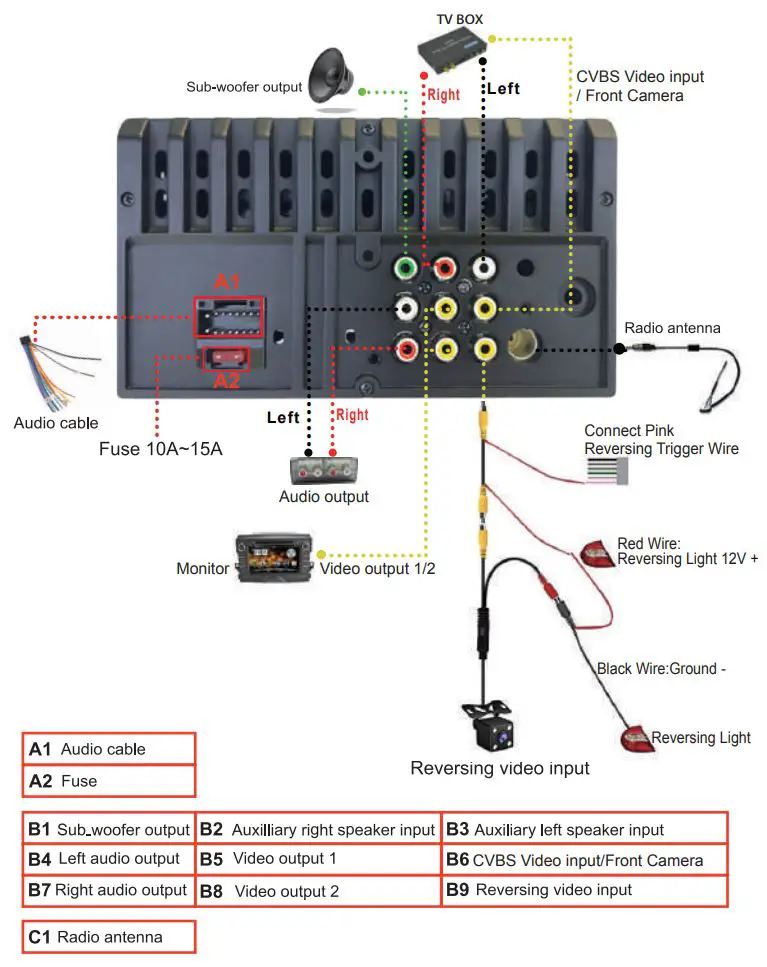
REAR INTERFACE DESCRIPTION
TEST BEFORE INSTALLATION
A quick simple test before the installation is to confirm that the device is working normally and as expected. In case there is a wrong step in the subsequent installation, which causes it to fail to work. If you perform a successful test but the unit did not work after installing it please recheck the installation steps. Operating voltage more than 14V should buy an extra adapter.
Step 1
Test car stereo:
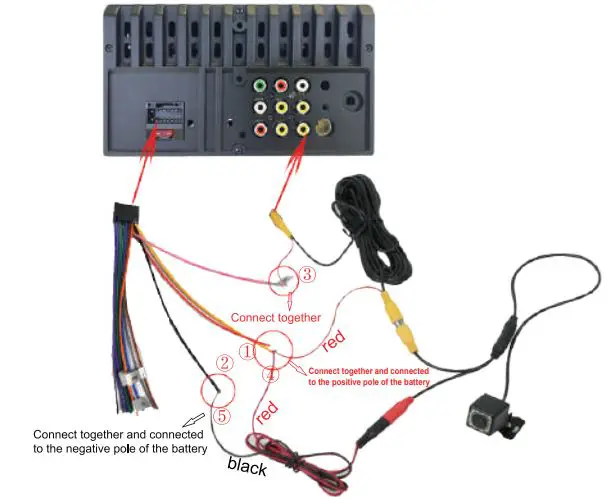
- The red and yellow wires of the car stereo combine together firstly and then connected to the positive pole of the battery.
- The black wire is connected to the negative pole of the battery.
- 2 seconds later, check the car stereo, if the screen is lighting up, it means the car stereo is proper functioning.
 Step2
Step2
Test rear view camera: Holding the Step 1 connection. and then the pink wire is connected with the top red wire of the rear view camera, ê The middle red wire and the bottom red wire of the rear view camera combine together and then connected to the æ (which the red and yellow wires connected to the positive pole of the battery). The black wire of rear view camera is connected to(which the black wire is connected to the negative pole of the battery). At this time , if the camera lights up, and the car stereo shows the reverse image, it means rear view camera is proper functioning.
Full show of the Realistic connection photo:
After completing the steps of the test, the car stereo is ready to be installed in your car.
![]() Pay attention
Pay attention
Unlike the period of test before installation, do not misunderstand the red wire(ACC) and yellow wire(B+). If the yellow wire and red wire are swapped, the head unit settings will not be saved. Please refer to common problems No.4 on page 31.(No memory)
Installation:
Note:
- For legal issues and your safety, the system will automatically disconnect with the mobile phone, such as calls & music in Bluetooth mode, phone mirror link, etc when using the rear view reversing function. Besides, if you do not intend to use the rear-view reversing function, please keep disconnecting the part to avoid disturbing the normal use of the car stereo.
- If you’re not satisfied with the effect with the installation or size, you can contact the seller within a month since your order have been placed via the order page for a return. Feel free to ask the seller for help when you meet with other questions.
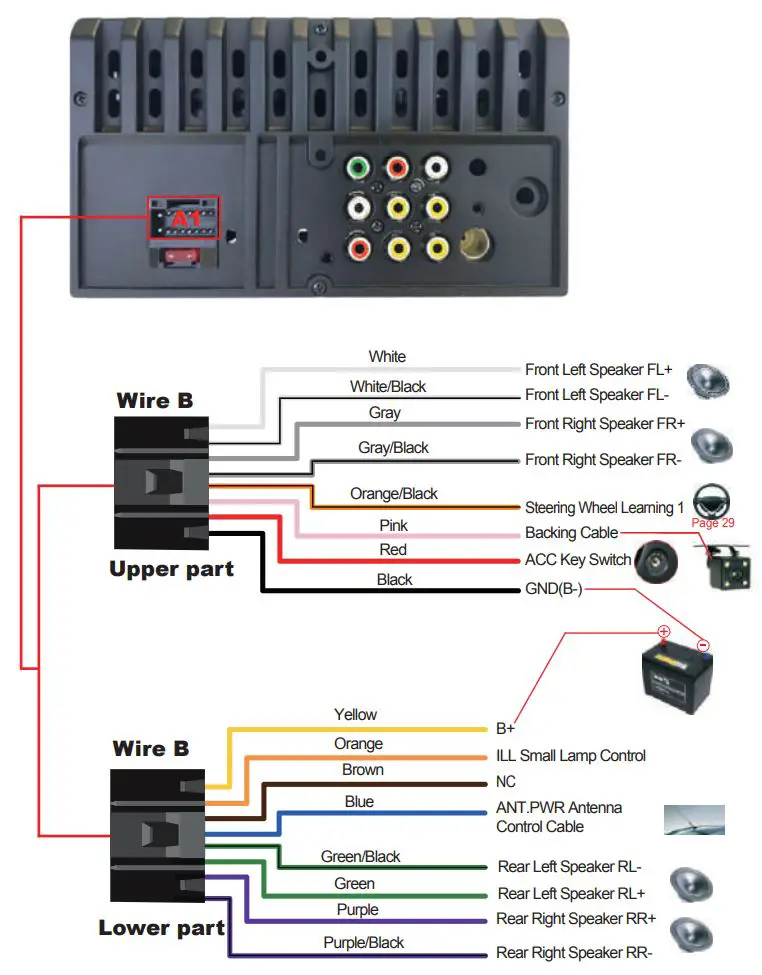
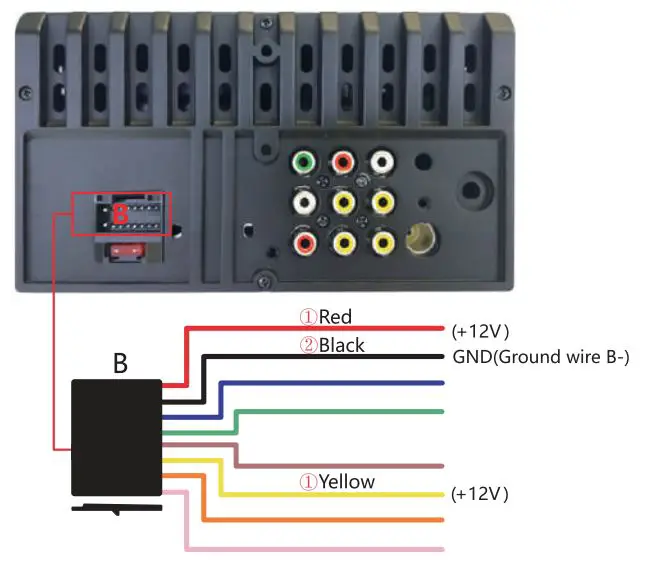
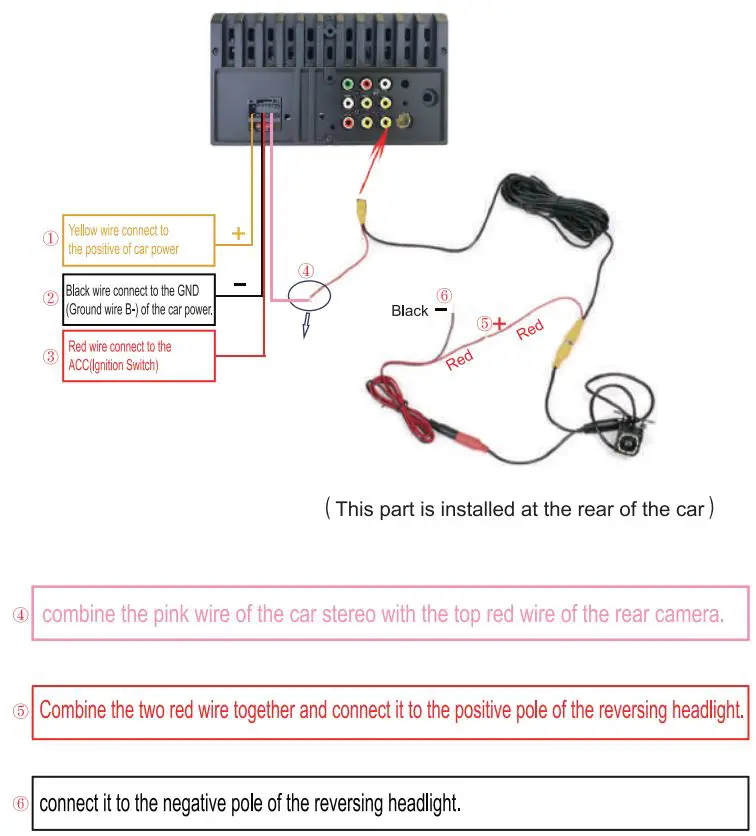
Wire Connection Details
– When ready to install
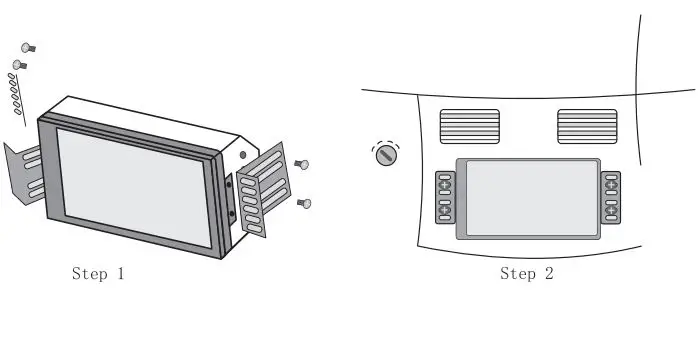
MACHINE INSTALLATION
The size of this car stereo is universal, suitable for most cars, and can be easily installed by following the steps below. But if you find that the unit is not suitable for your car, please consider these four methods. You may need three aftermarket accessories to complete your installation:
- Double DIN dash kit for (your car model).
- Wire harness (Connects car wiring to stereo wiring) for (your car model).
- Antenna adapter for (your car model). You can find the correct aftermarket accessories by searching the year, make, and model of your vehicle on Amazon or Google. ·Or you would need to mill the original frame of your car.
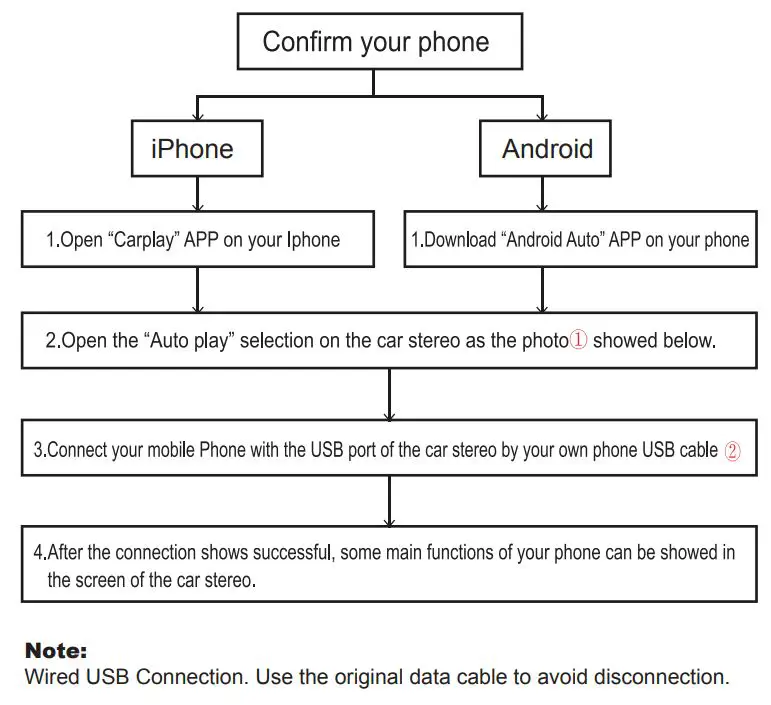
Carplay/Android Auto Function (Auto Play Mode)
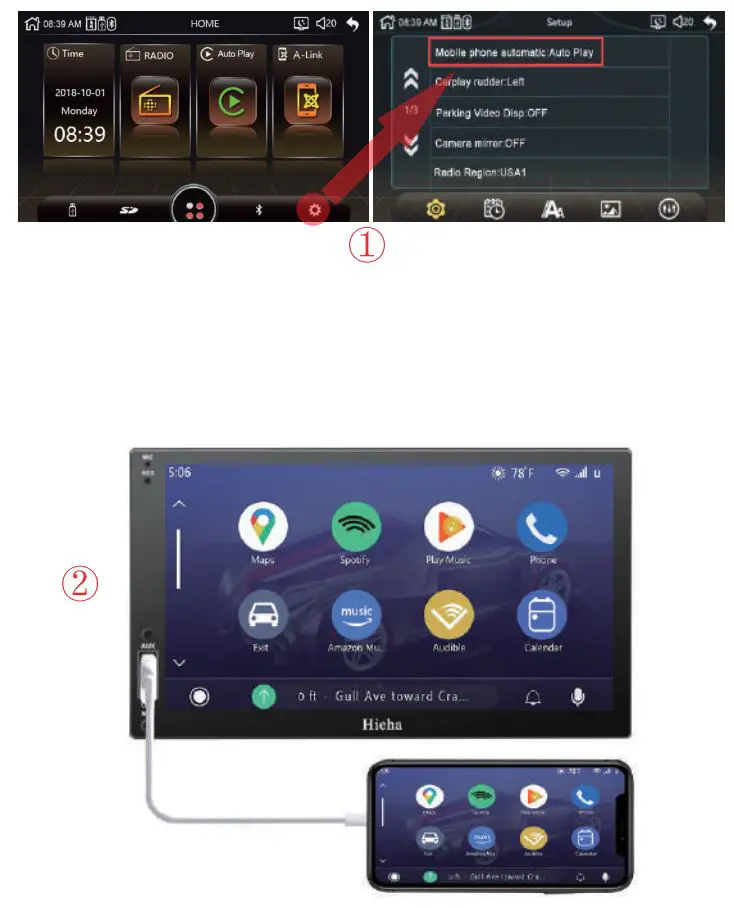
Mirror Link Function (A-Link Mode)
Note: This function allows your mobile phone to directly project the screen to the car stereo, so it is called the mirror link function. But this function is not suitable for phones which with too high resolution and version. For example, the mobile phone with the following three conditions.
- Phone resolution is above (1920*1080)
- iPhone X or higher version
- Android 10.1 or above
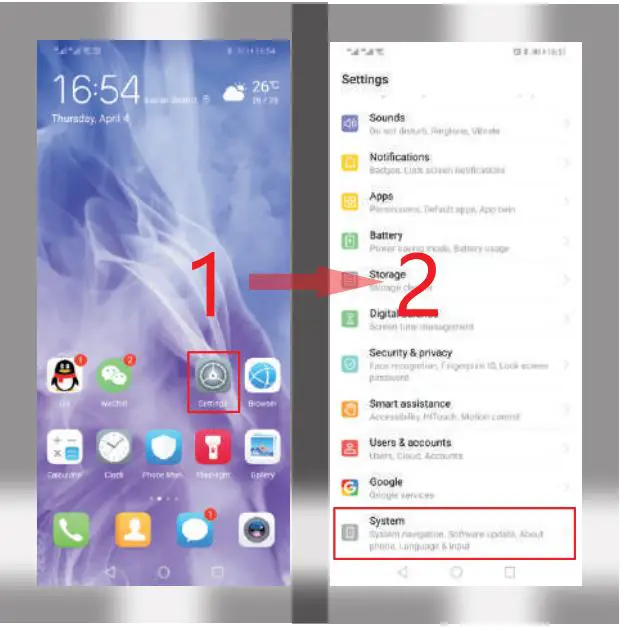
Mirror Link for iPhone
Note:
If your phone is I phone X or above the phone link function won’t work.
- Only when the display mode of the phone is on” landscape”, then the display of the car stereo can be displayed in full screen.
- Bluetooth must be connected, then the audio on the mobile phone can be synchronized to the car stereo.
- When the phone screen is turned off, the display of the car stereo will also be turned off at the same time.
- Use the original data cable to connect the car stereo and mobile phone with.
- When the phone pops up a dialog box: ‘Trust This Computer?”, Select ‘Trust” to enter the interconnect mode.
- Match the Blue tooth if you need to use the audio
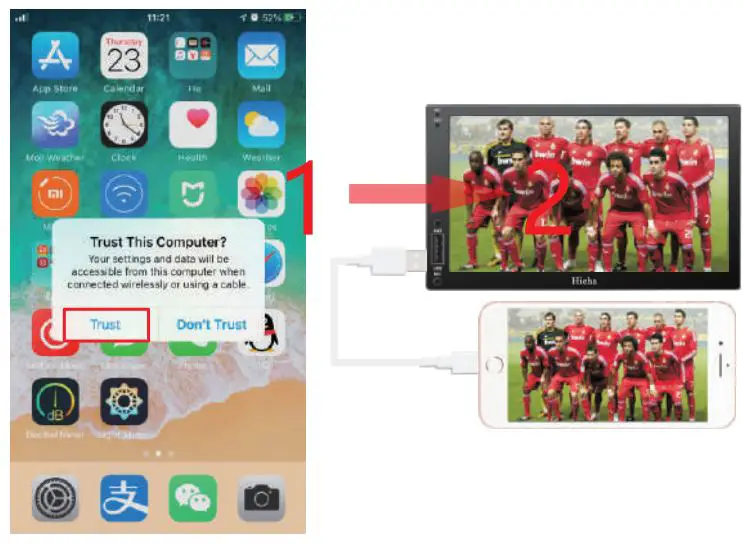
Mirror Link for Android
Note:
If your phone is running Android version 10.1 or above the phone link function won’t work.
- Only when the display mode of the phone is on” landscape”, then the display of the car stereo can be displayed in full screen.
- Bluetooth must be connected, then the audio on the mobile phone can be synchronized to the car stereo.
- When the phone screen is turned off, the display of the car stereo will also be turned off at the same time
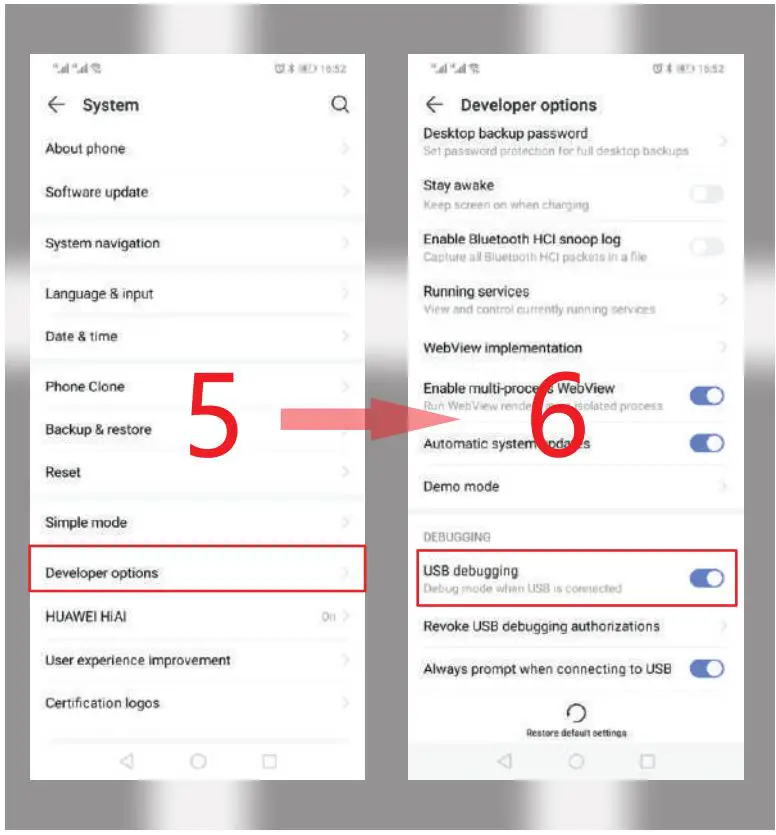
- Find “System” on your phone setting.
- Find the “About phone” and click Enter. Click on the “Build number” continuously until the phone screen displays “You are already a developer”.
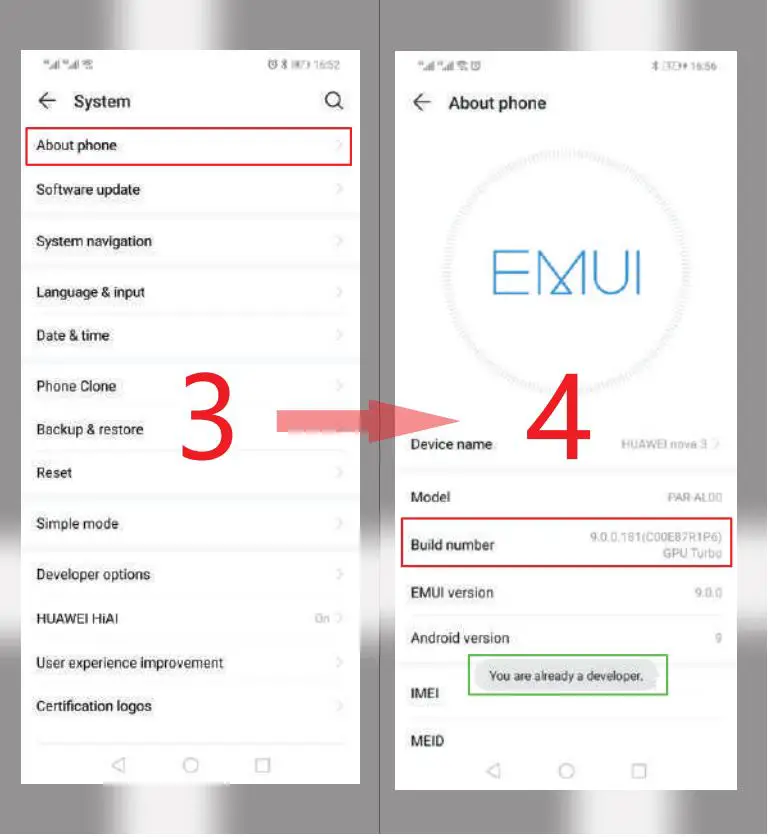
- Go back to the “System” interface, find “Developer options”, and click Go to find “USB debugging” and turn this feature on.
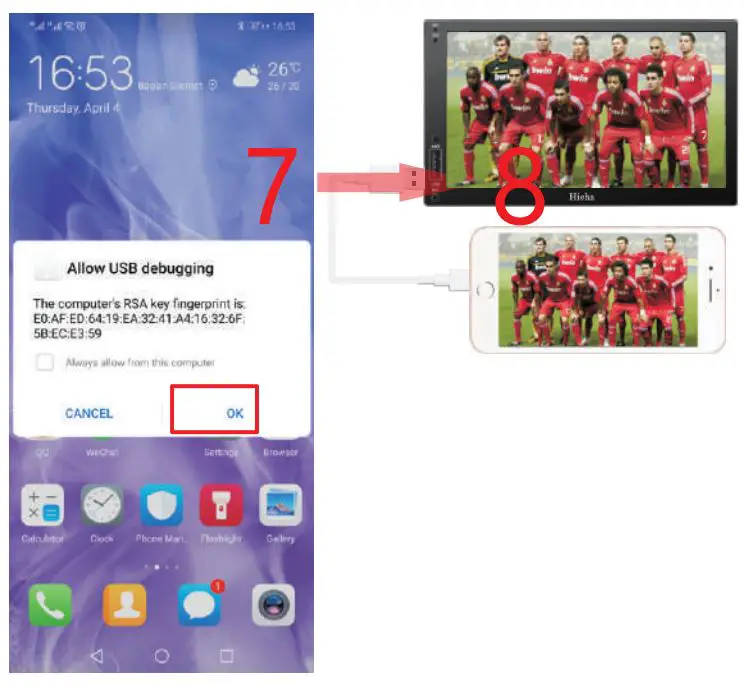
- Connect the phone and the car stereo with the USB cable, and the dialog box “Allow USB debugging” will pop up on the phone. Click the “OK” button.
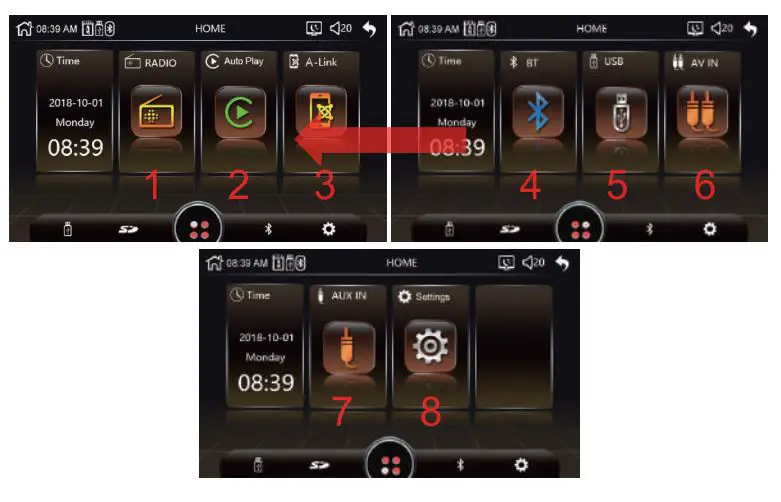
(Scroll/Slide the bottom icon to the left to find this part.)
- Brightness: Screen brightness adjustment.
- Constrict: Screen contrast adjustment.
- Saturation: Screen saturation adjustment.
- Hue: Screen hue adjustment.
- Reset: Touch the button to restore all settings of the current page to their original state.
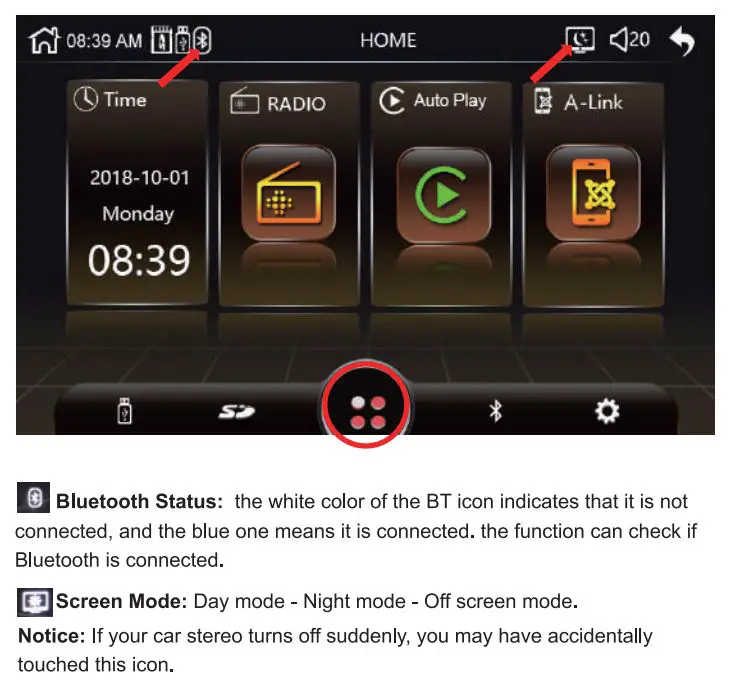
FUNCTIONAL DESCRIPTION
Note:
Swipe to the left on the screen to enter the next page. If you want to use SD CARD mode, you should have a card reader and use
the USB function.
- RADIO: Touch to enter the radio mode to listen to the radio station.
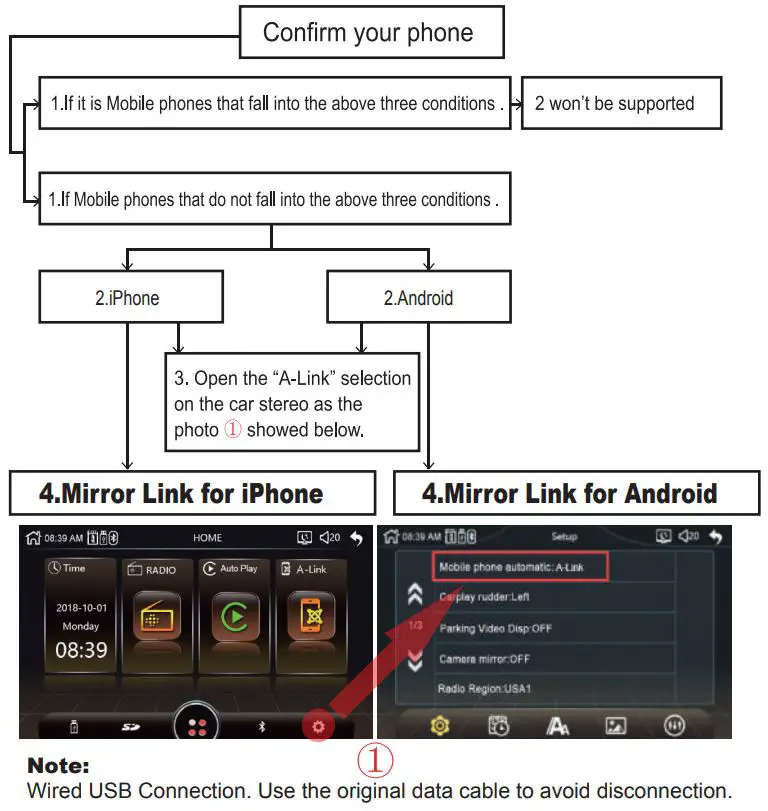
- Auto Play: The IOS system phone uses the Car Play function and the Android system phone uses the Android Auto function via this mode. Use the USB data cable to connect with the car.
- A-Link: Phone link function, connect the machine and mobile phone with USB cable, you can project the display on the mobile phone to the machine for display. Only after the connection is successful, touch the icon to enter.
- Bluetooth: Touch to enter Bluetooth mode.
- USB: Touch to enter USB mode. Insert U disk.
- AV IN: Touch to enter AV IN mode.
- AUX IN: Plug in the AUX hole on the front of the machine.
- Settings: Touch to enter system settings.
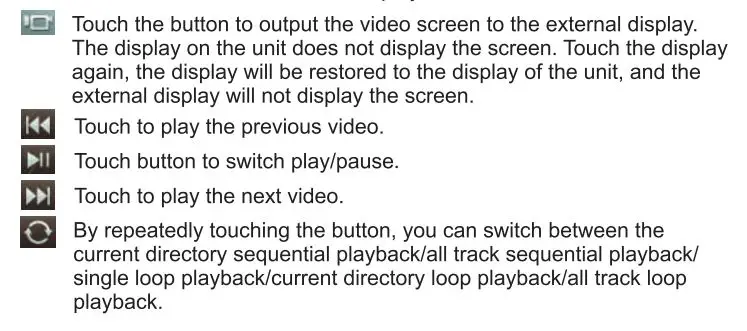
RADIO FUNCTION
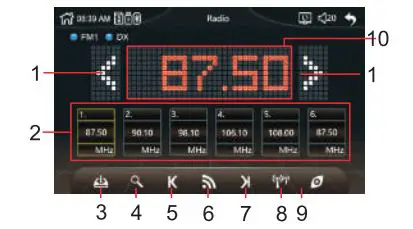
- Press the button repeatedly to fine tune the radio frequency point to the desired position of the user.
- Store the station number of the station 1-6 display area, and touch the number to select the corresponding station to listen to. Press and hold the number key to store the current frequency point (displayed in area 10) to the corresponding station number.
- When the button is touched, the machine automatically scans the full-band frequency and stores the effective station on the stations 1-6 of FM1-FM3. Up to 18 stations can be stored. During the scanning process, touch this button again to stop scanning.
- Touch the button to scan the station forward from the current frequency point. When scanning to a valid station, stop and play for 10 seconds, continue scanning the next station, and so on.
- Touch the button to scan the station backwards from the current frequency. When scanning to a valid station, stop and play the current station.
- The radio band can be switched by touching the button.
- Touch the button to scan the station forward from the current frequency. When scanning to a valid station, stop and play the current station.
- Touch the button to switch between local signals and distant signals. A criterion for judging the signal strength of an effective station during the scanning process.
- Touch the button to browse the stations 1-6 of FM1-FM3 in turn. Each station plays for 10 seconds. Touch the button again to stop browsing and turn to the currently playing station.
- Radio frequency display area.
BLUETOOTH FUNCTION
Device Name: www.hieha.net
PIN Code: 0000
Connection Method:
- Power on the machine and turn it on.
- Turn on the Bluetooth function on the mobile phone, click Search Device, when the mobile device list searches for the Bluetooth device name of the current machine, click the device name to connect, and when the display is successful, you can use it.
- After successful Bluetooth connection, the BT icon in the upper left corner will turn blue. Which can operate more functions.
* If some parts cannot be operated or used properly, it may be that the connection is not perfect. Please delete (unpair) the connected Bluetooth name of the mobile phone, and then search for the device again and connect it. Generally, the problem can be solved.
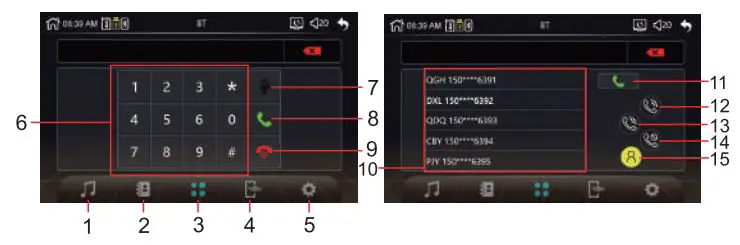
- Touch the button to enter the Bluetooth music player interface, in this interface you can play the music inside the phone through Bluetooth, and you can control the previous song, next song, play/pause through the machine.
- Touch the button to enter the phone book interface.
- Touch the button to enter the dialling interface.
- When the Bluetooth connection of the mobile phone is successful, touching this button will disconnect the connected Bluetooth mobile phone. Touching this button again will automatically connect the Bluetooth of the last disconnected mobile phone.
- Touch the button to enter the help interface, this interface will display the Bluetooth name of the machine. If the phone is connected successfully, the connected phone Bluetooth name will also be displayed.
- In the dialing interface, dial the keyboard area.
- In the dialing interface, when you are in a Bluetooth call, touch this button to pause the call.
- In the dialing interface, Touch this button to dial the phone number entered by the user. When there is an incoming call, touch this button to answer.
- In the dialing interface, When there is an incoming call, touch this button to reject the call. While on a call, touch this button to hang up the call.
- In the phone book interface, the phone number list display area.
- In the phone book interface, After selecting a number in the phone list, touch this button to dial the selected phone number.
- Touch the button to download a list of all incoming call numbers.
- Touch the button to download a list of all the dialled phone numbers.
- Touch the button to download a list of all phone numbers for unanswered calls.
- Touch the button to download the phone book inside the phone.
USB / CARD PLAY FUNCTION

- USB/CARD FILE LIST : The USB/CARD list interface allows you to select audio/video/photo files for playback, provided that there is a corresponding file in the USB/CARD memory that supports playback.
- USB/CARD MUSIC PLAY: The music player interface can display the ID3 information of the song.
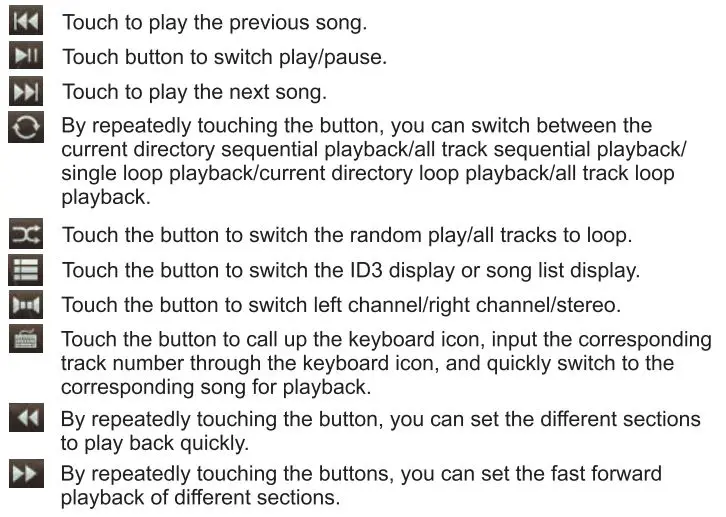
- USB/CARD VIDEO PLAY : The video player interface.

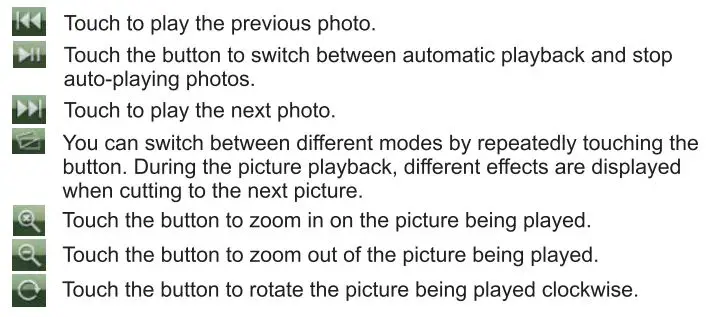
- USB/CARD PHOTO PLAY
AV IN FUNCTION
In AV IN mode, users can simultaneously input video and sound through the CVBSIN connector and the 3.5mm AUX input connector, or they can be input separately.
SETTING
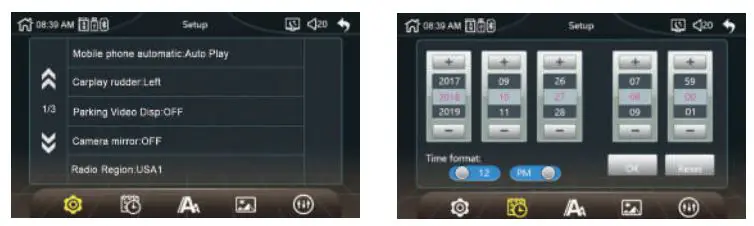
- Mobile phone automatic: This switch can choose to communicate with the phone as: Auto Play/A-Link/OFF.
- Carplay rudder: This switch can set the Carplay rudder to the left or right.
- Parking Video Dips: Normally this switch is set to OFF, otherwise the machine will pop up a warning when you watch the video, prompting you not to watch the video while driving.
- Camera mirror: This switch can set the rear camera mirror to the OFF or ON.
- Radio Region: Users can select the corresponding radio area according to the area they are in. The available areas are: USA1/Europe/China/ Brazil1/Brazil2/OIRT/Japan/USA2.
- BT Auto Connect: This switch can be set to the connected Bluetooth device. If it is within the valid range after disconnection, it is necessary to automatically connect the Bluetooth device again.
- BT Auto Answer: This switch can be set to answer automatically when there is an incoming call during a Bluetooth call.
- Key light: Button light setting: It can be set to automatically change the period of the seven-color lamp, or it can be set to a single fixed color lighting effect.
- Reversing mute: This switch can set the reversing mute to the OFF or ON.
- Delay exit reverse : This switch can set the delay to the
OFF, 6, 7, 8, 9, 10, 11, 12 seconds. - Restore Default: Touching this option and selecting “YES” in the dialog box will restore all the settings in the common settings to the initial state.
- Time Format: Users can choose the time format as 12-hour or 24-hour.
- The user can set the time and time on this interface. After the setting is completed, touch the “OK” button to save the settings.
- Touch the “Reset” button to return all settings of this interface to their original state.
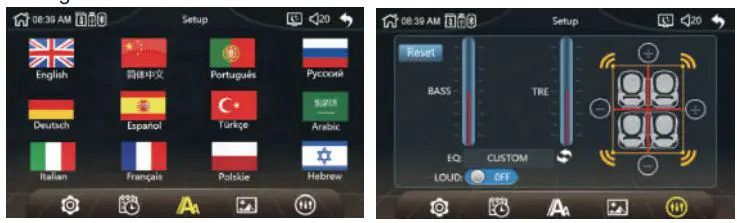
Users can set the system language according to the language they use. Due to the memory limitations of the system, the system only enters some of the more commonly used languages.
Users can change the background image of the system according to their own needs. They can only choose from 4 different background images preset by the system. User-defined background images are not supported.
- LOUD: Equal loudness setting, you can turn on or off the loudness.
- EQ: With the equalizer setting, the user can switch the non-EQ mode by touching the S1 button to achieve a different sound experience. The EQ modes that can be used are: CUSTOM/DBB/CLASS/ROCK/JAZZ/POP.
- BASS: When the EQ mode is selected as: CUSTOM, you can manually set the value of the BASS item to adjust the bass effect. Manual setting of BASS values is not supported in other EQ modes.
- TRE: When the EQ mode is selected as: CUSTOM, you can manually set the value of the TRE item to adjust the treble effect. Manual setting of TRE values is not supported in other EQ modes.
- Touch the “+” and “-” symbols on the display to adjust the focus of the four speakers, front, back, left and right. If the adjusted value is shifted to which side, it will cause the speaker output sound in the opposite direction to become smaller or no sound output.
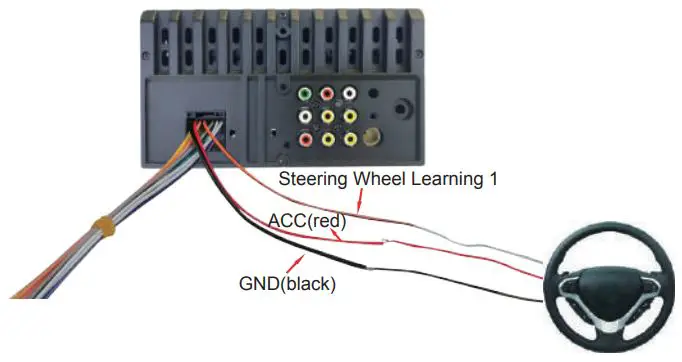
- Connect the Steering Wheel Learning wire of your car to the Steering Wheel Learning 1 of the head unit. (If there are 2 Learning wires in your car, connect both of them to the “SWC Leering 1” of the head unit.)
- Connect the ACC wire(mostly in red) of your car to the ACC (red) of the head unit.
- Connect the negative pole of your car to the GND wire(black) of the head unit.
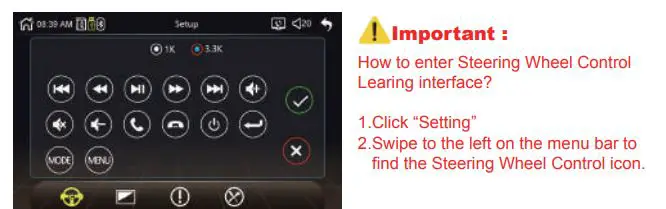
- In the “settings” interface, find “Steering Wheel Controls” and enter.
- Enter the steering wheel control learning interface and press the button to learn. After the learning is successful, click the “confirm” button on the page. After saving, you can use the buttons on the original steering wheel to control the machine.
Learning method: press and hold a button on the steering wheel of the original car without letting go, find the button icon corresponding to the function of the button on the steering wheel of the machine. Click this icon to change the color, indicating that the button has been successfully learned, according to the same
The way you can learn other buttons. After all the keys have been learned, click the “Confirm” button on the page to save the settings. If you need to relearn, please click the “RESET” button on the page and then re-learn.
(Scroll/Slide the bottom icon to the left to find this part.)
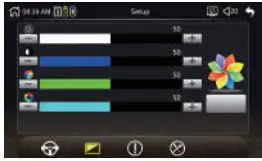
- Brightness: Screen brightness adjustment.
- Constrict: Screen contrast adjustment.
- Saturation: Screen saturation adjustment.
- Hue: Screen hue adjustment.
- Reset: Touch the button to restore all settings of the current page to their original state.
The factory mode is the setting of some core components of the machine. It is generally not recommended to set the internal information to avoid causing the machine to not work properly.
*Factory setting password: 8800.
COMMON PROBLEMS AND SIMPLE TROUBLESHOOTING
1> Unable to boot normally — Reason for not booting
- “Yellow” “Red” “Black” this 3 lines only connected 2 line of them, so it will not start, it should be that the yellow line is connected to the positive pole, red line to the key control line, black to the negative pole, less connection or wrong connection does not boot.
- The original car line and unit wiring can not be connected to the color, the color of the original car line is not standard, if you connect like that it can not only be turned on but also may burn.
- The original car plug can’t be plugged directly into the new unit, even if it just plugs in, ii can’t be used, otherwise it won’t be turned on or burned.
- The 3 wires are connected right, but it does not boot. Check if the fuse on the yellow line is broken. If there is no problem with the fuse, twist the yellow and red wires together. Turn on the key and press the unit’s power button to see if it can be turned on.
- Every time you change the fuse, it burns. Please don’t change it again The reason is that when you first connect the positive and negative poles, the protection circuit of the unit is short-circuited. The unit can be repaired under the guidance of our master. No basis can only be returned to the after-sales or new unit. If these are no problem, or also don’t boot, please make the final step to confirm, find a 12V battery or 12V power supply “yellow” and “red” twist together with the positive, black to the negative pole, press the button check if it can boot or no, if you can boot, it showed that the original car line is not right connect, or there is a problem with the car line. If it can’t be boot, the unit is broken. Does not boot unit, check the line carefully, do not blindly suspect the unit problem.
2> Automatic shut-down
—Automatic shutdown is generally caused by the following situations:
- The cable were connected wrong: If the blue cable (automatic antenna power supply) is connected as the power cord of the unit, an automatic shutdown will occur. Please follow the correct wiring connection method to solve the problem.
- The voltage is unstable: please find a 12V-5A power supply and re-tested to see if it will automatically shut down or not. If it won’t automatically shut down after the test, please replace the power supply. If it will automatically shut down, it is problem with the unit.
3> Having noise
— The general situation of noise is caused by two reasons
- The original speaker power is too small. When the volume of the unit is turned up, there will be noise.
Solution: Either replace the speaker or do not turn the volume too large when listening to songs. - The speaker cable is grounded.
Solution: Take the iron speaker cable. Directly connected to the speaker cable of the unit.
4> Unable to save the settings of the clock or the Steering Wheel Control
Two reasons for no memory function.
- The yellow line and the red line are connected together (separate yellow to positive, red to key control).
- Yellow and red are reversed (you need to change their position).
5> Car audio with Bluetooth but it can’t work
— Check the phone to see if you can search for the unit code
Operation steps: turn on the unit, use the phone Bluetooth search, search for “www.Hieha.net” then click the connection, after connecting, you can answer the phone or Bluetooth to play the song. PIN Code: 0000.
6> The product smoke has proved that the internal circuit has been burned. Change the insurance FUSE can not solve the problem.
— In this case, the unit needs to be repaired.
7> How to adjust the sound, where is the equalizer set, the sound can not be adjusted?
- Adjust the sound: please use the volume “up” and “down” button to adjust.
- Equalizer settings: In the menu page, click this button to to enter the interface to adjust sound effect.
- The sound cannot be adjusted: Please reset the unit or unplug the power cord and plug it in.
8>No display image of reversing video
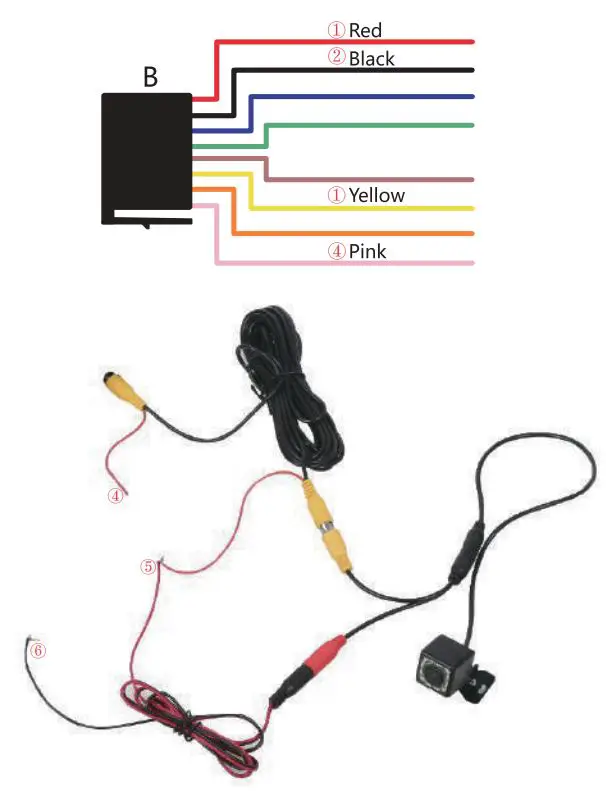
- Connect the wrong line or less wiring. Camera connection method: a> The first step is to find accessories (accessory: one camera + one power cord + one video cable). b> The second step is to find the port of the wiring. First find the reverse control line on the power line of the unit. The control line is a pink line or brown line, connect this line to the positive pole of 12V and the screen will turn blue. And then find the back of the unit the CAME video input interface, find the positive and negative of the backup light. The third step is connect: there are two sockets on the camera, the red socket is connected to the power cable, the yellow is inserted into the video cable, the red wire of the power cable and the wire of the video cable are screwed together on the positive pole of the reverse lamp, and the black wire of the power cable is not used or connected, the other end of the video cable is connected to the CAME video input interface on the back of the unit. The red line coming out of the video line is connected to the reversing control line of the power line.
- The camera is broken. If the lamp that is properly wired to the camera still not lit, it must be broken and replace it with a new one.
9>USB flash disk can not be played, the card with the map can not be recognized, the card slot does not enter the card, the map card folder has no content?
— USB flash disk can not be played:
Format the USB flash disk, and the file system must be: FAT32, re-download one or two songs and try again. If it still doesn’t work, please replace the USB flash drive.
— The map card cannot be recognized(Only for GPS models}:
Insert the card into the computer to format, re-download the map or change the memory card to download the map software.
— The card cannot fit into the card slot:
Check if the memory card being inserted reversely or the card slot has been damaged.
— There is no content in the map card folder(Only for GPS models): Insert the card into the computer to view it. If there is no content, you need to download it again.
10> FM does not receive the radio station
— Can not receive the station check below 2 points
- The antenna plug is not fully inserted, the antenna is disconnect or the line is disconnect.
- Search channel, on the FM menu page, perform a channel scan search.
If the above 2 points don’t work, please unplug the antenna plug and find a screwdriver or a metal strip to insert into the antenna port to see if ii works or not.
11> There is no sound right after installation
— Dear customer, the unit has been tested before shipment. If there is no sound, ii is usually a wiring error or the original car speaker wire is short-circuited with iron. According to the steps to check it.
- Check if the speaker cable is short-circuited and connected right. Please reconnect if it have any short circuit.
- Check how many speaker cables does the original speaker have. If there are only 2 speaker cables then ii means that the original car line does not match our unit. In this case you need to re-organize the original car line. One speaker must lead to 2 speaker wires; 2 speakers must be have 4 speaker cables, only in this way, the unit can work properly.
12>There is no sound after some time of use
— Disconnect all the speaker cable from the unit (do remember to remove all of them), and then find an external speaker to connect to one of the grey/ white/ purple/ Green of the tail line of the unit. Pull out the power supply and then plug the power supply back, reboot the unit and to see if there is any sound. If there is a sound, it means that the car’s speaker line is short-circuited with iron or the speaker is damaged. If there is no sound, it means the unit is broken.