Hisense 4074372-02 Remote Controller Instructions

Thanks you very much for purchasing this Air Conditioner. Please read this instructions carefully before using this appliance and keep this manual for future reference.
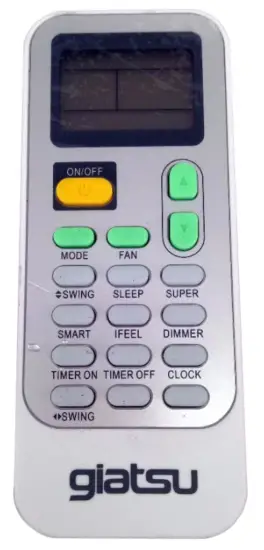
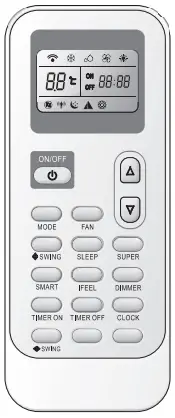
Remote controller
The remote controller transmits signals to the system.
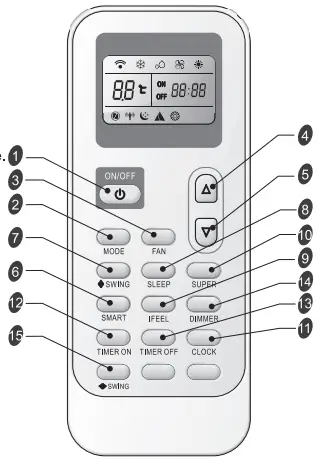
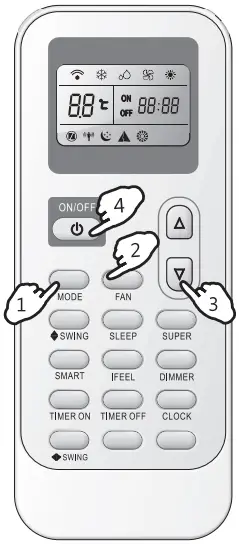
- ON/OFF BUTTON The appliance will be started when it is energized or will be stopped when it is in operation, if you press this button.
- MODE BUTTON Press this button to select the operation mode.
- FAN BUTTON Used to select fan speed in sequence auto, high, medium or low.
- ROOM TEMPERATURE SETTING BUTTONS Used to adjust the room temperature and the timer, also real time.
- SMART BUTTON(invalid for some models) Used to enter fuzzy logic operation directly, regardless of the unit is on or off.
- SWING BUTTON(invalid for some models) Used to stop or start vertical adjustment louver swinging and set the desired up/down airflow direction.
- SLEEP BUTTON Used to set or cancel Sleep Mode operation.
- IFEEL BUTTON Used to set IFEEL mode operation. Press it once, the IFEEL function wil be started. Press it again, the IFEEL function will be shut off. Advice to put the remote controler in the place where the indoor unit receive signal easily. Advice to cancel the IFEEL mode so as to save energy when stopping the air conditioner.
- SUPER BUTTON Used to start or stop the fast coding/heating. (Fast cooling operates at high fan speed with 16t set temp automaticaly : Fast heating operates at auto fan speed with 30t: set temp automatically) Indication symbols on LCD:
- CLOCK BUTTON Used to set the current time.
- TIMER ON/OFF BUTTON Used to set or cancel the timer operation.
- DIMMER BUTTON(invalid for some models) When you press this button, all the display of indoor unit will be closed. Press any button to resume display.
 SWING BUTTON(invalid for some models) Used to stop or start Horizontal adjustment louver swinging and set the desired left/right airflow direction.
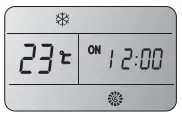
Indication symbols on LCD:

Note: Each mode and relevant function will be further specified in following page.
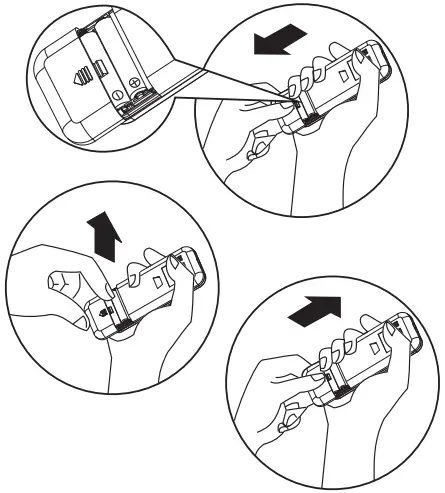
- How to Insert the Batteries
Remove the battery cover according to the arrow direction. Insert new batteries making sure that the (+) and (-) of battery are matched correctly. Reattach the cover by sliding it back into position. Note: • Use 2 LRO3 AAA(1.5yolt) batteries. Do not use rechargeable batteries. Replace batteries with new ones of the same type when the display becomes dim.
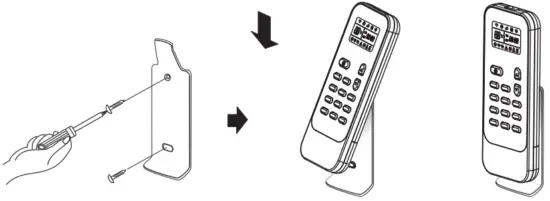
- Storage and Tips for Using the Remote Controller
The remote controller may be stored mounted on a wall with a holder.
Note: The remote controller holder is an optional part.
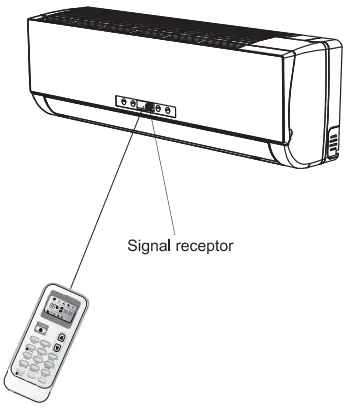
- How to Use
To operate the room air conditioner, aim the remote controller to the signal receptor. The remote controller will operate the air conditioner at a distance of up to 7m when pointing at signal receptor of indoor unit.
 CAUTIONS
For appropriate signal transmission between remote controller and indoor unit, keep the signal receiver away from the following items:
- Direct sunlight or other strong lights or heat
- Flat panel television screen or other electrical appliances that react to the remote controller
Additionally, the air conditioner will not operate if curtains, doors or other materials block the signals from the remote controller to the indoor unit. If the signal may not be transmitted properly, either move these materials or consult your local dealer.
Operation mode
- Selecting mode
Each time MODE button is pressed, the operation mode is changed in sequence:

Heating mode is NOT available for cooling only air conditioner. - FAN mode
Each time the “FAN” button is pressed, the fan speed is changed in sequence:

At “FAN ONLY mode, only ”High”,”Medium” and ‘tow” are available.
At “DRY” mode, Fan speed is set at “AUTO” automatically, “FAN” button is ineffective in this case. - Setting temperature
 Press once to raise temperature setting by 1 C
 Press once to lower temperature setting by 1 C
Range of available set temperature HEATING, COOLING 16 C-30 C DRY -7 – 7 FAN ONLY unable to set Note: Heating mode is NOT available for cooling only models. Note: At “Dry” mode, the unit can decrease or rise 2°C if you still feel uncomfortable.(For some models you can choose from -7 to 7.)
- Turning on
Press button, when the appliance receives the signal, the RUN indicator of the indoor unit lights up.
SWING, SMART, TIMER ON, TIMER OFF, CLOCK, SLEEP and SUPER operation modes will be specified in the following pages.- Changing modes during operation, sometimes the unit does not response at once. Wait 3 minutes.
- During heating operation, air flow is not discharged at the beginning. After 2-5 minutes, the air flow will be discharged until temperature of indoor heat exchanger rises.
- Wait 3 minutes before restarting the appliance.
Airflow direction control
- Airflow direction control
Vertical airflow(Horizontal airflow) is automatically adjusted to a certain angle in accordance with the operation mode after turning on the unit.Operation mode Direction of airflow COOLING, DRY horizontal HEATING, FAN ONLY downward The direction of airflow can be also adjusted to your own requirement by pressing the “SWING” button of the remote controller.

Heating mode s only available for heat pump models.
Vertical airflow control (with the remote controller)
Using remote controller to set various angles of flow or specific angle as you like.
Singing airflow
Pressing “ SWING” button once, the vertical adjustment louver will swing up and down automatically.
Desired direction airflow
Pressing the “ SWING” button again when the louvers swing to a suitable angle as desired.
Horizontal airflow control (with the remote controller)
Using remote controller to set various angles of flow or specific angle as you like.
Swinging airflow
Pressing “ SWING” button once, the horizontal adjustment louver will swing left and right automatically.
Desired direction airflow
Pressing the “ SWING” button again when the louvers swing to a suitable angle as desired.
NOTE: If the unit doesn’t have four ways airflow function,you can adjust horizontal airflow by yourself.(invalid for some models)
A. Do not turn the vertical adjustment louvers manually, otherwise malfunction may occur. If that happens, turn off the unit first and cut off the power supply, then restore power supply again.
B. It is better not to let the vertical adjustment louver tilt downward for a long time at COOLING or DRY mode to prevent condensed water from dripping.
SMART mode
(invalid for some models)
Press the SMART button, the unit enters SMART mode(fuzzy logic operation) directly regardless of the unit is on or off. In this mode, temperature and fan speed are automatically set based on the actual room temperature.
For the split-type models, such as wall-mounted air conditioners and some floor-standing air conditioners, their operation mode and set temperature should be determined based on the indoor temperature.
Operation mode and temperature are determined by indoor temperature
Heat pump models
| Indoor temperature | Operation mode | Target temperature |
| 21 r or below | HEATING | 22°C |
| 21 t-23r | FAN ONLY | |
| 23°C-26r | DRY | Room temperature decrease 2t after operate for 3 minutes |
| Over 26r | COOLING | 26r |
Cooling only models
| Indoor temperature | Operation mode | Target temperature |
| 23t or below | FAN ONLY | |
| 23°C-26°C | DRY | Room temperature decrease VC after operate for 3 minutes |
| Over 26°C | COOLING | 26°C |
For commercial air conditioner products, such as cassette type air conditioners, duct type air conditioners, ceiling & floor air conditioners and some floor-standing air conditioners, their operation mode should be determined based on the difference between the indoor temperature and set temperature.
The operation mode is determined by the difference between the indoor temperature and set temperature.
Heat pump models
| Indoor temperature | Operation mode | Target temperature |
| Below T-3°C | HEATING | T |
| T-3°C -CT indoor —,T+3°C | FAN ONLY | T |
| Over T-1-3°C | COOLING | T |
Cooling only models
| Indoor temperature | Operation mode | Target temperature |
| T+3°C or below | FAN ONLY | T |
| Over T+3°C | COOLING | T |
SMART button is ineffective in SUPER mode. Press MODE button cancel SMATR mode. Note: Temperature, airflow and direction are controlled automatically in SMART mode. However, For the on/off, you can choose from -2 to 2 (for some models you can choose from -7 to 7), for the inverter you can choose from -7 to 7. if you still feel uncomfortable.
| What you can do in SMART mode | ||||
| Your feeling | button | adjustment procedure | ||
| Uncomfortable because of unsuitable air flow volume. |  FAN |
Indoor fan speed alternates among High, Medium and Low each time this button is pressed. |
||
| Uncomfortable because of unsuitable flow direction. | SWING |
Press it once, the vertical adjustment louver swings to change vertical airflow direction. Press it again, swings stops. For horizontal airflow direction, please refer to the previous page for details. , |
||
CLOCK button
You can adjust the real time by pressing CLOCK button, then using and buttons to get the correct time, press CLOCK button again the real time is set.

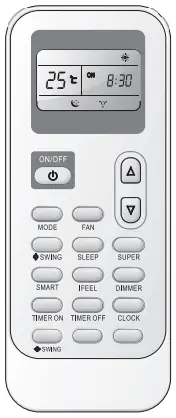
SUPER mode
- SUPER mode is used to start or stop fast cooling or heating. In SUPER mode, the super indicator
 will display on LCD. Fast cooling operates at high fan speed, changing the set temperature automatically to 16°C; Fast heating operates at auto fan speed, changing the set temperature automatically to 30 °C.
 - SUPER mode can be set when the appliance is in operation or energized.
- In SUPER mode, you can set temperature, airflow direction or timer. If you want to escape from SUPER mode, press SUPER, MODE, FAN, ON/OFF or SLEEP button, the display will return to the original mode.
Note:
- SMART button is not available in SUPER mode.
- The Appliance will continue working in SUPER mode , if you don’t escape from it by pressing any of the buttons mentioned above.
- Heating is NOT available for cooling only air conditioner.
- For the first generation of products, you can’t set temperature in super mode, but you can press TEMPERATURE SETTING button to escape super mode.
Timer mode
It is convenient to set the timer on with TIMER ON button when you go out in the morning to achieve a comfortable room temperature at the time you get home. You can also set timer off at night to enjoy a good sleep.
How to set TIMER ON
TIMER ON button can be used to set the timer programming as wished in order to switch on the appliance at your desired time.
- Press TIMER ON button, “ON 12:00” flashes on the LCD, then you can press the or buttons to select your desired time for appliance on.
Increase
Decrease
Press theor button once to increase or decrease the time setting by 1 minute.
Press the or button 2 seconds to increase or decrease the time setting by 10 minute.
Press the or button for a longer time to increase or decrease the time by 1 hour.
Note: If you don’t set the time in 10 seconds after you press TIMER ON button, the remote controller will exit the TIMER ON mode automatically. - When your desired time displayed on LCD, press the TIMER ON button and confirm it.
A “beep” can be heard.
“ON” stops flashing.
The TIMER indicator on the indoor unit lights up.(invalid for some models) - After the set timer displayed for 5 seconds the clock will be displayed on the LCD of the remote controller instead of set timer.
How to cancel TIMER ON
Press the TIMER ON button again, a “beep” can be heard and the indicator disappears, the TIMER ON mode has been canceled.
Note: It is similar to set TIMER OFF, you can make the appliance switch off automatically at your desired time.
SLEEP mode
SLEEP mode can be set in COOLING, HEATING or DRYING operation mode. This function gives you a more comfortable environment for sleep. In SLEEP mode,
- The appliance will stop operation automatically after operating for 8 hours
- Fan speed is automatically set at low speed.
- Set temperature will rise by 2°C at most if the appliance operates in cooling mode for 2 hours constantly, then keeps steady.
- Set temperature will decrease by 2″C at most if the appliance operates in heating mode for 2 hours constantly, then keeps steady.
Note: In cooling mode, if room temperature is 26 C or above, set temperature will not change(invalid for some models).
Note: Heating is NOT available for cooling only air conditioner.
Note: Press SUPER ,SMART, MODE,SLEEP or FAN button cancel SLEEP mode.