![]()
USER MANUAL
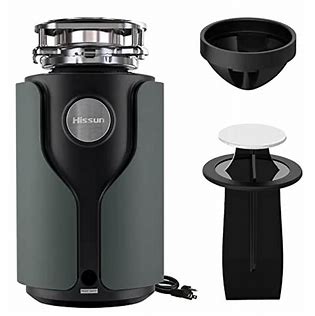
FOOD WASTE DISPOSER
MODEL NO.:
FCD-713A,CD-714A,FCD-910A,FCD-1010A
FOOD WASTE DISPOSER INSTALLATION, CARE and USE MANUAL
Read through the entire Installation, Care & Use manual before installing the disposer. Determine which of the tools, materials, and accessories you will need before you begin. Make sure you have all necessary disposer parts before installing the disposer.
NOTE: The Evolution models grind much finer than any other disposer. For this reason, you may notice that it take sal ittle longer to grind some food waste.
NOTE: Make sure that the installation of this appliance is allowed by the authorities.
TOOLS & MATERIALS YOU WILL NEED:
Slotted Screwdriver. Adjustable Pliers, Electrical Tape
TOOLS, MATERIALS. AND ACCESSORIES YOU MAY NEED:
Phillips Screwdriver, Drain Auger. 9.5 mm Electrical Clamp, Wire Nuts (2), Safety Glasses, Hammer, Hacksaw,
Water Hose Clamp, Pipe Wrench, Copper Earth Wire, Dishwasher Drain Connection Kit, Electrical On/Off Switch, Drain Tube Extension
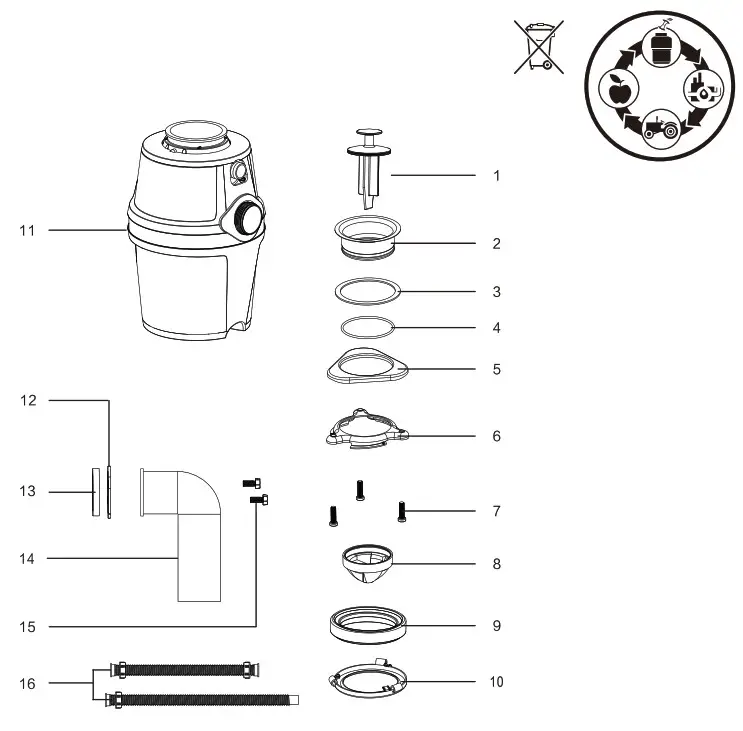
PARTS LIST
| MOUNTING ASSEMBLY
1.Multifunctional sink plug |
1. Lower Mounting Ring 2. Model 3.Drainpipe Gland 4.Rubber Gasket 5.Drainpipe 6.Screw(2) 7. Drainage Hose ASM |
 DANGER
Danger indicates an imminently hazardous situation which, if not avoided, will result in death or serious injury.
 WARNING
Warning indicates a potentially hazardous situation which, if not avoided, could result in death or serious injury.
CAUTION
Caution indicated a potentially hazardous situation, which, if not avoided, may result in minor or moderate injury.
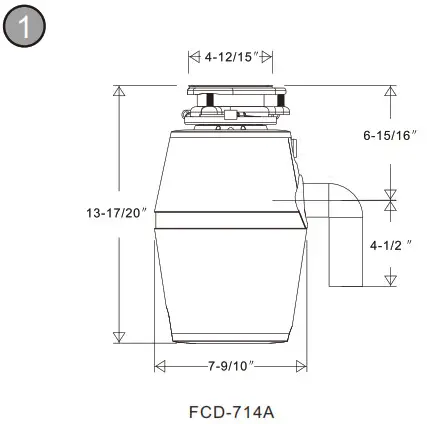
CHECK INSTALLATION DIMENSIONS
 |
 |
- Disposer Height
- Distance from bottom of sink bowl to the centerline of discharge outlet. (Add 12 mm when stainless steel sink is used.)
- Distance from the centerline of the discharge outlet to end of the discharge tube.
- Disposer Width
- Distance from disposer vertical centerline to centerline of trap connection.
DISCONNECT SINK DRAIN
CAUTION
PERSONAL INJURY
To properly drain and prevent standing water in the disposer, the waste pipe entering the wall must be lower than the disposer discharge outlet.
Wearing safety glasses is recommended during the installation of the food waste disposer.
- Loosen nut (1) at top of trap (4) with pipe wrench (see Figure 2.1).
- Loosen nut (2) at top of extension pipe. Remove extension pipe.
- Loosen nut (3) at base of the sink flange.
- Push sink flange up through sinkhole and remove it (see Figure 2.2).
- Clean sink flange area of any putty or other debris.
DISASSEMBLE NEW DISPOSER MOUNTING ASSEMBLY

- Use a screwdriver to pry the mounting ring off of the sink flange.
- Turn the mounting assembly over (see Figure 3.1) and loosen three mounting screws (1) Mounting assembly will now come apart.
Reference Figure in Instruction 1 for part identification of items in Figure 4.1.
- Place one of two rubber gaskets (3) under sink flange (2). Ensure sinkhole area is clear of debris and place sink flange/gasket into a sinkhole. You may wish to place a weighted object in the sink to hold the sink flange in place. (Place a towel under the object to prevent scratching.)
- Working under the sink, slip second rubber gasket (3), fiber gasket (4), and metal backup ring (5) (flat side up) over the sink flange.
- Holding second rubber gasket, fiber gasket, and metal backup ring in place, slip mounting ring (6) over sink flange so it seats against the backup ring.
- With the rubber gasket. fiber gasket, backup ring, and mounting ring tight against sink bottom turn the mounting ring until it can be fixed in the backup ring.
- Tighten three mounting screws (7) up to sink until the mounting assembly is seated tightly and evenly against the sink.
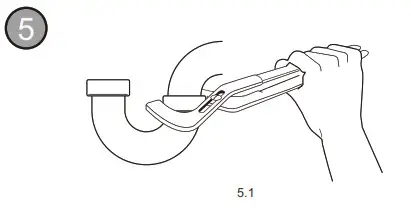
CLEAN SINK WASTE PIPE
Failure to clean sink waste pipelines may result in waste pipe blockage.
- Remove trap. (See Figure 5.1)
- With drain auger, clear away all hardened waste material in horizontal drain line running from drain trap to the main pipe.
IF YOU ARE NOT CONNECTING A DISHWASHER TO A DISPOSER, SKIP AHEAD TO INSTRUCTION 7.
DISHWASHER ATTACHMENT AND OVERFLOW CONNECTION
Wastewater from a dishwasher can be plumbed into the disposer through the inlet access on the upper part of the disposer. There is a plug on the inside of the inlet tube on all models. Once removed, the knockout plug cannot be replaced.
NOTE: If the dishwasher connection is made without removing the plug, the dishwasher may overflow. (Connections must comply with local plumbing codes.)
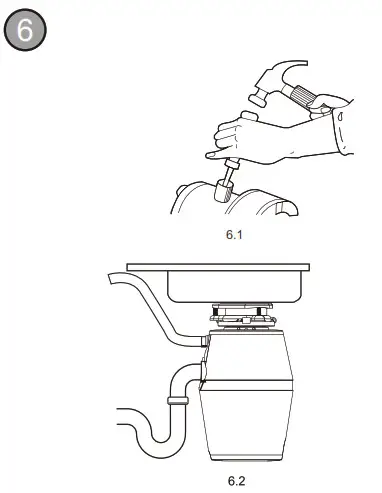
REMOVE KNOCKOUT PLUG
- Lay disposer on its side and insert a screwdriver into dishwasher inlet so tip rests on the outer edge of the knockout plug.
- Tap the end of the screwdriver handle with a hammer until molded plug breaks loose (see Figure 6.1).
- Remove loose knockout plug from the inside disposer. If you have a sink overflow, it should be connected to the overflow inlet on the tailpipe (see Figure 6.2).
CONNECT DISPOSERT OM COUNTING ASSEMBLY
 |
 |
CAUTION
PERSONAL INJURY
To avoid personal injury, do not position your head or body under the disposer; the unit could fall during installation.
Clear any objects from inside the disposer grind chamber before mounting the disposer to the sink.
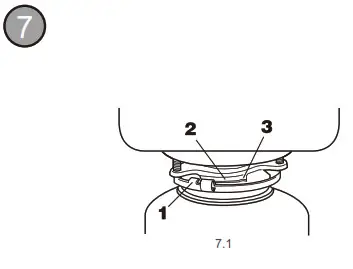
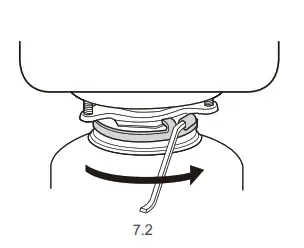
- Position disposer with three mounting tabs (1) aligned in position to slide over mounting tracks (2). (See Figure 7.1)
- Lift disposer, insert top end (mounting gasket) into the mounting assembly and turn the lower mounting ring to the right (with wrenchette or adjustable pliers) until mounting tabs lock over ridges (3) on mounting ring tracks (see Figure 7.2). Make sure all three mounting tabs are locked over ridges. The disposer will now hang by itself.
- Run water into sink, then check for leaks.
ATTACH DISCHARGE TUBE TO WASTE DRAIN PIPE

CAUTION
PROPERTY DAMAGE
- Wearing safety glasses is recommended during the installation of the food waste disposer.
- Do not use plumber’s putty on any other disposer connection other than on the sink flange. Do not use thread sealants or pipe dope. These may harm disposer and cause property damage.
- Regularly inspect disposer and plumbing fittings for water leaks, as water leaks can cause property damage. The manufacturer cannot be held responsible for property damage as a result of water leaks.
DISCHARGE TUBE INSTALLATION
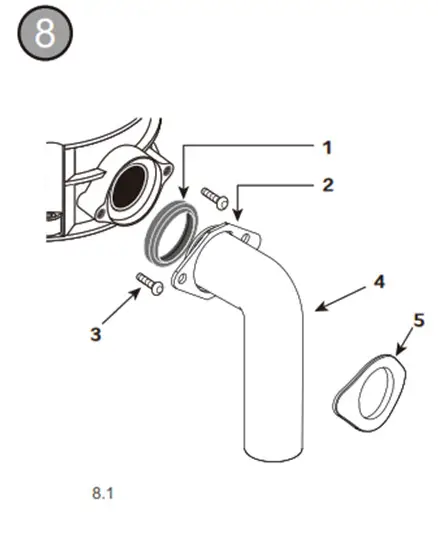
- Place metal flange (2) over-discharge tube (4). Insert rubber gasket (1) with gasket lip facing the metal flange into the discharge tube. (See Figure 8.1)
- Secure metal flange and discharge tube to disposer with two 13 mm bolts (3).
- Put the rubber plug (5) on the housing through the drain pipe. (Only FCD-714A have rubber plug(5)) ALL DISPOSERS CONTINUE WITH STEPS 3-6
- Rotate disposer so that discharge tube is aligned with drain trap. (To prevent leaks, do not pull or bend discharge tube to drain trap.) If the discharge tube is too short, you can purchase an extension from the hardware store. (Disposer must remain in a vertical position to prevent vibration.)
- Place nut, then ferrule on discharge tube (not supplied) and tighten on drain trap. (If you have a double sink, use separate drain traps for both sides of the sink.)
- Ensure the lower mounting ring is still securely locked over ridges on the mounting flange.
- Place stopper in sink in close position. Fill the sink with water, remove the stopper and check for leaks.
CONNECT DISPOSER TO ELECTRICAL SUPPLY

DANGER
ELECTRICAL SHOCK
- To avoid electrical shock, disconnect power before installing or servicing the disposer.
- If you are not thoroughly familiar with electric power, contact a
qualified electrician to connect the disposer to an electrical circuit. - If a three-prong, earth (grounded) plug is used, plug must be inserted into a three-hole, earth (grounded) receptacle.
- Do not modify plug provided with the unit (if applicable).
- Improper connection of equipment earth (grounded) conductor can result in electric shock.
- All wiring must comply with local electrical codes.
- Do not attach earth wire (ground wire) to the gas supply pipe.
- Do not reconnect electrical current at the main service panel until proper earth (grounded) outlets are installed.
- If the supply cord is damaged, it must be replaced by the manufacturer, its service agent or similarly qualified persons in order to avoid a hazard.
NOTE: You must have access to earth (grounded) wall socket. Any additional socket should be fitted by a qualified electrician and properly earthed (grounded). The disposer is fitted with a molded plug and cable
WARRANTY TERMS
This warranty is for a period of 6 years against manufacturing defects
from the date of original purchase, subject to the following terms and conditions.
- The Warranty card is to be completed, signed by the dealer immediately on purchase.
- The Waste disposer is to be installed by its Authorized Service person and serviced by the Company Regional Service Centre or authorized service Centre only.
- The Customer shall carry the Waste disposer to the nearest Company Regional Service Centre or Authorized Service Centre or purchased Dealer point as his/her own cost and risk.
- The company shall make all endeavors/ attempts to carry out the service/replacement under this warranty at the earliest, but shall not be obliged to do so within any specified time.
- The warranty will continue and remain in force only for the unexpired period of the original warranty, in regards to the Repair/Replacement of parts of the Waste Disposer.
- The Waste Disposer shall be used strictly for domestic purpose in accordance with the user’s manual.
- The Company shall not be held liable for any accident, loss or damage(direct or indirect)
To person or property caused by reason of: Installation/Repair/Service attended by an unauthorized service person.
Overloading/Misuse/abuse and negligence on the part of the person using the Waste Disposer.
Defects causes by improper/reckless fittings and usages.
Use of chemicals, spurious spares or old, non-genuine spares .
Failure to company with any safety precaution or maintenance tip suggested byte company Original serial number is deleted/defected or altered.
In case the warranty is void die to any of The reasons listed above, the customer shall be liable to pay the cost of all the spares and service charges. - The warranty does not cover damages due to negligence mishandling, breakage of glass/Abs body, dents of body and breakage/fuse of lighting parts.
- The company shall not be responsible for any special consequential damages or bss arising directly or indirectly for any delay in the performance of this warranty.
- The company reserves The right to retain any part or component at the regional service centre/branches or authorized service centre or at its workshop and shall effect repairs/ replacement of parts or components at its sole discretion.
- This warranty shall not in any case extent towards payment or any monetary consideration whatsoever and shall be limited to The product replacement only.
- Electrical appliances are prone to voltage fluctuation risks, therefore precaution should be taken before every use. The company shall not be responsible for any damage to electrical parts viz. coil, motor, etc. arising out of this problem.
- The decision of the company is final in all cases of complaints.
- The company will not be responsible for delay in service of the appliance or complaint resolution if it is due to reasons beyond its control.
- These products are not for use by children. The company is not liable for any damages or physical injury arising out of improper use, modification or alteration of the product or clue to unauthorized spares use and poor maintenance of this product.
- The Labour charges shall be payable by the customer after 12 months from the date of purchase.
- What we will charge or not covered during the warranty period:-Reinstallation or service trips to your home to teach how to use the product. Incidental or consequential damage caused by possible defects with this appliance. Failure of the product if it is abused, misused, or used for other than the intended purpose or used commercially. Replacement of house fuses or resetting of circuit breakers. Product not accessible to provide required service.
WARRANTY CARD
| NAME OF DEALER | |
| BILL NO: & DATE | |
| PRODUCT & MODEL NAME | |
| CUSTOMERS NAME | |
| ADDRESS &TEL NOS | |
| DEALERS ADDRESS & STAMP |
|
| INSTALLED BY NAME | |
| INSTALLED DATE & REG.NO |
AIR SWITCH INSTALLATION
- Drill a 28 mm wide hole into the kitchen worktop, or the corner of the sink unit, at the most convenient point for use. Some sink units may already have a suitable hole in them which can be exposed by removing the cap.
- Remove the nut from the push button bellows, while keeping the stainless steel washer and rubber gasket in place. Push one end of the PVC tubing onto the spout of the push button bellows, feed the other end of the tube through the hole in the worktop and through the nut underneath the work (See Figure 9.2)
- Fit the push button bellows in the hole and then screw up the nut underneath the worktop until it is hand tight not use a wrench to tighten the nut. (See Figure 9.3)
- Take the other end of the air tube and firmly push it over the spout of the air switch, which is located on the underside of the waste disposer.
TROUBLESHOOTING TIPS
| Problem | Possible Causes | What To Do |
| Loud noises (other than those during grinding of bonesandfruitpits) | Silverware, bottle cap or other foreign object has fallen into the | • Remove the splash guard and remove the object with long-handled tongs. Replace the splash guard. |
| Disposer does not start | Reset button has been tripped.
|
• With the splash guard removed, check to see if the turntable will move freely using a broom handle. If the turntable moves freely, replace the splash guard and check the reset button to see if it has been tripped. The reset button is red and located opposite the discharge elbow, near the bottom of the disposer. Push the button in until it clicks and remains depressed. If the reset button has not been tripped, check for a shorted or broken wire connecting to the disposer. Check the electrical power switch, fuse box or circuit breaker. If wiring and electrical components are intact, the unit may have internal problems that |
| The turntable can not rotate.
|
• If the turntable does not turn freely, check for an object lodged between the turntable and the grind ring. Dislodge the object by moving the turntable with a broom handle. Then remove the object.
• If no foreign object is present, there may be internal problems. |

Disposer leaks
If the leak is at the top, it may be caused by:
- Improper seating of sink flange (gasket choice, putty or tightening).
- The support ring is not tightened properly.
- Defective cushion mount. If the leak is at the discharge elbow, the leak may be caused by improper tightening of elbow flange screws.