Hitachi LCD Projector User Manual

Thank you for purchasing this product. This is the basic manual on the product. Visit our website to get the detailed manuals and the latest information on the product. Check them before using the product, for safe use and utilization of the product.
Our website: http://www.hitachi-america.us/projectors
http://www.hitachidigitalmedia.com
https://estadoc.hitachi.eu/index.htm
http://www.hitachiconsumer.com.sg
![]() WARNING ▶Before using this product, be sure to read all manuals for this product. After reading them, store them in a safe place for future reference.
WARNING ▶Before using this product, be sure to read all manuals for this product. After reading them, store them in a safe place for future reference.
▶ Heed all the warnings and cautions in the manuals or on the product ‘
▶ Follow all the instructions in the manuals or on the product.
NOTE • In this manual, unless any comments are accompanied, “the manuals’ means all the documents provided with this product, and means this projector and all the accessories came with the projector;
First of all
Entries and graphical symbols explanation
The following entries and graphical symbols are used for the manuals and the product as follows, for safety purpose. Please know their meanings beforehand, and heed them.
![]() WARNING This entry warns of a risk of serious personal injury or even death.
WARNING This entry warns of a risk of serious personal injury or even death.
![]() CAUTION This entry warns of a risk of personal injury or physical damage.
CAUTION This entry warns of a risk of personal injury or physical damage.
NOTICE This entry notices of fear of causing trouble.
Important safety instruction
The following are important instruction for safely using the product. Be sure to follow them always when handling the product. The manufacturer assumes no responsibility for any damage caused by mishandling that is beyond normal usage defined in these manuals of this projector.
Regulatory notices
About Electro-Magnetic Interference
In CANADA
CAN ICES-3(B)/NMB-3(B)
In the US, and other places where the FCC regulations are applicable
Declaration of Conformity
Trade name HITACHI
Model Number LP-AW4001/LP-AW30001/LP-AX3001
Responsible Party Hitachi America, Ltd.
Address 2420 Fenton Street, Suite 200 Chula Vista, CA 91914 U.S.A.
Telephone Number +1 -800-448-2244
This device complies with part 15 of the FCC Rules. Operation is subject to the following two conditions: (1) This device may not cause harmful
interference, and (2) this device must accept any interference received,
including interference that may cause undesired operation. This equipment
has been tested and found to comply wit the limits for a class B digital device, pursuant to Part 15 of the FCC Rules.
These limits are designed to provide reasonable protection against harmful interference in a residential installation. This equipment generates, uses, and can radiate radio frequency energy and, if not installed and used in accordance with the instructions, may cause harmful interference to radio communications. However, there is no guarantee that interference will not occur in a particular installation. If this equipment does cause harmful interference to radio or television reception, which can be determined by turning the equipment off and on, the user is encouraged to try to correct the interference by one or more of the following measures:
– Reorient or relocate the receiving antenna.
– Increase the separation between the equipment and receiver.
– Connect the equipment into an outlet on a circuit different from that to which the receiver is connected.
– Consult the dealer or an experienced radio/TV technician for help.
INSTRUCTIONS TO USERS: This equipment complies with the requirements of FCC (Federal Communication Commission) equipment provided that the following conditions are met. Some cables have to be used with the core set. Use the accessory cable or a designated-type cable for the connection. For cables that have a core only at one end, connect the core to the projector.
CAUTION: Changes or modifications not expressly approved by the party responsible for compliance could void the user’s authority to operate the equipment.
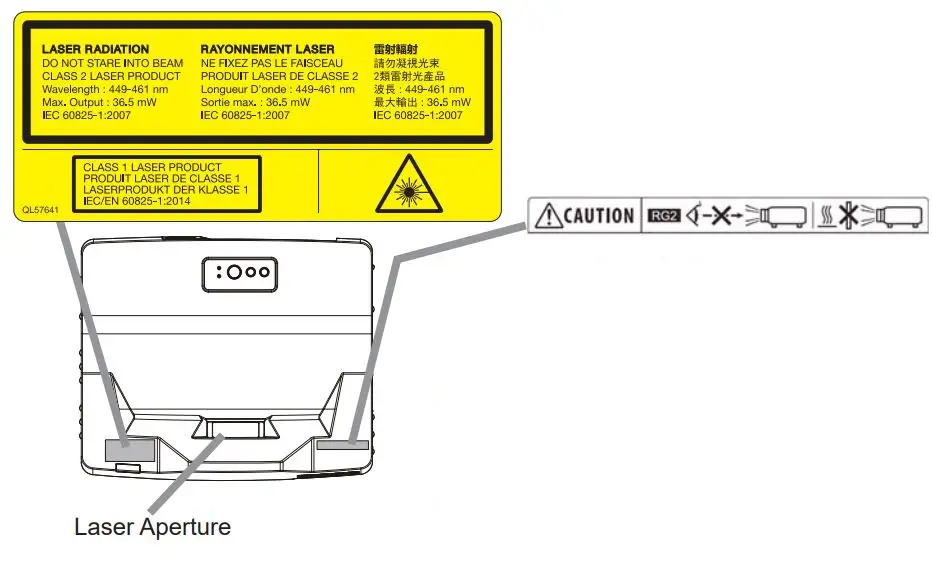
Product label
The position of the label is shown in the drawing below.

As with any bright source, do not stare into the direct beam, RG2 IEC 62471-5:2015.
Laser evaluation standard:
IEC60825-1: 2007, IEC60825-1: 2014,
EN60825-1: 2014
LP-AW4001:
Internal Laser Specifications
Max. Output: 95W
Wave Length: 449 – 461nm
LP-AW3001/LP-AX3001:
Internal Laser Specifications
Max. Output 71 W
Wave Length: 449 – 461nm
- This projector is classified as a class 1 laser product that complies with IEC60825-1 :2014 and JIS C 68022014, and as a class 2 laser product that complies with IEC60825-1 :2007. Improper handling may cause injury. Be careful of the following.
- If an abnormality occurs in the projector, turn it off immediately, unplug the power cord from the outlet, and consult your dealer or service company. If you continue to use it, it may cause not only electric shock or fire but also vision disorder.
- Do not disassemble or modify the projector. The projector has a high-power laser device inside. It may cause serious injury.
- Do not look into the beam while projecting an image. Do not look into the lens through optical devices such as magnifiers or telescopes. It may cause vision disorder.
- Make sure that nobody is looking into the lens when you turn on the projector by remote control away from the projector.
- Do not let children operate the projector. If children could possibly operate the projector, they must be accompanied by an adult.
- Do not expose optical devices such as magnifiers or reflection mirrors to a projected image. It may cause bad effects on the human body if you continue to use it. It may also cause fire or accidents.
- Do not disassemble the projector when you dispose Of it. Dispose Of it according to laws and regulations of each country or region.
![]() CAUTION ▶ Use of controls or adjustments or performance or procedures other than those specified herein may result in hazardous radiation exposure.
CAUTION ▶ Use of controls or adjustments or performance or procedures other than those specified herein may result in hazardous radiation exposure.
Disposal of Old Equipment and Batteries Only for European Union and countries with recycling systems
![]() The above mark is in compliance with the Waste Electrical and Electronic Equipment Directive 2021/19/EU (WEEE). the mark indicators the requirement NOT to dispose the equipment including any spent or discarded batteries as unsorted municipal waste, but use the return and collection systems available. If the batteries or accumulators included with this equipment display the chemical symbol Hg, Cd, or Pb, then it means that the battery has a heavy metal content of more than 0.0005% Mercury, or more than 0.002% Cadmium or more than 0.004% Lead.
The above mark is in compliance with the Waste Electrical and Electronic Equipment Directive 2021/19/EU (WEEE). the mark indicators the requirement NOT to dispose the equipment including any spent or discarded batteries as unsorted municipal waste, but use the return and collection systems available. If the batteries or accumulators included with this equipment display the chemical symbol Hg, Cd, or Pb, then it means that the battery has a heavy metal content of more than 0.0005% Mercury, or more than 0.002% Cadmium or more than 0.004% Lead.
![]() Note for the battery symbol (bottom symbol): This symbol might be used in combination with a chemical symbol. In this case it complies with the requirement set by the Directive for the chemical involved.
Note for the battery symbol (bottom symbol): This symbol might be used in combination with a chemical symbol. In this case it complies with the requirement set by the Directive for the chemical involved.
Contents of package
Your projector should come with the items shown below. Check that all the items are included. Contact your dealer immediately if any items are missing. Refer to figure F-7 at the back of this manual.
(1) Remote control with two AA batteries
(2) Power cord
(3) Computer cable
(4) User’s manual *
(5) Security label
(6) Adapter cover
(7) Hook metal
(8) Screw
(9) HDMI cable holder (x2)
(10) Cable tie – large (x1)
(11) Cable tie – medium (x2)
(12) Cable tie – small (x1)
(13) Ferrite Core
* The accessory book “User’s Manual (concise)” is a basic manual. Read the detailed manuals (Operating Guide etc.) from our website.
![]() WARNING▶ Do not attempt to install the projector yourself. Have your dealer or service center handle all installation work. Note that manufacturer will accept no liability whatsoever for accidents or injuries resulting from an incorrect installation or improper use.
WARNING▶ Do not attempt to install the projector yourself. Have your dealer or service center handle all installation work. Note that manufacturer will accept no liability whatsoever for accidents or injuries resulting from an incorrect installation or improper use.
![]() CAUTION▶ If the disc comes with this product, use it in a computer disc drive. Never insert the disc into a non-computer disc drive. Inserting the disc into an incompatible disc drive may produce a loud noise and result in ear and speaker damage.
CAUTION▶ If the disc comes with this product, use it in a computer disc drive. Never insert the disc into a non-computer disc drive. Inserting the disc into an incompatible disc drive may produce a loud noise and result in ear and speaker damage.
NOTE • Keep the original packing materials for future reshipment. Be sure to use the original packing materials when moving the projector. use special caution for the lens.
Arrangement
Refer to tables T-1 and T-2 anG¿JXUHVF-1 and F-2 at the end of this manual to determine the screen size and projection distance. The values shown in the table are calculated for a full size screen.
(a) Screen size (diagonal) (b1) , (b2) Projection distance (±8%) (c1) , (c2) Screen height (±8%)
Connecting with your devices
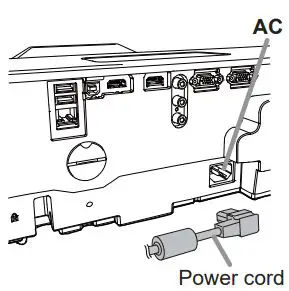
Connecting to a power supply
1. Put the connector of the power cord into the AC (AC inlet) of the projector.
2. Firmly plug the power cord’s plug into the outlet. In a couple of seconds after the power supply connection, the POWER/STATUS1 indicator will light up in steady orange.
Please remember that when the DIRECT POWER ON function is activated, the connection of the power supply makes the projector turn on. When the AUTO POWER ON function is activated and the projector is receiving an input signal, it is turned on by connecting to the power supply.
![]() WARNING ▶ Please use extra caution when connecting the power cord, as incorrect or faulty connections may result in fire and/or electrical shock.
WARNING ▶ Please use extra caution when connecting the power cord, as incorrect or faulty connections may result in fire and/or electrical shock.
- Do not touch the power cord with a wet hand.
- Only use the power cord that came with the projector. If it is damaged, consult your dealer to get a new one. Never modify the power cord.
- Only plug the power cord into an outlet whose voltage is matched to the power cord. The power outlet should be close to the projector and easily accessible. Unplug the power cord for complete disconnection.
- Do not distribute the power supply to multiple devices. Doing so may overload the outlet and connectors, loosen the connection, or result in fire, electric shock or other accidents.
- Do not press the main body of projector on the power cord.
- Connect the ground terminal for the AC inlet of this unit to the ground terminal of the building using an appropriate power cord (bundled).
NOTICE ▶ This product is also designed for IT power systems with a phase- to-phase voltage of 220 to 240 V.
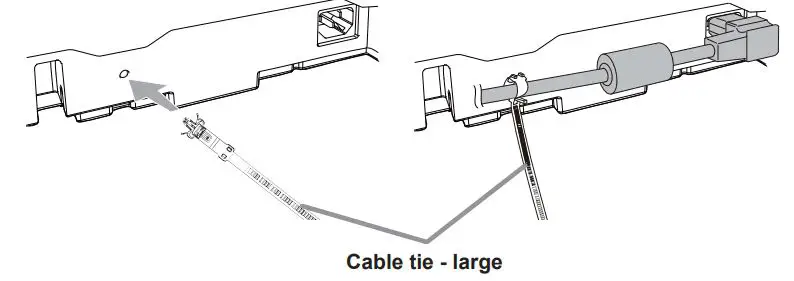
Fastening the cable
Use the supplied cable tie to fasten the cable.
Preparing for the remote control
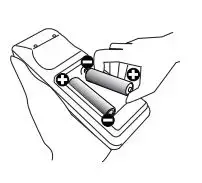
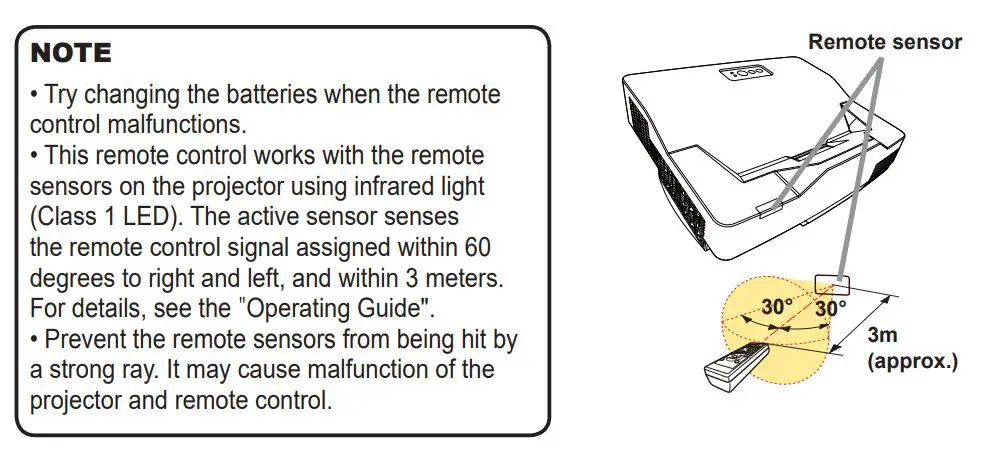
Please insert the batteries into the remote control before using it. If the remote control starts to malfunction, try to replace the batteries. If you will not use the remote control for long period, remove the batteries from the remote control and store them in a safe place.
1. Remove the battery cover.
2. Align and insert the two AA batteries (Use the appropriate AA carbon-zinc or alkaline batteries (non-rechargeable) in accordance with laws and regulations.) according to their plus and minus terminals as indicated in the remote control.
3. Put the battery cover back to the former state.
Turning on the power
1. Make sure that the power cord is firmly and correctly connected to the projector and the outlet.
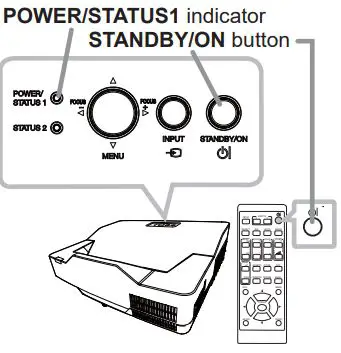
2. Make sure that the POWER/STATUS1 indicator is steady orange.
3. Press the STANDBY/ON button on the projector or the remote control. The projection light source will light up, and the POWER/STATUS1 indicator will begin blinking in green. When the power is completely on, the indicator will stop blinking and light in steady green.
![]() WARNING▶ Never look into the projection window while the projection light source is on, since the projection ray may cause a trouble on your eyes.
WARNING▶ Never look into the projection window while the projection light source is on, since the projection ray may cause a trouble on your eyes.
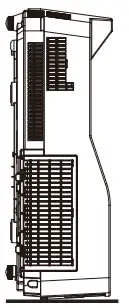
▶ Do not place the projector vertically as shown in the figure on the right. It could cause malfunction or injury. If you install the projector vertically on a table or desk, be sure to use the designated optional accessories.
▶ The projection window of this machine is made of glass. It can be damaged by excessive force or an impact. Read the following important warnings carefully, and follow them for your own safety.
- Do not apply excessive force on or allow impact to the projection window.
- Keep the projector out of the reach of children.
- If the projection window is broken, the projected image will be distorted. Never touch a broken projection window, and contact your dealer.
NOTE
• Please power on the projector prior to the connected devices.
• The projector has the DIRECT POWER ON function, which can make the projector automatically turn on. For more information, see the “Operating Guide”.
Adjusting the projector’s elevator
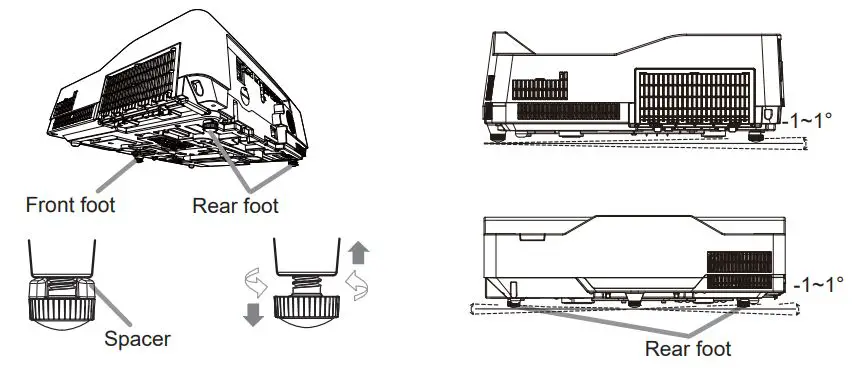
The projector has 2 Rear feet for adjusting the horizontal position and inclination. You can use the projector as it is with attached Spacers of Rear feet. You can make more precise adjustments by detaching the spacers and turning the Rear feet.
![]() WARNING▶ Keep the spacers away from children and pets. Be careful not to let them swallow the spacers. If swallowed, consult a physician immediately for emergency treatment.
WARNING▶ Keep the spacers away from children and pets. Be careful not to let them swallow the spacers. If swallowed, consult a physician immediately for emergency treatment.
NOTE • The adjustment angle can be adjusted up to plus or minus 1° each of foot. • You can attach the spacers to set the projector back to the factory default after adjusting the foot. If you install the projector in a different place in the future, it is recommended to keep the spacers and reuse them.
Operation
Displaying and switching the image
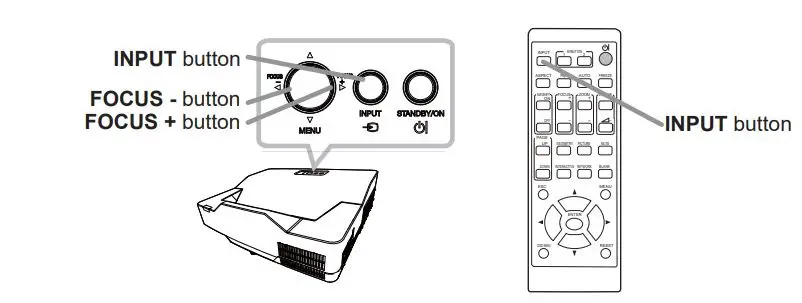
Press the INPUT button on the projector or the remote control. Select a desirable input referring to the displayed input list. (continued on next page)
Focusing
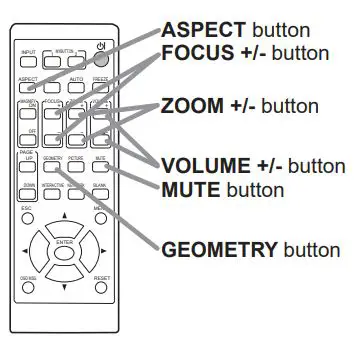
Use the FOCUS + and FOCUS – buttons on the projector or remote control to adjust the screen focus.
Selecting an aspect ratio
Each time you press the ASPECT button on the remote control, it switches the aspect ratio of the image in turn.
Zooming
Use the ZOOM + and ZOOM – buttons on the remote control to adjust the screen size.

Correcting distortion
Press the GEOMETRY button on the remote control. A dialog will appear on the screen to aid you in correcting the distortion. Use the ▲/▼ cursor buttons to select, KEYSTONE or PERFECT FIT operation, and press the ▶ button to perform the following.
KEYSTONE dialog for keystone correction.
PERFECT FIT displays a dialog for adjusting the shape of the projected image in each of the corners and sides. Use the cursor buttons according to the dialog, checking the image. Press the GEOMETRY button again to finish this operation.
Adjusting the volume
Use the VOLUME +- buttons to adjust the volume. To turn off the sound, press the MUTE button on the remote control.
![]() WARNING ▶ If you wish to have a blank screen while the light source is on, use the BLANK function (see the Operating Guide). Any other method of blocking the projection light, such as attaching something to the projection window or placing something in front of the projection window, may cause the damage to the projector. Blocking the beam by something causes high temperature and could result in fire or smoke.
WARNING ▶ If you wish to have a blank screen while the light source is on, use the BLANK function (see the Operating Guide). Any other method of blocking the projection light, such as attaching something to the projection window or placing something in front of the projection window, may cause the damage to the projector. Blocking the beam by something causes high temperature and could result in fire or smoke.
NOTE
- The ASPECT button does not work when no proper signal is input
- For details, see the “Operating Guide”.
- There may be some noise and/or the screen may flicker for a moment when an operation is made. This is not a malfunction.
Turning off the power
1. Press the STANDBY/ON button on the projector or the remote control. The message Power Off? will appear on the screen for about 5 seconds.
2. Press the STANDBY/ON button again while the message appears. The light source will go off, and the POWER/ STATUS1 indicator will begin blinking in orange. Then the POWER/STATUS1 indicator will stop blinking and light in steady orange when the light source cooling is completed.

![]() WARNING ▶Do not touch around the exhaust vents during use or just after use, since it is too hot.
WARNING ▶Do not touch around the exhaust vents during use or just after use, since it is too hot.
▶ Unplug the power cord for complete disconnection. The power outlet should be close to the projector and easily accessible.
NOTE
- Please power off the projector after any connected devices are powered off.
- This projector has the AUTO POWER OFF function that can make the projector turn off automatically. For more information, see the “Operating Guide”.
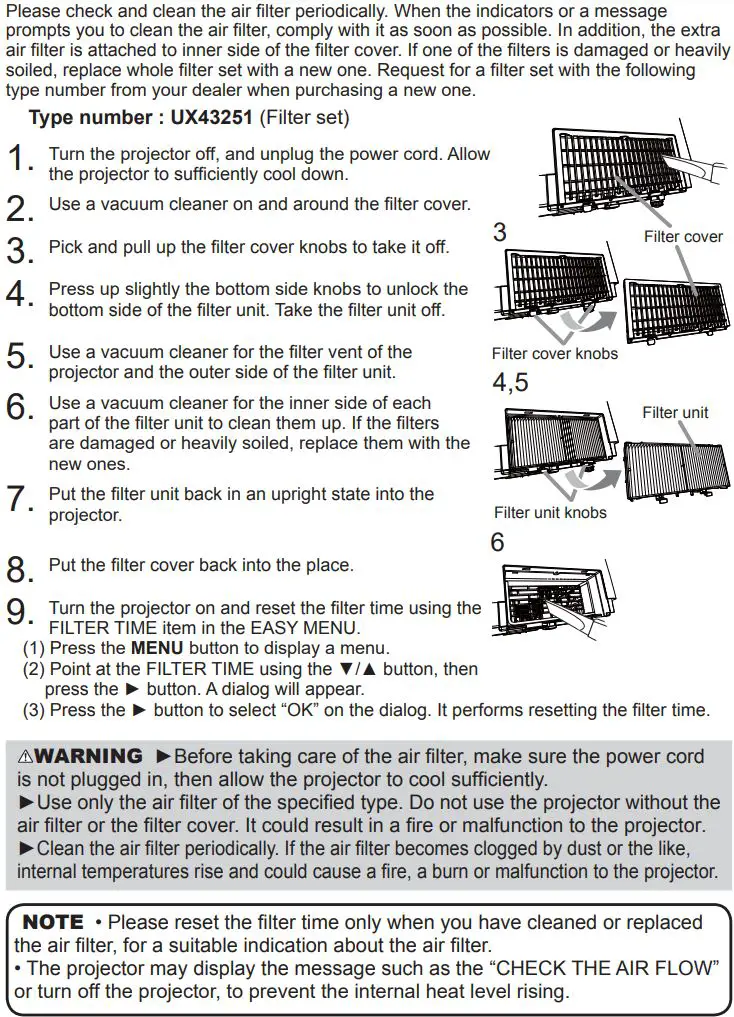
Cleaning and Replacing the air Filter
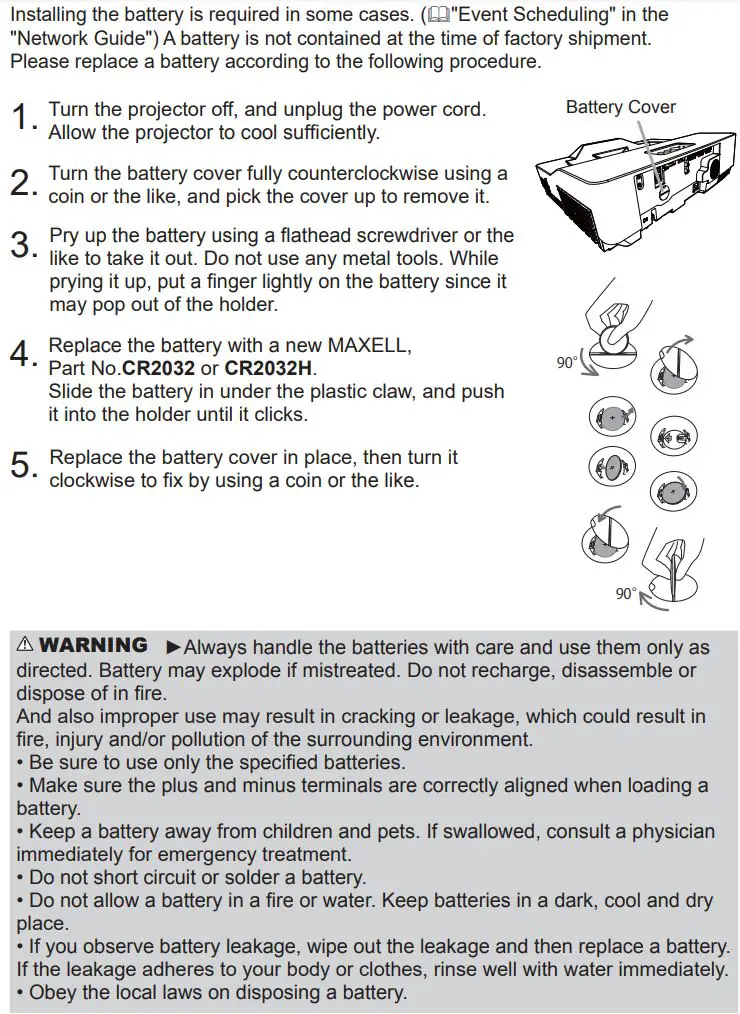
Replacing the internal clock battery

Caring for the projection window

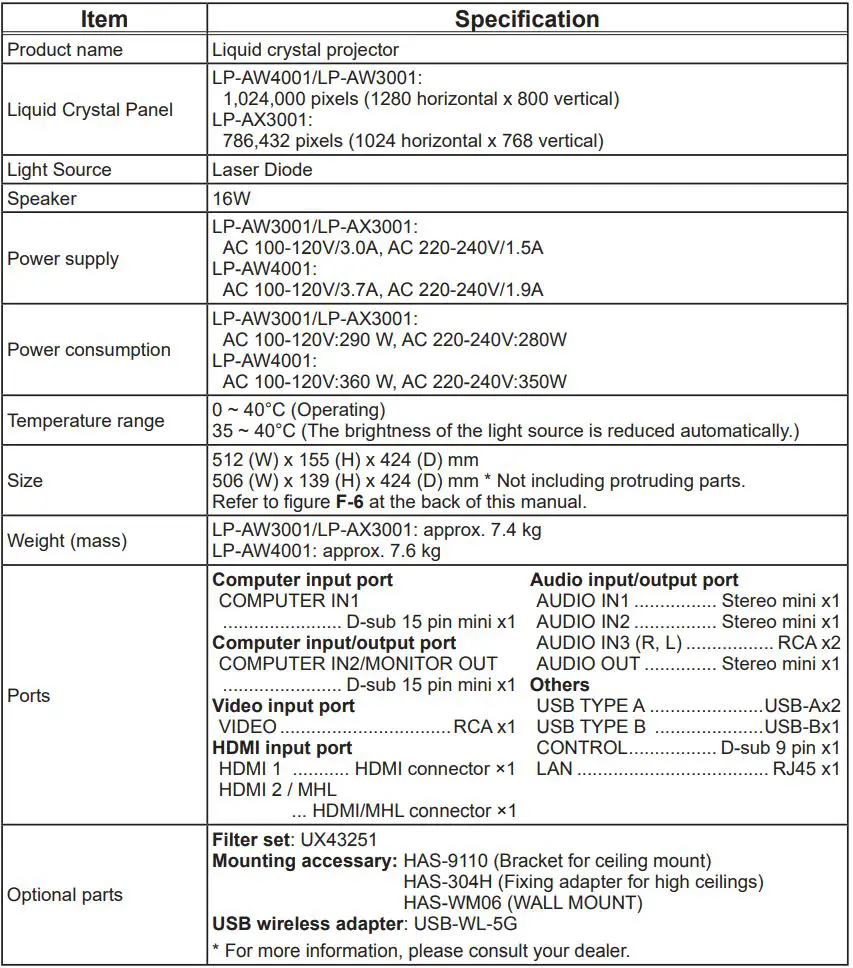
Specifications

Troubleshooting – Warranty and after-service
If an abnormal operation (such as smoke, strange odor or excessive sound) should occur, stop using the projector immediately. Otherwise if a problem occurs with the projector, first refer to “Troubleshooting” of “Operating Guide” and “Network Guide”, and run through the suggested checks. If this does not resolve the problem, please consult your dealer or service company. They will tell you what warranty condition is applied. Check our website where you may find the latest information for this product. (LAI)
NOTE
- The information in this manual is subject to change without notice.
- The illustrations in this manual are for illustrative purposes. They may differ slightly from your projector.
- The manufacturer assumes no responsibility for any errors that may appear in this manual.
- The reproduction, transfer or copy of all or any part of this document is not permitted without express written consent.
Manufacturing year and month
The manufacturing year and month of this projector is indicated as follows in the
serial number of the rating label on the projector.

End User License Agreement for the Product Software
End User License Agreement for the Product Software Software in the product consists of the plural number of independent software modules and there exist our copyright and/or third party copyrights for each of such software modules. The product also uses software modules that we have developed and/or produced. And there exist our copyright and intellectual property for each of such software and related items including but not limited to the software related documents. These rights above are protected by copyright law and other applicable laws. And the product uses software modules licensed as Freeware upon GNU GENERAL PUBLIC LICENSE Version 2 and GNU LESSER GENERAL PUBLIC LICENSE Version 2.1 established by Free Software Foundation, Inc. (U.S.) or license agreements for each software. Refer to the following web page for license agreements for such software modules and other software.
Our website: http://www.hitachiconsumer.com.sg
Contact dealer in your region for inquiry regarding licensed software. Refer to license agreements of each software on the web page for detail of the license conditions and so on. (The original in English is carried since the license agreement is established by third party other than us.) Because the program (the software module) is licensed free of charge, the program is provided “as is” without warranty of any kind, either expressed or implied, to the extent permitted by applicable law. And we do not take any responsibility or compensate for loss of any kind (including but not limited to loss of data, loss of accuracy or loss of compatibility with interface between other programs) by the software conceded and/or use of the software concerned to the extent permitted by applicable law.
Trademark acknowledgment
- HDMI, the HDMI logo and High-Definition Multimedia Interface are trademarks or registered trademarks of HDMI Licensing LLC in the United States and other countries.
- MHL@, the MHL logo, and Mobile High-Definition Link are trademarks or registered trademarks of MHL, LLC in the United States and other countries.
- Blu-ray Disc™ and Blu-ray™ are trademarks of Blu-ray Disc Association. All other trademarks are the properties of their respective owners.
