
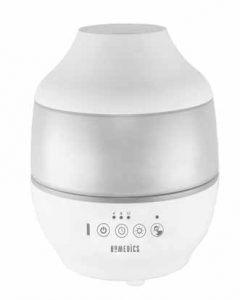
Homedics UHE-CM18 Total Comfort Ultrasonic Humidifier
PLEASE TAKE A MOMENT NOW REGISTER YOUR PRODUCT AT: www.homedics.com/register Your valuable input regarding this product will help us create the products you will want in the future.
2-YEAR LIMITED WARRANTY
IMPORTANT SAFETY INSTRUCTIONS
WHEN USING ELECTRICAL PRODUCTS, BASIC SAFETY PRECAUTIONS SHOULD ALWAYS BE FOLLOWED, INCLUDING THE FOLLOWING:
READ ALL INSTRUCTIONS BEFORE USING.
DANGER – TO REDUCE THE RISK OF ELECTRIC SHOCK:
- Always place humidifier on a firm, flat surface. A waterproof mat or pad is recommended for use under the humidifier. Never place it on a rug or carpet, or on a finished floor that may be damaged by exposure to water or moisture.
- Always unplug the unit from the electrical outlet immediately after using and before cleaning.
- DO NOT reach for a unit that has fallen into water. Unplug it immediately.
- DO NOT place or store the unit where it can fall or be pulled into a tub or sink.
- DO NOT place or drop into water or other liquids.
- DO NOT use water above 86° Fahrenheit.
WARNING – TO REDUCE THE RISK OF BURNS, FIRE, ELECTRIC SHOCK, OR INJURY TO PERSONS:
- Use this unit only for its intended use as described in this manual. Do not use attachments not recommended by HoMedics; specifically, any attachments not provided with this unit.
- NEVER drop or insert any object into any opening.
- DO NOT operate where aerosol (spray) products are being used, or where oxygen is being administered.
- NEVER operate the appliance if it has a damaged cord or plug, if it is not working properly, if it has been dropped or damaged, or dropped into water. Return the appliance to a HoMedics Service Center for examination and repair.
- Always unplug the unit when filling or moving the unit.
- Ensure that your hands are dry when operating the controls or removing the plug.
- NEVER use the humidifier in an environment where explosive gases are present.
- DO NOT place the humidifier near heat sources, such as a stove, and do not expose the humidifier to direct sunlight.
- DO NOT carry this unit by the power cord or use the power cord as a handle.
- To disconnect, turn all controls to the off position, then remove the plug from the outlet.
- CAUTION: All servicing of this humidifier must be performed by authorized HoMedics service personnel only.
SAVE THESE INSTRUCTIONS
CAUTION – PLEASE READ ALL INSTRUCTIONS CAREFULLY BEFORE OPERATING.
- This product is intended for household use only.
- Never cover the unit while it is operating.
- Always keep the cord away from high temperature and fire.
- Perform regular maintenance on the ultrasonic membrane.
- Never use detergent to clean the ultrasonic membrane.
- Never clean the ultrasonic membrane by scraping with a hard object.
- Do not attempt to adjust or repair the unit. Servicing must be performed by professional or
qualified personnel. - Stop using this unit if there is an unusual noise or smell.
- Unplug this unit when not in use for a long period of time.
- Do not touch the water or any parts of the unit that are covered by water while the unit is on or plugged in.
- Never operate without water in the tank.
- Only use water in the tank.
- Never use any additive in the water.
- Keep this unit out of reach of children. Do not allow children to use this unit without supervision.
- DO NOT use outdoors. For indoor use only.
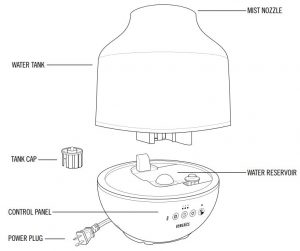
UNIQUE FEATURES & SPECIFICATIONS
ULTRASONIC TECHNOLOGY
This humidifier uses ultrasonic, high-frequency technology to convert water into a fine mist that is dispersed evenly into the air.
MIST OUTPUT SETTINGS
Select low or high mist output.
360° ROTATING MIST NOZZLE
Easily adjust the mist direction.
BUILT-IN TIMER
Programmable timer, up to 12 hours.
7 NIGHTLIGHT COLOR OPTIONS
Choose your favorite or scroll through all the colors.
AUTO SHUT-OFF PROTECTION
When the tank is empty the unit will shut off automatically.
CAPACITY
0.5 gallons – 1.9 liters.
RUNTIME: 25 HOURS
Runtime is calculated based on the low setting. Depending on the natural humidity level in your home, the temperature of water you use, and the mist-level setting you choose, you may experience longer or shorter runtimes.
OIL TRAY
Includes 3 essential oil pads. Use your favorite essential oil to deliver aroma into the air.
CLEAN TRANSDUCER/ULTRASONIC MEMBRANE
A red LED will illuminate above the clean icon, indicating it is time to clean the transducer/ ultrasonic membrane.


Premium Arm Blood Pressure Monitor
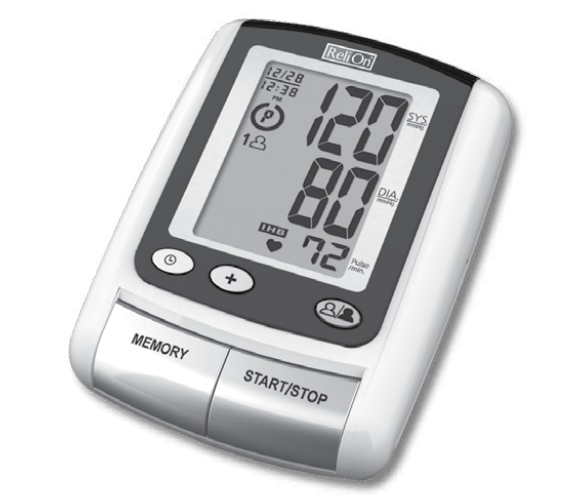
WMTBPA-845
IMPORTANT PRODUCT NOTICES AND SAFETY INSTRUCTIONS
When using your blood pressure monitor, basic precautions should always be followed. Please read and follow all instructions and warnings before using this product. Save these instructions for future reference.
- Please note that this is a home healthcare product only and it is not intended to serve as a substitute for the advice of a physician or medical professional.
- This device uses oscillometric method to measure systolic and diastolic blood pressure, as well as heart rate.
- Do not use this device for diagnosis or treatment of any health problem or disease. Measurement results are for reference only. Consult a healthcare professional for interpretation of pressure measurements. Contact your physician if you have or suspect any medical problem. Do not change your medications without the advice of your physician or healthcare professional.
- Proper cuff size is critical for accurate measurements. Follow the instructions in this manual and printed on the arm cuff to ensure the appropriate size of the cuff is being used.
- This product is not suitable for people with arrhythmias. This device may have difficulty determining the proper blood pressure for pregnant women and for users with an irregular heartbeat, diabetes, poor circulation of blood, kidney problems, or for users who have suffered from a stroke.
- The pulse display is not suitable for checking the frequency of heart pacemakers.
- Electromagnetic interference: The device contains sensitive electronic components. Avoid strong electrical or electromagnetic fields in the direct vicinity of the device (e.g. mobile telephones, microwave ovens). These may lead to temporary impairment of measurement accuracy.
- Use blood pressure monitor only for its intended use.
- Do not wrap the cuff around body parts other than your arm.
- Not for use by or on persons under the age of 18.
- Do not plug or unplug the adapter power cord with wet hands.
- Please use only the AC adapter included with this monitor or 1.5V AA alkaline batteries for the power supply.
Blood pressure measurements determined with this device are equivalent to those obtained by a trained observer using the cuff/stethoscope auscultatory method, within the limits prescribed by the American National Standard, Manual, electronic, or automated sphygmomanometers.
ABOUT BLOOD PRESSURE
What is Blood Pressure?
Blood pressure is the pressure exerted on the artery walls while blood flows through the arteries. The pressure measured when the heart contracts and sends blood out of the heart is systolic (highest) blood pressure. The pressure measured when the heart dilates with blood flowing back into the heart is called diastolic (lowest) blood pressure.
Why Measure Your Blood Pressure?
Among today’s various health problems, those associated with high blood pressure are very common. High blood pressure dangerously correlates with cardiovascular diseases. Therefore, blood pressure monitoring is important for identifying those at risk.
BLOOD PRESSURE STANDARD
The table on page 6 contains defined levels for hypertension that are publicly available from the National Heart Lung and Blood Institute at the U.S. National Institutes of Health (NIH) (http://www.nhlbi.nih.gov/health/dci/Diseases/Hbp/HBP_WhatIs.html). Users can compare their own blood pressure readings against these defined levels to determine if they may be potentially at increased risk.
This table is applicable to most adults aged 18 and older.
Blood pressure tends to go up and down, even in people who normally don’t have high readings. If your numbers stay above the “normal” range most of the time, you may be at increased risk and should consult your physician.

Although one can easily find where their own blood pressure readings fall on this table, this monitor comes equipped with a Risk Category Index that automatically compares each reading to the defined levels and provides a helpful cue if your reading falls into one of the stages that could potentially indicate increased risk. See page 20 for more information on this feature.
Please note that cues provided by this monitor are only intended to assist you in using this table. The table and cues are only provided for convenience to help you understand your non-invasive blood pressure reading as it relates to the NIH information. They are not a substitute for a medical examination by your physician. It is important for you to consult with your physician regularly. Your physician will tell you your normal blood pressure range as well as the point at which you may actually be considered to be at risk.
HOW THIS BLOOD PRESSURE MONITOR WORKS
This monitor uses innovative technology to detect your blood pressure. This technology enables the monitor to automatically inflate and deflate at the appropriate level for each individual. With one touch of a button, the cuff will automatically inflate to block the blood flow through your artery. Next, the deflation process starts. Please note that any muscle movement during inflation or deflation will cause measurement errors. When the measurement is complete, the monitor will display your systolic pressure, diastolic pressure, and pulse readings.
The monitor automatically finds where your measurement results fall on the NIH’s National Heart Lung and Blood Institute’s table and provides a cue if your reading falls into one of the stages that could potentially indicate increased risk. Please refer to page 20 for more information on this feature.
The appearance of the icon indicates that a pulse irregularity consistent with an irregular heartbeat was detected during measurement. Refer to page 21 for more information on the Irregular Heartbeat Detector.
NAME/FUNCTION OF EACH PART
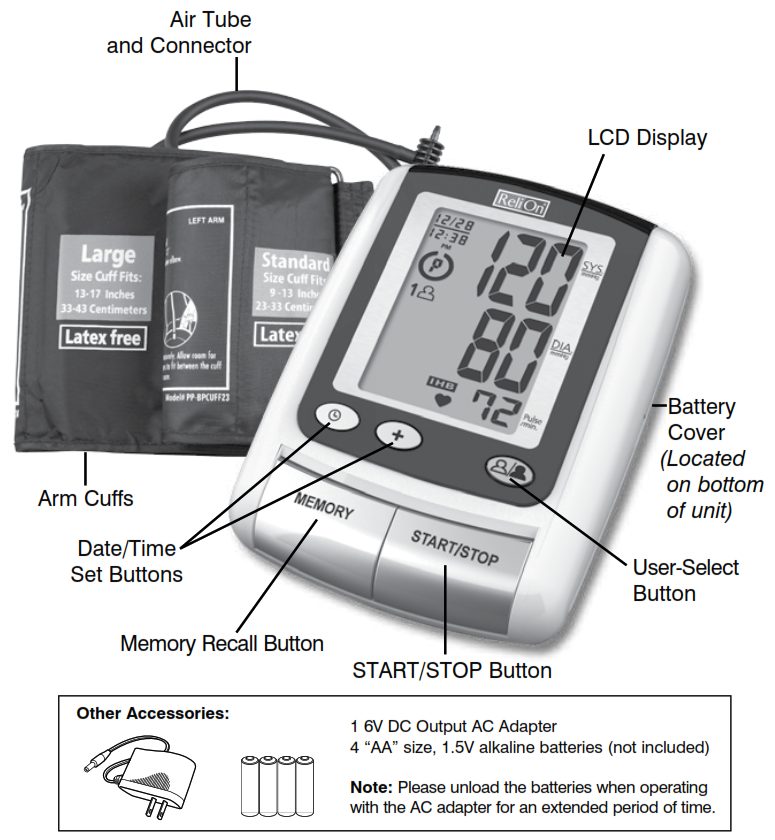
DISPLAY EXPLANATIONS
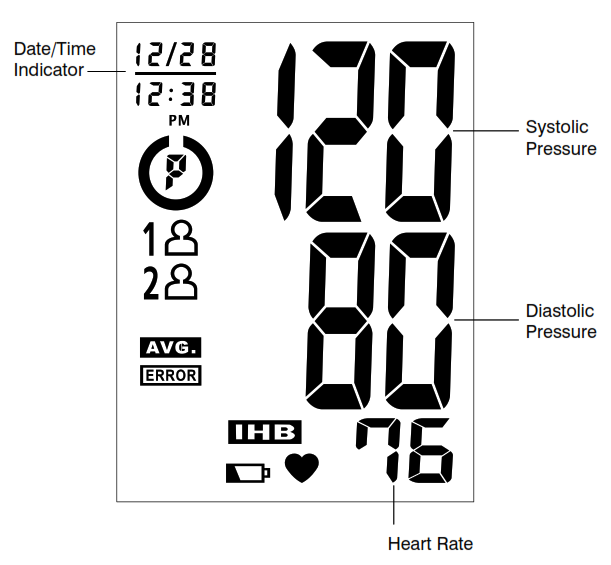
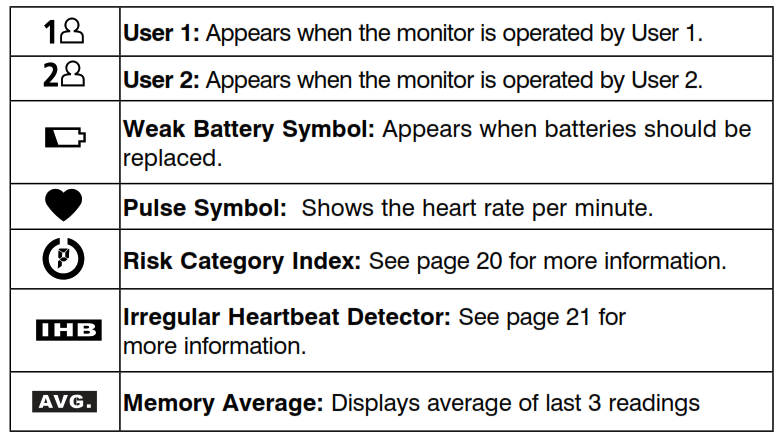
Display Symbols:
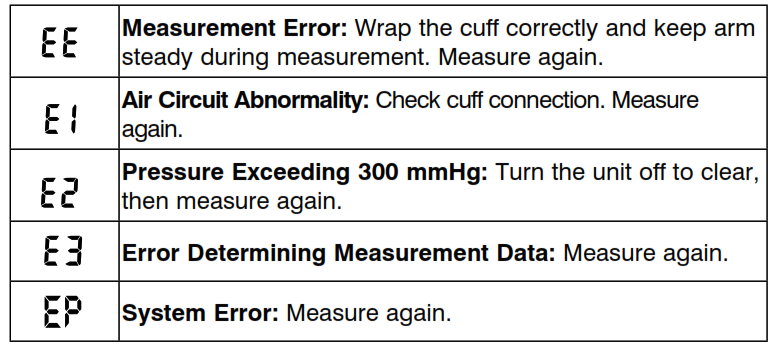
If and any of the following letters and numbers appear in the area that systolic pressure should be displayed, an error has occurred with your reading. See the Troubleshooting section of this manual for more information.
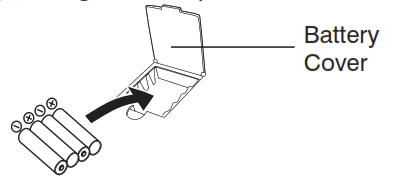
INSTALLING BATTERIES (NOT INCLUDED)
1. Press down on the latch and lift the battery cover to open the battery compartment.
2. Install or replace 4 “AA ” sized alkaline batteries in the battery compartment according to the indications inside the compartment.
3. Close the battery cover by pushing to the top end of the battery door.
Replace the batteries if:
• The weak battery symbol appears on the display.
• Nothing appears on the display when the power is switched on.
Replace all batteries at one time (as simultaneous set). Use only 1.5V AA alkaline batteries. Remove batteries when unit is not in use for extended periods of time. Date and time will need to be reset if batteries are removed or replaced. Clean contacts on battery and in battery compartment with a soft dry cloth each time you install batteries.
Note:
Batteries are hazardous waste. Do not dispose of them together with the household garbage.
USING THE AC ADAPTER
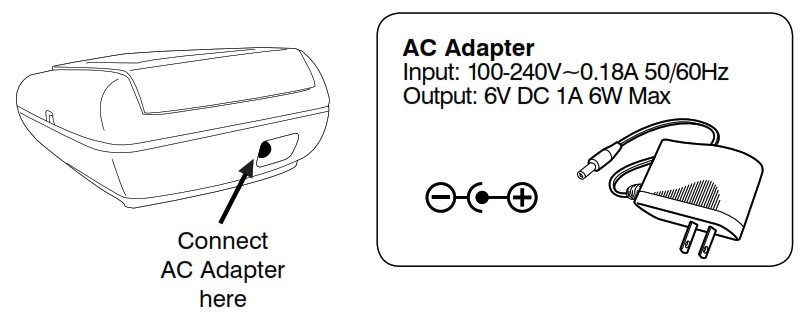
1. Connect the AC adapter with the AC adapter jack in the back of the unit as shown below.
2. Please use only the AC adapter included with this monitor.
Note:
- Please unload the batteries when operating with an AC adapter for an extended period of time. Leaving the batteries in the compartment for a long time may cause leakage, which may lead to damage to the unit.
- No batteries are needed when operating with an AC adapter.
- Date and time will need to be reset if AC adapter is unplugged and unit is without batteries.
DATE & TIME SET PROCEDURE
- To adjust the date and time, press the Date/Time Set button
 .
.
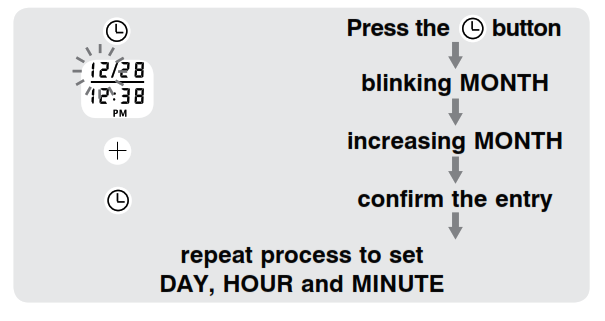
- The display will show a blinking number showing the MONTH. Change the MONTH by pressing the + button. Each press will increase the number by one in a cycling manner. Press the Date/Time Set button
 again to confirm the entry, and the screen will show a blinking number representing the DAY.
 - Change the DAY, HOUR, and MINUTE as described in Step 2 above, using the + button to change the numbers and the Date/Time Set button
 to confirm the entries.
USING THE ARM CUFF
Very Important: Proper cuff size is critical to accurate measurement.
This monitor comes with two sizes of arm cuffs:
Standard Size Fits 9”–13” (23 cm – 33 cm)
Large Size Fits 13”–17” (33 cm – 43 cm)
The appropriate cuff is suitable for your use if the colored arrow falls within the solid color line as shown below.
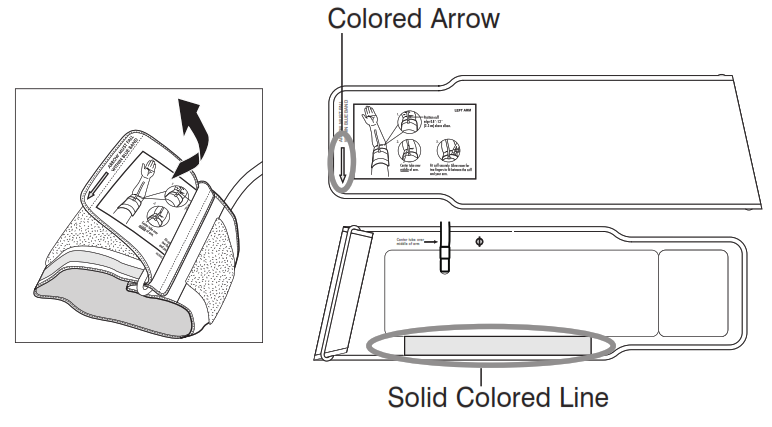
- If the cuff is not assembled, pass the end of the cuff furthest away from the tubing through the metal D-ring in order to form a loop. The smooth side without the felt material should be on the inside of the cuff loop.
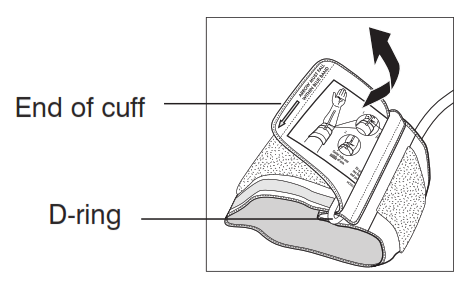
- Plug the cuff tube into the left side of the unit.
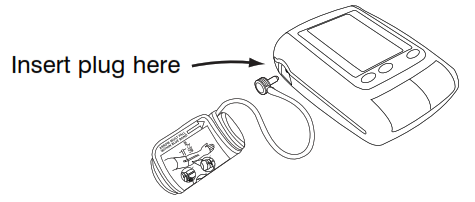
- Open the arm cuff so that your arm may be placed through it.
- Remove tight fitting clothing from your upper left arm so that the cuff can be wrapped around your exposed arm.
- Position cuff edge 0.8-1.2 inches (2-3 cm) above elbow.

- Center tube over middle of arm.
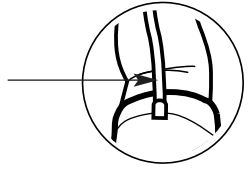
- Pull the end of the cuff so that it tightens evenly around your arm. Press the hook and loop material together to secure. Allow room for 2 fingers to fit between the cuff and your arm.
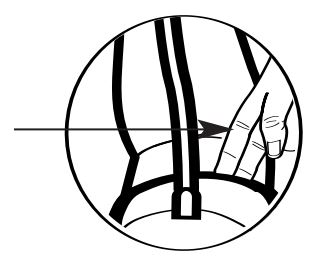
- Lay your arm on a table (palm upward) so the cuff is at the same height as your heart. Make sure the tube is not kinked.
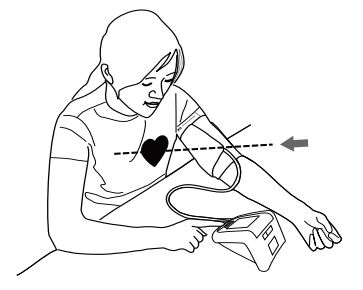
Note:
If it is not possible to fit the cuff to your left arm, it can also be placed on your right arm. However, all measurements should be made using the same arm.
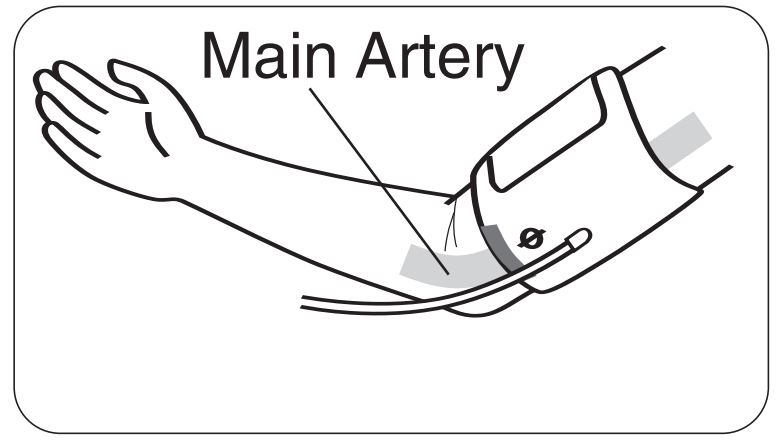
To use on the right arm, you must position the artery symbol “Φ ” over the main artery. Locate the main artery by pressing with two fingers approximately 1” (2 cm) above the bend of your elbow on the inside of your right arm. Identify where the pulse can be felt the strongest. This is your main artery.
MEASUREMENT PROCEDURE
Important Notes:
- Blood pressure changes with every heartbeat and is in constant fluctuation throughout the day.
- Blood pressure measurement can be affected by the position of the user, his or her physiologic condition and other factors. For greatest accuracy, wait 1 hour after exercising, bathing, eating, drinking beverages with alcohol or caffeine, or smoking to measure blood pressure.
- Before measurement, it is suggested that you sit quietly for 15 minutes as measurements taken during a relaxed state will have greater accuracy. You should not be physically tired or exhausted while taking measurements.
- During the measurement, do not talk or move your arm or hand muscles.
- See page 24 for additional notes regarding your blood pressure measurement.
If you are using this blood pressure monitor for the first time, please remove the protective film from the screen.
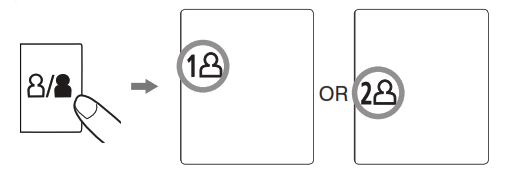
- Press the User-Select button to choose User 1 or User 2.
- With the cuff wrapped around your arm, press the START/STOP button. Do not inflate the cuff unless it is wrapped around your arm. All digits will light up to check the display functions. The checking procedure will be completed after about 3 seconds.
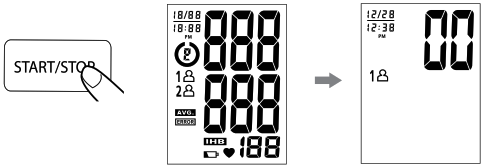
- After all, symbols disappear, the display will show “00”. The monitor is “Ready to Measure” and will automatically inflate the cuff to begin measurement. The cuff will then start deflating as measurement continues.
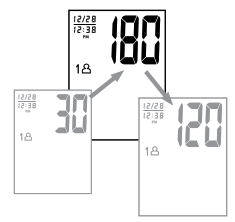
Note:
This monitor will re-inflate automatically if the system detects that your body requires more pressure for measurement. - When the measurement is completed, the cuff will deflate entirely. Systolic pressure, diastolic pressure, and pulse will be shown simultaneously on the LCD screen. The measurement is then automatically stored in memory.
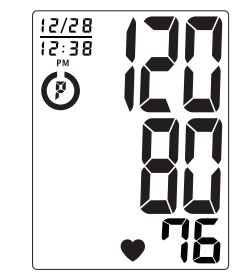
Note:
- This monitor automatically turns off approximately 1 minute after the last operation. You may also press the START/STOP button to turn the unit off.
- To interrupt the measurement, you may press the START/STOP (recommended), MEMORY, User- Select, or Date/Time Set (
 ) buttons. The cuff will deflate immediately after a button is pressed.
RISK CATEGORY INDEX
This monitor comes equipped with a Risk Category Index that automatically compares each reading to defined levels established by the U.S. National Institutes of Health’s (NIH) National Heart Lung and Blood Institute as described earlier in this manual, and provides a helpful cue if your reading falls into one of the stages that could potentially indicate increased risk. No cue is given if the reading falls in the normal range as defined by NIH. Please note that cues provided by this monitor are only intended to assist you in using this table. The table and cues are only provided for convenience to help you understand your non-invasive blood pressure reading as it relates to the NIH information. They are not a substitute for a medical examination by your physician. It is important for you to consult with your physician regularly. Your physician will tell you your normal blood pressure range as well as the point at which you may actually be considered to be at risk.

IRREGULAR HEARTBEAT DETECTOR (IHB)
The appearance of the icon indicates that a pulse irregularity consistent with an irregular heartbeat was detected during measurement. Usually this is not a cause for concern. However, if the symbol appears often, we recommend you seek medical advice. Please note that the device does not replace a cardiac examination, but serves to detect pulse irregularities at an early stage.
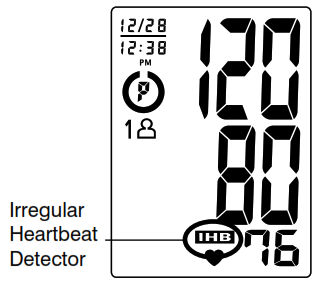
Movement, shaking or talking during the measurement can result in pulse irregularities that may cause the appearance of this icon. Therefore, it is of great importance to not move or talk during measurement.
To determine the presence of an irregular heartbeat, the average of the heartbeat intervals is calculated with the first 3 normal effective heartbeat values. It is important to note that the average is not a strict mathematical averaging of all recorded intervals. At least 3 beats with 25% or greater difference from the average heartbeat interval will generate the icon on the screen.
Important Information:
This blood pressure monitor is not designed for use by people with arrhythmias nor for diagnosing or treating an arrhythmia problem. As a safeguard, we recommend that if you have arrhythmias such as atrial or ventricular premature beats and atrial fibrillation, or any other special conditions you should check with your physician before using your blood pressure monitor.
RECALLING VALUES FROM MEMORY
This monitor can be used by two individuals. Each user can store up to 60 measurements.
1. Press the User-Select button to select User 1 or User 2.

2. Press the MEMORY button to access the memory.

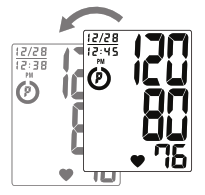
3. The monitor will first display the calculated average applied to the last 3 memories.
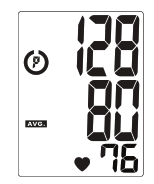
4. Every new press of the MEMORY button will recall a previous reading. The latest reading will be recalled first.
CLEARING VALUES FROM MEMORY
1. Press the User-Select button to select User 1 or User 2.

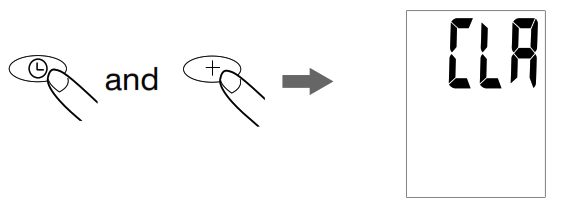
2. Press and hold the Date/Time Set buttons ( +) at the same time while in memory recall mode, and the data for the selected user will be erased automatically.
IMPORTANT NOTES REGARDING YOUR BLOOD PRESSURE MEASUREMENT
- Take your reading in a comfortable environment as measurements can be affected by hot or cold temperatures. Take your blood pressure at normal body temperature.
- Do not move or talk during measurement as this can elevate readings.
- Do not move or cross legs during measurement. Keep feet flat on the floor.
- Do not touch the cuff or monitor during the measurement procedure.
- It is suggested that you take your measurements at the same time each day and use the same arm for consistency.
- Users should wait a minimum of 5 minutes before taking additional measurements. More time may be necessary depending upon your physiology.
- The measurement results that users receive are for reference only. If users have any blood pressure concerns, please consult a physician.
- Once inflation reaches 300 mmHg, the unit will deflate automatically for safety reasons.
- This product is not suitable for people with arrhythmias.
- This device may have difficulty determining the proper blood pressure for pregnant women and for users with an irregular heartbeat, diabetes, poor circulation of blood, kidney problems, or for users who have suffered a stroke.
CARE, MAINTENANCE & CLEANING
- Clean the blood pressure monitor body and cuff carefully with a slightly damp, soft cloth. Do not press. Do not wash cuff or use chemical cleaner on it. Never use thinner, alcohol or petrol (gasoline) as cleaner.
- Leaky batteries can damage the unit. Remove the batteries when the unit will not be used for a long time.
- Follow local ordinances and recycling instructions regarding disposal or recycling of the device and device components, including batteries.
- If the unit is stored near freezing, allow it to acclimate to room temperature before use.
- This blood pressure monitor is not field serviceable. You should not use any tool to open the device nor should you attempt to adjust anything inside the device. If you have any problems with this device, please contact HoMedics Consumer Relations (contact information can be found on the warranty page).
- Do not immerse the unit in water as this will result in damage to the unit.
- Do not subject the monitor or cuff to extreme temperatures, humidity, moisture, or direct sunlight. Protect from dust.
- Do not fold the cuff and tubing tightly.
- Do not disassemble the monitor or cuff. If in need of repair, refer to the warranty section of this manual.
- Do not subject the monitor to extreme shocks (do not drop on floor).
- Do not inflate the cuff unless wrapped around arm.
- Do not wrap the cuff around body parts other than your arm.
- Do not drop or insert any object into any opening or hose.
- To avoid accidental strangulation keep this product away from children. Do not drape tube around neck.
- This monitor may not meet its performance specifications if stored or used outside of these temperature and humidity ranges:
- Storage/Transportation Environment
Temperature: -13°F~158°F (-25°C~70°C)
Humidity: less than 93% RH - Operating Environment
Temperature: 41°F~104°F (5°C ~40°C)
Humidity: 15% ~ 93% RH
POTENTIAL FOR ELECTROMAGNETIC INTERFERENCE
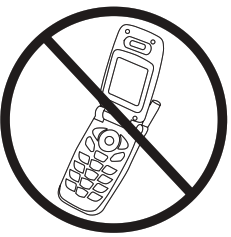
To avoid inaccurate results caused by electromagnetic interference between electrical and electronic equipment, do not use the device near a cell phone or microwave oven.
This device complies with Part 15 of the FCC Rules. Operation is subject to the following two conditions: (1) this device may not cause harmful interference, and (2) this device must accept any interference received, including interference that may cause undesired operation.
NOTE: The manufacturer is not responsible for any radio or TV interference caused by unauthorized modifications to this equipment. Such modifications could void the user’s authority to operate the equipment.
NOTE: This equipment has been tested and found to comply with the limits for a Class B digital device, pursuant to Part 15 of the FCC Rules. These limits are designed to provide reasonable protection against harmful interference in a residential installation. This equipment generates, uses and can radiate radio frequency energy and, if not installed and used in accordance with the instructions, may cause harmful interference to radio communications. However, there is no guarantee that interference will not occur in a particular installation. If this equipment does cause harmful interference to radio or television reception, which can be determined by turning the equipment off and on, the user is encouraged to try to correct the interference by one or more of the following measures:
• Reorient or relocate the receiving antenna.
• Increase the separation between the equipment and receiver.
• Connect the equipment into an outlet on a circuit different from that to which the receiver is connected.
• Consult the dealer or an experienced radio/TV technician for help.
TROUBLESHOOTING
If any abnormality arises during use, please check the following points.
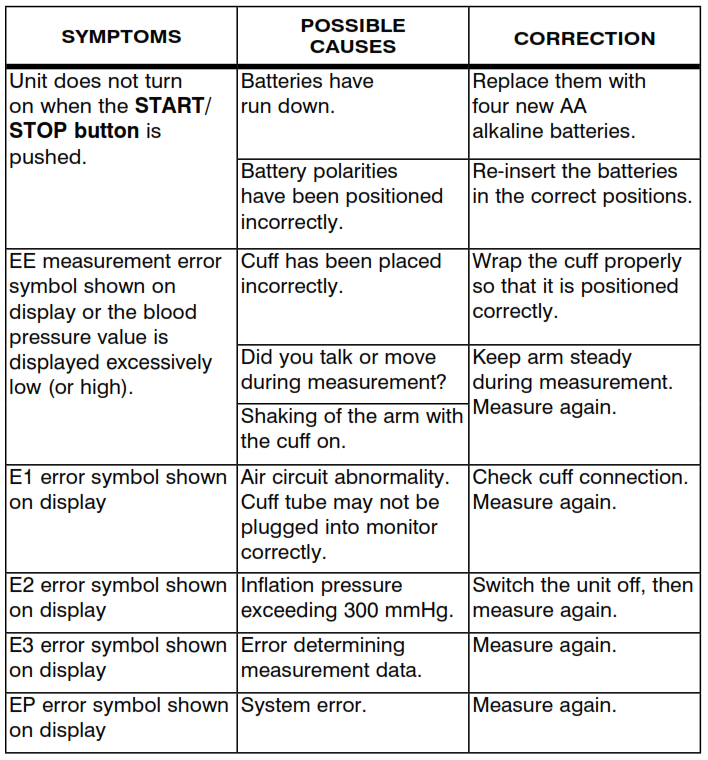
Note: If the unit still does not work, contact HoMedics Consumer Relations. Under no circumstance should you disassemble or attempt to repair the unit by yourself? Contact information for HoMedics Consumer Relations Department can be found on the warranty page.
SPECIFICATIONS
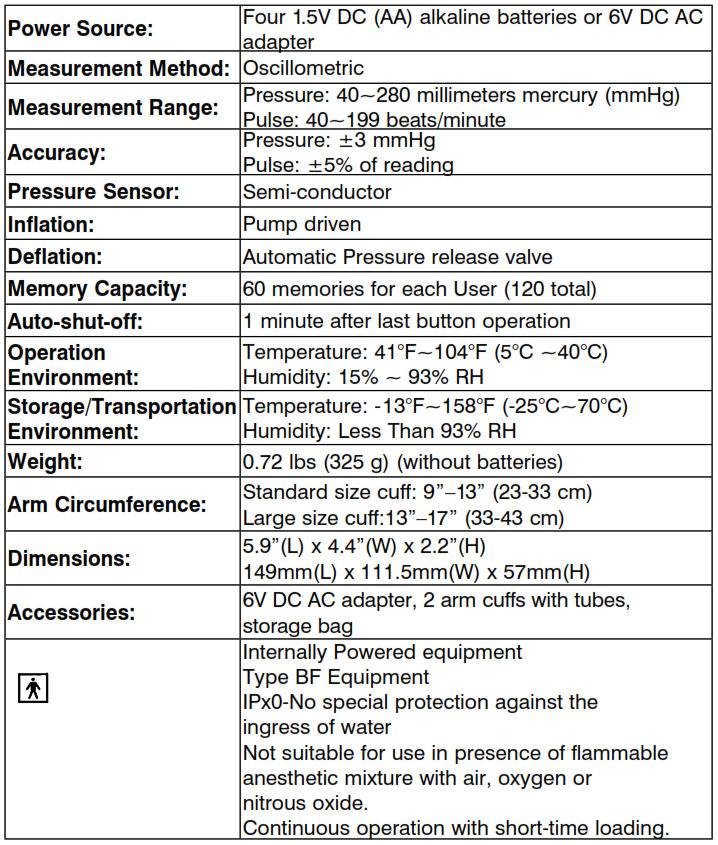
Note: These specifications are subject to change without notice.
LIMITED FIVE YEAR WARRANTY
HoMedics sells its products with the intent that they are free of defects in manufacture and workmanship for a period of five years from the date of original purchase, except as noted below. HoMedics warrants that its products will be free of defects in material and workmanship under normal use and service. This blood pressure monitor meets the simulated measurement cycles test requirement per EN1060-3, part 8.10. This warranty extends only to consumers and does not extend to Retailers.
To obtain warranty service on your HoMedics product, contact a Consumer Relations Representative by telephone at 1-800-466-3342 for assistance. Please make sure to have the model number of the product available.
HoMedics does not authorize anyone, including, but not limited to, Retailers, the subsequent consumer purchaser of the product from a Retailer or remote purchasers, to obligate HoMedics in any way beyond the terms set forth herein. This warranty does not cover damage caused by misuse or abuse; accident; the attachment of any unauthorized accessory; alteration to the product; improper installation; unauthorized repairs or modifications; improper use of electrical/power supply; loss of power; dropped product; malfunction or damage of an operating part from a failure to provide manufacturer’s recommended maintenance; transportation damage; theft; neglect; vandalism; or environmental conditions; loss of use during the period the product is at a repair facility or otherwise awaiting parts or repair; or any other conditions whatsoever that are beyond the control of HoMedics. This warranty is effective only if the product is purchased and operated in the country in which the product is purchased. A product that requires modifications or adoption to enable it to operate in any other country than the country for which it was designed, manufactured, approved, and/or authorized, or repair of products damaged by these modifications is not covered under this warranty.
THE WARRANTY PROVIDED HEREIN SHALL BE THE SOLE AND EXCLUSIVE WARRANTY. THERE SHALL BE NO OTHER WARRANTIES EXPRESS OR IMPLIED INCLUDING ANY IMPLIED WARRANTY OF MERCHANTABILITY OR FITNESS OR ANY OTHER OBLIGATION ON THE PART OF THE COMPANY WITH RESPECT TO PRODUCTS COVERED BY THIS WARRANTY. HOMEDICS SHALL HAVE NO LIABILITY FOR ANY INCIDENTAL, CONSEQUENTIAL OR SPECIAL DAMAGES. IN NO EVENT SHALL THIS WARRANTY REQUIRE MORE THAN THE REPAIR OR REPLACEMENT OF ANY PART OR PARTS WHICH ARE FOUND TO BE DEFECTIVE WITHIN THE EFFECTIVE PERIOD OF THE WARRANTY. NO REFUNDS WILL BE GIVEN. IF REPLACEMENT PARTS FOR DEFECTIVE MATERIALS ARE NOT AVAILABLE, HOMEDICS RESERVES THE RIGHT TO MAKE PRODUCT SUBSTITUTIONS IN LIEU OF REPAIR OR REPLACEMENT.
This warranty does not extend to the purchase of opened, used, repaired, repackaged, and/or resealed products, including but not limited to sale of such products on Internet auction sites and/or sales of such products by surplus or bulk resellers. Any and all warranties or guarantees shall immediately cease and terminate as to any products or parts thereof which are repaired, replaced, altered, or modified, without the prior express and written consent of HoMedics. This warranty provides you with specific legal rights. You may have additional rights that may vary from state to state. Because of individual state regulations, some of the above limitations and exclusions may not apply to you.
Made exclusively for:
Wal-Mart® Stores, Inc.
Bentonville, AR 72716
For service or repair, do not return this unit to the retailer. Contact HoMedics Consumer Relations at:
Email: [email protected]
Phone: 1-800-466-3342
Business Hours: 8:30am-7 pm ET
Monday-Friday
Distributed by

HoMedics, LLC
3000 Pontiac Trail
Commerce Township, MI 48390
Printed in China
Relion® is a registered trademark used under license by HoMedics, LLC.
HoMedics® is a registered trademark of HoMedics, LLC.
© 2012 HoMedics, LLC. All rights reserved.
IB-WMTBPA845
P/N: 323102068 VER: 001


PS-251
Instruction Manual and Warranty Information
2 year limited warranty
IMPORTANT SAFETY INSTRUCTIONS:
WHEN USING ELECTRICAL PRODUCTS, BASIC SAFETY PRECAUTIONS SHOULD ALWAYS BE FOLLOWED, INCLUDING THE FOLLOWING:
READ ALL INSTRUCTIONS BEFORE USING.
WARNING – To reduce the risk of burns, fire, electric shock, or injury to persons:
- Burns could occur from touching hot metal parts, hot water, or steam. Use care when you turn a steam appliance upside down – there may be hot water in the reservoir.
- To reduce the risk of contact with hot water emitting from steam vents, check appliance before each use by holding it away from the body and operating the steam button.
- Use appliance only for its intended use.
- To reduce the risk of electric shock, do not immerse the appliance in water or other liquids.
- Never yank cord to disconnect from outlet; instead, grasp plug and pull to disconnect.
- Do not allow cord to touch hot surfaces. Let the appliance cool completely before putting away. Loop cord loosely around the appliance when storing.
- Always disconnect the appliance from electrical outlet when filling with water or emptying, and when not in use.
- Do not operate the appliance with a damaged cord, or if the appliance has been dropped or damaged. To reduce the risk of electric shock, do not disassemble or attempt to repair the appliance, take it to a qualified service person for examination and repair. Incorrect reassembly or repair could cause a risk of fire, electric shock, or injury to persons when the appliance is used.
- Close supervision is necessary for any appliance being used by or near children. Do not leave the appliance unattended while connected.
- To reduce the likelihood of circuit overload, do not operate another high wattage appliance on the same circuit.
- If an extension cord is absolutely necessary, a 15 ampere rated cord should be used. Cords rated for less amperage may overheat. Care should be taken to arrange the cord so that the cord cannot be pulled or tripped over.
- Attention California Residents:
WARNING: This product contains chemicals known to the State of California to cause cancer, birth defects, and other reproductive harm.
SAVE THESE INSTRUCTIONS
Grounding Instructions
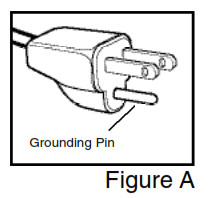
This product must be grounded. If it should malfunction or breakdown, grounding provides a path of least resistance for the electric current to reduce the risk of electric shock. This product is equipped with a cord having an equipment-grounding conductor and a grounding plug. The plug must be plugged into an appropriate outlet that is properly installed and grounded in accordance with all local codes and ordinances.
DANGER
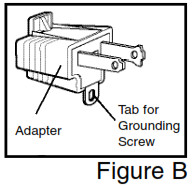
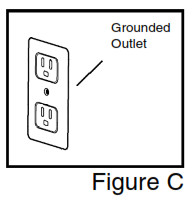
Improper connection of the equipment-grounding conductor can result in a risk of electric shock. Check with a qualified electrician or serviceman if you are in doubt as to whether the product is properly grounded. Do not modify the plug provided with the product – if it will not fit the outlet, you may temporarily use an adapter (such as the one shown in Figure B) until you have a proper outlet (such as the one shown in Figure C) installed by a qualified electrician.
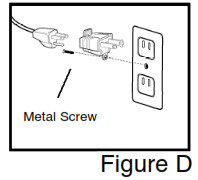
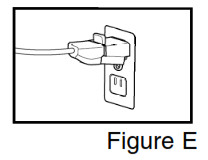
This product is for use on a nominal 120-volt circuit and has a grounding plug that looks like the plug illustrated in Figure A. A temporary adapter that looks like the adapter illustrated in Figure B may be used to connect this plug to a 2-pole receptacle as shown in Figure D if a properly grounded outlet is not available. The temporary adapter should be used only until a properly grounded outlet Figure C can be installed by a qualified electrician. The tab for grounding screw Figure B extending from the adapter must be connected to a permanent ground such as a properly grounded outlet box cover. Whenever the adapter is used, it must be held in place by a metal screw. See Figures D and E.
Perfect Steam Features
- Safe for use on all types of fabrics
- Quick heat-up feature emits steam in 45 seconds
- Convenient integrated garment hanger
- Telescoping design for compact storage
- 5 foot flexible hose with Safe Touch® hose cover for safe and comfortable handling
- Easy-fill water tank provides 45 minutes of continuous steam
- Rolling casters for excellent mobility
- Low water auto shut-off for safe use
Assembly Instructions
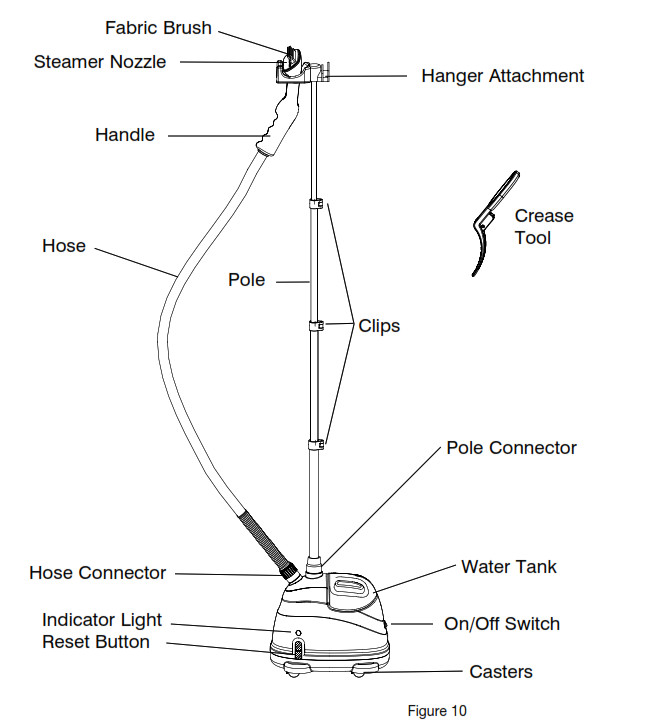
- Carefully remove all contents from the packaging and inspect the product to make sure all components have been received (Fig. 10).
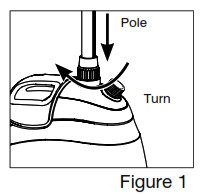
- Insert pole into the top of the unit. Match the grooves on the pole with the notches in the pole connector and push down. Securely tighten the nut on the pole over the connector by turning it clockwise (Fig 1).
- To attach the hanger attachment, align tabs in hanger attachment with grooves on pole and push down (Fig. 2).
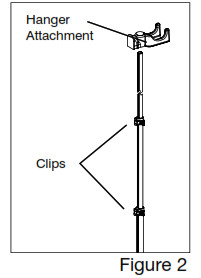
- Fully extend the telescopic pole. To do so, open the 3 clips on the pole and pull the pole upwards (Fig. 2). When fully extended close the clips. Make sure that the pole is securely locked into place and cannot be pushed downward.
- Attach the fabric brush to the nozzle by setting into place (Fig. 3).
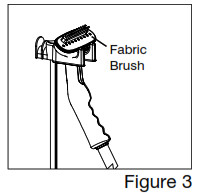
- Attach handle & hose assembly to unit. Line up the nut on the hose with the screw on the hose connector. Turn nut clockwise until it is securely tightened on the hose connector, (Fig 4). It should be tightly screwed into place. Then you may hang the steamer handle onto the hanger attachment (Fig. 3).
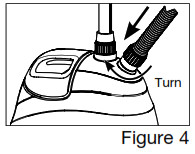 NOTE: Do not hang the hose on the hanger attachment until after it has been connected to the base to prevent the hose from falling on you.
 - Attach the crease tool (Fig. 5) onto the nozzle tab and gently push into place.
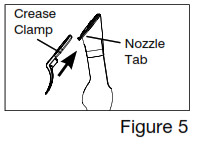 NOTE: Do not use the crease clamp and the fabric brush at the same time
Instructions for Use
Always check fabric labels for recommendations before steaming. Test colorfastness in an inconspicuous spot. Some fabrics can be steamed better from the underside of the material. Heavy fabrics may require repeated steaming. Never steam a garment while it is being worn.
- Remove the water tank from the unit by grasping the handle and turning upside down. Unscrew the cap from the bottom of the water tank. Hold the tank under cold running water and fill to the desired level (Fig. 6). DO NOT fill past the 45 min. fill line. When you have finished filling the tank screw the cap back on and turn it over (Fig. 7). Place water tank back into the unit and make sure it is sitting properly & securely in the cavity.
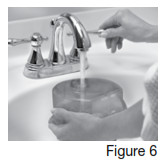
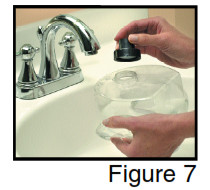
NOTE:
• Only fill the water tank with cold water. Do NOT use hot water.
• Do not use any additives in the water such as fabric softeners, scents, bleach, and starch. They will damage the garment steamer and your garment. - Plug the steamer cord into a 120V AC electrical outlet.
- Turn the On/Off switch to the On position. The switch will light to indicate that the garment steamer is on. Steam will emit in 45 seconds from the nozzle.
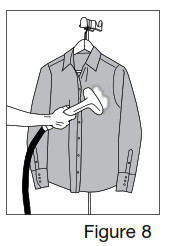
- Hang the garment onto the hanger attachment (Fig 8). Steam the garment in an up/down motion starting from the top of the garment to the bottom. Always keep the hose and nozzle elevated above the water container.
- This unit has a reset button (Fig. 10). When the unit runs out of water it will automatically shut off to ensure safe use and the red indicator light will come on above the reset button. If you wish to continue your steaming session:
• Turn On/Off switch to “Off” position and unplug the power cord
• Remove and refill water tank by following Step 1 under Instructions for Use
• Plug the steamer cord into a 120V AC electrical outlet.
• Push the reset button on side of unit
• Turn On/Off switch to “On” position
- When you have finished with your steaming session place the On/Off switch in the Off position and remove the plug from the outlet.
NOTE: Be cautious when handling until the steamer has fully cooled.
Using Attachments
NOTE: When installing or changing attachments, be sure the unit is off, unplugged, and no steam is being released to avoid contact with hot water.
- Fabric Brush
Helps open the fabric for greater steam penetration.
– Attach the fabric brush onto the steam nozzle (Fig. 3).
– Move the fabric brush in a downward motion from top to bottom gently brushing the fabric. - Crease Tool
Helps create a straight crease
– Attach the crease tool to the steam nozzle (Fig. 5).
– Push the trigger to open the crease tool.
– Place the garment between the crease tool and steam nozzle.
– Release the trigger.
– Move the crease tool in a downward motion from top to bottom to set a crease. - Travel Lint Roller
Helps remove light lint from clothing
– Remove protective sheet from lint roller.
– Roll sticky surface of lint roller over area of lint on clothing.
– Pull off used outer sheet and tear at perforation to expose new sticky surface.
– Replace protective sheet to preserve sticky surface for next use.
Cleaning and Maintenance
- Be sure the steamer is turned off and unplugged.
- Allow the steamer to cool for at least 30 minutes.
- Empty any excess water from the water tank and allow it to air dry before replacing the cap and setting it back in the unit.
- Empty excess water from the reservoir by tipping the unit over a sink.
Storing
- Open the 3 clips (Fig. 2) on the telescopic pole and glide it slowly to collapse being careful not to pinch your fingers. When it is all the way down close the 3 clips back into place.
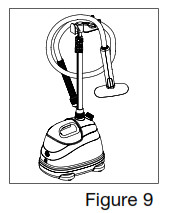
- Coil the hose and place it on the hanger attachment (Fig. 9)
- Store in a cool, dry place.
Removing Mineral Buildup
One common problem with steamers is mineral buildup caused by the high mineral content in many municipal water supplies. Mineral residue inside of the internal pipes and heater can cause intermittent steaming or in severe cases no steaming at all.
The best way to avoid this is to use demineralized or distilled water in the unit. The procedure below can be used to clear mineral buildup. If you are unable to use demineralized or distilled water we recommend you use this procedure every 30 hours of operation to help avoid mineral buildup.
- Turn the unit off and unplug the power cord.
- Unscrew and remove the hose from the hose connector on the top of the unit.
- Remove the pole from the unit.
- Remove the water tank from the main unit and drain any water in the unit over a sink.
- Make a mixture of 4 oz. white vinegar and 4 oz. water. In most cases, 1 cup of this mixture will be sufficient.
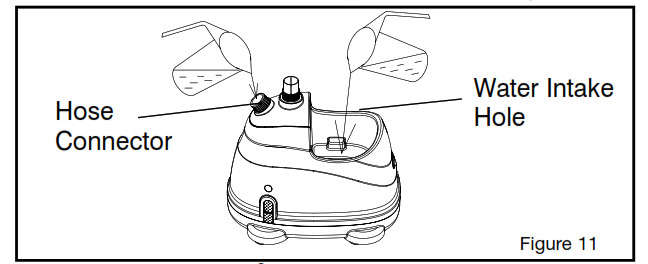
- Slowly pour the water-vinegar mixture into the hose connector (Fig. 11).
a. If the internal piping is only partially blocked by mineral buildup, the water-vinegar mixture will soon start flowing out of the water intake hole. If this happens proceed to step 8.
b. If the internal piping is completely blocked, continue to pour the mixture into the hose connector until full. - Pour the water-vinegar mixture into the water intake hole until full.
- Let stand for 40 minutes.
- Drain the water-vinegar mixture from hose connector or the reservoir by tipping the unit over a sink.
- Pour clean water through the hose connector and water intake hole until the vinegar smell dissipates.
- Drain the residual water from hose connector or the reservoir by tipping the unit over a sink. Reassemble the unit and operate normally.
If the procedure above does not return the unit to normal operation, the unit may need servicing.
Trouble Shooting the Steamer
| PROBLEM | CAUSE | SOLUTION |
| Steamer fails to heat | Steamer not plugged in
ON/OFF switch not in “ON” position Auto shut off engaged |
Plug in to electrical outlet
Push switch to the “ON” position. Switch will illuminate. Check water container to ensure it is not empty. If full, press the reset button on side of unit. If empty, refill and push reset to begin. |
| No steam | Water level is low | Turn-ON/OFF switch OFF and refill water container |
| Water drips from nozzle | Condensation in hose | Hold the hose vertically and allow water to drain back into tank |
| Nozzle gurgles | Condensation in hose | Hold the hose vertically and allow water to drain back into tank |
| Steam is intermittent | Mineral build-up | Follow the procedure for removing mineral build-up |
NOTE:
- Water mineral content and conditions will vary in different areas. To ensure continued operation of the steamer, never store without cleaning and removing excess water from the reservoir and water container.
- If the reset light comes on with water in the tank you probably need to remove mineral buildup.
- In areas where the voltage exceeds 120V, it may be necessary to clean your unit more frequently.
Limited Two Year Warranty
HoMedics sells its products with the intent that they are free of defects in manufacture and workmanship for a period of two years from the date of original purchase, except as noted below. HoMedics warrants that its products will be free of defects in material and workmanship under normal use and service. This warranty extends only to consumers and does not extend to Retailers.
To obtain warranty service on your HoMedics product, contact a consumer relations representative for assistance. Please make sure to have the model number of the product available.
HoMedics does not authorize anyone, including, but not limited to, Retailers, the subsequent consumer purchaser of the product from a Retailer or remote purchasers, to obligate HoMedics in any way beyond the terms set forth herein. This warranty does not cover damage caused by misuse or abuse; accident; the attachment of any unauthorized accessory; alteration to the product; improper installation; unauthorized repairs or modifications; improper use of electrical/power supply; loss of power; dropped product; malfunction or damage of an operating part from a failure to provide manufacturer’s recommended maintenance; transportation damage; theft; neglect; vandalism; or environmental conditions; loss of use during the period the product is at a repair facility or otherwise awaiting parts or repair; or any other conditions whatsoever that are beyond the control of HoMedics.
This warranty is effective only if the product is purchased and operated in the country in which the product is purchased. A product that requires modifications or adoption to enable it to operate in any other country than the country for which it was designed, manufactured, approved, and/or authorized, or repair of products damaged by these modifications is not covered under this warranty.
THE WARRANTY PROVIDED HEREIN SHALL BE THE SOLE AND EXCLUSIVE WARRANTY. THERE SHALL BE NO OTHER WARRANTIES EXPRESS OR IMPLIED INCLUDING ANY IMPLIED WARRANTY OF MERCHANTABILITY OR FITNESS OR ANY OTHER OBLIGATION ON THE PART OF THE COMPANY WITH RESPECT TO PRODUCTS COVERED BY THIS WARRANTY. HOMEDICS SHALL HAVE NO LIABILITY FOR ANY INCIDENTAL, CONSEQUENTIAL, OR SPECIAL DAMAGES. IN NO EVENT SHALL THIS WARRANTY REQUIRE MORE THAN THE REPAIR OR REPLACEMENT OF ANY PART OR PARTS WHICH ARE FOUND TO BE DEFECTIVE WITHIN THE EFFECTIVE PERIOD OF THE WARRANTY. NO REFUNDS WILL BE GIVEN. IF REPLACEMENT PARTS FOR DEFECTIVE MATERIALS ARE NOT AVAILABLE, HOMEDICS RESERVES THE RIGHT TO MAKE PRODUCT SUBSTITUTIONS IN LIEU OF REPAIR OR REPLACEMENT.
This warranty does not extend to the purchase of opened, used, repaired, repackaged, and/or resealed products, including but not limited to sale of such products on Internet auction sites and/or sales of such products by surplus or bulk resellers. Any and all warranties or guarantees shall immediately cease and terminate as to any products or parts thereof which are repaired, replaced, altered, or modified, without the prior express and written consent of HoMedics.
This warranty provides you with specific legal rights. You may have additional rights which may vary from country to country. Because of individual country regulations, some of the above limitations and exclusions may not apply to you.
For more information regarding our product line in the USA, please visit: www.homedics.com.
For Canada, please visit: www.homedics.ca.
For service in the USA
Email:
Monday-Friday
8:30am-7:00pm EST
1.800.466.3342
For service in Canada
Email:
Monday-Friday
8:30am-5:00pm EST
1.888.225.7378
HoMedics®, Home Touch®, and PerfectSteam® are registered trademarks of HoMedics, LLC.
© 2009 – 2015 HoMedics, LLC. All rights reserved.
IB-PS251

AUTOMATIC WRIST
Blood Pressure Monitor
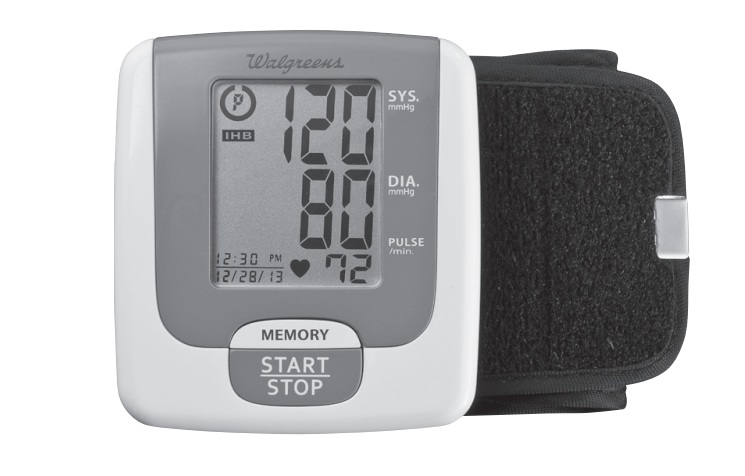
WGNBPW-710
Ver. A
IMPORTANT PRODUCT NOTICES AND SAFETY INSTRUCTIONS
When using your blood pressure monitor, basic precautions
should always be followed. Please read and follow all
instructions and warnings before using this product. Save these
instructions for future reference.
- Please note that this is a home healthcare product only and it is not intended to serve as a substitute for the advice of a physician or medical professional.
- This device uses the oscillometric method to measure systolic and diastolic blood pressure, as well as heart rate.
- Do not use this device for the diagnosis or treatment of any health problem or disease. Measurement results are for reference only. Consult a healthcare professional for interpretation of blood pressure measurements. Contact your physician if you have or suspect any medical problem. Do not change your medications without the advice of your physician or healthcare professional.
- This product is not suitable for people with arrhythmias. This device may have difficulty determining the proper blood pressure for pregnant women, individuals with an irregular heartbeat, diabetes, poor circulation of blood, kidney problems or for users who have suffered from a stroke.
- Excessive use may result in blood flow interference, which is likely to cause uncomfortable sensations, such as partial subcutaneous hemorrhage, or temporary numbness to your wrist. In general, these symptoms should not last long. However, if you do not recover in time, please seek advice from a medical professional.
- Consult your physician before measuring blood pressure at the wrist if you have any of the following conditions: Severe hypertension, severe diabetes, severe arteriosclerosis, severe kidney disease, or vascular disease that may compromise circulation.
- The pulse display is not suitable for checking the frequency of heart pacemakers.
- Electromagnetic interference: The device contains sensitive electronic components. Avoid strong electrical or electromagnetic fields in the direct vicinity of the device (e.g. mobile telephones, microwave ovens). These may lead to temporary impairment of measurement accuracy.
- Consider the electromagnetic compatibility of the device (ex. power disturbance, radio frequency interference etc.) Please use this device indoors only.
- Use blood pressure monitor only for its intended use.
- Do not wrap the cuff around body parts other than your wrist.
- Not for use by or on persons under the age of 18.
- Do not use this device on infants, children, or those who cannot express their own intention.
- Use only 1.5V “AAA” alkaline batteries for the power supply. Blood pressure measurements determined with this device are equivalent to those obtained by a trained observer using the cuff/stethoscope auscultatory method, within the limits prescribed by the American National Standard, Manual, electronic, or automated sphygmomanometers.
ABOUT BLOOD PRESSURE
What is Blood Pressure?
Blood pressure is the pressure exerted on the artery walls while blood flows through the arteries. The pressure measured when the heart contracts and sends blood out of the heart is systolic (highest) blood pressure. The pressure measured when the heart dilates with blood flowing back into the heart is called diastolic (lowest) blood pressure.
Why Measure Your Blood Pressure?
Among today’s various health problems, those associated with high blood pressure are very common. High blood pressure dangerously correlates with cardiovascular diseases. Therefore, blood pressure monitoring is important for identifying those at risk.
BLOOD PRESSURE STANDARD
The table on page 6 contains defined levels for hypertension that are publicly available from the National Heart Lung and Blood Institute at the U.S. National Institutes of Health (NIH) (http://www.nhlbi.nih.gov/health/dci/Diseases/Hbp/HBP_WhatIs.html). Users can compare their own blood pressure readings against these defined levels to determine if they may be potentially at increased risk.
This table is applicable to most adults aged 18 and older.
Blood pressure tends to go up and down, even in people who normally don’t have high readings. If your numbers stay above the “normal” range most of the time, you may be at increased risk and should consult your physician.

Although one can easily find where their own blood pressure readings fall on this table, this monitor comes equipped with a Risk Category Index that automatically compares each reading to the defined levels and provides a helpful cue if your reading falls into one of the stages that could potentially indicate increased risk. See page 19 for more information on this feature.
Please note that cues provided by this monitor are only intended to assist you in using this table. The table and cues are only provided for convenience to help you understand your non-invasive blood pressure reading as it relates to the NIH information. They are not a substitute for a medical examination by your physician. It is important for you to consult with your physician regularly. Your physician will tell you your normal blood pressure range as well as the point at which you may actually be considered to be at risk.
HOW THIS BLOOD PRESSURE MONITOR WORKS
This monitor uses innovative technology to detect your blood pressure. This technology enables the monitor to automatically inflate and deflate at the appropriate level for each individual. With one touch of a button, the cuff will automatically inflate to block the blood flow through your artery. Next, the deflation process starts.
Please note that any muscle movement during inflation or deflation will cause measurement errors. When the measurement is complete, the monitor will display your systolic pressure, diastolic pressure, and pulse readings.
The monitor automatically finds where your measurement results fall on the NIH’s National Heart Lung and Blood Institute’s table and provides a cue if your reading falls into one of the stages that could potentially indicate increased risk. See page 19 for more information on this feature.
The appearance of the icon indicates that a pulse irregularity consistent with an irregular heartbeat was detected during measurement. Refer to page 20 for more information on the Irregular Heartbeat Detector.
NAME/FUNCTION OF EACH PART
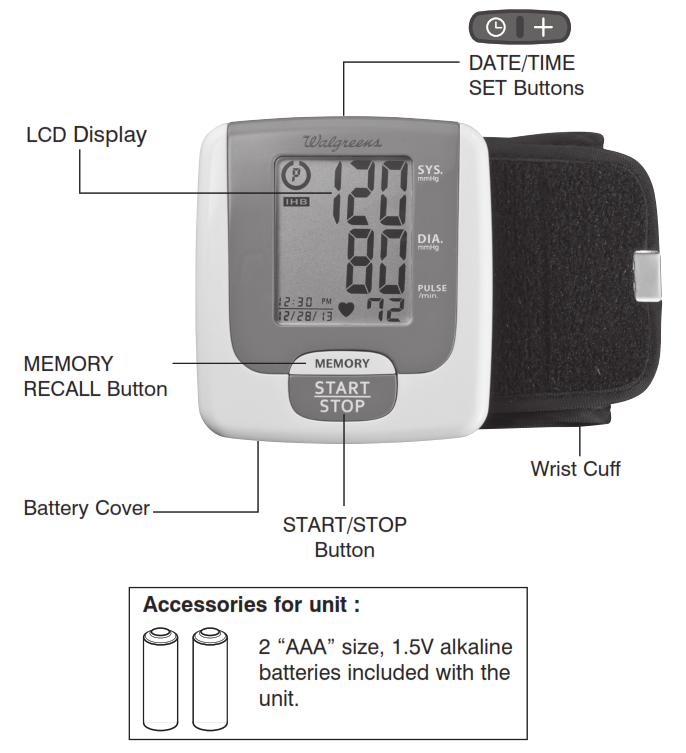
DISPLAY EXPLANATIONS
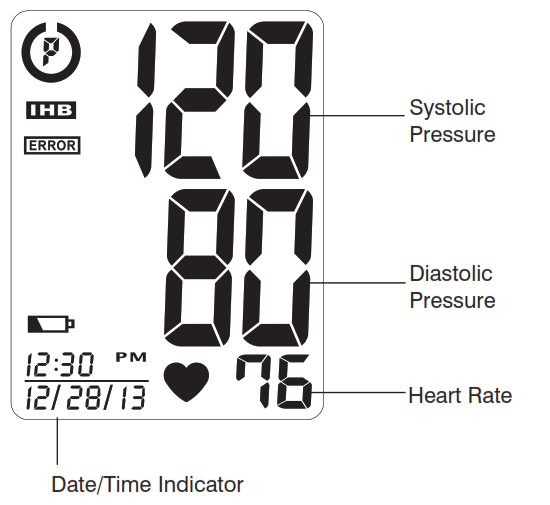
Display Symbols:
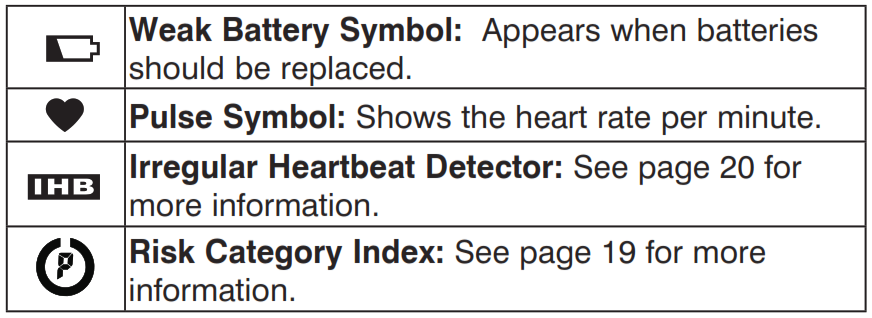
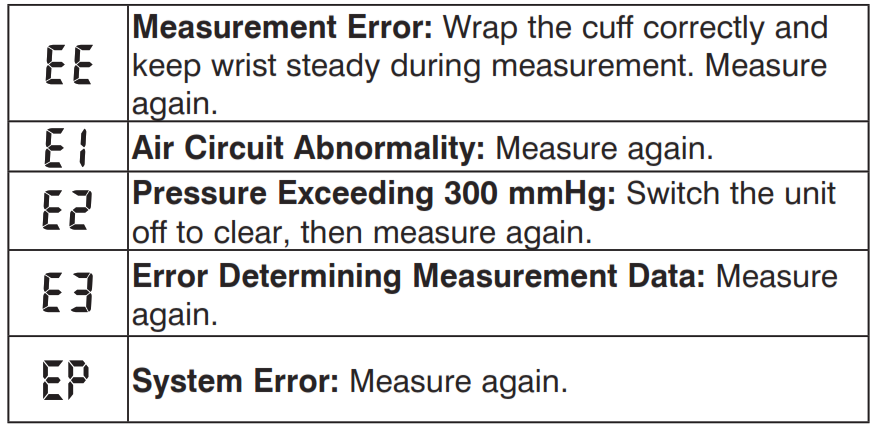
If and any of the following letters and numbers appear in the area that systolic pressure should be displayed, an error has occurred with your reading. See the Troubleshooting section of this manual for more information.
INSTALLING BATTERIES
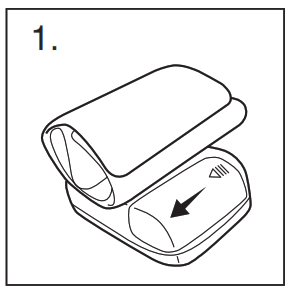
1. The battery cover is located along the side of the monitor. Remove the battery cover by pressing down and pulling away from the monitor.
2. Install batteries according to the polarity indications inside the compartment (as shown in figure 2). Battery Type: 2 Alkaline LR03 “AAA” size
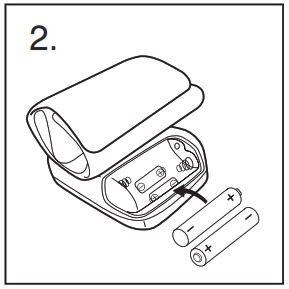
3. Insert the other battery, according to the polarity indications inside the compartment (as shown in figure 3).
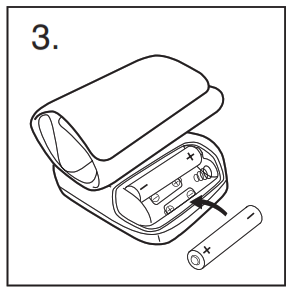
4. Replace the cover by inserting it back into place.
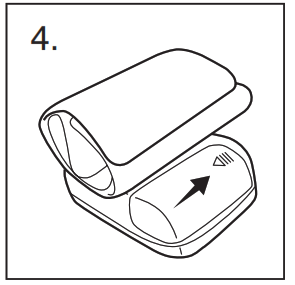
Replace the batteries if:
• The weak battery symbol appears on the display.
• Nothing appears on the display when the power is switched on.
As the supplied batteries are for test only, they may be discharged earlier than batteries you buy in stores. Replace all batteries at one time (as a simultaneous set). Use only 1.5V “AAA” alkaline batteries. Remove batteries when the unit is not in use for extended periods of time. The date and time will need to be reset if batteries are removed or replaced. Clean contacts on the battery and in the battery compartment with a soft dry cloth each time you install batteries.
Note:
Batteries are hazardous waste. Do not dispose of them together with the household garbage.
DATE & TIME SET PROCEDURE
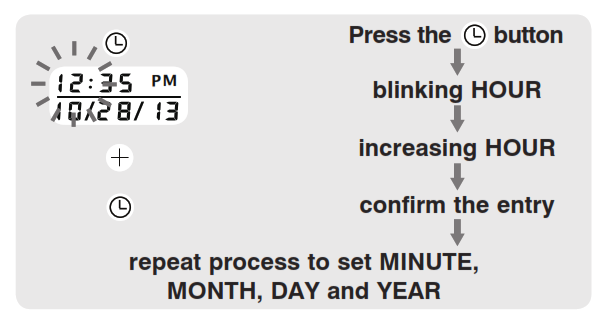
1. To adjust the date and time, press the DATE/TIME SET button located on the top of the monitor.
2. The display will show a blinking number showing the HOUR. Change the HOUR by pressing the button. Each press will increase the number by one in a cycling manner. Press the DATE/TIME SET button  again to confirm the entry, and the screen will show a blinking number representing the MINUTE.
3. Change the MINUTE, MONTH, DAY, and YEAR as described in Step 2 above, using the button to change the numbers and the DATE/TIME SET button  to confirm the entries.
APPLYING THE CUFF
1. Remove all watches, wrist jewelry, etc. prior to attaching the wrist monitor. Clothing sleeves should be rolled up and the cuff should be wrapped around bare skin for correct measurements.
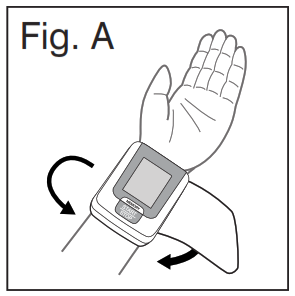
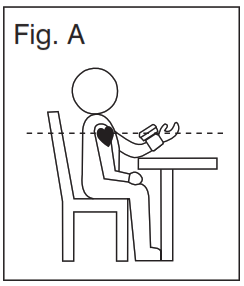
2. Apply the cuff to the left wrist with the palm facing up as shown in Fig. A.
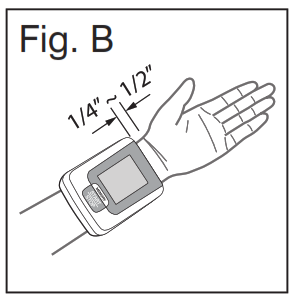
3. Make sure the edge of the cuff is about 1/4”~1/2” (1 cm) from the palm as shown in Fig. B.
4. In order to ensure accurate measurements, fasten the hook and loop strap securely around your wrist so there is no extra space between the cuff and the wrist. If the cuff is not wrapped tight enough, the measurement values will not be accurate.
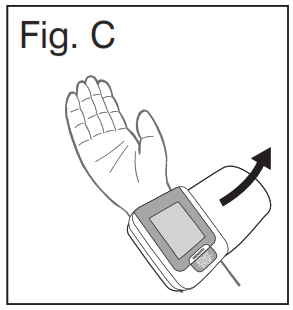
5. If your physician has diagnosed you with poor circulation in your left arm, place the cuff around your right wrist as shown in Fig. C.
Note:
• This device should not be used when your wrist is wounded or injured.
• If it is not possible to use the cuff on your left wrist, it can also be used on your right wrist. However, all measurements should be made using the same wrist.
CORRECT MEASUREMENT POSTURE
1. Place your elbow on a table so that the cuff is at the same level as your heart as shown in Fig. A. Relax your entire body, especially between your elbow and fingers.
Note: Your heart is located slightly below your armpit.
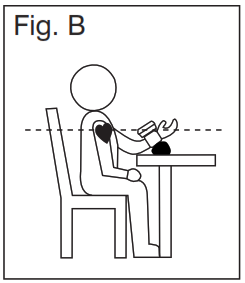
2. If the cuff is not at the same level as your heart or if you cannot keep your arm completely still throughout the reading, use a soft object such as a folded towel to support your wrist as shown in Fig. B.
3. Turn your palm upwards.
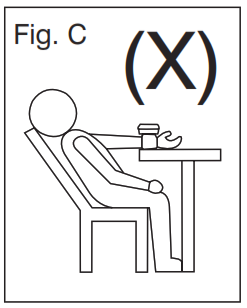
4. Sit upright in a chair, and take 5-6 deep breaths.
Avoid leaning back while the measurement is being taken as shown in Fig. C.
MEASUREMENT PROCEDURE
Important Notes:
- Position the monitor at the same level as your heart during measurement to ensure accurate readings.
- Blood pressure changes with every heartbeat and is in constant fluctuation throughout the day.
- Blood pressure measurement can be affected by the position of the user, his or her physiologic condition, and other factors. For greatest accuracy, wait 1 hour after exercising, bathing, eating, drinking beverages with alcohol or caffeine, or smoking to measure blood pressure.
- Before a measurement, it is suggested that you sit quietly for 15 minutes as measurements taken during a relaxed state will have greater accuracy. You should not be physically tired or exhausted while taking measurements.
- During the measurement, do not talk or move your arm or hand muscles.
- See page 22 for additional notes regarding your blood pressure measurement.
If you are using this blood pressure monitor for the first time, please remove the protective film from the screen.
1. With the cuff wrapped around your wrist, press the START/STOP button. Do not inflate the cuff unless it is wrapped around your wrist. All digits will light up, checking the display functions. The checking procedure will be completed after about 3 seconds.
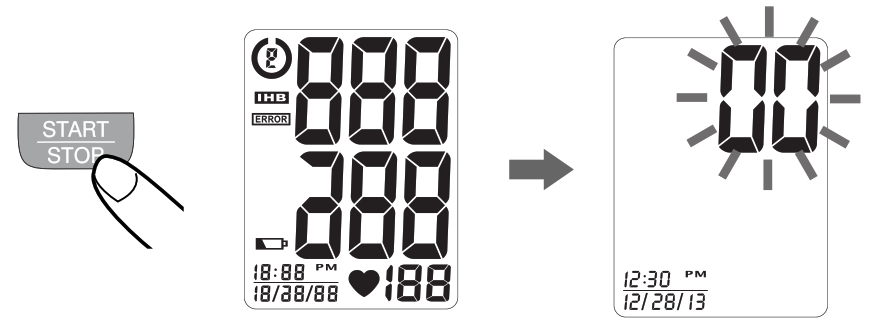
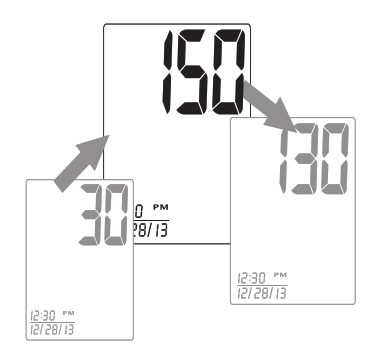
2. After all symbols disappear, the display will show “00”. The monitor is “Ready to Measure” and will automatically inflate the cuff to begin measurement. The cuff will then begin deflating as measurement continues.
Note:
The monitor will re-inflate automatically if the system detects that your body requires more pressure for measurement.
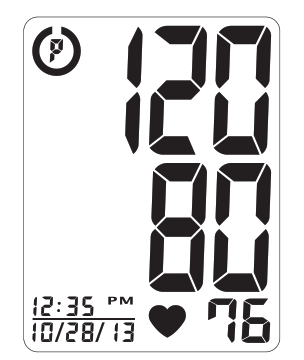
3. When the measurement is completed, the cuff will deflate entirely and systolic pressure, diastolic pressure, and pulse will be shown simultaneously on the LCD screen. The measurement is then automatically stored in memory.
Note:
- This monitor automatically turns off approximately 1 minute after the last operation. You may also press the START/STOP button to turn the unit off.
- To interrupt the measurement, you may press the START/STOP button (recommended), the MEMORY button, or DATE/TIME SET (
 ) buttons. The cuff will deflate immediately after a button is pressed.
RISK CATEGORY INDEX
This monitor comes equipped with a Risk Category Index that automatically compares each reading to defined levels established by the U.S. National Institutes of Health’s (NIH) National Heart Lung and Blood Institute as described earlier in this manual, and provides a helpful cue if your reading falls into one of the stages that could potentially indicate increased risk. No cue is given if the reading falls in the normal range as defined by NIH. Please note that cues provided by this monitor are only intended to assist you in using this table. The table and cues are only provided for convenience to help you understand your non-invasive blood pressure reading as it relates to the NIH information. They are not a substitute for a medical examination by your physician. It is important for you to consult with your physician regularly. Your physician will tell you your normal blood pressure range as well as the point at which you may actually be considered to be at risk.

IRREGULAR HEARTBEAT DETECTOR (IHB)
The appearance of the icon indicates that a pulse irregularity consistent with an irregular heartbeat was detected during measurement. Usually this is not a cause for concern. However, if the symbol appears often, we recommend you seek medical advice. Please note that the device does not replace a cardiac examination, but serves to detect pulse irregularities at an early stage.
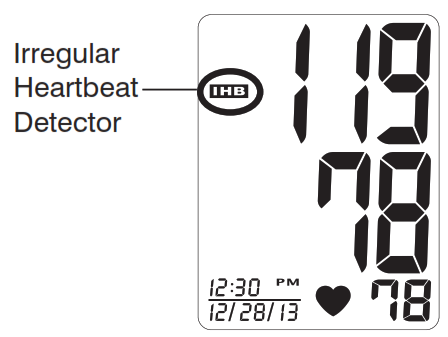
Movement, shaking, or talking during the measurement can result in pulse irregularities that may cause the appearance of this icon. Therefore, it is of great importance to not move or talk during measurement.
To determine the presence of an irregular heartbeat, the average of the heartbeat intervals is calculated with the first 3 normal effective heartbeat values. It is important to note that the average is not a strict mathematical averaging of all recorded intervals. At least 3 beats with a 25% or greater difference from the average heartbeat interval will generate the icon on the screen.
IMPORTANT INFORMATION:
This blood pressure monitor is not designed for use by people with arrhythmias nor for diagnosing or treating an arrhythmia problem. As a safeguard, we recommend that if you have arrhythmias such as atrial or ventricular premature beats and atrial fibrillation or any other special conditions you should check with your physician before using your blood pressure monitor.
RECALLING VALUES FROM MEMORY
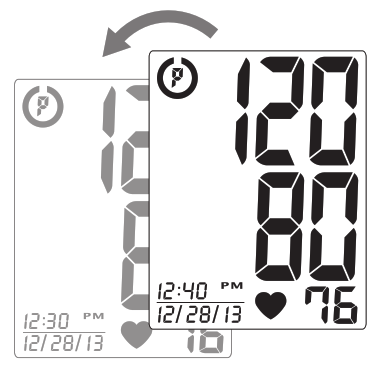
1. Press the MEMORY button to access the memory.

2. Every new press of the MEMORY button will recall a previous reading. The latest reading will be recalled first.
CLEARING VALUES FROM MEMORY
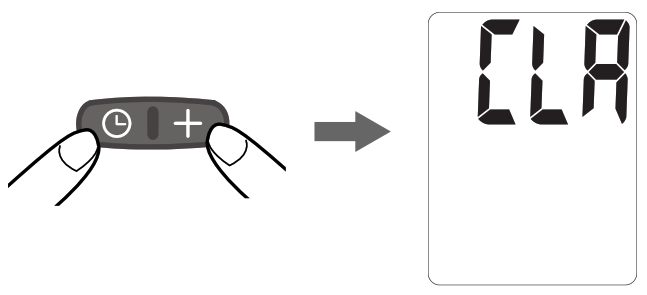
Press and hold the  and buttons at the same time while in memory recall mode and the data will be erased automatically.
IMPORTANT NOTES REGARDING YOUR BLOOD PRESSURE MEASUREMENT
- Take your reading in a comfortable environment as measurements can be affected by hot or cold temperatures. Take your blood pressure at normal body temperature.
- Do not move or talk during measurement as this can elevate readings.
- Do not move or cross legs during measurement. Keep feet flat on the floor.
- Do not touch the cuff or monitor during the measurement procedure.
- It is suggested that you take your measurements at the same time each day and use the same wrist for consistency.
- Users should wait a minimum of 5 minutes before taking additional measurements. More time may be necessary depending upon your physiology.
- The measurement results that users receive are for reference only. If users have any blood pressure concerns, please consult a physician.
- Once inflation reaches 300 mmHg, the unit will deflate automatically for safety reasons.
- This product is not suitable for people with arrhythmias.
- This device may have difficulty determining the proper blood pressure for pregnant women and for users with an irregular heartbeat, diabetes, poor circulation of blood, kidney problems, or for users who have suffered a stroke.
CARE, MAINTENANCE & CLEANING
- Clean the blood pressure monitor body and cuff carefully with a slightly damp, soft cloth. Do not press. Do not wash cuff or use chemical cleaner on it. Never use thinner, alcohol or petrol (gasoline) as a cleaner.
- Leaky batteries can damage the unit. Remove the batteries when the unit will not be used for a long time.
- Follow local ordinances and recycling instructions regarding disposal or recycling of the device and device components, including batteries.
- If the unit is stored near freezing, allow it to acclimate to room temperature before use.
- This blood pressure monitor is not field serviceable. You should not use any tool to open the device nor should you attempt to adjust anything inside the device. If you have any problems with this device, please contact HoMedics Consumer Relations (contact information on warranty page).
- Do not immerse the unit in water as this will result in damage to the unit.
- Do not subject the monitor or cuff to extreme temperatures, humidity, moisture, or direct sunlight. Protect from dust.
- Do not fold the cuff tightly.
- Do not disassemble the monitor or cuff. If in need of repair, refer to the warranty section of this manual.
- Do not subject the monitor to extreme shocks (do not drop on the floor).
- Do not inflate the cuff unless wrapped around the wrist.
- Do not wrap the cuff around body parts other than your wrist.
- Do not drop or insert any object into any opening.
- This monitor may not meet its performance specifications if stored or used outside of these temperature and humidity ranges:
- Storage/Transportation Environment
Temperature: -13°F~158°F (-25°C~70°C)
Humidity: Less than 93% RH - Operation Environment
Temperature: 41°F~104°F (5°C ~40°C)
Humidity: 15 ~ 93% RH
POTENTIAL FOR ELECTROMAGNETIC INTERFERENCE
To avoid inaccurate results caused by electromagnetic interference between electrical and electronic equipment, do not use the device near a cell phone or microwave oven. For most wireless communication devices, it is recommended to maintain a distance of 10.8 feet (3.3m) in order to avoid electromagnetic interference.

This device complies with Part 15 of the FCC Rules. Operation is subject to the following two conditions: (1) this device may not cause harmful interference, and (2) this device must accept any interference received, including interference that may cause undesired operation.
NOTE: The manufacturer is not responsible for any radio or TV interference caused by unauthorized modifications to this equipment. Such modifications could void the user authority to operate the equipment.
NOTE: This equipment has been tested and found to comply with the limits for a Class B digital device, pursuant to Part 15 of the FCC Rules. These limits are designed to provide reasonable protection against harmful interference in a residential installation. This equipment generates, uses and can radiate radio frequency energy and, if not installed and used in accordance with the instructions, may cause harmful interference to radio communications. However, there is no guarantee that interference will not occur in a particular installation. If this equipment does cause harmful interference to radio or television reception, which can be determined by turning the equipment off and on, the user is encouraged to try to correct the interference by one or more of the following measures:
- Reorient or relocate the receiving antenna.
- Increase the separation between the equipment and receiver.
- Connect the equipment into an outlet on a circuit different from that to which the receiver is connected.
- Consult the dealer or an experienced radio/TV technician for help.
ELECTROMAGNETIC COMPATIBILITY (EMC)
• Guidance and manufacturer’s declaration – electromagnetic emissions
The device is intended for use in the electromagnetic environments listed below, and should only be used in such environments:

• Guidance and manufacturer’s declaration – electromagnetic immunity
The device is intended for use in the electromagnetic environments listed below, and should only be used in such environments:

• Recommended separation distances between portable and mobile RF communication equipment and the device.
The device is intended for use in an electromagnetic environment where radiated RF disturbances are under control. Users can help prevent electromagnetic interference by keeping the device at a minimum distance from portable and mobile RF communications equipment (transmitters). The below table details the maximum output power of the transmitter:
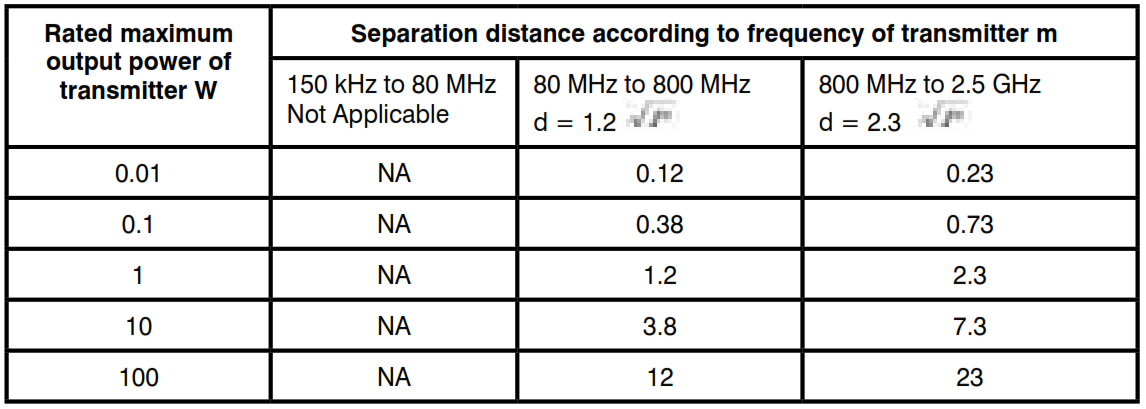
For transmitters rated at a maximum output power not listed above, the recommended separation distance d in meters (m) can be estimated using the equation applicable to the frequency of the transmitter, where P is the maximum output power rating of the transmitter in watts (W) according to the transmitter manufacturer.
NOTE 1 At 80 MHz and 800 MHz, the separation distance for the higher frequency range applies.
NOTE 2 These guidelines may not apply in all situations. Electromagnetic propagation is affected by absorption and reflection from structures, objects, and people.
• Guidance and manufacturer’s declaration – electromagnetic immunity
The device is intended for use in the electromagnetic environments listed below, and should only be used in such environments:
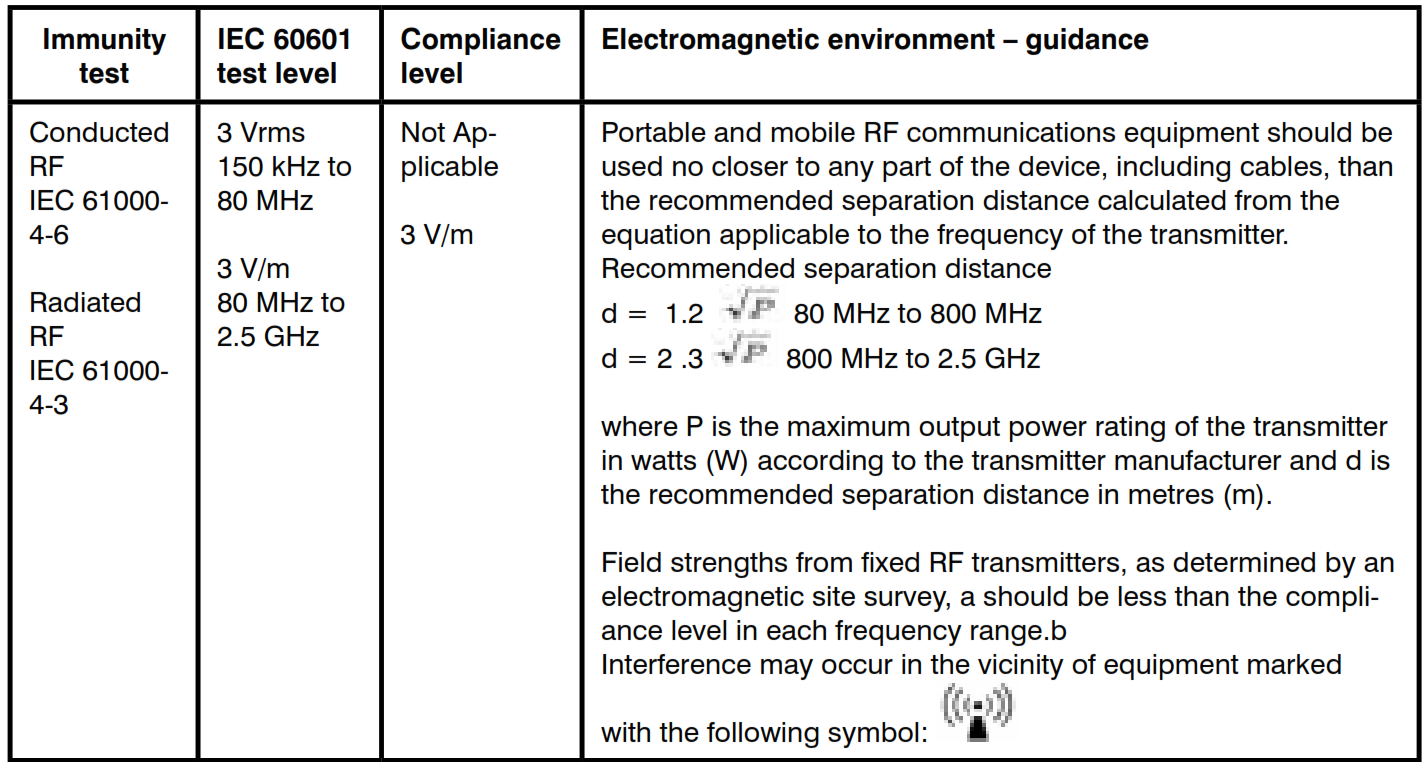
NOTE 1 At 80 MHz and 800 MHz, the higher frequency range applies.
NOTE 2 These guidelines may not apply in all situations. Electromagnetic propagation is affected by absorption and reflection from structures, objects, and people.
a Field strengths from fixed transmitters, such as base stations for radio (cellular/cordless) telephones and land mobile radios, amateur radio, AM and FM radio broadcast, and TV broadcast cannot be predicted theoretically with accuracy. To assess the electromagnetic environment due to fixed RF transmitters, an electromagnetic site survey should be considered. If the measured field strength in the location in which the device is used exceeds the applicable RF compliance level above, the device should be observed to verify normal operation. If abnormal performance is observed, additional measures may be necessary, such as reorienting or relocating the device.
b Over the frequency range 150 kHz to 80 MHz, field strengths should be less than 3 V/m.
TROUBLESHOOTING
If any abnormality arises during use, please check the following points:
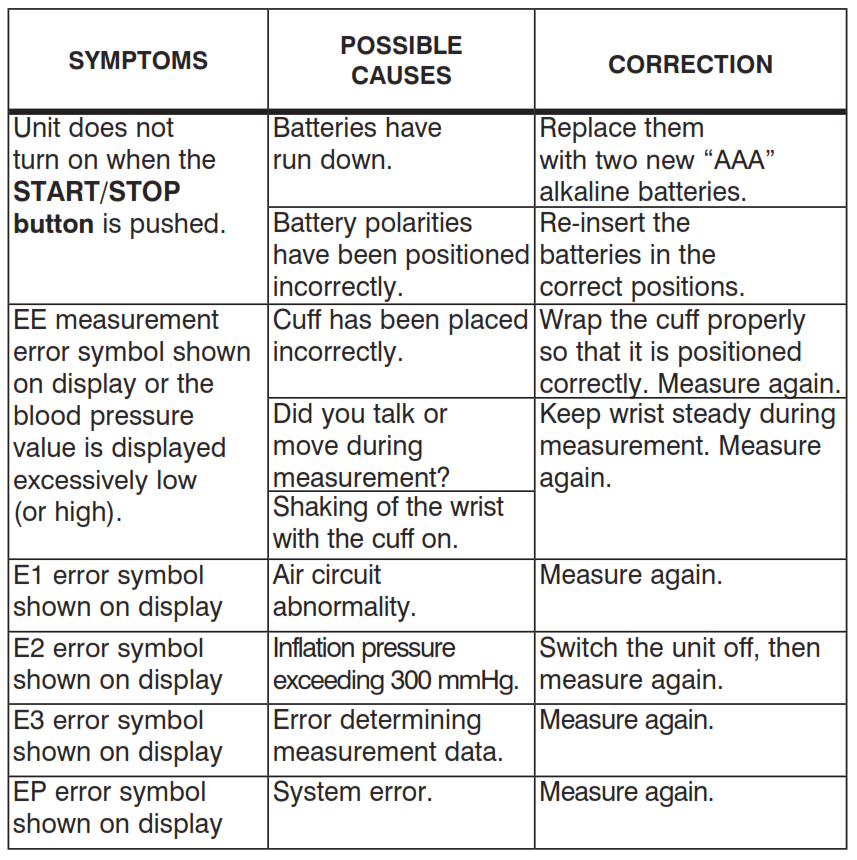
Note: If the unit still does not work, contact HoMedics Consumer Relations. Under no circumstance should you disassemble or attempt to repair the unit by yourself? Contact information for HoMedics Consumer Relations Department can be found on the warranty page.
SPECIFICATIONS
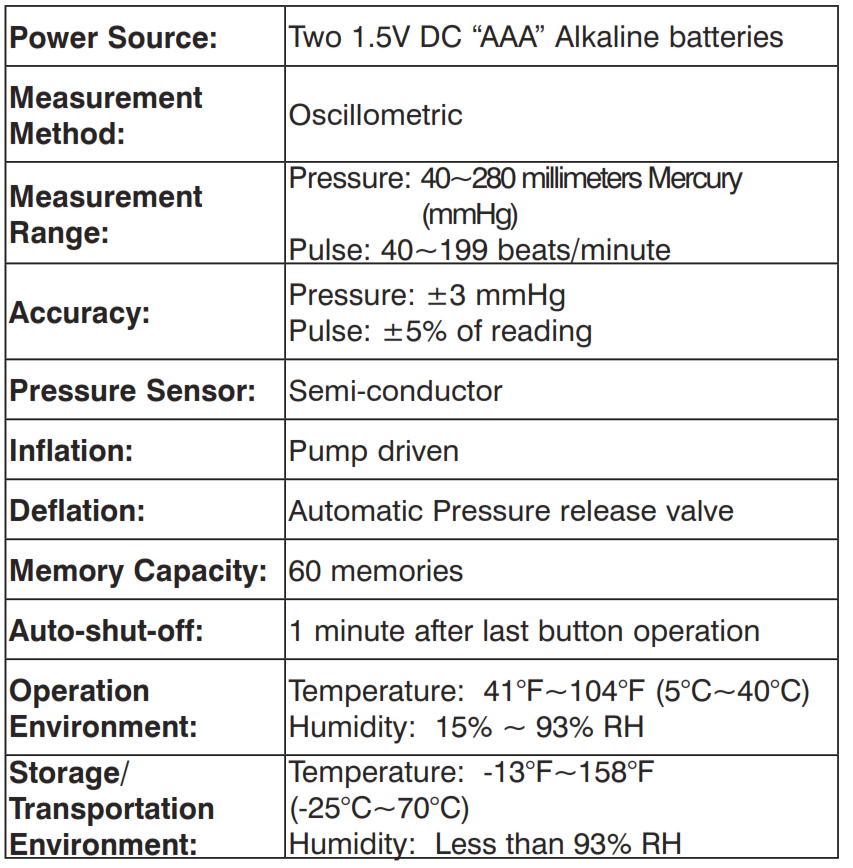
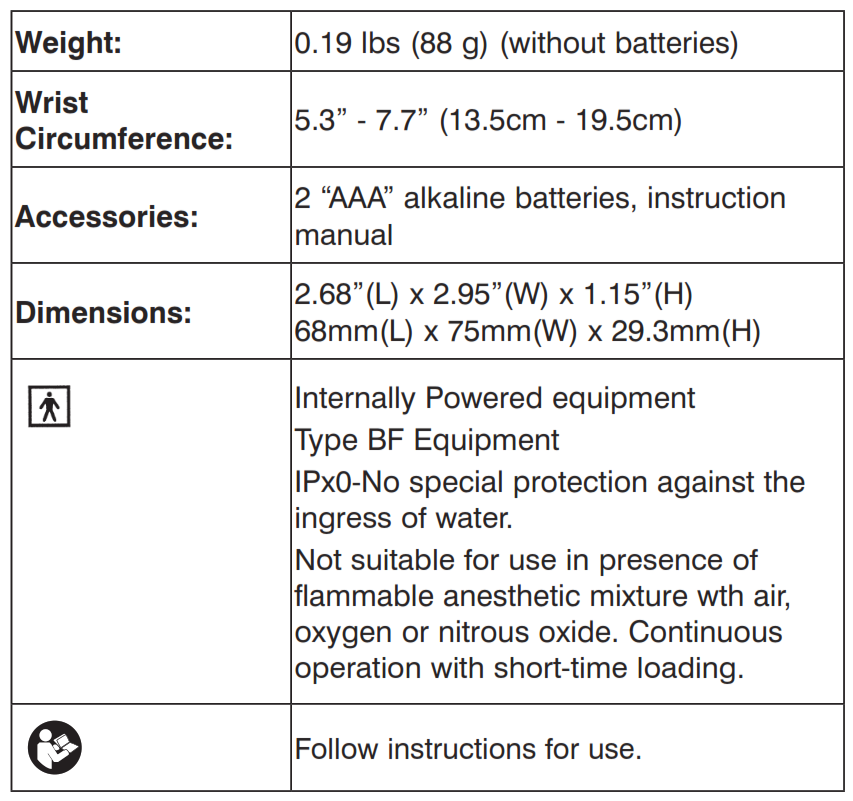
Note: These specifications are subject to change without notice.
LIMITED FIVE YEAR WARRANTY
HoMedics sells its products with the intent that they are free of defects in manufacture and workmanship for a period of five years from the date of original purchase, except as noted below. HoMedics warrants that its products will be free of defects in material and workmanship under normal use and service. This blood pressure monitor meets the simulated measurement cycles test requirement per EN1060-3, part 8.10. This warranty extends only to consumers and does not extend to Retailers.
To obtain warranty service on your HoMedics product, contact a Consumer Relations Representative by telephone at 1-800-466-3342 for assistance. Please make sure to have the model number of the product available.
HoMedics does not authorize anyone, including, but not limited to, Retailers, the subsequent consumer purchaser of the product from a Retailer or remote purchasers, to obligate HoMedics in any way beyond the terms set forth herein. This warranty does not cover damage caused by misuse or abuse; accident; the attachment of any unauthorized accessory; alteration to the product; improper installation; unauthorized repairs or modifications; improper use of electrical/power supply; loss of power; dropped product; malfunction or damage of an operating part from failure to provide manufacturers recommended maintenance; transportation damage; theft; neglect; vandalism; or environmental conditions; loss of use during the period the product is at a repair facility or otherwise awaiting parts or repair; or any other conditions whatsoever that are beyond the control of HoMedics.
This warranty is effective only if the product is purchased and operated in the country in which the product is purchased. A product that requires modifications or adoption to enable it to operate in any other country than the country for which it was designed, manufactured, approved, and/or authorized, or repair of products damaged by these modifications is not covered under this warranty.
THE WARRANTY PROVIDED HEREIN SHALL BE THE SOLE AND EXCLUSIVE WARRANTY. THERE SHALL BE NO OTHER WARRANTIES EXPRESS OR IMPLIED INCLUDING ANY IMPLIED WARRANTY OF MERCHANTABILITY OR FITNESS OR ANY OTHER OBLIGATION ON THE PART OF THE COMPANY WITH RESPECT TO PRODUCTS COVERED BY THIS WARRANTY. HOMEDICS SHALL HAVE NO LIABILITY FOR ANY INCIDENTAL, CONSEQUENTIAL OR SPECIAL DAMAGES. IN NO EVENT SHALL THIS WARRANTY REQUIRE MORE THAN THE REPAIR OR REPLACEMENT OF ANY PART OR PARTS WHICH ARE FOUND TO BE DEFECTIVE WITHIN THE EFFECTIVE PERIOD OF THE WARRANTY. NO REFUNDS WILL BE GIVEN. IF REPLACEMENT PARTS FOR DEFECTIVE MATERIALS ARE NOT AVAILABLE, HOMEDICS RESERVES THE RIGHT TO MAKE PRODUCT SUBSTITUTIONS IN LIEU OF REPAIR OR REPLACEMENT.
This warranty does not extend to the purchase of opened, used, repaired, repackaged, and/or resealed products, including but not limited to the sale of such products on Internet auction sites and/or sales of such products by surplus or bulk resellers. Any and all warranties or guarantees shall immediately cease and terminate as to any products or parts thereof which are repaired, replaced, altered, or modified, without the prior express and written consent of HoMedics.
This warranty provides you with specific legal rights. You may have additional rights that may vary from state to state. Because of individual state regulations, some of the above limitations and exclusions may not apply to you.

Made exclusively for For service or repair, do not return this unit to the retailer. Contact HoMedics Consumer Relations at:
Email: [email protected]
Phone: 1-800-466-3342
Business Hours: 8:30 am-7 pm ET
Monday-Friday
Distributed by

HoMedics, LLC
3000 Pontiac Trail
Commerce
Township, MI
48390
Printed in China
HoMedics® is a registered trademark of HoMedics, LLC.
© 2012-2013 HoMedics, LLC. All rights reserved.
IB-WGNBPW710A
P/N: 323102378 VER. 001
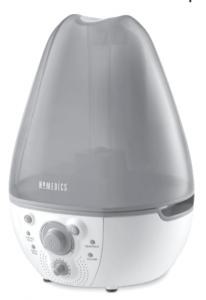
IMPORTANT SAFETY INSTRUCTIONS:
WHEN USING ELECTRICAL PRODUCTS, ESPECIALLY WHEN CHILDREN ARE PRESENT, BASIC SAFETY PRECAUTIONS SHOULD ALWAYS BE FOLLOWED, INCLUDING THE FOLLOWING:
READ ALL INSTRUCTIONS BEFORE USING
DANGER – TO REDUCE THE RISK OF ELECTRIC SHOCK:
- Always place humidifier on a firm, flat surface. A waterproof mat or pad is recommended for use under the humidifier. Never place it on a rug or carpet, or on a finished floor that may be damaged
by exposure to water or moisture. - Always unplug the unit from the electrical outlet immediately after using and before cleaning
- DO NOT reach for a unit that has fallen into water. Unplug it immediately.
- DO NOT use while bathing or in the shower.
- DO NOT place or store the unit where it can fall or be pulled into a tub or sink.
- DO NOT place or drop into water or other liquids.
- DO NOT use water above 86° Fahrenheit.
WARNING – TO REDUCE THE RISK OF BURNS, ELECTRIC SHOCK, FIRE OR INJURY TO PERSONS:
- A unit should never be left unattended while plugged in.
- Close supervision is necessary when this unit is used by or near children, invalids, or disabled persons.
- Use this unit only for its intended use as described in this manual. Do not use attachments not recommended by HoMedics; specifically any attachments not provided with this unit.
- NEVER drop or insert any object into any opening.
- DO NOT operate where aerosol (spray) products are being used, or where oxygen is being administered.
- Always hold the water tank firmly with both hands when carrying a full tank of water.
- NEVER use the humidifier in an environment where explosive gasses are present.
- DO NOT place the humidifier near heat sources, such as a stove, and do not expose the humidifier to direct sunlight.
- DO NOT carry this unit by the power cord or use the power cord as a handle.
- To disconnect, turn all controls to the “off” position, then remove the plug from the outlet.
- This unit is designed for personal, non-professional use only.
- DO NOT use outdoors. For indoor use only.
SAVE THESE INSTRUCTIONS
CAUTION – PLEASE READ ALL INSTRUCTIONS CAREFULLY BEFORE OPERATION.
- Never cover the unit while it is operating.
- Always keep the cord away from high temperature and fire.
- If the cord sustains damage, you must stop using this product immediately and contact HoMedics consumer relations (see Warranty section for consumer relations contact information).
- Perform regular maintenance on the ultrasonic membrane.
- Never use detergent to clean the ultrasonic membrane.
- Never clean the ultrasonic membrane by scraping with a hard object.
- Do not attempt to adjust or repair the unit. Servicing must be performed by professional or qualified personnel.
- Stop using this unit if there is an unusual noise or smell.
- Unplug this unit when not in use for a long period of time.
- Do not touch the water or any parts of the unit that are covered by water while the unit is on or plugged in.
- Never operate without water in the tank.
- Only use water in the tank.
- Never use any additive to the water.
- Do not wash, adjust, or move this unit without first unplugging it from the electrical outlet.
- Keep this unit out of reach of children. Do not allow children to use this unit without supervision.
Unique Features and Specifications
Ultrasonic Technology
This humidifier uses ultrasonic high frequency technology to convert the water into 1-5 million super particles that are dispersed into the air evenly.
Night Light
A useful night light feature is included for your convenience.
Auto Shut-Off Protection
When the tank is empty the unit will shut off automatically.
Voltage Watts Tank Capacity
110–120V/60Hz 25 gallon – 3.78 liters
Ultrasonic Cool Mist Humidifier
How To Use
CAUTION: This appliance has a polarized plug (one blade wider than the other). To reduce the risk of shock, this plug is intended to fit only one way in a polarized outlet. If the plug does not fit fully in the outlet, reverse the plug. If it still does not fit, contact a qualified electrician.
DO NOT attempt to defeat this safety feature. To do so could result in an electric shock hazard.
How To Use
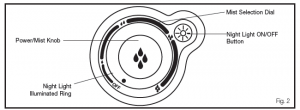
Power/Mist Knob
Plug unit into a 120 volt AC electrical outlet. Turn the POWER/MIST ( ) knob clockwise to
turn the humidifier on.
ATTENTION: When the water in the tank is almost empty, the humidifying function will power off
to indicate to the user to refill the tank.
Mist Adjustment Setting
Mist adjusts from MINIMUM ( ) mist to MAXIMUM ( ) mist. To increase the mist output,
turn the POWER/MIST knob clockwise. To decrease mist output, turn the POWER/MIST knob
counter-clockwise.
Night Light
Press the NIGHT LIGHT ( ) button to turn on the night light. The surround around the
POWER/MIST knob will glow softly.
How to Fill
CAUTION: Before filling unit with water, turn power off and unplug unit from the outlet.
Note: Always use two hands to carry the water tank.
- Grasp tank handle and lift up from humidifier base.
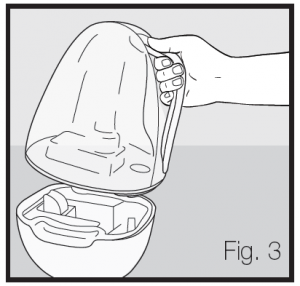
- Turn the tank upside down—remove the tank cap by turning it counter-clockwise.
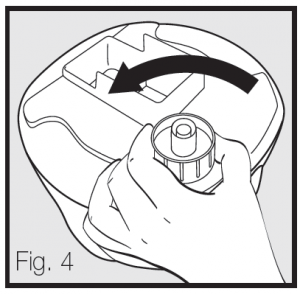
- Fill the water tank with clean, cool (not cold) water. We recommend using distilled water if you live in a hard water area.
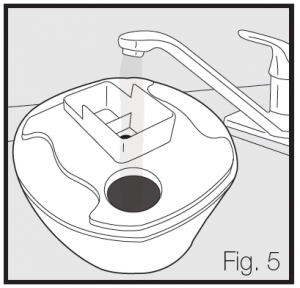
- Replace the tank cap by turning clockwise until tight.
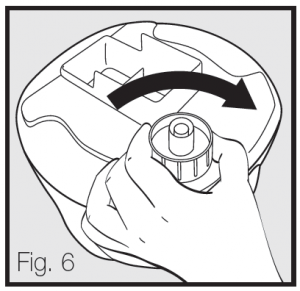
- Install the tank back on the base of the unit. Make sure the tank is firmly seated.
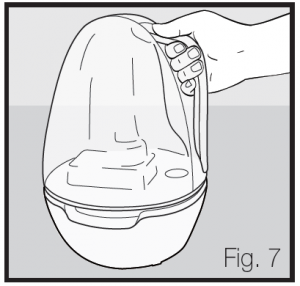
About White Dust:
Use of high mineral content hard water may cause a white mineral residue to accumulate on surfaces in the room near the humidifier. The mineral residue is commonly called “white dust.”
The higher the mineral content (or, the harder your water is), the greater the potential for white dust. The white dust is not caused by a defect in the humidifier. It is caused only by minerals
suspended in the water.
How and Why To Use Demineralization Cartridges:
The HoMedics demineralization cartridge will help reduce the potential for white dust, a deposit of minerals left behind from using hard water in your humidifier. The cartridge should be replaced every 30 – 40 fillings. The cartridge may need to be replaced more often if you are using very hard water. Replace the cartridge when you notice an increase in white dust build-up. If white dust still forms around the humidifier after a new cartridge has been installed, consider using distilled water. To purchase new demineralization cartridges, model # HUM-HDDC4-6CTM, go
back to the retailer (where you purchased your humidifier), or visit www.homedics.com
If you live in an area with hard water, or use a water softener, we recommend usingdistilled water for better results from your humidifier. Never use water softening additives in your humidifier.
Installing Instructions
- Remove demineralization cartridge from packaging and let it soak in water for 10 minutes.
- Remove the tank from humidifier base. (Fig. 3)
- Place the soaked demineralization cartridge into the matching slot in the humidifier base. (Fig. 9)
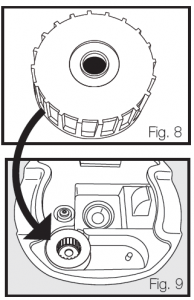
- Place the tank back on the base, making sure the tank is firmly seated. (Fig. 7)
Note: Demineralization cartridge has no top or bottom. Either side can
face upward.
Cleaning and Care
CAUTION: Before cleaning the unit, turn power off and unplug unit from the outlet.
Tank Cleaning
Remove the water tank from the humidifier base by lifting it from the main unit. Unscrew the tank cap and rinse inside the tank with clean water. To remove any scale or build up, use a 50/50 mixture of vinegar and lukewarm water to clean the inside of the tank.
Suggestion: Clean the water tank once every two to three weeks, depending on your water conditions.
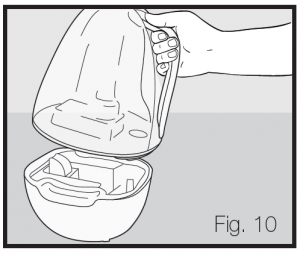
To Clean the Ultrasonic Membrane:
Put a small amount of mild dish soap on the surface of the ultrasonic membrane, then pour in some water and soak for 5 minutes. Brush clean with soft bristle brush (not included) and rinse. (Fig. 11)
Suggestion: Clean the membrane once every two to three weeks, depending on your water conditions.
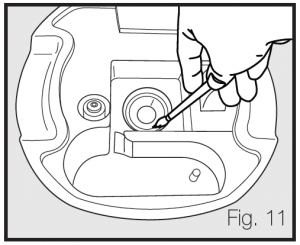
NOTE: Never submerge the base in water or any liquid.
Surface Cleaning Clean the surface of the unit with a clean damp soft cloth as often as needed. (Fig. 12)
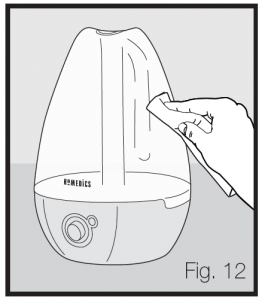
Troubleshooting
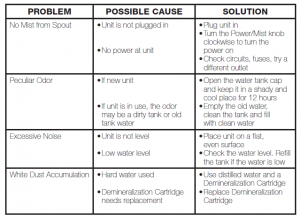
LIMITED ONE YEAR WARRANTY
HoMedics sells its products with the intent that they are free of defects in manufacture and workmanship for a period of one year from the date of original purchase, except as noted below. HoMedics warrants that its products will be free of defects in material and workmanship under normal use and service. This warranty extends only to consumers and does not extend to Retailers.
To obtain warranty service on your HoMedics product, contact a Consumer Relations Representative by telephone at 1-800-466-3342 for assistance. Please make sure to have the model number of the product available.
No COD’s will be accepted.
HoMedics does not authorize anyone, including, but not limited to, Retailers, the subsequent consumer purchaser of the product from a Retailer or remote purchasers, to obligate HoMedics in any way beyond the terms set forth herein. This warranty does not cover damage caused by misuse or abuse; accident; the attachment of any unauthorized accessory; alteration to the product; improper installation; unauthorized repairs or modifications; improper use of electrical/power supply; loss of power; dropped product; malfunction or damage of an operating part from failure to provide manufacturer’s recommended maintenance; transportation damage; theft; neglect; vandalism; or environmental conditions; loss of use during the period the product is at a repair facility or otherwise awaiting parts or repair; or any other conditions whatsoever that are beyond the control of HoMedics.
This warranty is effective only if the product is purchased and operated in the country in which the product is purchased. A product that requires modifications or adoption to enable it to operate in any other country than the country for which it was designed, manufactured, approved and/or authorized, or repair of products damaged by these modifications is not covered under this warranty.
THE WARRANTY PROVIDED HEREIN SHALL BE THE SOLE AND EXCLUSIVE WARRANTY. THERE SHALL BE NO OTHER WARRANTIES EXPRESS OR IMPLIED INCLUDING ANY IMPLIED WARRANTY OF MERCHANTABILITY OR FiTNESS OR ANY OTHER OBLIGATION ON THE PART OF THE COMPANY WITH RESPECT TO PRODUCTS COVERED BY THIS WARRANTY. HOMEDICS SHALL HAVE NO LIABILITY FOR ANY INCIDENTAL, CONSEQUENTIAL OR SPECIAL DAMAGES. IN NO EVENT SHALL THIS WARRANTY REQUIRE MORE THAN THE REPAIR OR REPLACEMENT OF ANY PART OR PARTS WHICH ARE FOUND TO BE DEFECTIVE WITHIN THE EFFECTIVE PERIOD OF THE WARRANTY. NO REFUNDS WILL BE GIVEN. IF REPLACEMENT PARTS FOR DEFECTIVE MATERIALS ARE NOT AVAILABLE, HOMEDICS RESERVES THE RIGHT TO MAKE PRODUCT SUBSTITUTIONS IN LIEU OF REPAIR OR REPLACEMENT.
This warranty does not extend to the purchase of opened, used, repaired, repackaged and/or resealed products, including but not limited to sale of such products on Internet auction sites and/or sales of such products by surplus or bulk resellers. Any and all warranties or guarantees shall immediately cease and terminate as to any products or parts thereof which are repaired, replaced, altered, or modified, without the prior express and written consent of HoMedics.
This warranty provides you with specific legal rights. You may have additional rights which may vary from country to country. Because of individual country regulations, some of the above limitations and exclusions may not apply to you.
For more information regarding our product line in the USA, please visit: www.homedics.com
SS-4520
Instruction Manual and Warranty Information
1 year limited warranty
Create your perfect sleep environment.
Thank you for purchasing Sound Spa, the HoMedics acoustic relaxation machine. This, like the entire HoMedics product line, is built with high-quality craftsmanship to provide you years of dependable service. We hope that you will find it to be the finest product of its kind.
Sound Spa helps create your perfect sleep environment. Fall asleep to any of its eight calming sounds, then wake to nature sounds or alarm. Sound Spa can also mask distractions to improve your concentration while you read, work or study.
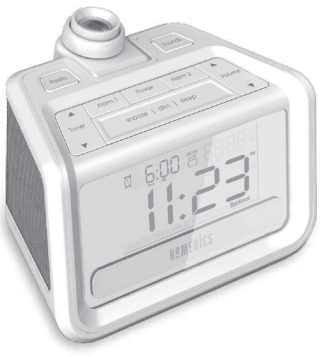
Sound Spa Clock Radio Features
- 8 Nature Sounds: rain, ocean, brook, white noise, thunderstorm, rainforest, fan, and campfire.
- Built-in projector to display time on ceiling, wall, or any flat surface
- Full function dual alarm with snooze and gradual wake
- Digital FM radio
- Enhanced LCD display
- Battery backup (Battery type CR-2032)
IMPORTANT SAFEGUARDS:
WHEN USING AN ELECTRICAL PRODUCT, BASIC PRECAUTIONS SHOULD ALWAYS BE FOLLOWED, INCLUDING THE FOLLOWING:
READ ALL INSTRUCTIONS BEFORE USING
WARNING: DO NOT PLACE SPEAKERS TOO CLOSE TO EARS. MAY CAUSE DAMAGE TO EAR DRUMS, ESPECIALLY IN YOUNG CHILDREN.
- Close supervision is necessary when this product is used by, on or near children, invalids or disabled persons.
- Use this product only for its intended use as described in this manual. Do not use attachments not recommended by HoMedics.
- DO NOT place or store this product where it can fall or be dropped into a tub or sink.
- DO NOT place or drop into water or any other liquid.
- Not for use by children. THIS IS NOT A TOY.
- Turn off product when not in use.
- NEVER operate this product if it has a damaged cord, plug, cable or housing.
- Keep away from heated surfaces.
- Only set on dry surfaces. Do not place on surface wet from water or cleaning solvents.
SAVE THESE INSTRUCTIONS
CAUTION: PLEASE READ ALL INSTRUCTIONS CAREFULLY BEFORE OPERATING.
- NEVER leave the product unattended, especially if children are present.
- NEVER cover the product when it is in operation.
- This unit should not be used by children without adult supervision.
- Always keep the product away from high temperature and fire.
Battery Precautions
- Use only the size and type of batteries specified.
- When installing batteries, observe proper +/- polarities. Incorrect installation of battery may cause damage to the unit.
- Do not mix different types of batteries together (e.g., alkaline with carbon-zinc or old batteries with new ones).
- If the unit is not going to be used for a long period of time, remove batteries to prevent damage due to possible battery leakage.
- Do not dispose of batteries in fire. Batteries may explode or leak.
- Dispose of used batteries properly in accordance with all state, province, and county regulations.
Assembly and Instructions for Use
Unpack the unit carefully. Remove all the accessories from the carton. Do not remove any labels or stickers on the bottom of the unit or adapter. Before setting up the unit, verify that the following contents are present:
- Sound Spa Auto Set Clock Radio x 1
- AC Adapter and power cord x 1
Power Source
This unit is supplied with an AC adapter; take the following steps to connect the adaptor.
- Unwind the power cord of the AC adaptor to its full length.
- Connect the AC adapter to the DC5V Input.
- Plug the AC adapter into an outlet (100V – 240VAC 50/60 Hz).
- To power the unit off completely, unplug the AC adapter from the wall outlet.
NOTE: Connecting this system to any other power source may cause damage to the system. For sufficient ventilation, keep other objects at least 4 inches away from the unit.
Setting Clock Time
Press and hold (3 seconds) the TIME SET button on back of unit (Fig. 2), the hour will begin to flash. Select the hour using the VOLUME buttons on the top to adjust the hour (when in 12 hour mode remember to set correct AM/PM, a “PM” icon will be displayed) (Fig. 1), press TIME SET button again to select the minute using the VOLUME buttons on top again to adjust. Press TIME SET button again, now time is set.
NOTE: After time is set, press TIME SET button again and use the VOLUME button to select 12 or 24 hour format.
Setting and Using the Alarms
Setting Alarm 1 or Alarm 2
- Press and hold (3 seconds) the desired alarm button (ALARM 1 or ALARM 2) located on the top of the unit to activate the alarm set feature. (Fig. 1)
- Press and hold the ALARM button again and the hour will begin flashing.
- Use the TUNER button (or the volume up/down button) on top of the unit to adjust the hour, paying attention to the AM and PM indicators (when in 12 hour mode).
- Press the ALARM button again and the minute will begin flashing. Use TUNER button again to adjust the minute.
- Press the ALARM button again to select the source. The alarm can be set to sound a Beep, Nature Sounds or play the FM radio. Select using the TUNER button.
- Press ALARM button again to adjust the maximum volume of the gradual wake feature (alarm begins soft and slowly gets louder) by using the TUNER buttons to adjust the sound level up or down.
- Press the ALARM button a final time, the alarm is now set.
Turning Off The Alarm / Snooze Operation
The Sound Spa is equipped with gradual wake, which means that the alarm begins soft and slowly gets louder. This will ensure a non-jarring wake-up.
- After the alarm sounds, press the SNOOZE bar located on the top of the unit and the alarm will sound again after nine minutes.
NOTE: You may only press the SNOOZE button during the ALARM mode for one hour (7 times). After the seventh time, the alarm will turn off and will not sound again until the next set time. - To turn off the alarm, press any button (except the SNOOZE/DIM/SLEEP button) on the top of the unit.
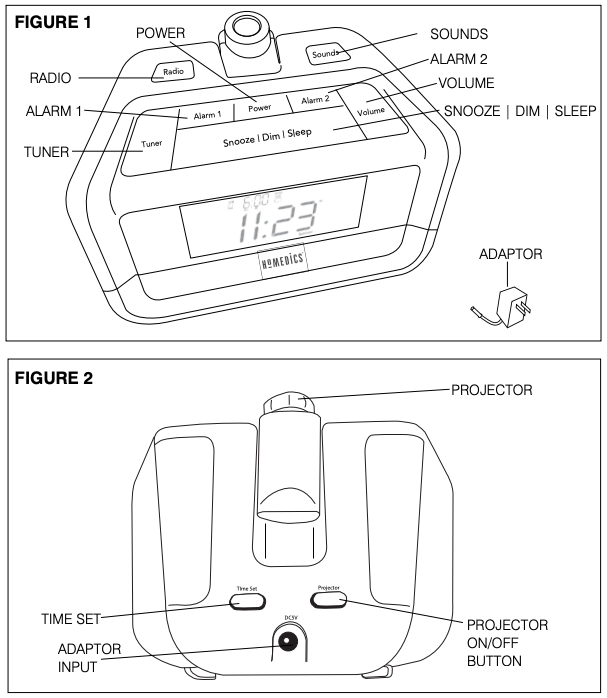
Listening to the Radio
NOTE: For best reception, fully unwind the wire antenna. DO NOT strip, alter or attach to other antennas.
- To listen to the radio, press the POWER button located on top of the unit.
- Press the RADIO button on the unit until FM icon and station frequency appears on the display.
- Use the TUNER selector button on the top of the unit to select desired station. For auto seek press and hold TUNER selector for 2 seconds then release and the tuner will find the next station with a signal.
- Press the POWER button to turn radio off.
Sounds
- To listen to the Nature Sounds, press the POWER button on the top of the unit.
- Press the SOUND button to scroll through the sounds.
- Your sound selection will illuminate on the LCD screen.
Sleep Feature
While listening to the radio press the SNOOZE/DIM/SLEEP button to activate the sleep feature. This allows you to set a sleep timer for 15, 30, 45, and 60 minutes. Once set, the unit will continue playing for the set length of time, then will automatically turn off.
Projector Function
The Sound Spa is equipped with a feature that allows you to project the TIME on any flat surface.
- To turn projector on, press the PROJECTOR button on back of unit.
- Carefully move the PROJECTOR device up or down to change where the image gets projected.
- To adjust the focus, carefully turn the round end of the projector lens to the desired focus.
- Press the PROJECTOR button to turn off.
Volume Control
To adjust the volume, use the VOLUME buttons located on the top of the unit.
Display Dimmer Control
Press the SNOOZE/DIM/SLEEP bar to adjust the backlight intensity of the clock display. The POWER selector button needs to be off to use the dimmer control.
Backup Battery
This alarm clock is equipped with a battery backup feature (1 CR-2032 battery included and already installed) to keep the clock time and alarm settings during power outage. The battery is located on the bottom of the unit for easy access (small Phillips head screw driver required, not included).
Maintenance
To Store: You may leave the unit on display, or you can store it in a cool, dry place.
To Clean: Use only a soft dry cloth to clean the enclosure of the unit.
NEVER use liquids or abrasive cleaner to clean.
FCC Disclaimer
NOTE: This device complies with part 15 of the FCC Rules. Operation is subject to the following two conditions: (1) This device may not cause harmful interference, and (2) this device must accept any interference received, including interference that may cause undesired operation.
NOTE: This equipment has been tested and found to comply with the limits for a Class B digital device, pursuant to part 15 of the FCC Rules. These limits are designed to provide reasonable protection against harmful interference in a residential installation. This equipment generates, uses and can radiate radio frequency energy and, if not installed and used in accordance with the instructions, may cause harmful interference to radio communications. However, there is no guarantee that interference will not occur in a particular installation. If this equipment does cause harmful interference to radio or television reception, which can be determined by turning the equipment off and on, the user is encouraged to try to correct the interference by one or more of the following measures:
- Reorient or relocate the receiving antenna.
- Increase the separation between the equipment and receiver.
- Connect the equipment into an outlet on a circuit different from that to which the receiver is connected.
- Consult the dealer or an experienced radio/TV technician for help.
Changes or modifications not expressly approved by HoMedics could void the user’s authority to operate the equipment.
]]>
Instruction Manual DWS-150
GETTING STARTED
- IMPORTANT: Insert batteries into the home receiver unit first.
Lift off the battery cover on the back of the home receiver. Install 2 alkaline AA batteries (included) according to the polarity indicated. Close the battery cover.
Loosen the 4 screws securing the battery cover with a small screwdriver (included) and remove. Insert 2 alkaline AA batteries according to the polarity direction indicated. Replace the cover and tighten the 4 screws. - Place the home receiver as close as possible to the remote sensor. This will help with synchronization between the two units.
- REMEMBER: Once you are ready to position your remote sensor and the home receiver, ensure that the distance is not outside the effective transmission range (100 feet). Some building materials and location of the home receiver or remote sensor can affect transmission quality and range. Try various locations for best results.
NOTE: There are no consumer serviceable parts. All questions or service request should directed to our consumer relations department. (See Warranty section for contact information.)
SETTING TIME
RADIO-CONTROLLED CLOCK
The home receiver will start synchronizing the clock after the 1st channel of the RF thermometer is registered.
- At normal mode, hold the “ – ” button located on the back of the home receiver for 3 seconds to force synchronization.
- The antenna icon will appear during the synchronization process (on the right side of the time display).
- If the icon disappears afterwards, radio time signal is not available at that moment. Try setting the home receiver in other locations. Remember to place the unit away from sources of interference such as mobile phones, appliances, TV etc.
- Antenna icon will appear on screen if the radio time reception is successful. The radio-controlled clock will have a daily synchronization at 1:00 am everyday. If previous attempts of reception were unsuccessful, the home receiver will attempt synchronization each hour until successful.
- Each reception cycle is minimum 2 minutes and maximum 10 minutes.
TIME ZONE SELECTION
Press “ – ” button on back of home receiver to select from the following time zones in the U.S. (zone is displayed in the upper right hand corner of time display).
P – Pacific Standard Time
C – Central Standard Time
M – Mountain Standard Time
E – Eastern Standard Time
MANUAL SETTING FOR CLOCK & CALENDAR
- Hold “SET ” button for 3 seconds to enter clock set.
- First, select 12 hour or 24 hour setting using the “ + , – ” buttons located on the back of the home receiver. Press “ SET ” button to confirm.
- Select Hour – Use the “ + , – ” buttons located on the back of the home receiver to adjust hour setting. Press “ SET ” button to confirm.
- Select Minute – Use the “ + , – ” buttons located on the back of the home receiver to adjust minute setting. Press “ SET ” button to confirm.
- DST On/Off (Daylight Savings Time) – Use the “ + , – ” buttons to turn DST on or off. Press “ SET ” button to confirm.
Now you will select the calendar settings - Select Year – Use the “ + , – ” buttons located on the back of the home receiver to adjust year setting. Press “ SET ” button to confirm.
- Select Month – Use the “ + , – ” buttons located on the back of the home receiver to adjust month setting. Press “ SET ” button to confirm.
- Select Day – Use the “ + , – ” buttons located on the back of the home receiver to adjust day setting. Press “ SET ” button to confirm.
- Select Fahrenheit/Centigrade Temperature Readings – Use the “ + , – “ buttons located on the back of the home receiver to toggle between Fahrenheit or Centigrade readings. Press “ SET ” button to confirm.
SETTING ALARM TIME
- Hold the “CLEAR
 ” button for 3 seconds. Press “ + , – ” on the back of the unit to enter the desired Hr/ Min values. Press “CLEAR
  ” to confirm.
 - To view alarm time – Press “CLEAR
 ” button. Alarm time will display for 5 seconds and then resume to normal clock thereafter.
 - To select between daily alarm and snooze alarm or alarm off – Press “ + “ button on the back of the unit.
For Daily Alarm – The “ ” icon will appear in the upper left corner of the time display.
For Snooze Alarm – The “ ” icon will appear in the upper left corner of the time display (see photo to the right).
No Alarm – The “ ” icons will not be shown.
 - The home receiver will provide either a daily alarm, which last for 2 minutes or a snooze mode where the alarm will repeat every 8 minutes until manually cleared (see SNOOZE/LIGHT section below.)
SNOOZE/ LIGHT
- Press the SNOOZE/ LIGHT button for an extended backlight.
- In snooze alarm mode, press this button to trigger a repetitive snooze alarm.
- When daily alarm mode is selected, press “ +/
 ” button on back of home receiver to turn off the alarm for one day.
MIN/ MAX MEMORY SETTINGS
- Press ”MIN/ MAX“ button to view the maximum values for 5 seconds. Press again to view the minimum values.
- To clear the memory record, press “CLEAR
 ” while the respective values are displayed on screen.
TEMPERATURE TREND INDICATOR:
In the upper right hand corner of the home receiver LCD display, you will see one of 3 icons;

will indicate Rising Temperature readings if it changes more than 1 degree in an hour

will indicate Steady Temperature readings

will indicate Falling Temperatures if it is more than 1 degree in an hour.
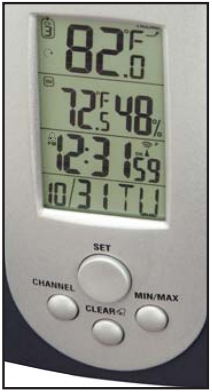 TEMPERATURE/ HUMIDITY ALERT
Press “ALERT” to turn temperature & humidity alert on and off.
- Hold “ALERT” button located on back of home receiver for 3 seconds to enter the alert setting mode. The indoor icon will flash.
- Press “ +, – ” to select the between indoor temperature, indoor humidity or remote sensor channel 1 to be alerted to. Press “ALERT” to confirm your selection. The Upper pointer and the value on the LCD display will flash, enter the desired upper limit with the “ +, – ” buttons, press “ALERT” to confirm your selection and then go to the lower limit setting.
- The Lower pointer and value will flash, enter the desired lower limit with “ +, – ” buttons, press “ALERT” to confirm and exit.
- You may enter an alert setting for the indoor temp, indoor humidity and temperature of the remote sensor channel 1.
- When temperature hits the limit of your preset levels, the Upper/Lower pointers and the temperature of the respective channel (indoor or remote sensor channel 1) will flash and produce an audible alarm. Press any button on the home receiver to acknowledge and stop the alarm.
LOW BATTERY INDICATION
Low battery indication is available for the home receiver and the remote sensor. “LO” will be displayed on the remote sensor. A battery life “  ” icon will be shown on the home receiver or on the remote sensor. Replace the batteries as necessary and follow the setup procedure as mentioned earlier in this instruction manual.
MOUNTING INSTRUCTIONS
Both the home receiver and remote sensor come with a table stand or they can be wall mounted.
Table Top –
For the home receiver, fold out the base on the back of the unit and snap into place. For the remote sensor, simply pull out the integrated stand from the bottom.
Wall Mounting –
For the home receiver – Snap stand in upright position. Set a screw (not included) into the desired wall and place unit onto the screw using the back side hanging hole.
For the remote sensor – Set a screw into the desired hanging location and mount.
MAINTENANCE AND CARE INSTRUCTIONS
- Extreme temperatures, shock or areas of unusual vibration should be avoided to prevent damage to the units.
- Clean the units using only a soft, damp cloth to wipe. Do not use solvents, abrasives, detergents or other strong cleaning agents. After cleaning, wipe surfaces with a dry cloth.
- Do not submerge units in water or other liquids.
- Do not subject the units to extremely severe temperatures – DO NOT PLACE UNITS INTO OVENS, FREEZERS or MICROWAVE OVENS.
NOTES
- Opening the housing of either the remote sensor or the home receiver will invalidate your warranty. Do not attempt to repair this unit. There are no consumer serviceable parts.
- If you encounter any difficulties in setting up your wireless thermometer system, please contact Consumer Relations.
- Your new RF Thermometer is built with random security code technology. The home receiver will learn the random code of the first remote sensor and log it in as channel 1. Channel 2 and Channel 3 will be registered in the same way if additional sensors are used. The home receiver can monitor up to 3 separate sensors.
- Once a channel is registered, it will not accept any new sensors. However, registered channels can be erased by removing the batteries in the remote sensor or the home unit.
- When replacing batteries for the remote sensor – Remember to clear the corresponding channel of the home receiver by removing the batteries –OR– Select the respective channel of the sensor by pressing the CHANNEL button on the home receiver. Hold the CHANNEL button for 3 seconds to clear the registration.
- When replacing batteries for the home receiver – Please remove the batteries of all remote sensors. Once you have replaced the home receiver batteries, re-install the batteries to the sensors according to the desired channel sequence. This will ensure that the home receiver and the remote sensors are properly synchronized.
- Press the Tx button on the back of remote sensor to verify the RF reception.
- It is recommended to test the home receiver and the remote sensor next to each other to ensure that both are properly synchronized.
- Keep the remote sensor out of direct sunlight and rain. Do not mount on a metal surface.
About the Atomic Clock
The National Institute of Standard and Technology (NIST) in Fort Collins, Colorado broadcasts the time signal (WWVB at 60kHz AM radio signal) with an accuracy of 1 second per every 3,000 years. The signal will cover a distance up to 2,000 miles from the source. Like a typical AM radio, your Atomic Clock will not able to receive the WWVB signal in places surrounded by heavy concrete or metal panels. The reception of the time signal can be affected by mobile phones, TV, electrical appliances or other electronic interference. To get the best performance of the Atomic clock, please install the home receiver near a window and away from large metallic objects. If the unit is not working properly, change the unit position. There may be some interference at this location.
TROUBLE SHOOTING
Indoor and Outdoor temperatures do not match when placed next to each other –
Each sensor is manufactured to be +/- 2 degrees in accuracy under normal conditions. So it is possible to have up to four degrees difference shown on the separate temperature sensors (one could be “+2 degree” and the other “-2 degrees”. Additionally, the calibration curve is different between the two units because of the greater temperature range of the outdoor sensor. Errors are usually noted on the extreme ends of the temperature ranges.
Base unit is not accepting remote transmissions –
The units may not be properly synchronized or the batteries may need to be replaced. See “GETTING STARTED” section beginning on page 2 of the instructions for detailed instructions. With the two units next to each other, attempt synchronization. Remember to always place the remote sensor within the effective transmission range and away from large metal surfaces.
What is the recommended battery type?
Your units will come with 4 “AA” alkaline batteries (2 “AA” batteries required for each unit). We recommend using only alkaline batteries for replacements.
Where can I mount the remote sensor?
To get accurate readings and to prolong the life of your sensor, we recommend that you mount it out of direct sunlight and rain. Fog and mist will not affect the sensor, but large volumes of soaking rain may. To guard against this, we recommend that you mount it under the eve of your house, your garage or any other suitable place that will keep it out of direct sun and rain.
Outdoor Temperature Reading shows “- -”
This is usually an indication that the channel selector (located in the top left corner of the home receiver) is set incorrectly to receive the signal from the remote sensor. If you have only one remote sensor, ensure that the channel selector is set to “1”. To change the channel, press the “channel” button located on the front of the home receiver.
The home receiver may also be “scrolling” – looking for sensor readings from more than one remote sensor. This home receiver can support up to three remote sensors (only one is included). If it is looking for more than one remote sensor, a “  ” icon will appear below the channel designator. Again, to select a reading from just one remote sensor, press the “channel” button to remove the scroll icon and ensure that the channel selected now reads “1”.
FCC DISCLAIMER
This device complies with part 15 of the FCC rules. Operation is subject to the following two conditions:
- This device may not cause harmful interference, and
- This device must accept any interference received, including interference that may cause undesired operation.
Freq. 434 MHz
FCC ID: L5C0761TX-1 (Transmitter)
SPECIFICATIONS
Range of temperature/humidity measurement:
Indoor temp : +32 F to +122 F (0 C to + 50 C)
Indoor humidity: 20% to 99% RH
Remote sensor: -4 F to +140 F (-20 C to +60 C)
Channel: max. 3 remote sensors
Temp. Alert: Indoor Temp/ Humidity and Ch 1
Transmission: max. 100 ft. (30 m) open area, RF434 MHz
Resolution: 0.1 degree for temperature, 1% for humidity
Clock: WWVB Radio-controlled
Batteries: (4) Alkaline AA batteries; 2 home receiver
2 remote sensor
Name and Functions of Buttons:

PREMIUM ARM
Blood Pressure Monitor
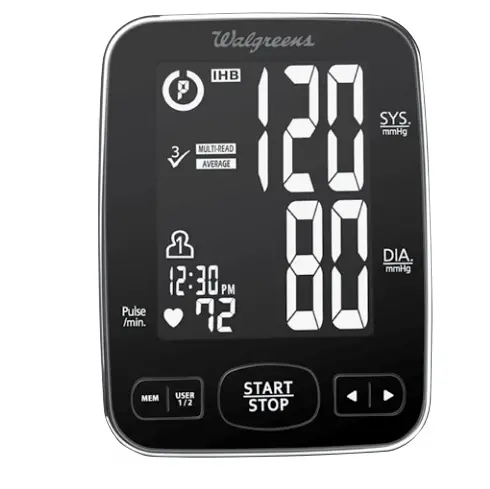
WGNBPA-750
IB-WGNBPA750A
Ver. A
IMPORTANT PRODUCT NOTICES AND SAFETY INSTRUCTIONS
When using your blood pressure monitor, basic precautions should always be followed. Please read and follow all instructions and warnings before using this product. Save these instructions for future reference.
- Please note that this is a home healthcare product only and it is not intended to serve as a substitute for the advice of a physician or medical professional.
- This device uses the oscillometric method to measure systolic and diastolic blood pressure, as well as heart rate.
- Do not use this device for diagnosis or treatment of any health problem or disease. Measurement results are for reference only. Consult a healthcare professional for interpretation of pressure measurements. Contact your physician if you have or suspect any medical problem. Do not change your medications without the advice of your physician or healthcare professional.
- Proper cuff size is critical for accurate measurements. Follow the instructions in this manual and printed on the arm cuff to ensure the appropriate size of cuff is being used.
- This product is not suitable for people with arrhythmias. This device may have difficulty determining the proper blood pressure for pregnant women and for users with irregular heartbeat, diabetes, poor circulation of blood, kidney problems or for users who have suffered from a stroke.
- Excessive use may result in blood overflow interference, which is likely to cause uncomfortable sensations, such as partial subcutaneous hemorrhage, or temporary numbness to your arm. In general, these symptoms should not last long. However, if you do not recover in time, please seek advice from a medical professional.
- The pulse display is not suitable for checking the frequency of heart pacemakers.
- Electromagnetic interference: The device contains sensitive electronic components. Avoid strong electrical or electromagnetic fields in the direct vicinity of the device (e.g. mobile telephones, microwave ovens). These may lead to temporary impairment of measurement accuracy.
- Consider the electromagnetic compatibility of the device (ex. power disturbance, radio frequency interference etc.) Please use this device indoors only.
- Use blood pressure monitor only for its intended use.
- Do not wrap the cuff around body parts other than your arm.
- Not for use by or on persons under the age of 18.
- Do not use this device on infants, children, or those who cannot express their own intention.
- Do not plug or unplug the adapter power cord with wet hands.
- Please use only the AC adapter included with this monitor or 1.5V AA alkaline batteries for power supply. Blood pressure measurements determined with this device are equivalent to those obtained by a trained observer using the cuff/stethoscope auscultatory method, within the limits prescribed by the American National Standard, Manual, electronic, or automated sphygmomanometers.
ABOUT BLOOD PRESSURE
What is Blood Pressure?
Blood pressure is the pressure exerted on the artery walls while blood flows through the arteries. The pressure measured when the heart contracts and sends blood out of the heart is systolic (highest) blood pressure. The pressure measured when the heart dilates with blood flowing back into the heart is called diastolic (lowest) blood pressure.
Why Measure Your Blood Pressure?
Among today’s various health problems, those associated with high blood pressure are very common. High blood pressure dangerously correlates with cardiovascular diseases. Therefore, blood pressure monitoring is important for identifying those at risk.
BLOOD PRESSURE STANDARD
The table on page 6 contains defined levels for hypertension that are publicly available from the National Heart Lung and Blood Institute at the U.S. National Institutes of Health (NIH) (http://www.nhlbi.nih.gov/health/dci/Diseases/Hbp/HBP_WhatIs.html). Users can compare their own blood pressure readings against these defined levels to determine if they may be potentially at increased risk.
This table is applicable to most adults aged 18 and older.
Blood pressure tends to go up and down, even in people who normally don’t have high readings. If your numbers stay above the “normal” range most of the time, you may be at increased risk and should consult your physician.

Although one can easily find where their own blood pressure readings fall on this table, this monitor comes equipped with a Risk Category Index that automatically compares each reading to the defined levels and provides a helpful cue if your reading falls into one of the stages that could potentially indicate increased risk. See page 24 for more information on this feature.
Please note that cues provided by this monitor are only intended to assist you in using this table. The table and cues are only provided for convenience to help you understand your non-invasive blood pressure reading as it relates to the NIH information. They are not a substitute for a medical examination by your physician. It is important for you to consult with your physician regularly. Your physician will tell you your normal blood pressure range as well as the point at which you may actually be considered to be at risk.
HOW THIS BLOOD PRESSURE MONITOR WORKS
This monitor uses innovative technology to detect your systolic pressure, diastolic pressure and pulse. This technology enables the monitor to automatically inflate and deflate at the appropriate level for each individual. With one touch of a button, the cuff will automatically inflate to block the blood flow through your artery. Next, the deflation process starts. Please note that any muscle movement during inflation or deflation will cause measurement error. When measurement is complete, the monitor will display your systolic pressure, diastolic pressure, and pulse readings.
Before measurement, it is suggested that you sit quietly for 15 minutes before measurement as measurements taken in a relaxed state have greater accuracy. The Rest Assure function provides a helpful countdown of the last 5 minutes of this suggested time. Refer to page 14 for more information on this feature.
The Triple Check Measurement System automatically takes and averages three readings for accuracy you can trust. Refer to page 14 for more information on this feature.
The monitor automatically finds where your measurement results fall on the NIH’s National Heart Lung and Blood Institute’s table and provides a cue if your reading falls into one of the stages that could potentially indicate increased risk. Please refer to page 24 for more information on this feature.
The appearance of the icon indicates that a pulse irregularity consistent with an irregular heartbeat was detected during measurement. Refer to page 25 for more information on the Irregular Heartbeat Detector.
NAME/FUNCTION OF EACH PART
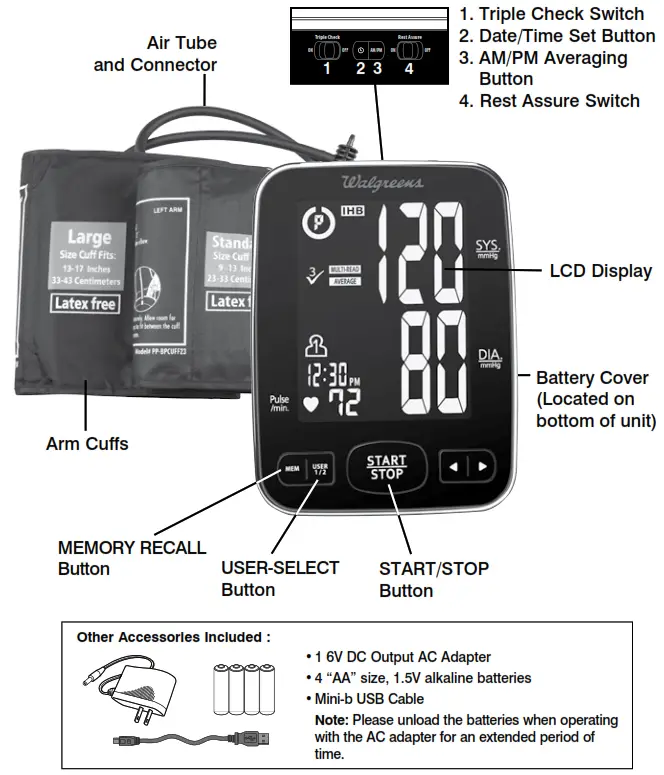
DISPLAY EXPLANATIONS
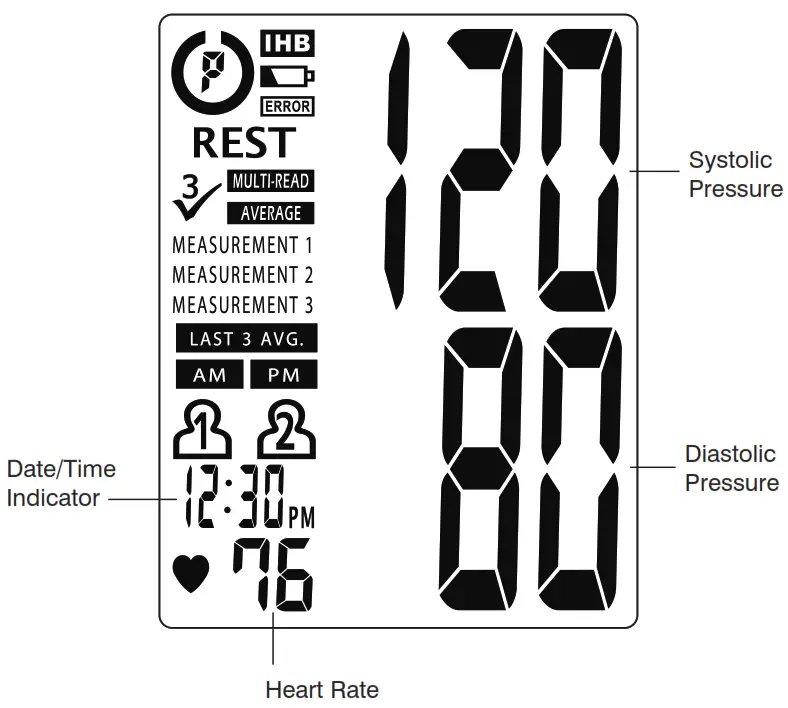
Display Symbols:
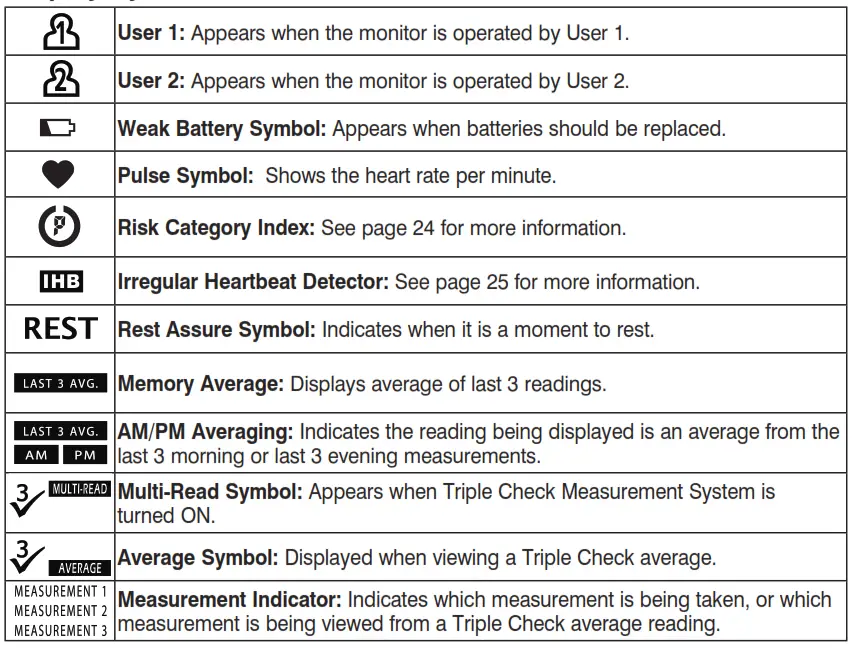
If any of the following letters and numbers appear in the area that systolic pressure should be displayed, an error has occurred with your reading. See Troubleshooting section of this manual for more information.
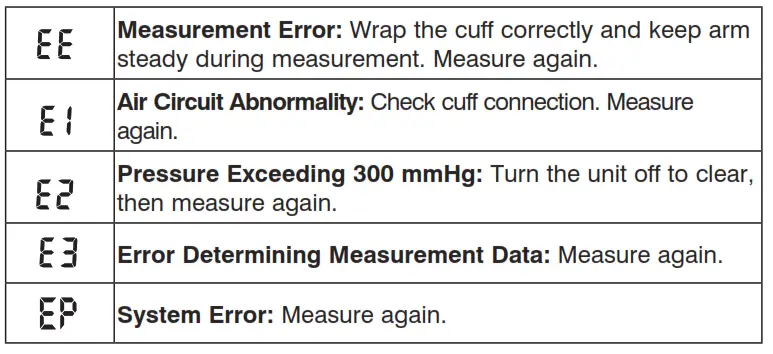
INSTALLING BATTERIES
- Press down on latch and lift the battery cover to open the battery compartment.
- Install or replace 4 “AA ” sized alkaline batteries in the battery compartment according to the indications inside the compartment.
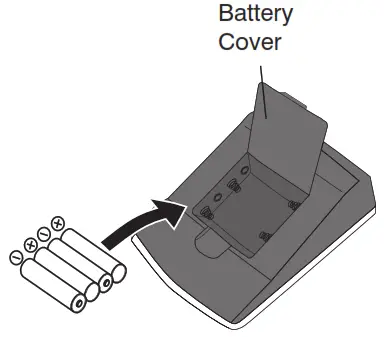
- Close the battery cover by pushing in the top end of the battery door.
Replace the batteries if:
- The weak battery symbol appears on the display.
- Nothing appears on the display when the power is switched on.
As the supplied batteries are for test only, they may be discharged earlier than batteries you buy in stores. Replace all batteries at one time (as simultaneous set). Use only 1.5V “AA ” alkaline batteries. Remove batteries when unit is not in use for extended periods of time. Date and time will need to be reset if batteries are removed or replaced. Clean contacts on battery and in battery compartment with a soft dry cloth each time you install batteries.
Note:
Batteries are hazardous waste. Do not dispose of them together with the household garbage.
USING THE AC ADAPTER
- Connect the AC adapter with the AC adapter jack as shown below.
- Please use only the AC adapter included with this monitor.
Note:
- Please unload the batteries when operating with an AC adapter for an extended period of time. Leaving the batteries in the compartment for a long time may
cause leakage, which may lead to damage to the unit. - No batteries are needed when operating with an AC adapter.
- Date and time will need to be reset if AC adapter is unplugged and unit is without batteries.
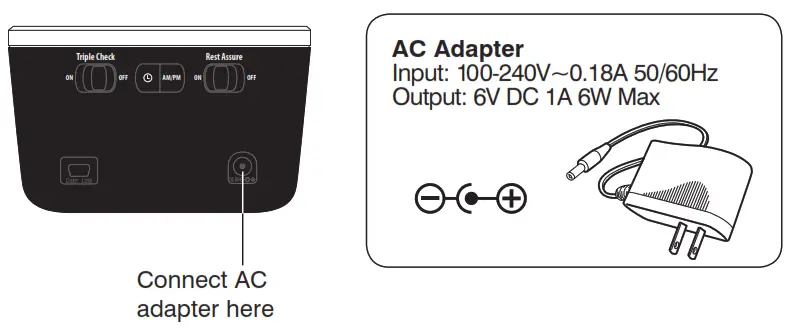
DATE & TIME SET PROCEDURE
- To adjust the date and time, press the DATE/TIME SET button
 .
.
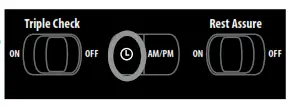
- The display will show a blinking number showing the YEAR. Change the YEAR by pressing the
 button. Each press will increase the number by one in a cycling manner. Pressing the
  button will decrease the number by one in a cycling manner. Press the DATE/TIME SET button Date Link again to confirm the entry, and the screen will show a blinking number representing the MONTH.
 - Change the MONTH, DAY, HOUR and MINUTE as described in Step 2 above, using the button/ button to change the numbers and the DATE/TIME SET button to confirm the entries.
(Please note that year does not appear on the display.)
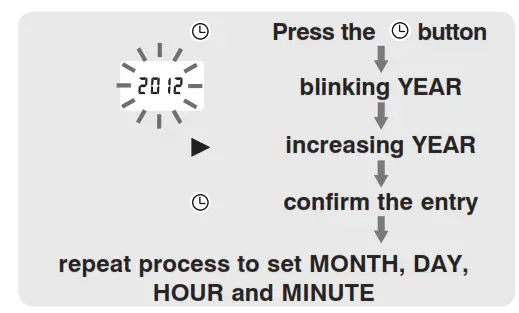
USING REST ASSURE
This blood pressure monitor features the Rest Assure function. It is suggested you sit quietly for 15 minutes prior to measurement. The Rest Assure function will count down the last 5 minutes before automatically starting the measurement. To turn this feature OFF, slide the switch on the back to the OFF position.

USING TRIPLE CHECK MEASUREMENT SYSTEM
The Triple Check Measurement System automatically takes and averages three readings in a row, with 1 minute rest intervals in between each measurement. To deactivate this feature and take only a single reading, slide the switch on the back to the OFF position.
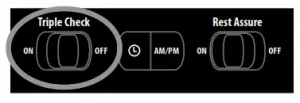
USING THE ARM CUFF
Very Important:
Proper cuff size is critical to accurate measurement.
This monitor comes with two sizes of arm cuffs:
Standard Size Fits 9”–13” (23 cm – 33 cm)
Large Size Fits 13”–17” (33 cm – 43 cm)
The appropriate cuff is suitable for your use if the colored arrow falls within the solid color line as shown below.
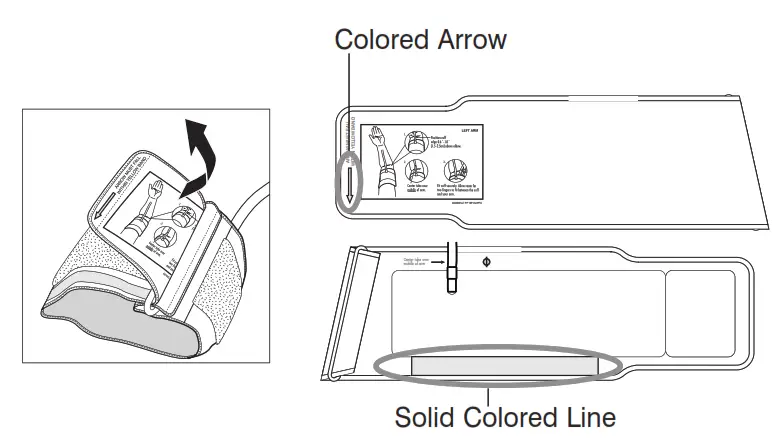
- If the cuff is not assembled, pass the end of the cuff furthest away from the tubing through the metal D-ring in order to form a loop. The smooth side without the felt material should be on the inside of the cuff loop.
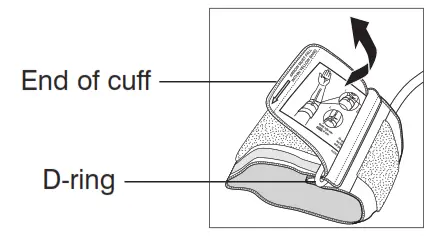
- Plug the cuff tube into the left side of the unit.
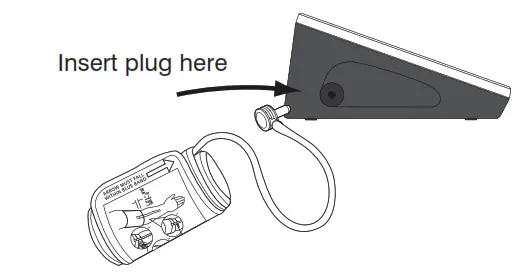
- Open the arm cuff so that your arm may be placed through it.
- Remove tight fitting clothing from your upper left arm so that the cuff can be wrapped around your exposed arm.
- Position cuff edge 0.8-1.2 inches (2-3 cm) above elbow.

- Center tube over middle of arm.
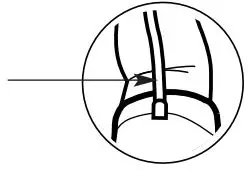
- Pull the end of the cuff so that it tightens evenly around your arm. Press the hook and loop material together to secure. Allow room for 2 fingers to fit between the cuff and your arm.
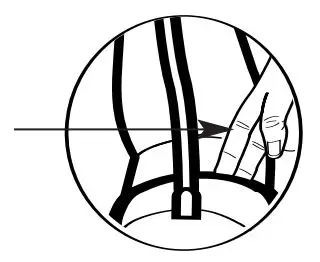
- Lay your arm on a table (palm upward) so the cuff is at the same height as your heart. Make sure the tube is not kinked.
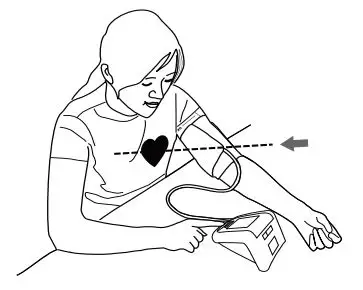
Note:
- This device should not be used when your arm is injured or wounded.
- If it is not possible to fit the cuff on your left arm, it can also be placed on your right arm. However, all measurements should be made using the same arm.
- To use on the right arm, you must position the artery symbol “ ” over the main artery. Locate the main artery by pressing with two fingers approximately 1” (2 cm) above the bend of your elbow on the inside of your right arm. Identify where the pulse can be felt the strongest. This is your main artery.
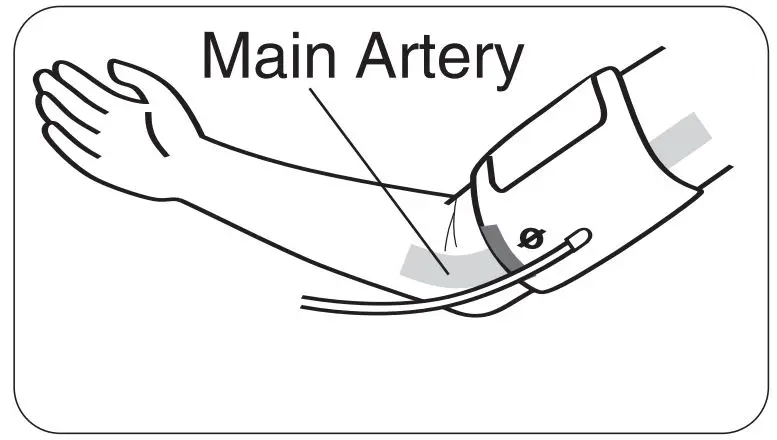
MEASUREMENT PROCEDURE
Important Notes:
- Blood pressure changes with every heartbeat and is in constant fluctuation throughout the day.
- Blood pressure measurement can be affected by the position of the user, his or her physiologic condition and other factors. For greatest accuracy, wait 1 hour after exercising, bathing, eating, drinking beverages with alcohol or caffeine, or smoking to measure blood pressure.
- Before measurement, it is suggested that you sit quietly for 15 minutes as measurements taken during a relaxed state will have greater accuracy. You should not be physically tired or exhausted while taking a measurement.
- During the measurement, do not talk or move your arm or hand muscles.
- See page 31 for additional notes regarding your blood pressure measurement.
If you are using this blood pressure monitor for the first time, please remove the protective film from the screen.
Using Single Measurement Mode:
- Please make sure the Triple Check measurement switch, located on the back of the unit, is in the OFF position.
- Press the USER-SELECT button to choose User 1 or User 2.
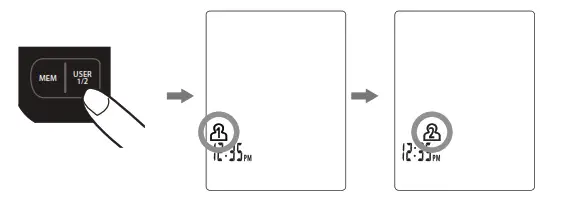
After the user number is selected, press the START/STOP button to confirm the chosen user. - With the cuff wrapped around your arm, press the START/STOP button. Do not inflate the cuff unless it is wrapped around your arm. All digits will light up to check the display functions. The checking procedure will be completed after about 3 seconds.

Note:
If the Rest Assure feature is ON, the 5 minute countdown will begin after the checking procedure is complete. - After all symbols disappear, the display will show “00”. The monitor is “Ready to Measure” and will automatically inflate the cuff to begin measurement. The cuff will start deflating as measurement continues.
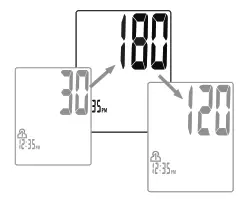
Note:
This monitor will re-inflate automatically if the system detects that your body requires more pressure for measurement. - When the measurement is completed, the cuff will deflate entirely. Systolic pressure, diastolic pressure and pulse will be shown simultaneously on the LCD screen. The measurement is then automatically stored into memory.
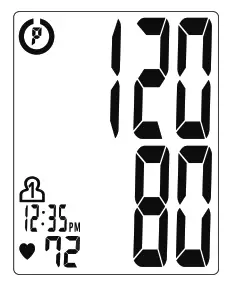
Note:
- This monitor automatically returns to standby mode approximately 30 seconds after last operation. You may also press the START/STOP button to return to standby mode.
- To interrupt the measurement, you may press the START/STOP (recommended), MEM, USER- SELECT or DATE/TIME SET (
 ) buttons. The cuff will deflate immediately after a button is pressed.
Using Triple Check Measurement:
- Please make sure the Triple Check measurement switch, located on the back of the unit, is in the ON position.

- Press the USER-SELECT button. After the user number is selected, press the START/STOP button to confirm the chosen user.
- With the cuff wrapped around your arm, press the START/STOP button. Do not inflate the cuff unless it is wrapped around your arm. All digits will light up to check the display functions. The checking procedurewill be completed after about 3 seconds.
Note:
If the Rest Assure feature is ON, the 5 minute countdown will begin after checking procedure is complete. - After all symbols disappear, the display will show “00”. The monitor is “Ready to Measure” and will automatically inflate the cuff to begin measurement. The cuff will begin deflating as measurement continues.
Note:
This monitor will reinflate automatically if the system detects that your body requires more pressure for measurement. - When the measurement is completed, the cuff will deflate entirely. Once the cuff is fully deflated, a 1 minute countdown will begin before starting the second measurement automatically. This process will continue until the end of the third measurement.
Note:
• If an ERROR code is displayed during measurement, the monitor will repeat the measurement up to 3 times during the consecutive measurement process.
• Remain still until all 3 measurements are completed. - At the conclusion of the third measurement, the Triple Check average will be displayed.
To review your individual results that make the Triple Check average, press the button.
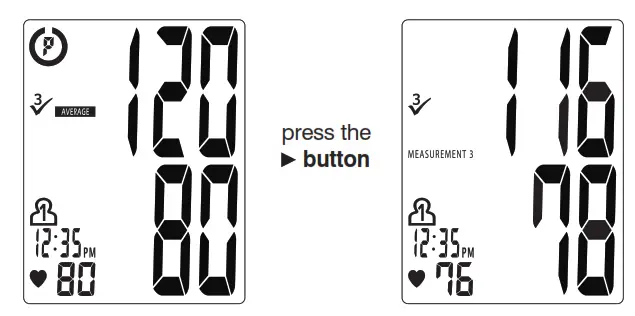
RISK CATEGORY INDEX
This monitor comes equipped with a Risk Category Index that automatically compares each reading to defined levels established by the U.S. National Institutes of Health’s (NIH) National Heart Lung and Blood Institute as described earlier in this manual, and provides a helpful cue if your reading falls into one of the stages that could potentially indicate increased risk. Please note that cues provided by this monitor are only intended to assist you in using this table. The table and cues are only provided for convenience to help you understand your non-invasive blood pressure reading as it relates to the NIH information. They are not a substitute for a medical examination by your physician. It is important for you to consult with your physician regularly. Your physician will tell you your normal blood pressure range as well as the point at which you may actually be considered to be at risk.

IRREGULAR HEARTBEAT DETECTOR (IHB)
The appearance of the icon indicates that a pulse irregularity consistent with an irregular heartbeat was detected during measurement. Usually this is not a cause for concern. However, if the symbol appears often, we recommend you seek medical advice. Please note that the device does not replace a cardiac examination, but serves to detect pulse irregularities at an early stage.
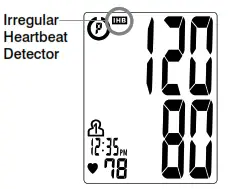 Movement, shaking or talking during the measurement can result in pulse irregularities that may cause the appearance of this icon. Therefore, it is of great importance to not move or talk during measurement.
To determine the presence of an irregular heartbeat, the average of the heartbeat intervals is calculated with the first 3 normal effective heartbeat values. It is important to note that the average is not a strict mathematical averaging of all recorded intervals. At least 3 beats with 25% or greater difference from the average heartbeat interval will generate the icon on the screen.
Important Information:
This blood pressure monitor is not designed for use by people with arrhythmias nor for diagnosing or treating an arrhythmia problem. As a safeguard, we recommend that if you have arrhythmias such as atrial or ventricular premature beats and atrial fibrillation or any other special conditions you should check with your physician before using your blood pressure monitor.
USING THE MEMORY FUNCTION
This monitor can be used by 2 users. Each user can store up to 120 measurements.
This monitor features an advanced memory mode to provide you with a variety of options for reviewing your measurement history, including AM/PM Averaging. Reviewing your morning (AM) and nighttime (PM) blood pressures can provide important information about how your blood pressure changes throughout the day.
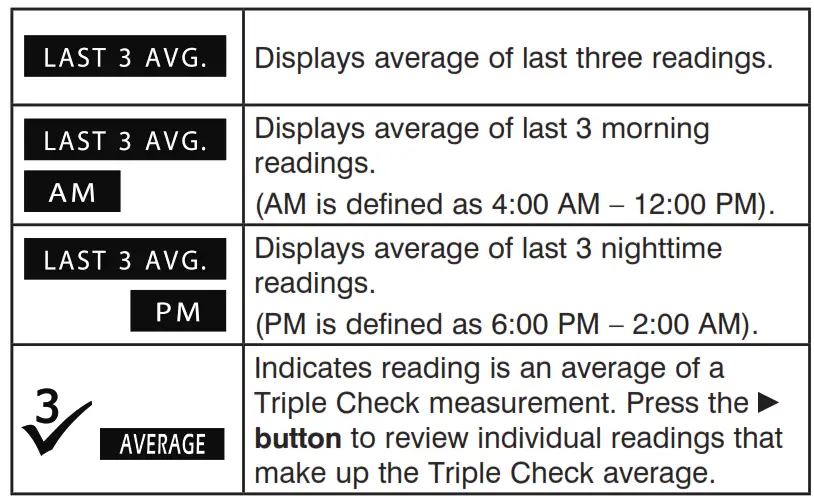
Note:
A Triple Check average and the 3 measurements that make this average, count as 4 readings when stored in memory.
To use the memory function:
- Press the USER-SELECT button to select User 1 or User 2.

- Press the MEM button to access memory.
- The monitor will first display the calculated average applied to the last 3 memories.
Note:
- If the last 3 readings were a Triple Check average, then the Triple Check average will be displayed.
- Memory averaging function will only average individual readings.
5. Every new press of the MEM button will recall a previous reading. The latest reading will be recalled first.
Note:
While reviewing the readings, the Triple Check Average icon may appear on the screen. Press the  button to review individual readings that make up the Triple Check average.
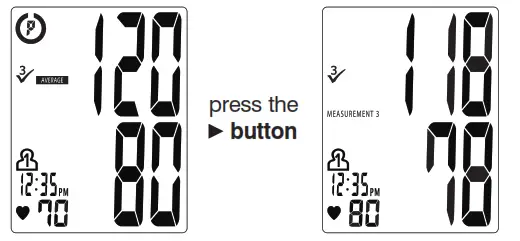
CLEARING VALUES FROM MEMORY
- Press the USER-SELECT button to select User 1 or User 2.
- Press and hold the DATE/TIME and buttons (

 ) at the same time while mmHg in memory recall mode and the data for the selected user will be erased automatically. DIA.
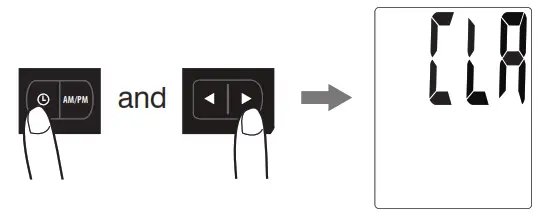
USING YOUR DEVICE WITH MICROSOFT® HEALTHVAULT™
Rather than entering data manually into Microsoft® HealthVault™, this monitor allows you to automatically upload your measurement data into a personal HealthVault™ account if desired. In HealthVault™, you can store your data and track your progress.
HealthVault™ is a free, privacy- and security-enhanced online Microsoft® service that puts you in control of your health information. HealthVault™ lets you store health information from many sources in a single location so that it’s always organized and available to you online. With HealthVault™, you can upload data from health and fitness devices and share your health information with your physicians and others you trust.
1. If desired, get started here: http://www.HealthVault.com/devicesetup
2. Create a personal HealthVault™ account to store your data online.
3. Track your progress using HealthVault™.
Connecting blood pressure monitor to computer
To download results to Microsoft® HealthVault™, the blood pressure monitor needs to be connected to a computer. This is done through a standard mini-b USB cable (included).
Connect the small end of the cable to your blood pressure monitor and the large end of the cable to the USB port on your computer. When connected properly, the monitor’s display will show
Note:
Only the individual readings will be uploaded to Microsoft® HealthVault™. The Triple Check average will not be uploaded.
To use Microsoft® HealthVault™, follow the directions at http://www.HealthVault.com

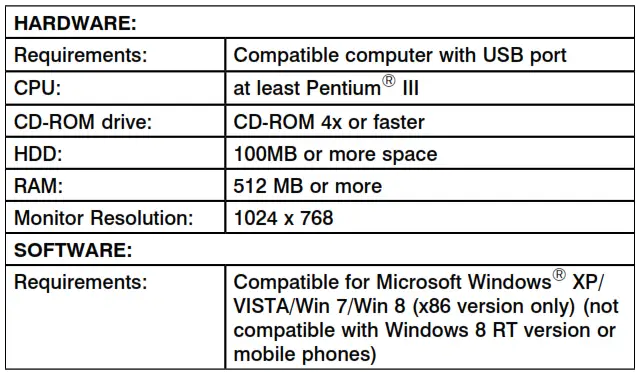
IMPORTANT NOTES REGARDING YOUR BLOOD PRESSURE MEASUREMENT
- Take your reading in a comfortable environment as measurements can be affected by hot or cold temperatures. Take your blood pressure at normal body temperature.
- Do not move or talk during measurement as this can elevate readings.
- Do not move or cross legs during measurement. Keep feet flat on the floor.
- Do not touch the cuff or monitor during the measurement procedure.
- It is suggested that you take your measurements at the same time each day and use the same arm for consistency.
- Users should wait a minimum of 5 minutes before taking additional measurements. More time may be necessary depending upon your physiology.
- The measurement results that users receive are for reference only. If users have any blood pressure concerns, please consult a physician.
- Once inflation reaches 300 mmHg, the unit will deflate automatically for safety reasons.
- This product is not suitable for people with arrhythmias.
- This device may have difficulty determining the proper blood pressure for pregnant women and for users with an irregular heartbeat, diabetes, poor circulation of blood, kidney problems, or for users who have suffered a stroke.
CARE, MAINTENANCE & CLEANING
- Clean the blood pressure monitor body and cuff carefully with a slightly damp, soft cloth. Do not press. Do not wash cuff or use chemical cleaner on it. Never use thinner, alcohol or petrol (gasoline) as cleaner.
- Leaky batteries can damage the unit. Remove the batteries when the unit will not be used for a long time.
- Follow local ordinances and recycling instructions regarding disposal or recycling of the device and device components, including batteries.
- If the unit is stored near freezing, allow it to acclimate to room temperature before use.
- This blood pressure monitor is not field serviceable. You should not use any tool to open the device nor should you attempt to adjust anything inside the device. If you have any problems with this device, please contact HoMedics Consumer Relations (contact information can be found on the warranty page).
- Do not immerse the unit in water as this will result in damage to the unit.
- Do not subject the monitor or cuff to extreme temperatures, humidity, moisture, or direct sunlight. Protect from dust.
- Do not fold the cuff and tubing tightly.
- Do not disassemble the monitor or cuff. If in need of repair, refer to the warranty section of this manual.
- Do not subject the monitor to extreme shocks (do not drop on floor).
- Do not inflate the cuff unless wrapped around arm.
- Do not wrap the cuff around body parts other than your arm.
- Do not drop or insert any object into any opening or hose.
- To avoid accidental strangulation keep this product away from children. Do not drape tube around neck.
- This monitor may not meet its performance specifications if stored or used outside of these temperature and humidity ranges:
- Storage/Transportation Environment
Temperature: -13°F~158°F (-25°C~70°C)
Humidity: less than 93% RH - Operating Environment
Temperature: 41°F~104°F (5°C ~40°C)
Humidity: 15% ~ 93% RH
POTENTIAL FOR ELECTROMAGNETIC INTERFERENCE
To avoid inaccurate results caused by electromagnetic interference between electrical and electronic equipment, do not use the device near a cell phone or microwave oven.
This device complies with Part 15 of the FCC Rules. Operation is subject to the following two conditions: (1) this device may not cause harmful interference, and (2) this device must accept any interference received, including interference that may cause undesired operation.
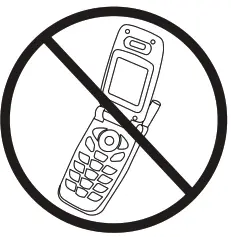 NOTE: The manufacturer is not responsible for any radio or TV interference caused by unauthorized modifications to this equipment. Such modifications could void the user authority to operate the equipment.
NOTE: This equipment has been tested and found to comply with the limits for a Class B digital device, pursuant to Part 15 of the FCC Rules. These limits are designed to provide reasonable protection against harmful interference in a residential installation. This equipment generates, uses and can radiate radio frequency energy and, if not installed and used in accordance with the instructions, may cause harmful interference to radio communications. However, there is no guarantee that interference will not occur in a particular installation. If this equipment does cause harmful interference to radio or television reception, which can be determined by turning the equipment off and on, the user is encouraged to try to correct the interference by one or more of the following measures:
- Reorient or relocate the receiving antenna.
- Increase the separation between the equipment and receiver.
- Connect the equipment into an outlet on a circuit different from that to which the receiver is connected.
- Consult the dealer or an experienced radio/TV technician for help.
TROUBLESHOOTING
If any abnormality arises during use, please check the following points:
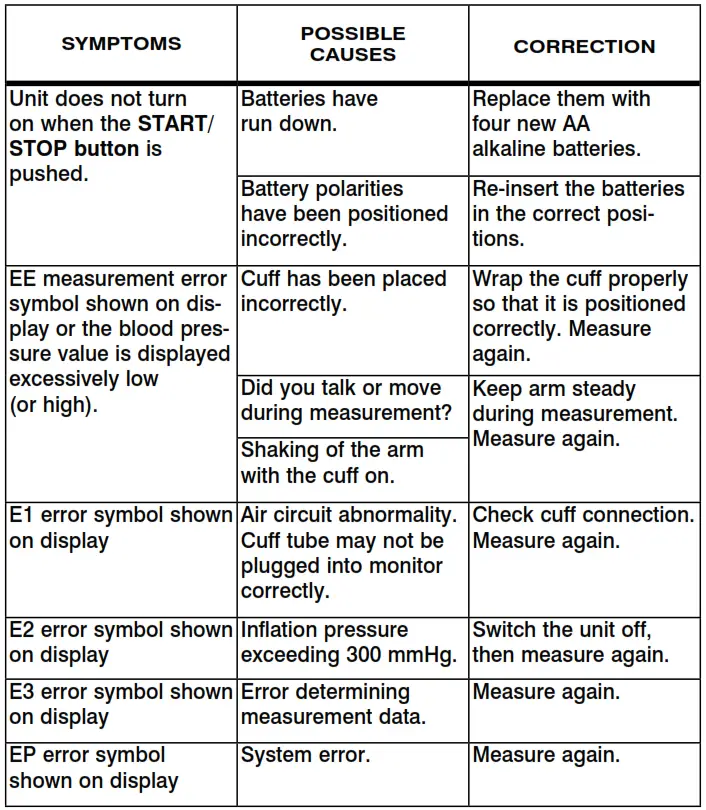
Note: If the unit still does not work, contact HoMedics Consumer Relations. Under no circumstance should you disassemble or attempt to repair the unit by yourself? Contact information for HoMedics Consumer Relations Department can be found on the warranty page.
SPECIFICATIONS
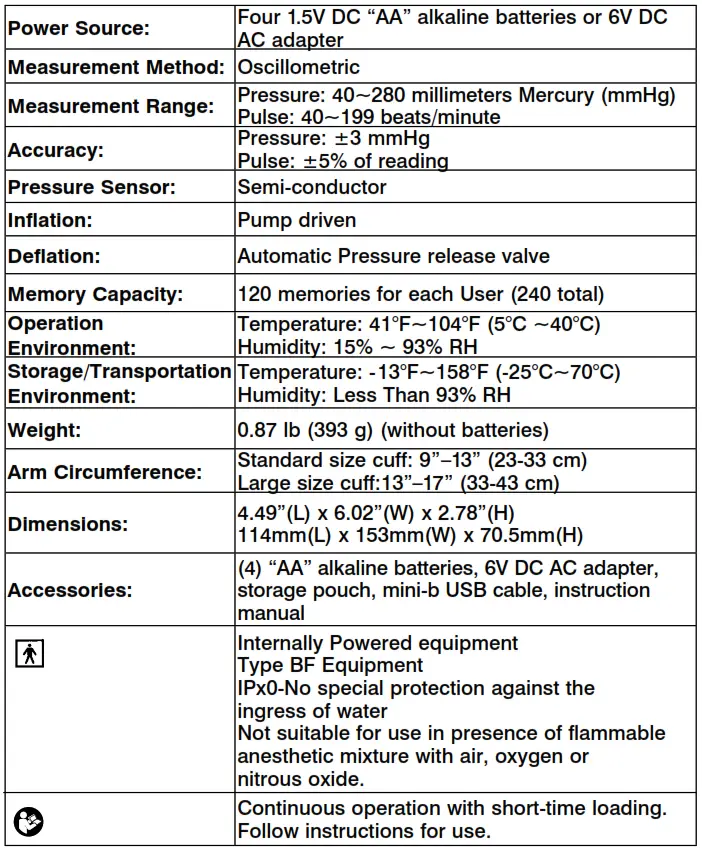
Note: These specifications are subject to change without notice.
LIMITED FIVE YEAR WARRANTY
HoMedics sells its products with the intent that they are free of defects in manufacture and workmanship for a period of five years from the date of original purchase, except as noted below. HoMedics warrants that its products will be free of defects in material and workmanship under normal use and service.
This blood pressure monitor meets the simulated measurement cycles test requirement per EN1060-3, part 8.10. This warranty extends only to consumers and does not extend to Retailers.
To obtain warranty service on your HoMedics product, contact a Consumer Relations Representative by telephone at 1-800-466-3342 for assistance. Please make sure to have the model number of the product available.
HoMedics does not authorize anyone, including, but not limited to, Retailers, the subsequent consumer purchaser of the product from a Retailer or remote purchasers, to obligate HoMedics in any way beyond the terms set forth herein. This warranty does not cover damage caused by misuse or abuse; accident; the attachment of any unauthorized accessory; alteration to the product; improper installation; unauthorized repairs or modifications; improper use of electrical/power supply; loss of power; dropped product; malfunction or damage of an operating part from a failure to provide manufacturer’s recommended maintenance; transportation damage; theft; neglect; vandalism; or environmental conditions; loss of use during the period the product is at a repair facility or otherwise awaiting parts or repair; or any other conditions whatsoever that are beyond the control of HoMedics.
This warranty is effective only if the product is purchased and operated in the country in which the product is purchased. A product that requires modifications or adoption to enable it to operate in any other country than the country for which it was designed, manufactured, approved and/or authorized, or repair of products damaged by these modifications is not covered under this warranty.
THE WARRANTY PROVIDED HEREIN SHALL BE THE SOLE AND EXCLUSIVE WARRANTY. THERE SHALL BE NO OTHER WARRANTIES EXPRESS OR IMPLIED INCLUDING ANY IMPLIED WARRANTY OF MERCHANTABILITY OR FITNESS OR ANY OTHER OBLIGATION ON THE PART OF THE COMPANY WITH RESPECT TO PRODUCTS COVERED BY THIS WARRANTY. HOMEDICS SHALL HAVE NO LIABILITY FOR ANY INCIDENTAL, CONSEQUENTIAL OR SPECIAL DAMAGES. IN NO EVENT SHALL THIS WARRANTY REQUIRE MORE THAN THE REPAIR OR REPLACEMENT OF ANY PART OR PARTS WHICH ARE FOUND TO BE DEFECTIVE WITHIN THE EFFECTIVE PERIOD OF THE WARRANTY. NO REFUNDS WILL BE GIVEN. IF REPLACEMENT PARTS FOR DEFECTIVE MATERIALS ARE NOT AVAILABLE, HOMEDICS RESERVES THE RIGHT TO MAKE PRODUCT SUBSTITUTIONS IN LIEU OF REPAIR OR REPLACEMENT.
This warranty does not extend to the purchase of opened, used, repaired, repackaged, and/or resealed products, including but not limited to sale of such products on Internet auction sites and/or sales of such products by surplus or bulk resellers. Any and all warranties or guarantees shall immediately cease and terminate as to any products or parts thereof which are repaired, replaced, altered, or modified, without the prior express and written consent of HoMedics.
This warranty provides you with specific legal rights. You may have additional rights that may vary from state to state. Because of individual state regulations, some of the above limitations and exclusions may not apply to you.
Made exclusively for

For service or repair, do not return this unit to the retailer. Contact HoMedics Consumer Relations at:
Email: [email protected]
Phone: 1-800-466-3342
Business Hours: 8:30 am-7 pm ET
Monday-Friday
Distributed by

HoMedics, LLC
3000 Pontiac Trail
Commerce Township, MI 48390
Printed in China
HoMedics® is a registered trademark of HoMedics, LLC.
© 2012-2013 HoMedics, LLC. All rights reserved.
HealthVault™ name and logo, and Microsoft® are either registered trademarks or trademarks of Microsoft
Corporation in the United States and/or other countries.
IB-WGNBPA750A
P/N: 323102120 VER:001
SOUNDSPA™ AM/FM Clock Radio Projects Time
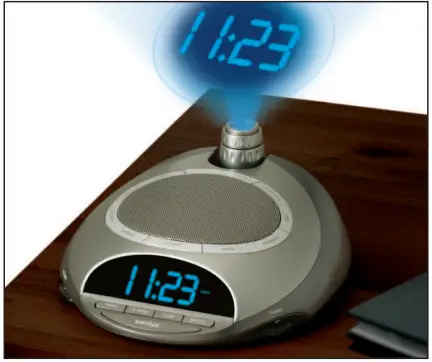
SS-4500
Instruction Manual and Warranty Information
1 year limited warranty
Create your perfect sleep environment.
Thank you for purchasing SoundSpa, the HoMedics acoustic relaxation machine. This, like the entire HoMedics product line, is built with high-quality craftsmanship to provide you years of dependable service. We hope that you will find it to be the finest product of its kind.
SoundSpa helps create your perfect sleep environment. Fall asleep to any of its six calming sounds, then wake to nature sounds, radio or alarm. SoundSpa can also mask distractions to improve your concentration while you read, work or study.
IMPORTANT SAFETY INSTRUCTIONS:
When using an electrical appliance, basic precautions should always be followed, including the following:
READ ALL INSTRUCTIONS BEFORE USING
DANGER – To reduce the risk of electric shock:
- Always unplug the appliance from the electrical outlet immediately after using and before cleaning.
- Do not reach for an appliance that has fallen into water. Unplug it immediately.
- Do not place or store appliance where it can fall or be pulled into a tub or sink. Do not place in or drop into water or other liquid.
WARNING – To reduce the risk of burns, fire, electric shock or injury to persons:
- Close supervision is necessary when this appliance is used by or near children, invalids or disabled persons.
- Use this appliance only for its intended use as described in this manual. Do not use attachments not recommended by HoMedics; specifically any attachments not provided with the unit.
- Never operate this appliance if it has a damaged cord, plug, cable or housing. If it is not working properly, if it has been dropped or damaged, return it to HoMedics Service Center for examination and repair.
- Keep cord away from heated surfaces.
- Never drop or insert any object into any opening.
- Do not operate where aerosol (spray) products are being used or where oxygen is being administered.
- Do not carry this appliance by power cord or use cord as handle.
- To disconnect, remove plug from outlet.
- This appliance is designed for indoor use only. Do not use outdoors.
- Only set on dry surfaces. Do not place on surface wet from water or cleaning solvents.
Caution: All servicing of this product must be performed by authorized HoMedics Service Personnel only
SAVE THESE INSTRUCTIONS
Caution – Please read all instructions carefully before operating.
- Never leave the appliance unattended, especially if children are present.
- Never cover the appliance when it is in operation.
- This unit should not be used by children without adult supervision.
- Always keep the cord away from high temperature and fire.
- Do not lift, carry, hang, or pull the product by the power cord.
- If the adaptor sustains damage, you must stop using this product immediately and contact the HoMedics Service Center. (See the warranty section for the HoMedics address.)
SoundSpa Clock Radio Features
- 6 Nature Sounds: Rain Forest, Ocean, Thunder, Summer Night, Rain and Water Fall
- AM/FM radio with alarm and snooze
- Three gentle-wake options – radio, alarm or nature sounds
- Easy-to-read clock with LED display
- Projection feature projects time on the ceiling in a soothing blue light
- Auto-timer lets you choose how long you listen – 15, 30, 45 or 60 minutes or continuously
- Volume control adjusts the volume of the radio, beep or nature sounds
Assembly and Instructions for Use
- Unpack the product and check to make sure everything is included (Fig 1).
- This unit is powered by a DC adaptor, which is included.
- The battery power is designed only to provide MEMORY BACK-UP for the clock and alarm settings. One 9 Volt battery (not included) should be inserted into the battery compartment if memory back-up is desired (in the event of power outages or if the unit is unplugged). However, the time will not be illuminated on the clock display. As soon as the power supply returns, the display will indicate the correct time.
NOTE: Battery must be installed in order for clock memory back-up to operate. In the event of a power failure or disconnection, if the battery is not installed, the clock and alarm will need to be re-set when power is restored. - To install battery, remove compartment cover. Insert one 9 Volt battery into the compartment on the bottom of the unit following the diagram. Replace cover and snap into place.
- Attach the DC adaptor to the jack located on the back of the unit (Fig 4) and insert the cord into a 120V household outlet.
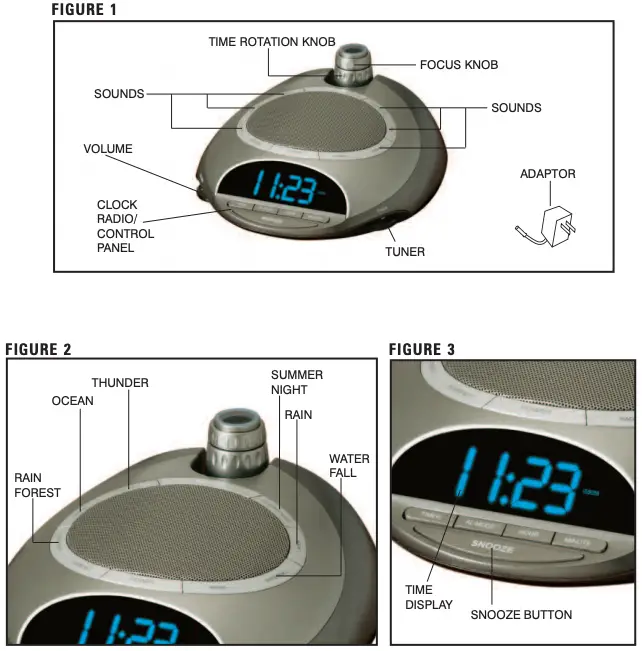
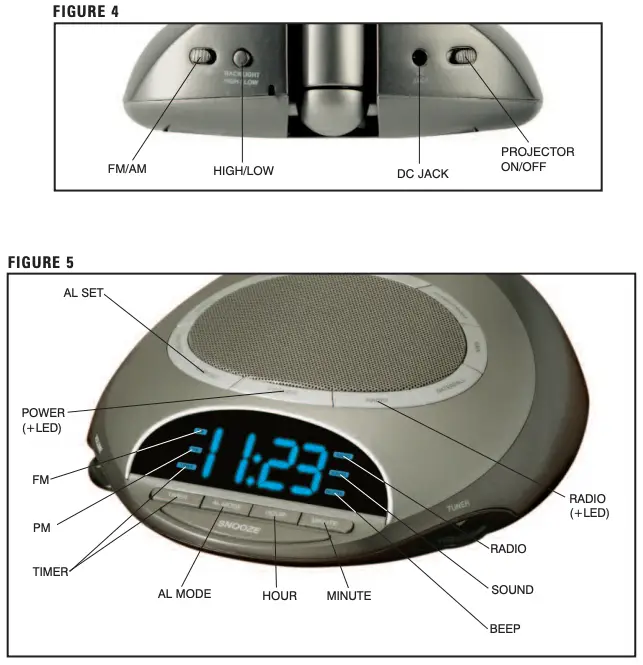
Setting the Clock
- Press and hold the HOUR button for 5 seconds (Fig. 5). The time will begin to flash
- While the time is flashing, press the HOUR button until you reach the correct hour. Then press the MINUTE button (Fig. 5) until you reach the correct minute.
NOTE: PM indicator will appear on the left side of the clock face for evening hours (Fig. 5). If the PM indicator is not illuminated, the hour is set to AM. Be sure to set the time for the correct 12-hour period – AM (morning) or PM (evening).
NOTE: After 5 seconds, the time will stop flashing and it will be set. - Press the BACKLIGHT HIGH/LOW button (Fig. 4) to choose between high and low clock brightness.
Listening to Nature Sounds
- Select the sound you wish to listen to and press the corresponding button (Fig 2).
- To adjust the volume, turn the VOLUME knob (Fig 1) to your desired level.
- When finished listening to the sounds you may turn them off by pressing the POWER button, or switch to the radio by pressing RADIO (Fig 5).
NOTE: When the unit is turned on it will always default to the last mode used.
Listening to the Radio
- Press the RADIO button (Fig 5).
- Rotate the TUNER (Fig 1) to select a radio station.
- To adjust the volume, turn the VOLUME knob (Fig 1) to your desired level.
- When finished listening to the radio you may turn it off by pressing the POWER button, or switch to a nature sound by pressing the corresponding button (Fig 2).
NOTE: To change between bands there is an AM/FM switch located on the back of the unit (Fig 4). When FM band is selected, a FM Indicator will appear on the left side of the clock face (Fig. 5). If the FM indicator is not illuminated, the band is set to AM.
Using the Auto-Timer
- When the power is on and you are listening to a nature sound or the radio you may set a timer so the unit will automatically turn off.
- Toggle through the TIMER button (Fig 5) until the time of your choice, 15, 30, 45 or 60 minutes, shows on the clock face. The TIMER indicator will appear on the left side of the clock face to confirm that the timer is set.
Setting and Using the Alarm
- Press the ALARM SET button (Fig 5). The time will flash.
- While the time is flashing press the HOUR button (Fig 5) until you reach the correct hour. Then press the MINUTE button (Fig 5) until you reach the desired minute.
- After 5 seconds the alarm set time will stop flashing and it will be programmed, or you may press the ALARM SET button.
NOTE: The PM indicator also applies to the alarm. You can review the alarm setting anytime by pressing the ALARM SET button. - To activate the alarm you may choose one of 3 wake options:
a. To wake to RADIO (Fig. 5) press the AL MODE button (Fig. 5) once. You may leave it on the current station or adjust the TUNER.
b. To wake to a SOUND, press the AL MODE button a second time. It will set to the last sound you listened to. If you wish to change it, press the sound you wish to wake to and then press the POWER button (Fig 5).
c. To wake to BEEP, press the AL MODE button a third time.
NOTE: The ALARM MODE indicator (RADIO/SOUND/BEEP) will appear on the right side of the clock face (Fig. 5), and will indicate that the alarm is set. - When the alarm sounds, the corresponding ALARM indicator (RADIO/SOUND/BEEP) blinks. You may either:
a. SNOOZE: Press the SNOOZE button (Fig 3). Your sleep time will be . You may use this feature until you turn the alarm off.
b. RESET: Turn the alarm off by pressing ANY button on the unit, except for the SNOOZE button (Fig 1). The alarm clock will automatically reset for the next day in its current mode. The corresponding ALARM indicator (RADIO/SOUND/BEEP) will indicate this. If you wish to change the wake mode follow step 1 under Setting and Using the Alarm.
c. OFF: To completely turn off the alarm so it is not set for the next day, continue to press the AL MODE button until all the ALARM indicators (RADIO/SOUND/BEEP) are all off.
NOTE: If the alarm sounds for it will automatically turn off and reset for the next day
Using the Projection Feature
- To turn the projection feature on, slide the switch on the back of the unit (Fig 4) to the ON position. The time is now projected on the ceiling.
NOTE: If the projection feature is off you may press the SNOOZE button (Fig 3) to trigger 5 seconds of projection. - To turn the angle of the time that appears on the ceiling, rotate the TIME ROTATION KNOB (Fig.1) until you have reached your desired result.
NOTE: The TIME ROTATION KNOB will rotate up to 350 degrees. - To focus the time on the ceiling, rotate the FOCUS KNOB (Fig 1.) until you have reached your desired result.
- The angle of the projector can be adjusted by angling forward or backward.
Maintenance
To Store
You may store the unit in its box or a cool, dry place.
To Clean
Wipe off dust with a damp cloth. NEVER use liquids or abrasive cleaner to clean.
Modifications not authorized by the manufacturer may void users authority to operate this device.
NOTE: This equipment has been tested and found to comply with the limits for a Class B digital device, pursuant to Part 15 of the FCC Rules. These limits are designed to provide reasonable protection against harmful interference in a residential installation. This equipment generates, uses and can radiate radio frequency energy and, if not installed and used in accordance with the instructions, may cause harmful interference to radio communications. However, there is no guarantee that interference will not occur in a particular installation. If this equipment does cause harmful interference to radio or television reception, which can be determined by turning the equipment off and on, the user is encouraged to try to correct the interference by one or more of the following measures:
- Reorient or relocate the receiving antenna.
- Increase the separation between the equipment and receiver.
- Connect the equipment into an outlet on a circuit different from that to which the receiver is connected.
- Consult the dealer or an experienced radio/TV technician for help
NOTE: The manufacturer is not responsible for any radio or TV interference caused by unauthorized modifications to this equipment. Such modifications could void the users authority to operate the equipment.
]]>Ellia GATHER
ARM-910
Create your perfect environment with Ellia Essential Oils and Diffusers.
Our beautiful diffusers gently lift the aroma of Ellia Essential Oils into the air to help you reduce stress, boost mental clarity, and soothe your body and mind. Ellia Diffusers are beautiful, functional centerpieces that add natural style to your home.
REGISTER YOUR DIFFUSER
Registering your diffuser secures the benefits of your warranty (even if you lose your receipt). It also makes it easier for us to assist you if you ever have an issue with your product.
www.homedics.com/product-registration
PARTS AND PIECES
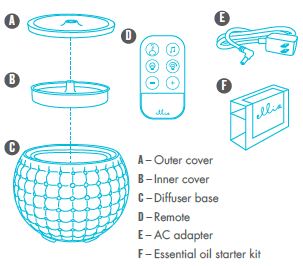
UNIQUE FEATURES AND SPECIFICATIONS
Ultrasonic Technology
This diffuser uses ultrasonic, high-frequency technology to convert the water and essential oil into a fine mist that is dispersed into the air evenly, delivering natural aroma to enhance your mood.
Color-Changing Light
The gentle glow creates a peaceful environment. Choose your desired color to best match your mood.
Relaxing and Uplifting Sounds
Quiet your mind or boost your energy.
Runtime
Up to 10 hours of continuous runtime or 20 hours of intermittent runtime.
Soothing Humidity
Alleviates dry air.
Auto Shut-Off Protection
When the reservoir is empty, the unit will shut off automatically.
Reservoir Capacity
200 ml
Adapter Voltage
100 – 240V 50/60Hz
HOW TO USE AND DIFFUSE

- Remove the outer cover from the base. Next, remove the inner cover.
- Pour water into the reservoir until it reaches the max fill line, then add 5-7 drops of essential oil to the water. Depending on your personal preference, you may add
more or fewer drops of essential oil. - Put the inner and outer covers back on.
- Plug the adapter into the diffuser, then plug the adapter into an outlet. Use caution when plugging the unit in to avoid spilling water and essential oil.
- Choose your aroma mist, light, and sound options.
Remote
Your remote uses a CR2025 Lithium 3V Battery. Make sure to remove the pull tab before use.
A – Aroma mist button
B – Music button
C – Light button
D – Light brightness
E – Volume down
F – Volume up
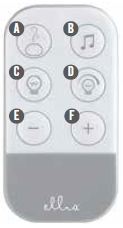
Aroma Mist
Your diffuser has two mist options. Press once for continuous mist, which will run for up to 10 hours. Press again for intermittent mist (30 seconds on, 30 seconds off), which will run for up to 20 hours. Press a third time to turn the mist off. Press and hold to turn the diffuser off. When your diffuser runs out of water, it will automatically shut off.
Color-Changing Light
Press once to turn on the color-changing light. Press again to stop on a preferred color. Press a third time to turn the light off.
Light Brightness
While the light is on, press once for medium light. Press again for low light. Press a third time for bright light.
Relaxing and Uplifting Sounds
Press once to play the first track. Press again to switch to the next track. Press and hold to turn the music off.
Power Button
Press once to turn on aroma mist and color-changing light. Press again to turn the light off. Press a third time to turn the mist off.
CLEANING AND CARE
- Before cleaning the unit, turn the power off and make sure the adapter is unplugged from the diffuser and outlet.
- Remove the outer cover from the base. Next, remove the inner cover.
- Carefully pour any remaining water and essential oil out of the reservoir, from the drain side, opposite the air outlet. Be sure not to empty the reservoir near the air outlet in order to avoid malfunction.
To Clean the Surface
Clean the surface of your diffuser with a clean, damp, soft cloth as often as needed.
To Clean the Reservoir and Ultrasonic Membrane
We recommend wiping the reservoir with a clean, damp, soft cloth at least once every 2 weeks.
NOTE: Depending on your usage, and the amount of essential oil you use, you may want to clean the reservoir and ultrasonic membrane more frequently for best performance.
For the most thorough clean, pour a 50/50 mixture of vinegar and water into the reservoir, then soak for five minutes. Brush reservoir walls, base, and ultrasonic membrane clean with a soft-bristle brush (not included) and rinse. NEVER touch the
ultrasonic membrane with your fingers, as the natural oils in skin can damage the membrane.
Clean the membrane once every two to three weeks, depending on your usage.
Clean and dry the unit before extended periods of inactivity.
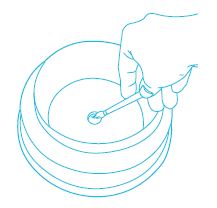
TROUBLESHOOTING

THE ELLIA™ FAMILY
Our range of eco-inspired products are designed to complement your lifestyle and decor. Once you try an Ellia diffuser, you’ll want one for every room in your home. Add to your own Ellia collection or buy a thoughtful gift for someone. Browse the entire product family at www.ellia.com.
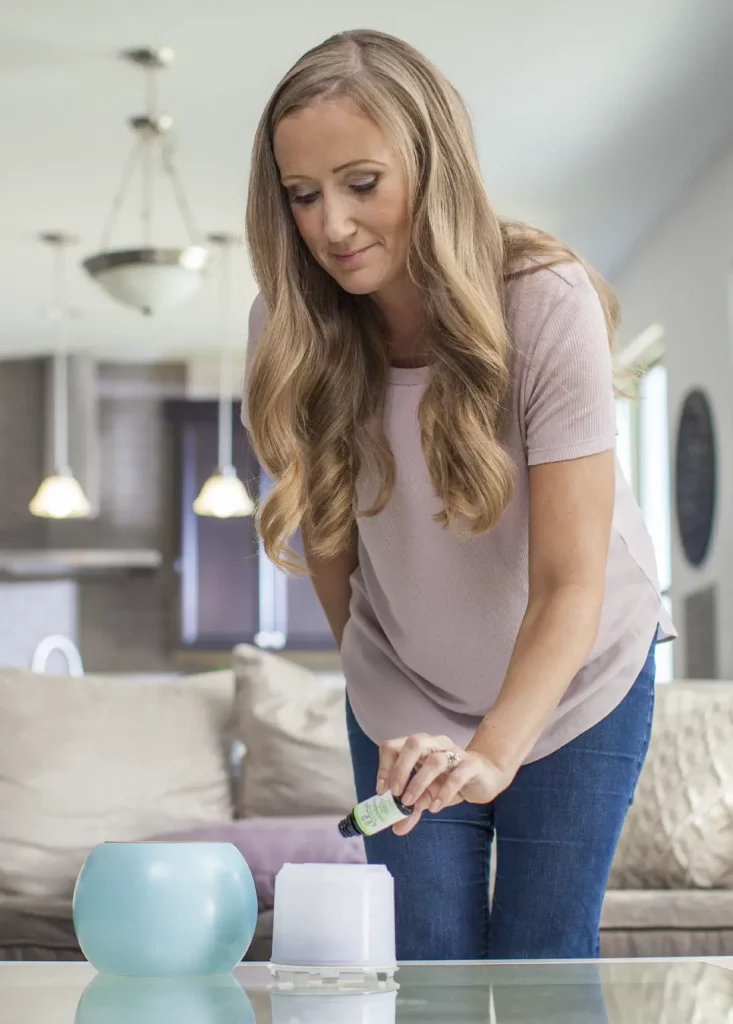
CONTACT US
Questions or concerns? We’re here to help. Contact a Consumer Relations representative by phone or email to help answer any questions. Please be sure to have the model number of your product available.
For Service in the USA
email: [email protected]
phone: 248.863.3160
Monday to Friday, 8:30am – 7:00pm EST
For Service in Canada
email: [email protected]
phone: 1.888.225.7378
Monday to Friday, 8:30am – 5:00pm EST
ONE YEAR LIMITED WARRANTY
For detailed warranty instructions, visit: www.ellia.com To obtain warranty service on your Ellia product, contact a Consumer Relations Representative by the telephone number or email address for your country of residence. Please make sure to have the model number of the product available.
For Service in the USA
email: [email protected]
phone: 1.248.863.3160
Monday to Friday, 8:30am – 7:00pm EST
For Service in Canada
email: [email protected]
phone: 1.888.225.7378
Monday to Friday, 8:30am – 5:00pm EST
FCC AND IC STATEMENTS
This device complies with part 15 of the FCC Rules. Operation is subject to the following two conditions: (1) This device may not cause harmful interference, and (2) this device must accept any interference received, including interference that may cause undesired operation.
This equipment has been tested and found to comply with the limits for a Class B digital device, pursuant to part 15 of the FCC Rules and ICES 003. These limits are designed to provide reasonable protection against harmful interference in a residential installation.
This equipment generates, uses and can radiate radio frequency energy and, if not installed and used in accordance with the instructions, may cause harmful interference to radio communications.
However, there is no guarantee that interference will not occur in a particular installation. If this equipment does cause harmful interference to radio or television reception, which can be determined by turning the equipment off and on, the user is encouraged to try to correct the interference by one or more of the following measures:
- Reorient or relocate the receiving antenna.
- Increase the separation between the equipment and receiver.
- Connect the equipment into an outlet on a circuit different from that to which the receiver is connected.
- Consult the dealer or an experienced radio/TV technician for help.
Changes or modifications not expressly approved by HoMedics could void the user’s authority to operate this equipment.
This product has been tested and complies with the requirements for Federal Communication Commission, Part 18 and ICES 001. Although this product is tested and complies with FCC, it may interfere with other devices. If this product is found to interfere with another device, separate the other device and this product. Conduct only the user maintenance found in this instruction manual. Other maintenance and servicing may cause harmful interference and can void the required FCC compliance.
IMPORTANT SAFETY INSTRUCTIONS
WHEN USING ELECTRICAL PRODUCTS, ESPECIALLY WHEN CHILDREN ARE PRESENT, BASIC SAFETY PRECAUTIONS SHOULD ALWAYS BE FOLLOWED, INCLUDING THE FOLLOWING:
READ ALL INSTRUCTIONS BEFORE USING
- Always place diffuser on a firm, flat surface. A waterproof mat or pad is recommended for use under the diffuser. Never place it on a rug or carpet, or on a finished floor that may be damaged by exposure to water or moisture.
- Always unplug the unit from the electrical outlet immediately after using and before cleaning
- DO NOT reach for a unit that has fallen into water. Unplug it immediately.
- DO NOT place or drop into water or other liquids.
- DO NOT use water above 86° Fahrenheit.
- Use this unit only for its intended use as described in this document, the quick start guide and user guide.
- Do not use attachments not recommended by Ellia or HoMedics; specifically any attachments not provided with this unit.
- NEVER drop or insert any object into any opening.
- DO NOT place the diffuser near heat sources, such as a stove.
- Always keep the cord away from high temperature and fire.
- To disconnect, turn unit off, then remove the plug from the outlet.
- DO NOT use outdoors. For indoor use only.
- Never cover the unit while it is operating.
- If the cord sustains damage, you must stop using this product immediately and contact Ellia consumer relations (see Warranty section for consumer relations contact information).
- Perform regular maintenance on the ultrasonic membrane.
- Never use detergent to clean the ultrasonic membrane.
- Never clean the ultrasonic membrane by scraping with a hard object.
- Do not attempt to adjust or repair the unit. Servicing must be performed by professional or qualified personnel.
- Stop using this unit if there is an unusual noise or smell.
- Unplug this unit when not in use for a long period of time.
- Do not touch the water or any parts of the unit that are covered by water while the unit is on or plugged in.
- Do not wash, adjust, or move this unit without first unplugging it from the electrical outlet.
- Keep this unit out of reach of children.
Attention California Residents:
WARNING: This product contains chemicals known to the State of California to cause cancer, birth defects and other reproductive harm.
]]>