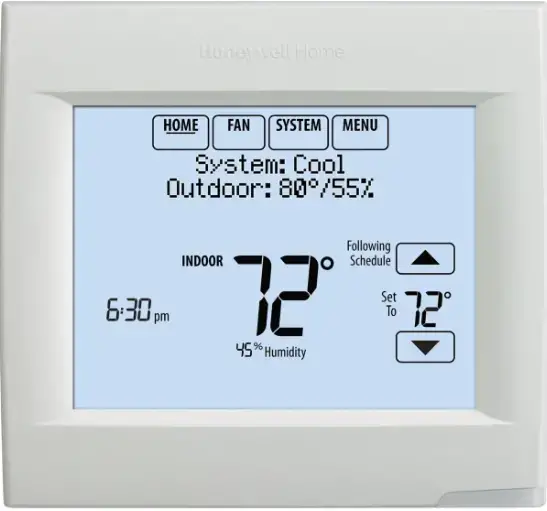
Honeywell TH8321WF1001 VisionPRO 8000 Smart Thermostat
Honeywell TH8321WF1001 VisionPRO 8000 Smart Thermostat
 ATTENTION: MERCURY RECYCLING NOTICE
This product does not contain mercury. However, this product may replace a product that contains mercury. Mercury and products containing mercury should not be discarded in household trash. For more information on how and where to properly recycle a thermostat containing mercury in the United States, please refer to the Thermostat Recycling Corporation at www.thermostat-recycle.org. For mercury thermostat recycling in Canada, please refer to Switch the Stat at www.switchthestat.ca
Getting started
Follow these basic steps to install this thermostat, set installer options, and connect to the Wi-Fi network.
Installing the thermostat
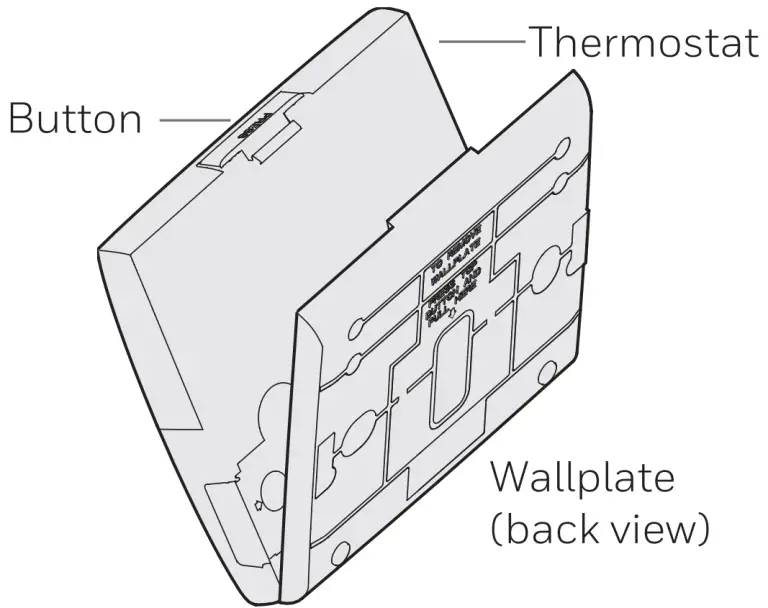
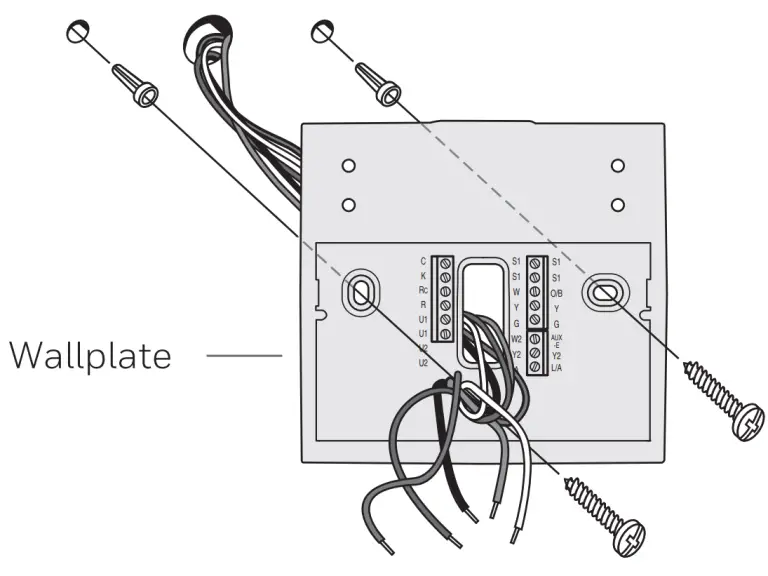
- Separate wallplate from thermostat.
If your thermostat has a button along the top of the wallplate, press the button on top and pull to remove the wallplate as shown. Some models made in 2019 didn’t have this button. On those models, pull evenly along the sides and bottom of the thermostat to separate it from the wallplate.
- Mount wallplate as shown
Mount new wallplate using screws and anchors included with the thermostat. Drill 3/16-in holes for drywall. Drill 7/32-in holes for plaster. - Wire the thermostat
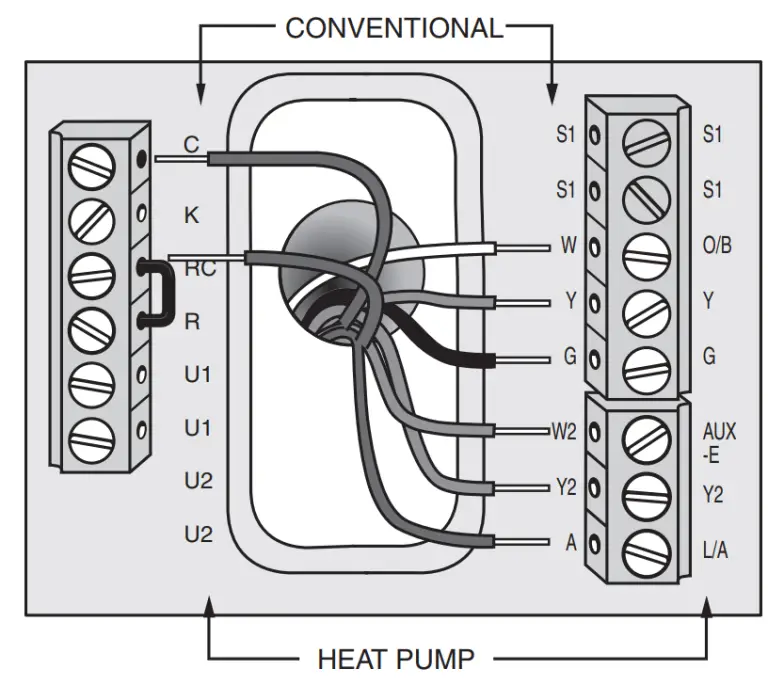
Refer to the table and wiring diagrams on the next page.
a) Turn on 24VAC NOW. 24VAC (C wire) is required. - Mount thermostat on wallplate
If your thermostat has hinges along the bottom and a button on the top, align the thermostat at the bottom and snap into place as shown. If you have the version without hinges, line the thermostat up evenly with the wallplate and push the thermostat evenly along the sides and bottom to snap it into place.
Performing installer setup
Setup options define the type of system you are installing and preferences for the display.
When newly installed, the thermostat goes into intstaller setup when first powered. If re-entering installer setup at a later time, go to menu, installer options, and enter the passcode (shown on page 2).
- Follow prompts on the screen to select the appropriate options.
- For all installer options, press the
 or
or 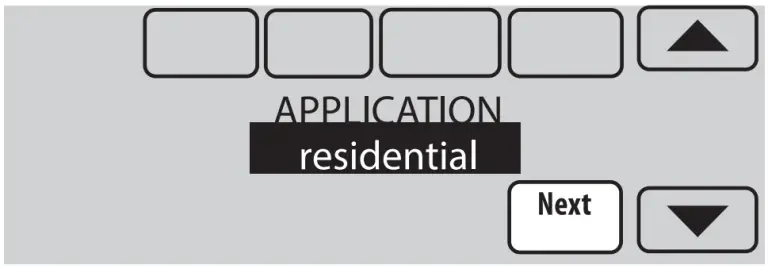 buttons to change the option.
 - Press Next to move to the next setting, and Done when setup is complete.
NOTE: The product data sheets list all installer setup options and is available at customer.resideo.com.
** The THP9045A1098 C-wire adaptor is used on heat/cool systems when you only have four wires at the thermostat and you need a fifth wire for a common wire. Use the K terminal in place of the Y and G terminals on conventional or heat pump systems to provide control of the fan and the compressor through a single wire–the unused wire then becomes your common wire. See THP9045 instructions for more information.
Wiring
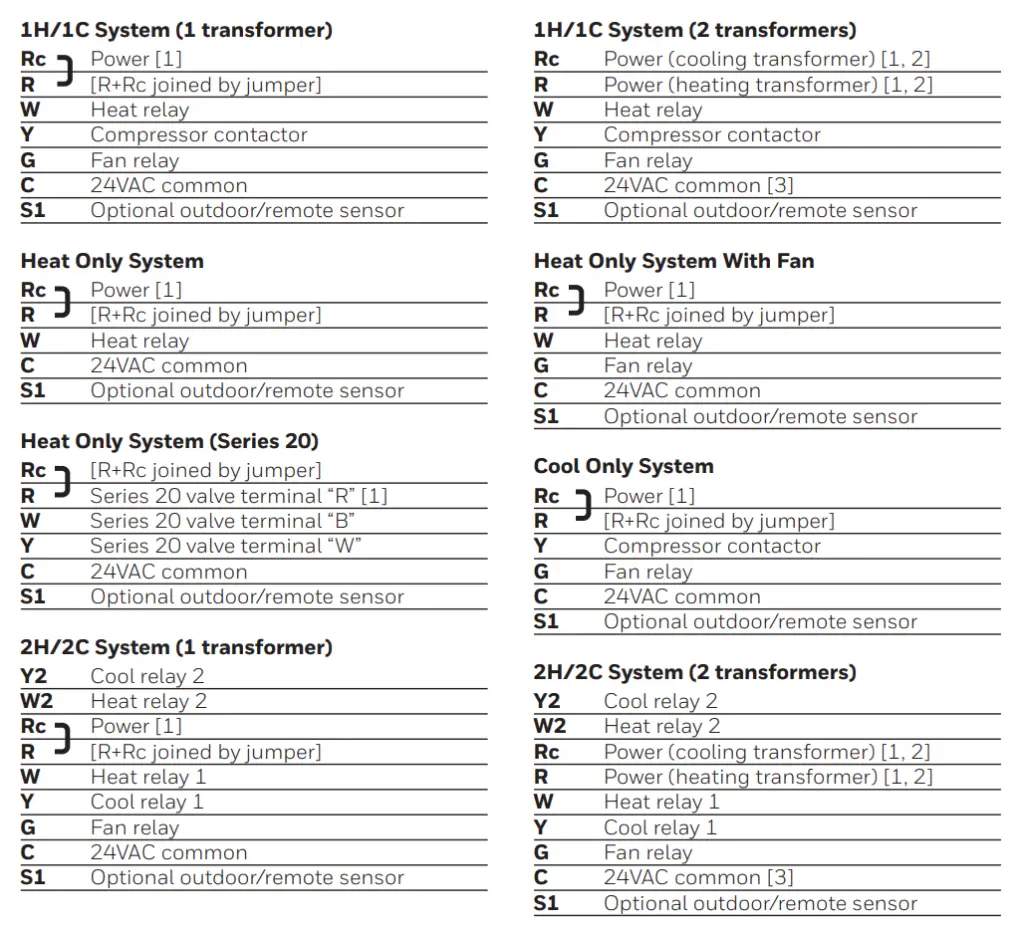
Wiring guide–conventional systems

[1] Power supply. Provide disconnect means and overload protection as required.
[2] Remove jumper for 2-transformer systems.
[3] Common connection must come from cooling transformer if a 2 transformer installation.
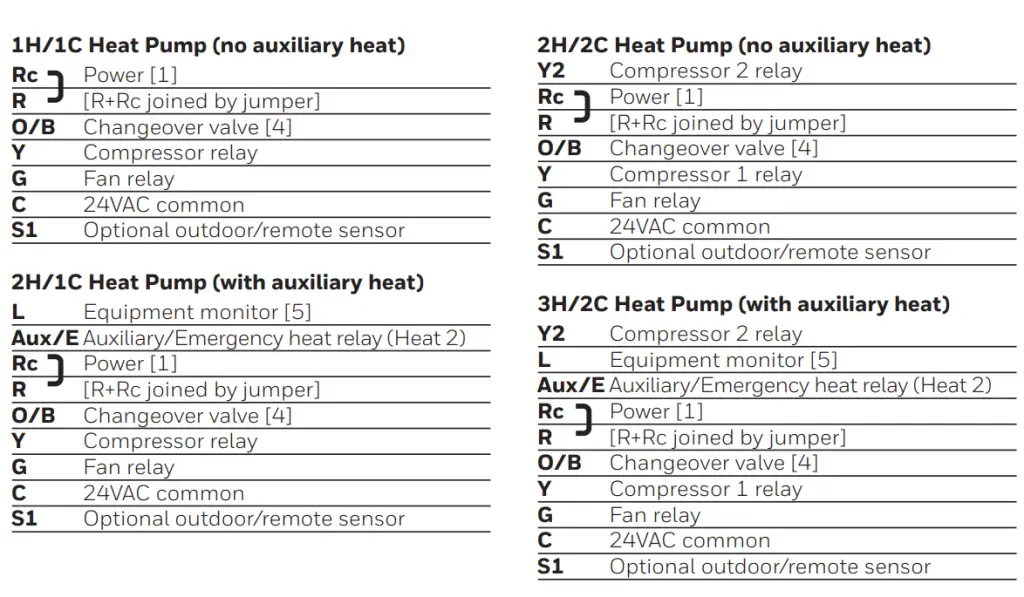
Wiring guide–heat pump systems

[1] Power supply. Provide disconnect means and overload protection as required.
[4] O/B set to control as either O or B in installer setup.
[5] Heat pump reset (powered continuously when thermostat is set to Em. Heat; system monitor when set to Heat, Cool, or Off).
NOTE: The product data sheets have more extensive wiring diagrams and is available at customer.resideo.com.
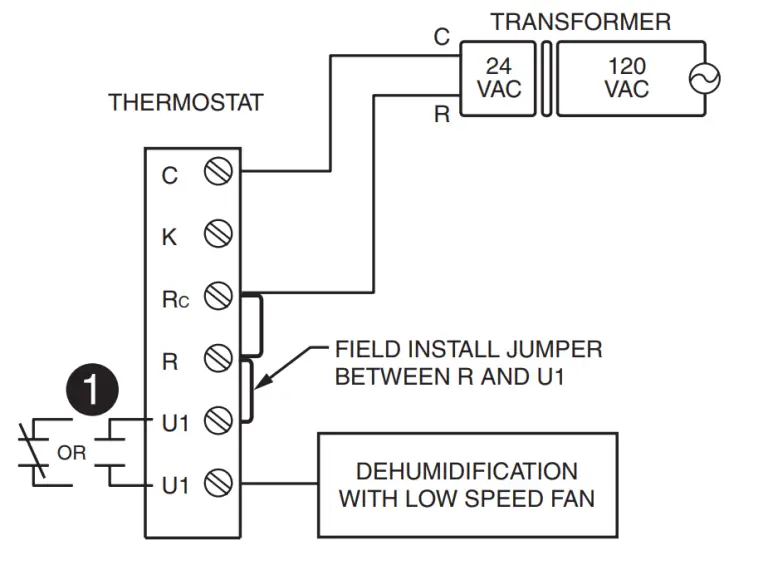
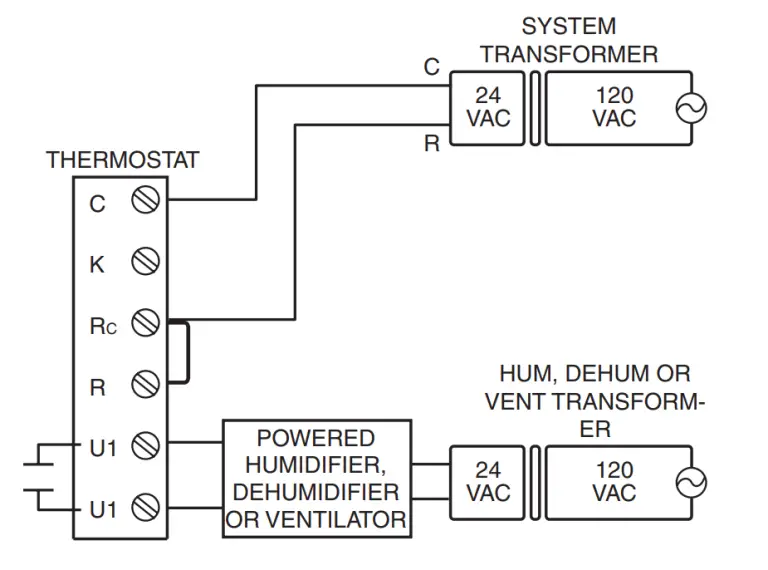 Wire the thermostat IAQ relay to the low speed fan for dehumidification control at the equipment. The thermostat relay can be set to normally open or normally closed in the thermostat installer setup.
Connecting to Wi-Fi
After installer setup, you will be prompted to connect to a Wi-Fi network.
NOTE: If you select No, the homeowner can connect to the Wi-Fi network later. (See “Connecting to Wi-Fi later” on page 9 or in the User’s Guide.) The thermostat will display its Home screen and thermostat setup is complete.
- Connect to the Wi-Fi network now.
1.1 Press Yes.
The thermostat will scan for available Wi-Fi networks.1.2 Use the arrow buttons to scroll up/ down or left/right. Press the Wi-Fi network name, then press Select.

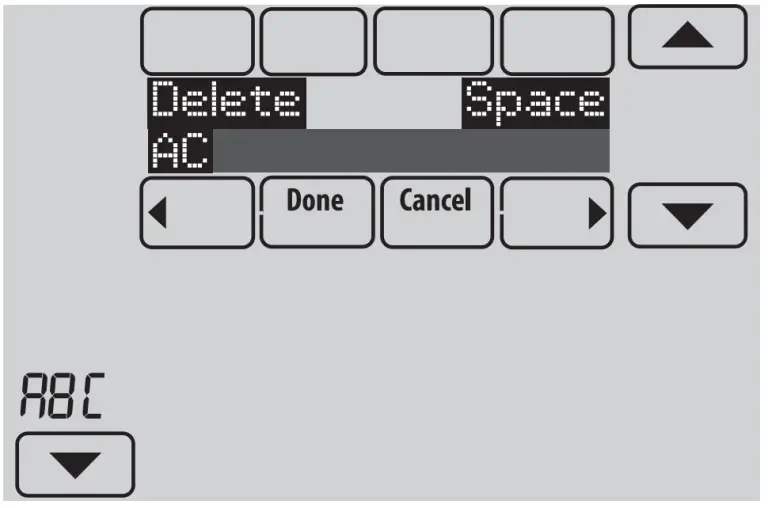
NOTE: If the Wi-Fi network name is hidden, see “Connecting to a hidden Wi-Fi network” on page 10.1.3 When prompted, press the screen to edit the password (if necessary).Enter the password. Press the or
or  buttons to change the letter or number.
Press the button to move to the next character, or the
  button to move to the previous character.
Use the or buttons at the bottom to change letter case. Press Done when complete.
1.4 The screen will let you know when the connection is successful. Press Done when the connection is successful. If the connection is not successful, the screen will explain why not. See “Unsuccessful connection” on page 9. Follow instructions on the screen to try again.
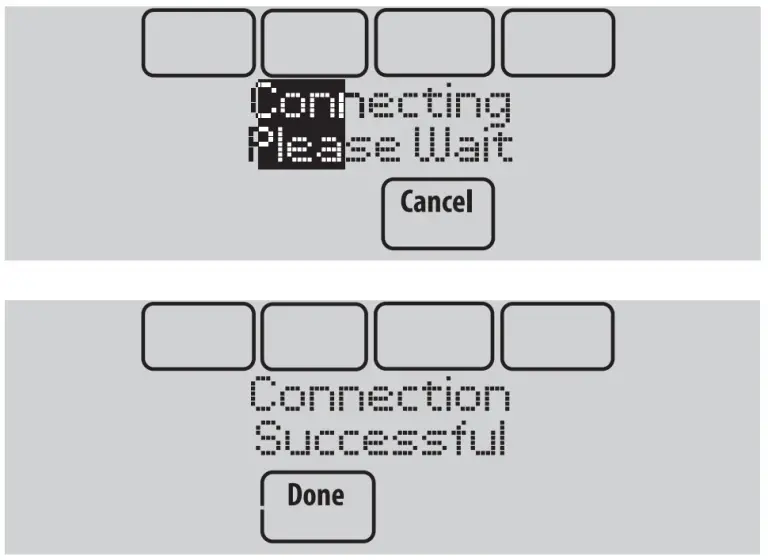
NOTE: Press the Help button for more information about an unsuccessful connection. - The homeowner must have a Total Connect Comfort account.
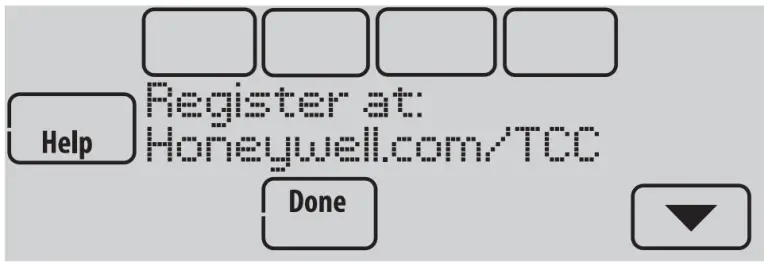
2.1 Have the homeowner go to mytotalconnectcomfort.com and follow the instructions to login or create an account.2.2 Press the button to display MAC and CRC.2.3 Note the Thermostat MAC and CRC; they will be needed during registration. Or, refer to the User’s Guide.
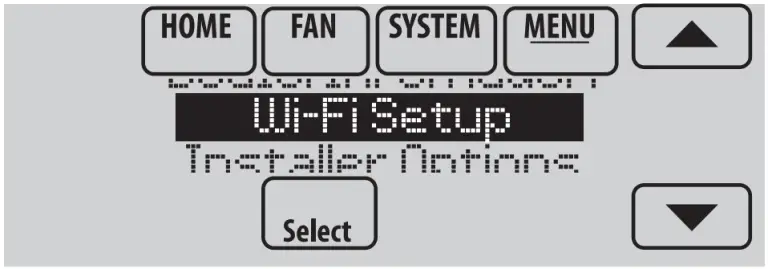
Making changes to Installer Setup and performing an Installer Test
- Touch Menu.
- Select Installer Options.
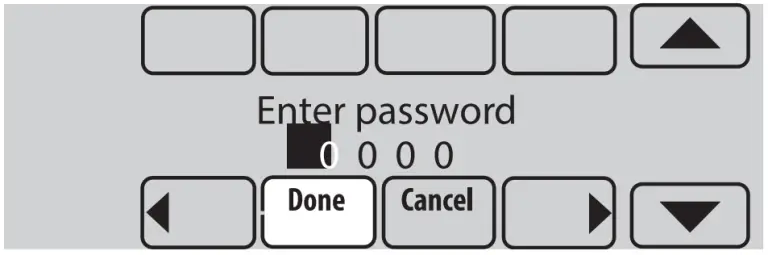
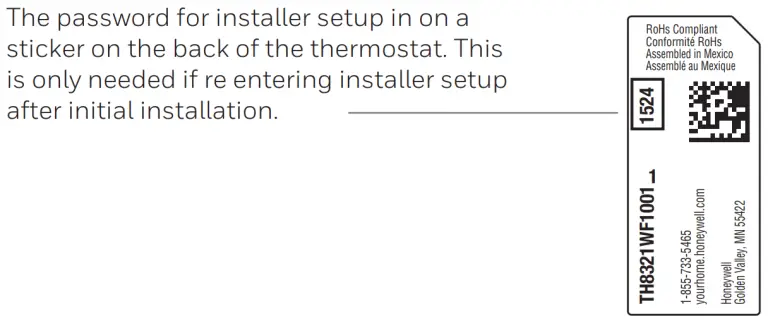
- Enter password (date code) and touch Done. See “Finding the password” on page 1 to find the date code.
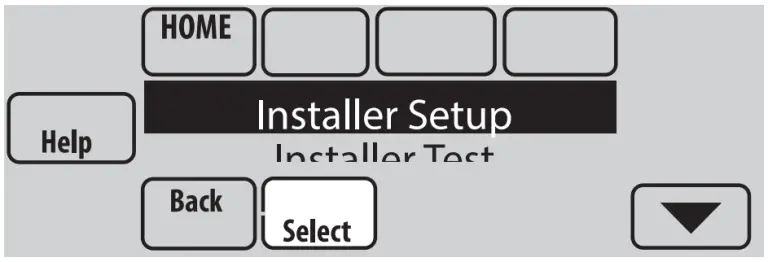
- Select Installer Setup or Installer Test.
- Follow prompts on the screen to select the desired setup options or to perform an equipment test.
Checking signal strength

After you successfully connect to the Wi-Fi network (see “Connecting to Wi-Fi” step 1.5), the thermostat will display signal strength. The signal strength symbols have the following meanings:
 Signal strength is 75%100%
 Signal strength is 50%75%
 Signal strength is 0%50%
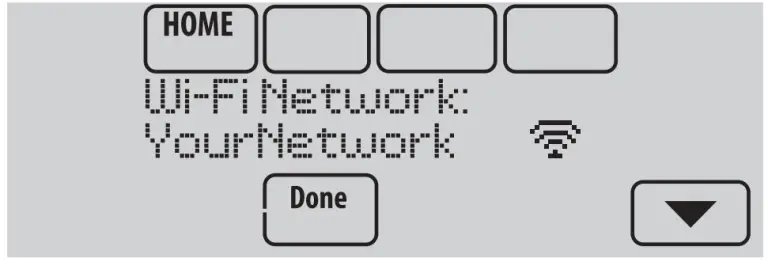
You can also check signal strength at any time after the thermostat is connected to the Wi-Fi network by pressing MENU then Wi-Fi Setup.
Connecting to Wi-Fi later
- Press MENU, then Wi-Fi Setup.
- Follow the prompts on-screen (and in “Connecting to Wi-Fi”) to select the Wi-Fi network and enter the password.
NOTE: To view and set the Wi-Fi thermostat remotely, the homeowner must have a Total Connect Comfort account. See “Connecting to Wi-Fi” step 2.
Unsuccessful connection
If you are unsuccessful in connecting the thermostat to the Wi-Fi network, you will see a Connection Failed screen. Press the button for other tips about this failed connection. Here are three specific reasons the connection might be unsuccessful.
For all Connection Failed screens, pressing Done will return to the Menu screen.
Invalid Password
The password you entered is invalid. Check that you have the right password and try again.
Press Done to return to “Connecting to Wi-Fi” step 1.3 on page 7.
No IP Address
The thermostat was unable to obtain an IP address from the router. Verify the router is correctly set up to automatically assign IP addresses. This connection can take several minutes. If there is still no connection, remove the thermostat from the wallplate for 10 seconds, then snap it back into place.
No Internet Link
The thermostat connected to the Wi-Fi network but was unable to establish a connection to the internet. Check the router settings and try again. Make sure the Ethernet cable is plugged into the router and try rebooting the router if necessary.
Connecting to a hidden Wi-Fi network
If the Wi-Fi network name is hidden and it doesn’t show up in the list in “Connecting to Wi-Fi” follow these steps to connect to it.
- Press MENU, then Wi-Fi Setup.

- Press Other, then press Select.

- When prompted, press the screen to edit the network name.

- Enter the network name. Press the
 or buttons to change the letter or number.
Press the button to move to the next character, or the
  button to move to the previous character.
Use the or buttons at the bottom to change letter case. Press Done when complete.

- Select the appropriate network security setting, then press Select.
- Enter the Wi-Fi network password as shown in “Connecting to Wi-Fi” step.
Specifications and replacement parts
Operating Ambient Temperature
Thermostat: 32 to 120° F (0 to 48.9° C)
Operating Relative Humidity
Thermostat: 5% to 90% (non-condensing)
Physical Dimensions (height, width, depth)
Thermostat: 4-15/16 x 4-5/8 x 1-1/8 inches (126 mm x 118 mm x 29 mm)
Wi-Fi Communication
Supports 802.11 B/G/N home wireless router
Frequency: 2.4 Ghz
Electrical ratings
| Terminal | Voltage (50/60 Hz) | Max. Current Rating |
| W – OB | 18 to 30 VAC and 750 mVDC | 1.00A |
| Y (cooling) | 18 to 30 VAC | 1.00A |
| G (fan) | 18 to 30 VAC | 0.50A |
| W2 – Aux (heating) | 18 to 30 VAC | 0.60A |
| Y2 (cooling) | 18 to 30 VAC | 0.60A |
| A-L/A (output) | 18 to 30 VAC | 1.00A |
| U1/U1 | 30 VAC max. | 0.50A |
Accessories and replacement parts
| Accessories / Replacement Parts | Part Number |
| Cover Plate (covers marks left by old thermostats) | THP2400A1019 |
| C-wire adaptor | THP9045A1098 |
Regulatory information
FCC REGULATIONS
47 CFR § 15.19 (a)(3)
This device complies with part 15 of the FCC Rules. Operation is subject to the following two conditions:
- This device may not cause harmful interference, and
- This device must accept any interference received, including interference that may cause undesired operation.
47 CFR § 15.21 (USA only)
Changes or modifications not expressly approved by the party responsible for compliance could void the user’s authority to operate the equipment.
47 CFR § 15.105 (b)
See https://customer.resideo.com/en-US/support/residential/codes-and-standards/ FCC15105/Pages/default.aspx for additional FCC information for this product.
IC REGULATIONS
RSS-GEN
This device contains license-exempt transmitter(s)/receiver(s) that comply with Innovation, Science and Economic Development Canada’s licence-exempt RSS(s). Operation is subject to the following two conditions:
- This device may not cause interference.
- This device must accept any interference, including interference that may cause undesired operation of the device.
 DISCONNECT POWER BEFORE INSTALLATION. Can cause electrical shock or equipment damage.
MERCURY NOTICE: If this product is replacing a control that contains mercury in a sealed tube, do not place the old control in the trash. Contact the Thermostat Recycling Corporation at www.thermostat-recycle.org or 800-238-8192 for information on how and where to properly and safely dispose of your old thermostat.
 Must be installed by a trained, experience technician. Read these instructions carefully. Failure to follow these instructions can damage the product or cause a hazardous condition.
Need Help?
For assistance please visit http://customer.resideo.com or call toll-free: 1-855-733-5465
Resideo Inc., 1985 Douglas Drive North Golden Valley, MN 55422
33-00065EFS–01 M.S. Rev. 06-20 | Printed in United States
©2020 Resideo Technologies, Inc.
This product is manufactured by Resideo Technologies, Inc., Golden Valley, MN, 1-800-633- 3991. The Honeywell Home trademark is used under license from Honeywell International Inc. All rights reserved.
Wi-Fi® is a registered trademark of Wi-Fi Alliance®
DOWNLOAD RESOURCES
- Honeywell TH8321WF1001 VisionPRO 8000 Smart Thermostat [pdf] Installation Guide TH8321WF1001, VisionPRO 8000 Smart Thermostat
- Read more: https://manuals.plus/honeywell/th8321wf1001-visionpro-8000-smart-thermostat-manual#ixzz7hvxIGMbg
FAQ’S
What if I have a battery-powered thermostat?
If you have a battery-powered thermostat, you must connect the thermostat to AC power. You can use a hardwired connection or an optional C-Wire.
What if I don’t have a C-wire?
You can use an optional 24VAC transformer to power the thermostat. See the instructions in this guide for wiring the transformer to the thermostat.
Can I wire this thermostat without using C-wire?
Yes, you can wire this thermostat without using C-wire.
How do I program my Honeywell 8000 thermostat?
Until you manually change it later when you’ve made your selection. Press done to change the thermostat to heating mode. First press the system button on the home screen. Now press heat then press.
How do I connect my Honeywell VisionPRO thermostat to WiFi?
Once yours is found use the arrow keys to highlight your network and press select touch. The press here area on the screen then use the arrow keys to enter the password to your Wi-Fi network.
How do I reset my Honeywell 8000 thermostat?
Power off the thermostat and remove the batteries. Put the batteries in the wrong way, with negative to positive and positive to negative. Wait ten seconds and put them back in the correct way. Your thermostat will be reset to factory settings.
How do you unlock a Honeywell VisionPRO 8000 thermostat?
So now the unlock it we go menu. Security settings change lock mode unlocked and let’s save and done now you can change the password or create a password.
Can I connect my Honeywell thermostat to my phone?
Honeywell’s reliable and highly-rated app allows you to program your thermostat from your computer, tablet, and smartphone, whether you’re across the room or around the world.
Why won’t My Honeywell thermostat connect to my phone?
Try the following: Make sure your app is up to date and your mobile phone is within 3-5 feet of your thermostat. Restart your mobile device and turn off any apps that may enhance the security, including VPN’s, GPS spoofers, etc. These can be turned on again once the connection of the thermostat is complete.
Does Honeywell smart thermostat work without Wi-Fi?
Yes, the thermostat will continue to operate your heating and/or cooling system even when your Wi-Fi network is down.
Can a Honeywell thermostat work without batteries?
Yes, the Smart Thermostat will work without batteries. If there are no batteries inserted, and the thermostat is running off solely of AC power, the thermostat will report a low battery (indicated by a caution sign and LOW BATTERY flashing on the display).
How do I change my Honeywell settings?
To change system settings, touch the mode button on the left hand side of the thermostat. To switch from heating to cooling, or to turn everything off continue to press the mode button until you have found your desired selection.


