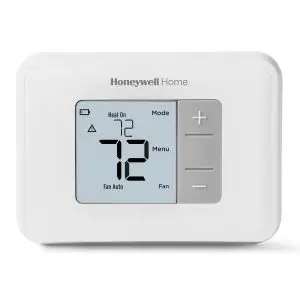
CT31A1003/E1
Owner’s Manual [pdf]: CT30 Series Low-Voltage Thermostat
How do I wire my thermostat?
*There is no standard for which color wire controls each function. When wiring, each wire should be identified by what terminal(s) it connects to, never by color. If you do not know the terminal that each wire connects to, it may be necessary to go to the HVAC system and look at the designations on the control board. For typical wiring examples, and for clarification of what types of systems your thermostat works with, please consult your owners/install guide. *
The thermostat uses 1 wire to control each of your HVAC system’s primary functions, such as heating, cooling, fan, etc. See the diagram below for what each wire controls on your system:
S – Indoor and Outdoor Wired Sensors
Y – Compressor Stage 1 (Cooling)
Y2 – Compressor Stage 2 (Cooling)
G – Fan
C – Common
U – Humidifier, Dehumidifier, or Ventilator control
L/A – A – Input for heat pump fault
O/B – Reversing valve for Heat Pump systems
E – Emergency Heat
Aux / W2 – Heat Stage 2 (Heating)
W – Heat Stage 1 (Heating)
R – 24vac (Heating transformer)
Rc – 24vac (Cooling transformer)
*Trade model thermostats are required to operate “dual-fuel” systems (systems that use a heat pump for the first 1 or 2 stages of heating and use a gas or oil furnace for backup / emergency heating). If you have a dual-fuel system, or are unsure, it is recommended that you contact a Professional HVAC Contractor to continue.
Please follow the below guide for the basic wiring walkthrough:
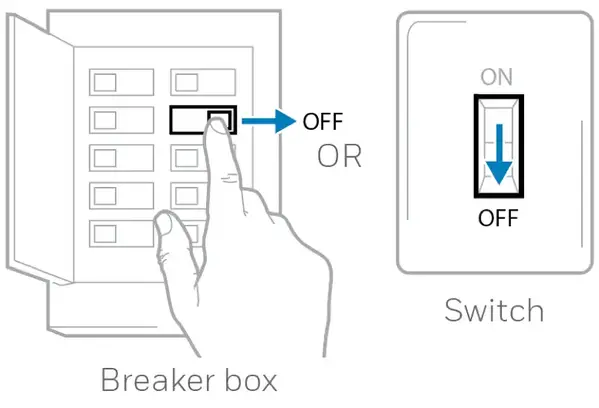
To protect your equipment, turn off the power at the breaker box or switch that controls your heating and cooling equipment. To make sure that your system is off, change the temperature on your existing thermostat so that your system starts heating or cooling. If you don’t hear or feel the system turn on within 5 minutes, the power is off. If you have a digital thermostat that has a blank display, you can skip this step.
Next, remove your existing thermostat from the wall plate. Most thermostats pull directly off the wall. However, some lift from the bottom and lever off, and others have a locking tab.
The next step is to take a picture of your wiring. When taking the picture, please make sure that the terminal markings are clearly visible.
Review your pictures.
If you see terminals labeled A B C, or 1 2 3 then your new thermostat may not be directly compatible, as your system requires a communicating thermostat.
If you see thick, black or red wires then you have a line voltage system. This type of wiring requires a line voltage thermostat and is not compatible with low voltage thermostats
If you see wires connected to terminals labeled G1,G2,G3, you will need a thermostat capable of controlling multiple fan speeds, none of our retail thermostats are compatible with this system type. G is compatible, but not G1,G2,and/or G3.
What you should typically see is 18 – gauge solid core wire. The most common configuration is five wires, however you could see as few as two, and as many as ten.
Any wire that is present, but not connected to a terminal you will want to make a note of, but you will not label these wires.
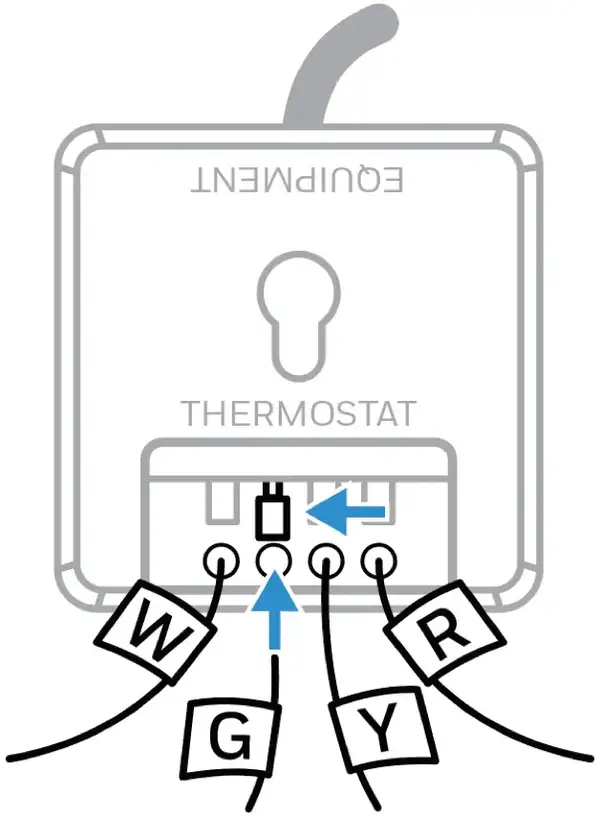
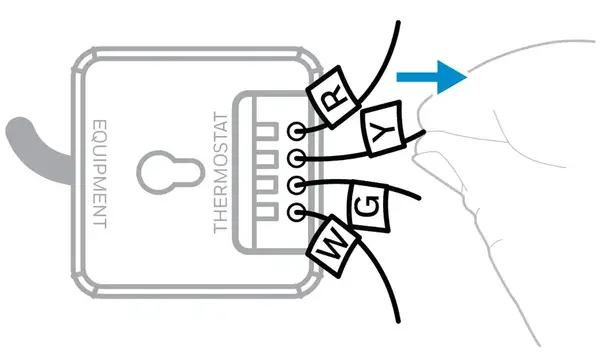
Using the photos that you took, remove each wire one at time and label it. If a terminal has multiple designations like W and O/B, it will be labeled as W and O/B and not just one or the other.
After you have removed and labeled all wires you can unscrew, remove the old thermostat wall plate and mount the new thermostat’s wall plate.
After mounting the new thermostat’s wall plate, we can re-connect the wiring. If we recommend placing a wire in a terminal, do not move it to another terminal if we address it later in the guide. (Ex. – You have a single wire labeled W-O/B and we advise placing it in the O/B terminal. If later in the guide we recommend putting the W wire in the W terminal, you will not move this wire, as we’ve already instructed you to place it in O/B.)
Now, let’s cover wiring configurations.
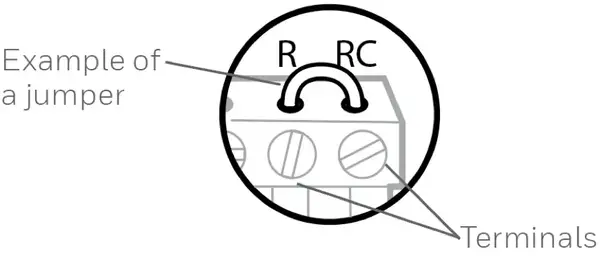
Identify any wires label R, RH, or RC. You will typically have one or two out of those three. If you just have one wire, regardless if it’s labeled RC, it will go into the R terminal, and the jumper connecting terminals R and RC will be in place. Some thermostats have a jumper switch, some have a metal staple, others may have a plug, and the jumper may also just be a wire connecting the two terminals. If you have two wires, R or RH will go into the R terminal, and RC will go into the RC terminal. If you have more than one wire (you have a wire labeled R, and another wire labeled Rc for example) you can remove any jumpers between the R and Rc terminals, or push the switch to open the RC terminal so you can insert a wire.
Next, let’s talk about the C, or common wire. If you have a Trane model thermostat, and have a wire labeled X or B refer to your thermostat manual. In some cases, one of those wires may be your common. If you have a C wire, place it into the C terminal on your wall plate.
Let’s take a look at the G wire. This wire will go to the G terminal on your new thermostat.
For the Y, Y1, and Y2 wires, Y or Y1 will go to the Y terminal, and Y2 will go to the Y2 terminal.
The O/B wire can have many configurations. It can be W-O/B, O/B, W-O, W-B, or you may even have separate O and B wires. If you have separate wires for O and B, you will want to tape off the B wire so it can’t make contact, and the O wire will be connected to the O/B terminal on your thermostat.
If your O or B terminal shares a label with another wire, typically W, you’ll need to identify whether you have a heat pump system or not. A heat pump runs your compressor for both heating and cooling. If you don’t know your system type, place this wire into the W terminal. If you have a heat pump system, place it into the O/B terminal.
Locate any unconnected wire labeled W or W1. If in the previous step you identified an O, B, or O/B wire that’s connecting to the O/B terminal, and have a separate W wire, place this wire into the W2 terminal. If you do not have a wire connected to the O/B terminal, connect the W wire to the W terminal.
What is a c-wire? Do I need one? What if I don’t have a c-wire?
What is a C-Wire?
A common wire (C-Wire) provides Wi-Fi thermostats continuous power by connecting it to a heating and cooling system (e.g. furnace). C-Wires are required on most Honeywell Wi-Fi thermostats, with the exception of the Smart Round Thermostat (formerly known as the Lyric Round). C-Wires are required on all Honeywell Home / Resideo Wi-Fi thermostats. For full wiring assistance/terminal designations/functions: Click here
How do I check if my thermostat is using a C-Wire?
1. Turn off power
To protect your equipment, turn off the power at the breaker box or switch that controls your furnace or heating equipment.
Note: Turning off your thermostat won’t turn off the power to the furnace or heating equipment.

2. Check that your system is off
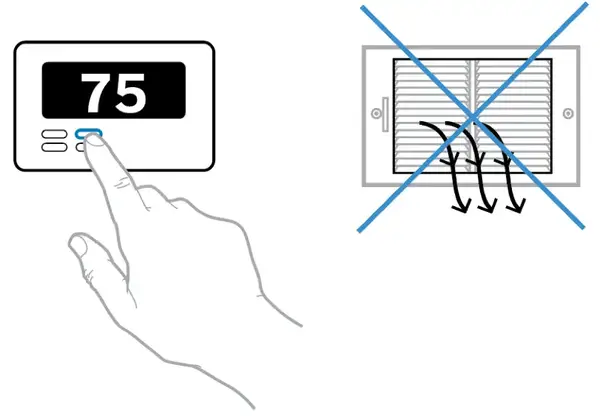
Change the temperature on your existing thermostat so that your system starts heating or cooling. If you don’t hear or feel the system turn on within 5 minutes, the power is off.
Note: If you have a digital thermostat that has a blank display, skip this step.

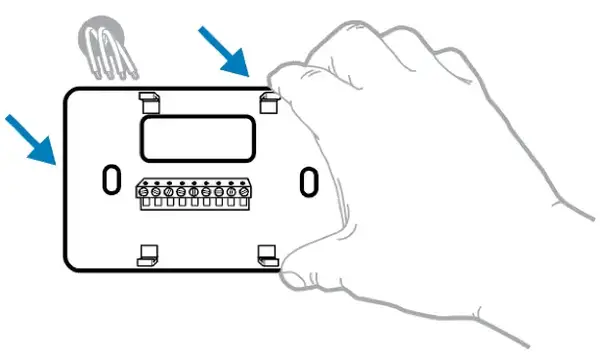
3. Remove your existing thermostat from the wall plate
On most thermostats, you can take off the thermostat by grasping and gently pulling. Some thermostats may have screws, buttons, or clasps.
Note: Don’t remove any wires from your thermostat at this time.

4. Do you have a C-Wire?
Look at the existing wall plate’s wiring: is there a wire in the C-Terminal?
YES – This means your thermostat is using a C-Wire.
NO – This means your thermostat isn’t using a C-Wire. Please view next question to learn what to do if your thermostat is missing a C-Wire.
If you’re installing a new thermostat, but your existing one is missing a C-Wire, you have the following options:
- Check for an unused C-Wire
- Use a C-Wire Adapter
- Check if your system is heat-only or RedLINK
Check for Unused C-Wire
Some homes have an unused C-Wire hidden in the wall. To check for an unused C-Wire:
1. Turn off power
To protect your equipment, turn off the power at the breaker box or switch that controls you heating and cooling equipment.
Note: The thermostat off switch won’t turn off the power to the equipment.

2. Check that your system is off
Change the temperature on your existing thermostat so that your system starts heating or cooling. If you don’t hear or feel the system turn on within 5 minutes, the power is off.
Note: If you have a digital thermostat that has a blank display, skip this step.

3. Remove your existing thermostat from the wall plate
On most thermostats, you can take off the thermostat by grasping and gently pulling. Some thermostats may have screws, buttons, or clasps.
Note: Don’t remove any wires from your thermostat at this time.

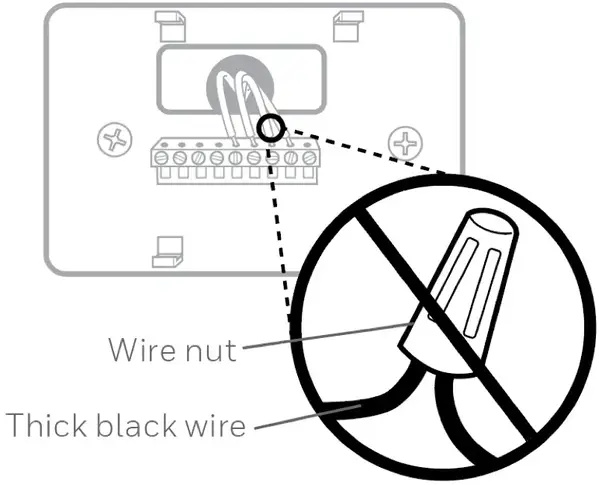
4. Do you have a line voltage system?
Line voltage systems have thick, black wires with wire nuts, or are labeled high voltage (120V or higher).
YES – Your system may not compatible. Contact Support at 1-855-733-5465 to find a pro-installer in your area.
NO – Continue to the next step.
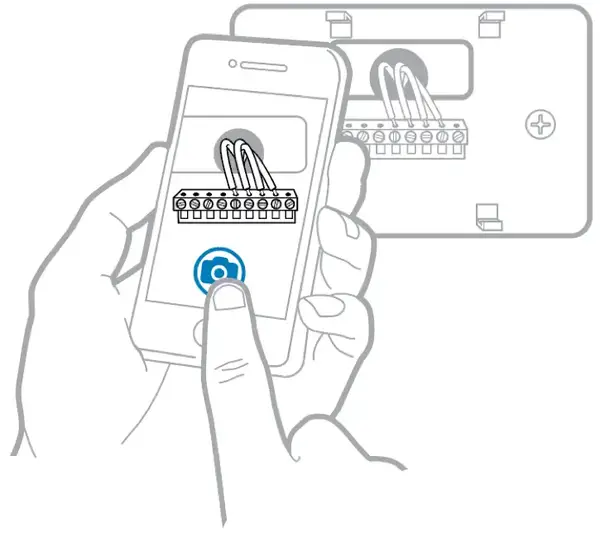
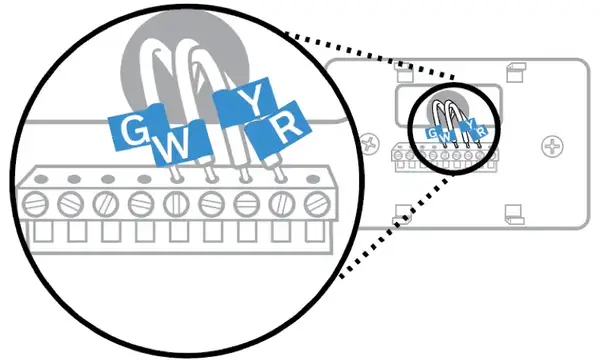
5. Take a picture of your existing wall plate’s wiring
Make sure you get a good view of all terminals. You may need to reference this image later.
6. Remove any jumpers
A jumper is used to connect two terminals. It may look like a small staple or colored wire.
Note: Don’t discard any jumpers.
7. Label wires
Label each wire on your existing wall plate with the stickers provided with your new thermostat. If you don’t have stickers, you can use tape and a pen.
Note: Don’t label jumpers.
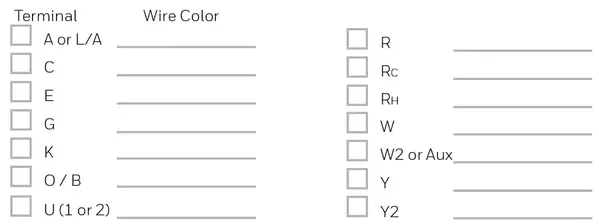
8. Write down the colors of the wires
Check the boxes and write down the color of the wires connected to terminals in the existing wall plate. Check all that apply (not all will apply).
Note: If there are wires in terminals that aren’t listed, you will need additional wiring support. Contact Support at 1-855-733-5465.
9. Disconnect the wires and remove the existing wall plate
Some wire terminals are “push-in” type (gently push on the terminal to release the wire), and some are flat-head screws. You may need a screwdriver to release wires from terminals.
Note: Wrap the wires around a pencil to prevent them from falling into the wall.
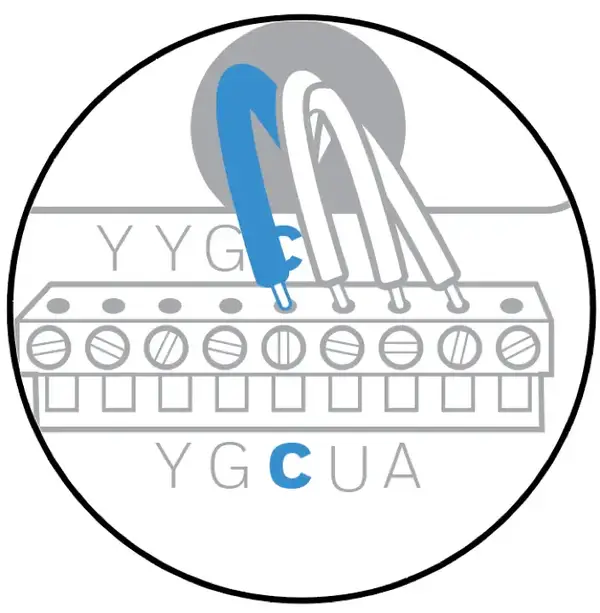
10. Do you have a C-Wire?
This is to confirm that your system isn’t using a C-Wire. Look at the thermostat wiring checklist from Step 8: is the C-Terminal checked? Alternatively, you can look at the photo from Step 5: is there a wire in the C-Terminal?
YES – This means your thermostat is using a C-Wire, and you don’t need to install a C-Wire Adapter. You can continue installing your new thermostat.
NO – This means your thermostat isn’t using a C-Wire. Continue to the next step.

 Go to your furnace or heating system
This system is often located in your basement, attic, or garage.
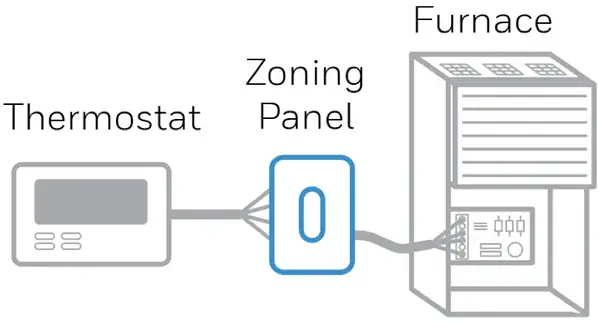
11. Do you have a zoning panel?
Your zoning panel is often mounted to the ducting on your furnace. It typically has a bundle of wires that runs to your heating/cooling system, and smaller bundles of wires that run to dampers on your ductwork.
YES – C-Wire Adapter installation is more complicated for zoned systems. Contact Support at 1-855-733-5465 to find a pro-installer in your area.
NO – Continue to the next step.
Return to your existing thermostat
12. Do you have an unused wire?
You previously removed your existing wall plate. Look at the bundle of wires coming from the wall.
Note: You may have to pull the bundle of wires out from the wall to find the unused wire.
YES – You can use this unused C-Wire. Continue to Step 13.
NO – Since you don’t have C-Wire, you need to use a C-Wire Adapter. Continue to the Use C-Wire Adapter section.
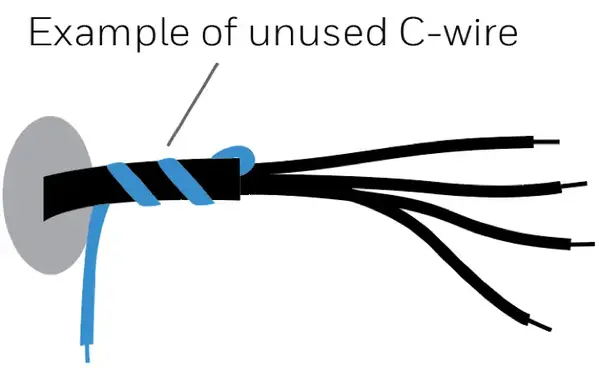
13. Label unused wire
Label your unused wire with the “C” sticker provided with your new thermostat. If you don’t have stickers, you can use tape and a pen. You may need to use a wire stripper to expose at least 1/4 inch of wire.
Note: If you have multiple unused wires, then label only one wire and make note of the color.
Go to your furnace or heating system
This system is often located in your basement, attic, or garage. Bring a flashlight and screwdriver.
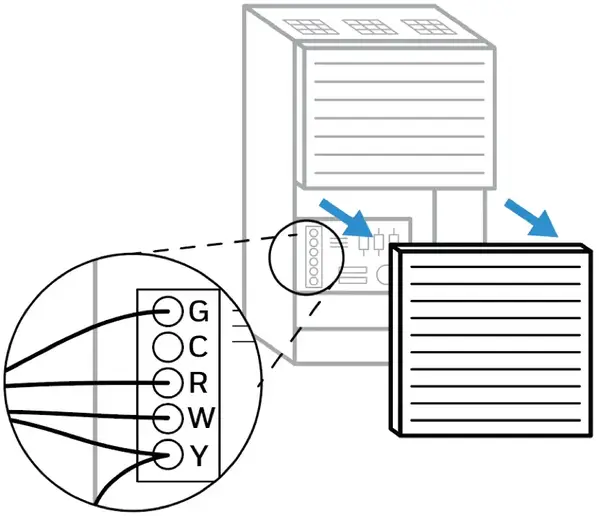
14. Remove cover from furnace or heating system
Open the heating and cooling system’s cover to find the control board. The control board may be at the top or the bottom. You should see the same terminal labels that are on your thermostat.
Note: If you don’t see a control board, your system may not be compatible. Contact Support at 1-855-733-5465 to find a pro-installer.
15. Find the other end of the unused wire
In Step 12, you found a bundle of wires near your existing thermostat. Locate the other end of this bundle near your furnace or heating system, and then find the unused wire.
Note: The unused wire should be the same color as the one near your existing thermostat. See Step 13 for the color you wrote down.
16. Connect the unused wire to the C-terminal in the control board
Note: If there are existing wires in the C-terminal, make sure they are still connected after connecting the unused wire.

17. Close the cover to the furnace or heating system
Be sure the cover is completely closed. Some systems won’t power up if the cover isn’t fully closed.
Congratulations, you’ve connected an unused C-Wire! You won’t need to use a C-Wire Adapter. You are now complete.
Use C-Wire Adapter
A C-Wire Adapter replaces the need for a C-Wire. The C-Wire Adapter is included in newer Honeywell Wi-Fi Thermostats. If you own an older thermostat model, you can purchase a C-Wire Adapter here.
To use a C-Wire Adapter:
18. Do you have a G and Y wire?
In Step 7, you labeled the wires of your existing wall plate. Look at those wires and make sure you have both a G and Y labeled.
YES – This means your system is compatible with the C-Wire Adapter. Continue to the next step.
NO – Your system is not compatible with the C-Wire Adapter. Contact Support at 1-855-733-5465 to find a pro-installer.
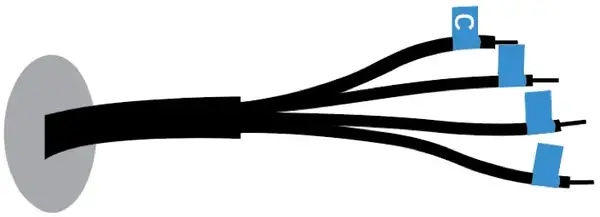
19. Relabel your G-Wire to “C”
Relabel your G-Wire with the “C” sticker provided with your new thermostat. If you don’t have stickers, you can use tape and a pen.
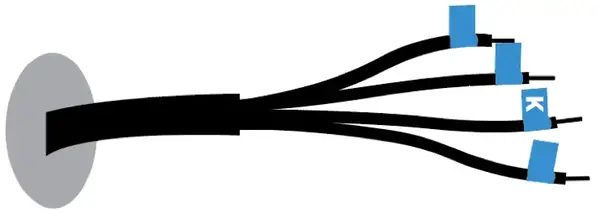
20. Relabel your Y-Wire to “K”
Relabel your Y-Wire with the “K” sticker provided with your new thermostat. If you don’t have stickers, you can use tape and a pen.
Go to your furnace or heating system
This system is often located in your basement, attic, or garage. Bring a flashlight, labels, phone, and screwdriver.

21. Remove cover from furnace or heating system
Open the heating and cooling system’s cover to find the control board. You should see the same terminal labels that are on your thermostat.
Note: You may need to unscrew the cover. The control board may be at the top or the bottom.
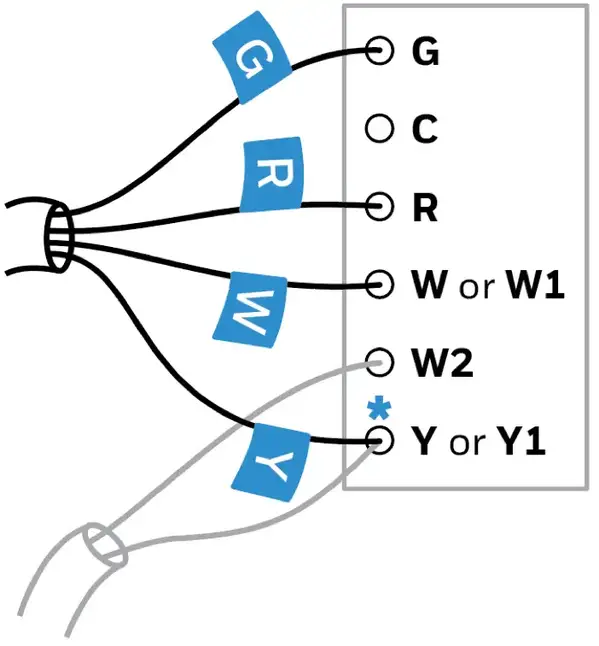
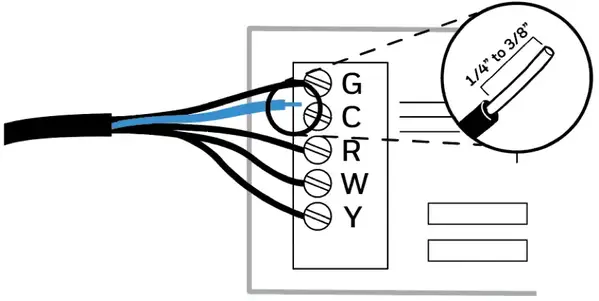
22. Take a picture of the control panel wiring
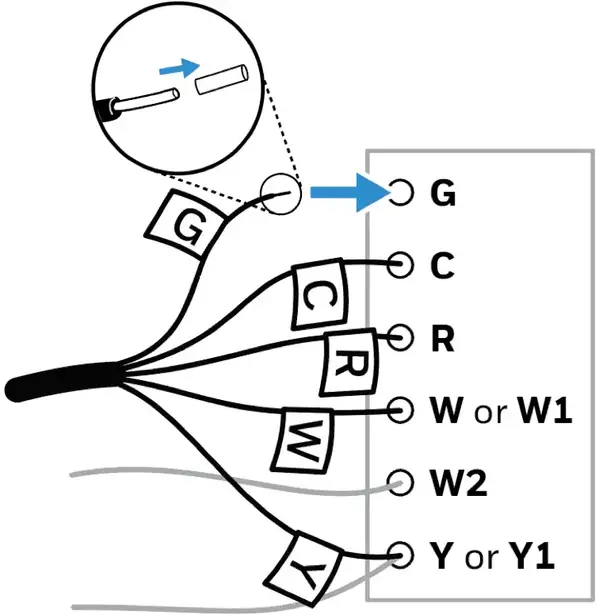
Make sure you get a good view of the following terminals, since you may need to reference this image later:
- G
- C
- R
- W or W1 (not in all systems)
- Y or Y1
Note: If you have wires connected to two R-Terminals, then you have a two-transformer system and need additional assistance. Contact Support at 1-855-733-5465 to find a pro-installer.
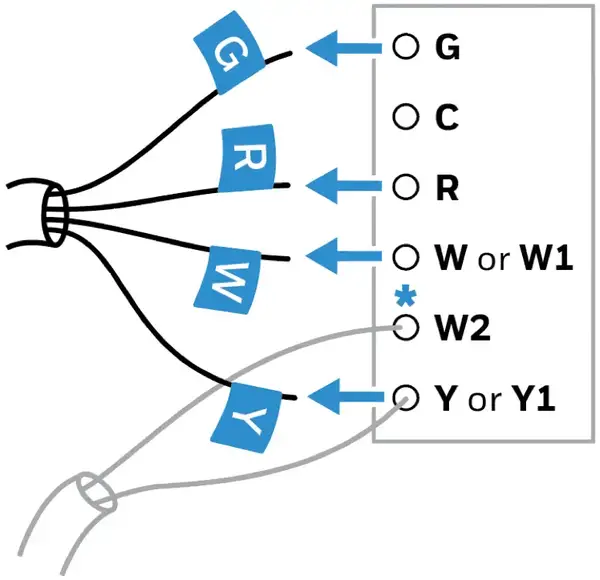
23. Label wires
Label each the following wires with the stickers provided with your new thermostat:
- G
- C
- R
- W or W1 (not in all systems)
- Y or Y1
If you don’t have stickers, you can use tape and a pen.
Note: If multiple wires are connected to a terminal, only label the wires running to your thermostat *.
24. Disconnect the labeled wires
Disconnect only the wires that you labeled. Don’t disconnect any unlabeled wires. If unlabeled wires disconnect, reconnect immediately.
Note: You may need a screwdriver to release wires from terminals.
25. Connect labeled wires to the C-Wire Adapter
On the C-Wire Adapter’s “Thermostat” side, press down a tab to open the corresponding terminal. Insert the labeled wires to the following terminals:
- W-Wire –> W-Terminal
- G-Wire –> C Terminal
- Y-Wire –> K-Terminal
- R-Wire –> R-Terminal
Note: This will convert G into C, and Y into K.
26. Make sure the wires are connected
Gently tug on the wires to make sure they are connected to the C-Wire Adapter.
27. Connect C-Wire Adapter to control board
On the C-Wire Adapter’s “Equipment” side, connect the wires to the corresponding terminals on the control board.
Note: Be sure to remove the plastic tip on each wire before connecting to a terminal.
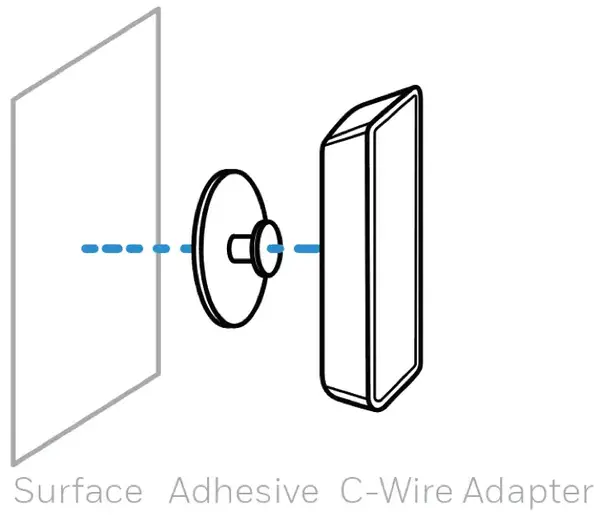
28. Mount C-Wire Adapter
Use the included mount and adhesive pad to attach the C-Wire Adapter inside your furnace or heating system.
Note: Make sure your wires aren’t over-extended or strained.
29. Close the cover to the furnace or heating system
Be sure the cover is completely closed. Some systems won’t power up if the cover isn’t fully closed.
Congratulations, you’ve connected a C-Wire Adapter! You are now complete.
Check if your System is Heat-only or RedLINK
Both heat-only and RedLINK thermostat systems have only two wires, typically R and W for heat only systems. Heat-only and REDLINK thermostats with only 2 wires are not directly compatible with wi-fi thermostat replacements or C Wire Adapters. Contact Support at 1-855-733-5465 to find a pro-installer.
30. Turn off power
To protect your equipment, turn off the power at the breaker box or switch that controls your furnace or heating equipment.
Note: Turning off your thermostat won’t turn off the power to the furnace or heating equipment.

31. Check that your system is off
Change the temperature on your existing thermostat so that your system starts heating or cooling. If you don’t hear or feel the system turn on within 5 minutes, the power is off.
Note: If you have a digital thermostat that has a blank display, skip this step.

32. Remove your existing thermostat from the wall plate
On most thermostats, you can take off the thermostat by grasping and gently pulling. Some thermostats may have screws, buttons, or clasps.
Note: Don’t remove any wires from your thermostat at this time.
33. Do you only have 2 wires?
Check how many wires you see connected to terminals.
YES – Continue to next step.
NO – You don’t have a heat-only system.
34. Are the 2 wires connected to the R and W terminals?
YES – You have a heat-only system, which is more complicated. Contact Support at 1-855-733-5465 to find a pro-installer in your area.
NO – You may have a RedLINK system, which is more complicated. Contact Support at 1-855-733-5465 to find a pro-installer in your area.
My Wi-Fi thermostat uses batteries. Do I still need a C-Wire?
If your Wi-Fi thermostat uses batteries, you don’t need a C-Wire.
Some Wi-Fi thermostats are dual-powered by either batteries or C-Wire. These devices only require either batteries or C-Wire, but not both.
Specifications
Heat And Cool Non-programmable Thermostat
| Thermostat Type | Mechanical, Non programmable |
| Color | White |
| Includes | Thermostat, Cover Plate, Wire Label, Caution Card, Wall Anchors, Mounting Screws |
| Program Modes | Manual / Not Programmed |
| Utility Rewards | No |
| Product Height | 5 in |
| Product Length | 3 in |
| Product Width | 1 in |
| Warranty | 1 Year |
| Control Functions | Heating, Cooling |


