
Hosmart Wireless Solar Driveway Alarm Instruction Manual

Hosmart was founded in 2012, the brainchild of a group of friends who previously designed Motorola products. Fast forward a few years and we are now the industry leader in home intercom and security products. Our vision is to create a global world leader in home intercom solutions and products. We design and engineer intelligent residential home solution and intercom systems. Our company philosophy is to direct our efforts based on our client’s wishes. We want you to have the best possible experience with our products. We also offer superior customer service to address damaged or defective products.If you have any questions with the unit, please contact us by navigating to www.myhosmart.com, then click Warranty, and fill out the form, we will assist you as quickly as possible.


Overview
The Wireless Motion Alert has a range of up to 1/4 mile (400 meters). It uses a Passive Infrared (PIR) Motion Sensor to detect movement of people and vehicles while allowing small animals to pass through undetected. The Base Station is powered by an AC adapter, it can also run on 4AA batteries as backup in case of power outage for 2 weeks.
What’s in the box


- Base station
- Ac Adapter
- Documentation
- sensor back plate screws
- masonry screw anchors
- PIR motion sensor
Operation and Features
Base Stition
On/Off :To turn the Base Station on or off, hold down the Power button until you hear the on/off tone. The red power light will illuminate on # 3 when the Base Station is on.
Volume: The Base Station is equipped with adjustable Volume +/- controls. The lowest volume setting mutes the volume. Volume adjustments will be heard on subsequent alarm activation, notwhile adjustments are being made. Powering off the base station will reset the volume to the factory setting.
Zone/Line 1 to Zone/Line 4 LED Indicators: When motion is detected the corresponding Zone LED indicator will flash.
Passive Infra-Red(PIR) Motion Sensor
Assembly and Setting Base Station:
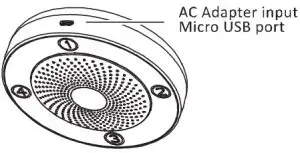
- Connect the Micro USB cable to the USB port on the base station to use the AC Adapter to supply power.
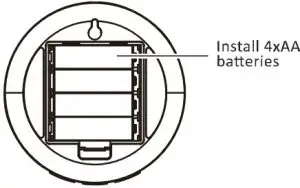
- Base station can also run on (4) AA batteries for up to 2 weeks, as backup in case of power outage.
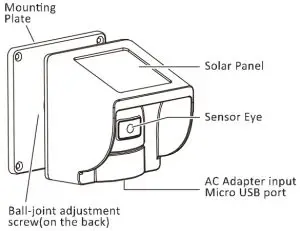
PIR Motion Sensor:
- Before installing the PIR Sensor, recharge the sensor (with 18650 battery attached) using the AC adapter to ensure a full charge. The blue light will illuminate while charging. The blue light will turn off once the battery is fully charged.
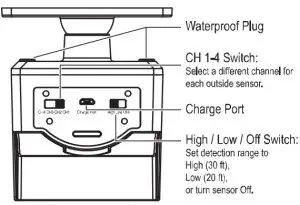
- High / Low / Off Switch: First, open the black silicone seal cap at the bottom of the PIR Motion Sensor, then turn on the sensor by switching to High or Low. Set the detection range to High (30feet), Low (20 feet) , or turn sensor Off.
- CH 1-4 Switch: Select a different channel for each outside sensor. If installing multiple PIR Motion Sensors, ensure that each sensor is set to a different Channel/Zone. Each separate channel uses an unique chime, allowing you to match different chimes with different channels.
- Test the PIR Motion Sensor by waving your hand in front of the sensor. The Base Station will produce a unique tone based upon the sensor’s setting.
- When detecting movements, a sensor eye will flash red only when assigned to lines 1 and 2, not lines 3 or 4
Low battery prompt:
When a sensor battery is low, the base station will say “Channe#1/2/3/4 power low, please charge” and the corresponding sensor Zone/Line LED indicator will flash. 2. When the Base Station battery is low the red power LED indicator will flash.