DTU-Pro WiFi Hoymiles Monitoring Module
User Manual
Important Safety Information
1.1 Read this First
This manual includes important instructions for installing and maintaining the Hoymiles Data Transfer Unit (DTU-Pro).
1.2 Safety Instructions
- Note that only professionals can install or replace DTU.
- Do not try to repair DTU without Hoymiles’ approval. If DTU is damaged, please send the DTU back to your installer for repairing/replacing. Disassembling DTU without Hoymiles’ approval will invalidate remaining of the warranty period.
- Please read all instructions and warnings on the technical specifications carefully.
- Do not use Hoymiles products in a way that is not suggested by manufacture. Doing so may cause death or injury to persons or damage to equipment.
1.3 User
This manual is only for professional installation and maintenance personnel to use.
1.4 Support and Contact Information
If you have technical queries concerning our products, please contact your system’s installer or distributor. If further support is required, please contact Hoymiles’ support at this link.
- www.hoymiles.com
- Hoymiles’ customer service center: [email protected]
1.5 Other Information
Product information is subject to change without notice. The user manual will be updated frequently; please refer to Hoymiles official website at www.hoymiles.com for the latest version.
Hoymiles Microinverter System
2.1 Microinverter
It converts the DC output of PV modules into grid-compliant AC power. It sends theoutputinformation of PV modules and the operation data of the microinverters to the DTU, whichisthe hardware basis of the module-level monitoring. With conversion efficiency upto96.7%and MPPT efficiency up to 99.9%, Hoymiles microinverters rank into the first classoftheworld’s microinverter industry
2.2 DTU
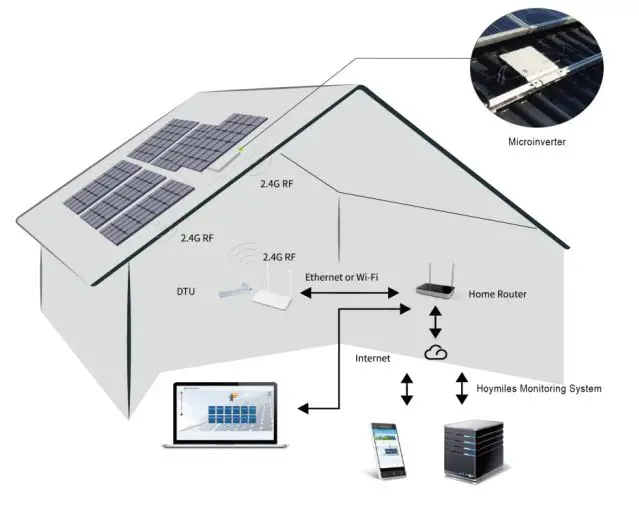
The DTU is the key component in Hoymiles microinverter system. It works as the communication gateway, which operates between the Hoymiles micro inverters and the Hoymiles Monitoring Server. The DTU communicates with the microinverter wirelesslyvia2.4GHz Proprietary RF (Nordic), collecting the operation data of the system. Meanwhile, the DTU connects to the Internet via router and communicates with Hoymiles Monitoring Server. The microinverter system operation data will be uploaded to Hoymiles Monitoring Server via DTU.
2.3 Hoymiles Monitoring Server
It collects the operation data and status of the microinverters in the system and provides the module-level monitoring for the users and maintenance staff. The following diagram shows the Hoymiles Microinverter system.
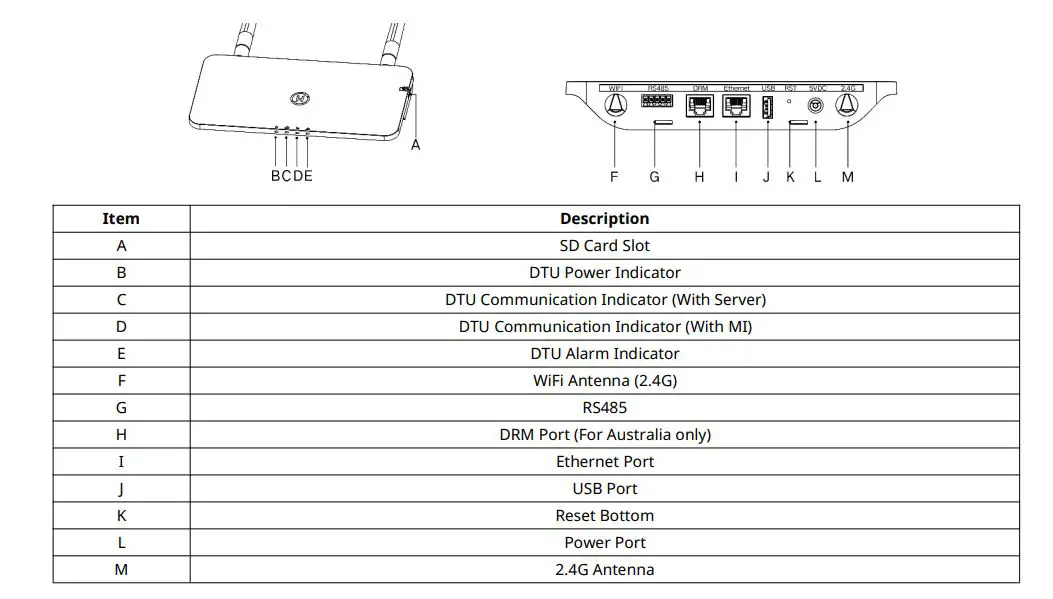
Interface Layout
3.1 Interface Layout
3.2 Export Management Function (RS485 port)
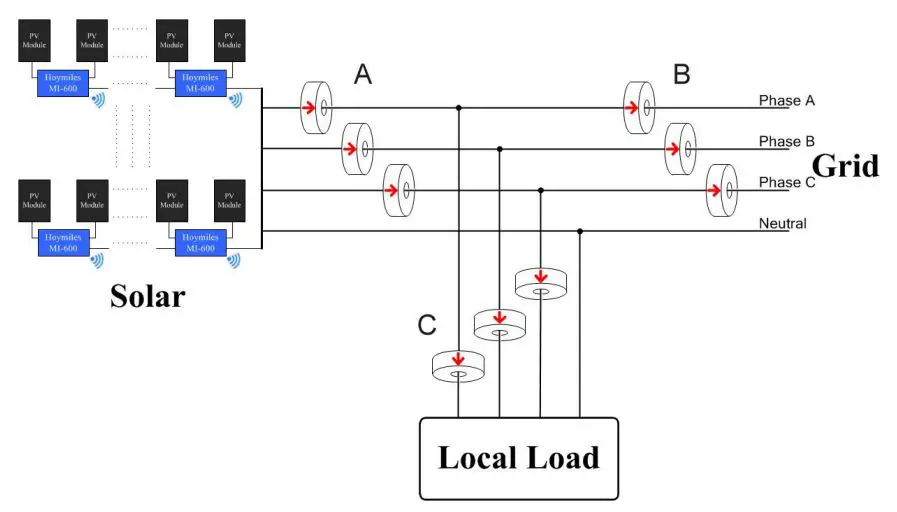
a. Device Required.
- Hoymiles Microinverter: 4 in 1 Unit, 2 in 1 Unit and Single Unit
- DTU: DTU-Pro:
- Meter: Chint Meter (DDSU666)/Chint Meter (DTSU666)/CCS WattNode Meter
b. Export Control Type.
- Type 1: Zero Export: to limit the exporting power to zero so that can prevent the generated power feed back to the grid.
- Type 2: Export Limit: to limit the exporting power within a certain value.
- Type 3: Production and Consumption Monitoring: enable to measure the PV generating under a high accuracy.
c. Installation Diagram.
Note: Please refer to “Hoymiles Export Management Technical Note” for more details.
3.3 Remote active power control (RS485 port)
In some countries, it might require that the generating plants should be equippedwithalogicinterface (input port) in order to cease output active power or limit active power toaregulatinglevel. This logic input can be RS485 port, Ethernet port, etc. DTU-Pro provide RTUModbusprotocol over RS485 port for this remote active power control. For more information, pleasereferto “Modbus implementation Technical Note”.
3.4 DRM Port
DRM port is provided to support several demand response modes as below by connecting external control device with a standard RJ-45 connector. For DTU-Pro, it cansupportDRM0/5/6/7/8 if used with Hoymiles microinverters.
3.5 Local Install Assistant
Local Install Assistant is a new function integrated with DTU-Pro, please download the Installer App (for installer/distributor use only) first.
DTU-Pro has improved from the previous generation of DTU product, and developed with this new function that allows installer:
a. One step to complete the WiFi configuration;
b. Station overall Inverters status indication allows the installer to see how many MI under this DTU is working properly (and the details for each MI) and how many is abnormal (and the details for each MI) with one glance of eyes;
c. Add the Connection status, which will display the signal strength between each MI with connected DTU, so that installer can adjust the DTU installation location accordingly. This function will simplify the DTU installation, and avoid the second visit for installer due to the poor connection between DTU and certain MI.
Note: Please refer to “Hoymiles Local Install Assistant Technical Note” for more details.
DTU Installation
4.1 System Capacity
The DTU-Pro is capable of monitoring up to 99 panels. If the communication between the DTU and microinverter caused by the installation conditions, the number of PV modules that the DTU can monitor may be reduced.
Note: Max. monitoring quantity is for open space, installation condition meets the requirement from both DTU and Microinverter manual, and the distance between Microinverter and DTU needs to be within the required range.
4.2 Basic Conditions Required
Before installing the DTU, ensure that the site meets the following requirements:
- Standard 220 VAC power outlet.
- Stable broadband internet connection.
- Router with Ethernet port.
The environmental requirements for DTU installation:
- Away from dust, liquid, acidic, or corrosive gas.
- The temperature should be between -20ºC and 55ºC.
If you plan to install the DTU on the wall, please prepared two #8 (4.166mmdiameter) screws and a screwdriver in advance.
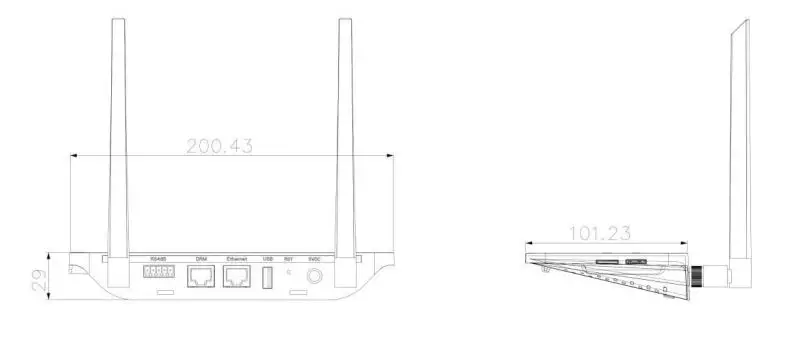
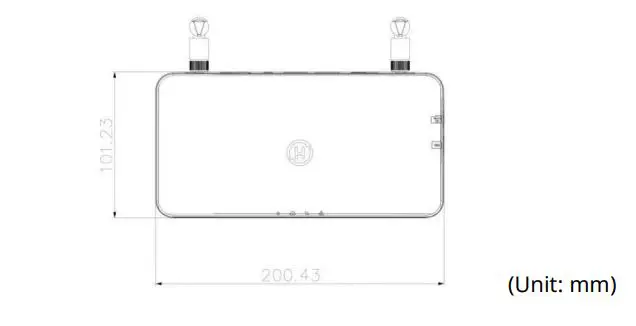
4.3 Dimensions

4.4 System Installation Sequence
4.5 Preparation
A. Download the Hoymiles mobile App
B. Check the box for following items:
– Hoymiles DTU-Pro
– Two Antennas
– Adapter
– Bracket
– 5 Pin Plug
C. Choose the way DTU-Pro connect to the Internet:
Use WiFi or Ethernet. Please prepare for the following items, if needed:
– Ethernet Cable (if choose Ethernet option).
– Hoymiles Installer App.
4.6 Install the DTU
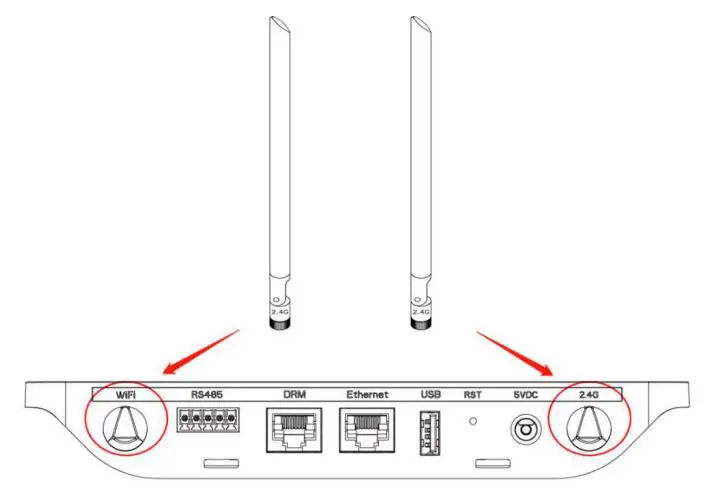
Step 1: Install the antennas
Take two 2.4G antennas out from the box, screw the antenna into the WiFi port and2.4Gport.

Note: If the DTU installation location is inside the metal box or under the metal / concrete roof, extended 2.4G cable or 2.4G sucker antenna will be suggested, which can be purchased from Hoymiles or local electrical store (Please contact Hoymiles’s Tech. support team for the detail type of the cable or antenna at [email protected]).
Step 2: Choose an Installation Location
– Installed on the top floor to increase the signal strength.
– Installed near the center of the PV array.
– Installed at least 0.5m above the ground and more than 0.8m away from the corner.
Note: Please do not install the DTU direct above the metal or concrete to prevent the signal dilution.
Step 3: Choose the Installation Method
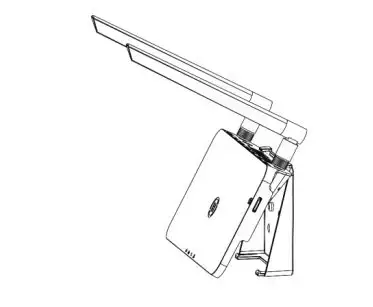
Option 1: Mount the DTU on the wall.
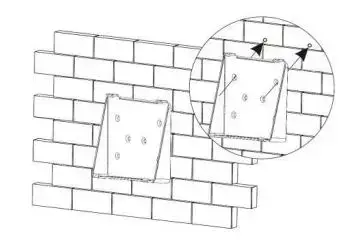
– Screw the bracket on the wall, please choose at least two screw holes (one from each side) to fix the bracket (the M4 screws need to prepare by installer);
– Match the bracket’s upper buckle with DTU-Pro;
– Match the bracket’s lower buckle by gently press the lower side of the DTU-Pro until hear the Click. Please make sure the antennas are vertical to the wall.
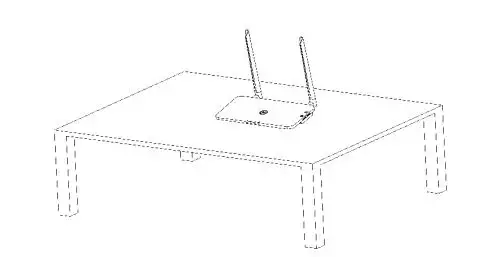
Option 2: Place the DTU on the table
– Place the DTU on the table, please make sure the antennas are vertical to the table;
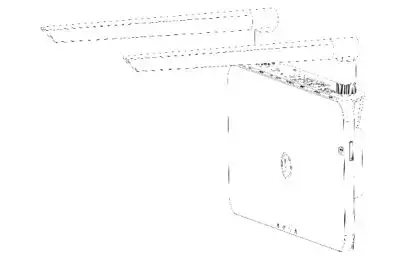
a. Plug in the power adapter to power the DTU;
b. Set up with Internet.
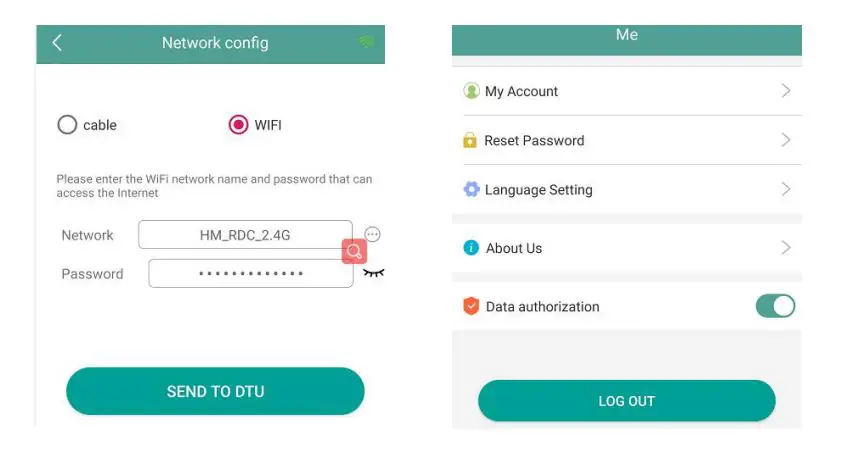
a. Use the smart phone/tablet open the Installer App and login. Approach to “Me” on the bottom of the page and then “Network Configuration”. And complete the WiFi configuration(If choose WiFi);
b. Use the Lan Cable, one side connect with house router, another side with DTU Ethernet port. Use the smart phone/tablet open the Installer App and login. Approach to “Me” on the bottom of the page and then “Network Configuration”, select “Ethernet” (If choose Ethernet).
Complete Installation Map
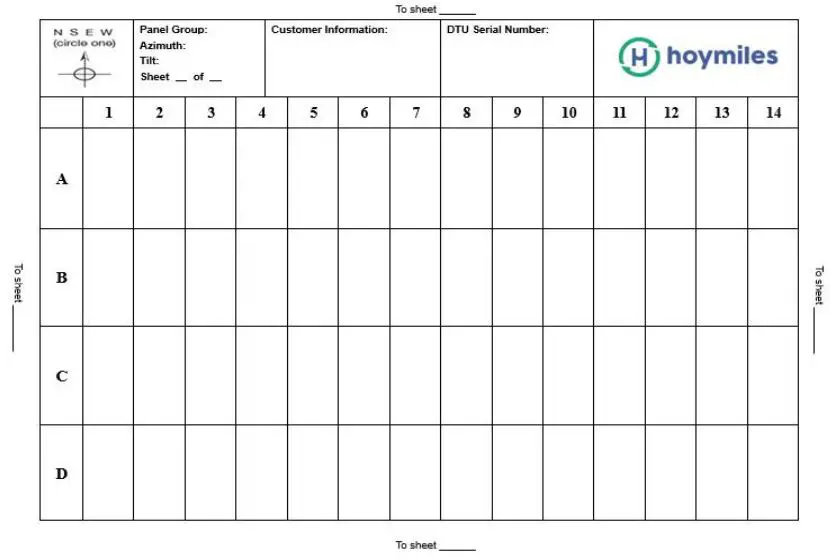
Please complete the installation map.
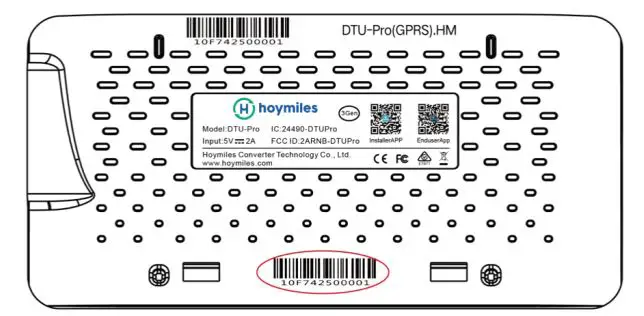
A) Peel the serial number label (as circled below) from the DTU and place it on the installation map.
B) Complete system information of the installation map shown as follows.
Site Creation on HMP
A. Install Hoymiles Installer APP by searching “Hoymiles” at the App Store (IOS) or Play Store(Android).
B. Open the APP and login in with your installer account name and password. If you are a new installer with Hoymiles, please apply an Installer account from your distributor in advance.
C. Add Station, select the “Station” tab on the bottom, then select “⊕” on the right top side of the page.
D. Select “Quick” for Single-DTU and “Profession” for Multi-DTU.
E. Please fill in the station details accordingly, and press “Next” after completed.
F. Press “Add DTU ID”, scan the DTU ID (or you can manually input ID) and press “Next” after complete.
G. Click “Start binding” and choose the angle and tilt base on the installation.
H. Scan the Microinverter ID (or you can manually input the ID) and click the tick after completing each ID input. Press “Finish” once all Microinverter ID has been input.
I. Disable the Scan function on the top of the right-hand side and design the Layout base on the installation. Click the tick box on the top of the right-hand side, and then select “Next” after completing the design.
J. Upload a picture of the site and select “Finish” to complete the site creation.
K. The new site will appear on the Station list from the Installer account.
L. Please click the “Networking” button after the power station is created.
M. Please wait about 30 minutes, the station will show online, and all the MI-IDs arefound.
Customer Login
a. Please download the End User App. You can search “Hoymiles” at the AppStore(IOS) orPlay Store (Android).
b. Log in with the Password and Username that has been set up by Installer ontheprevious step (Section 6 step e), and press “Login”.
c. Customers will able to view all details once the data start to upload, normally it will needaround 30 mins for the first data coming through.
d. Customer can also view the Microinverter generating details via accessing the HMP monitoring platform website at https://world.hoymiles.com.
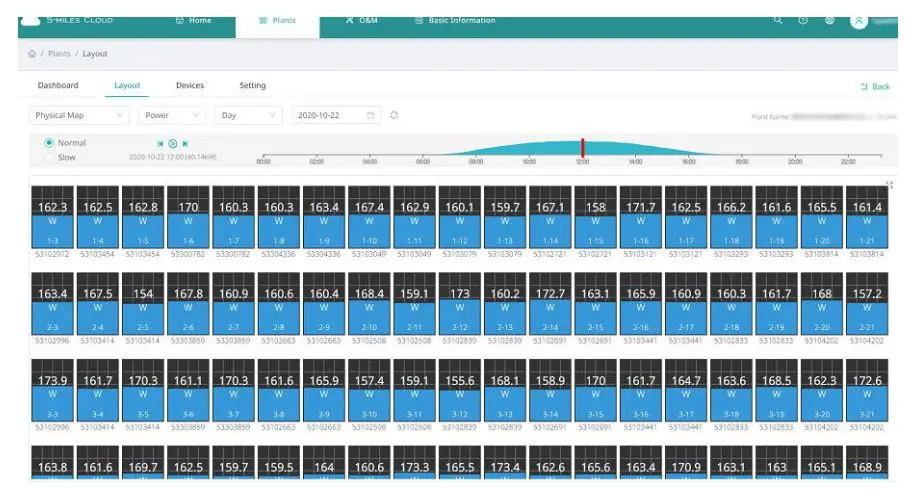
Browse the Web Station
Log in your account and browse the web station.
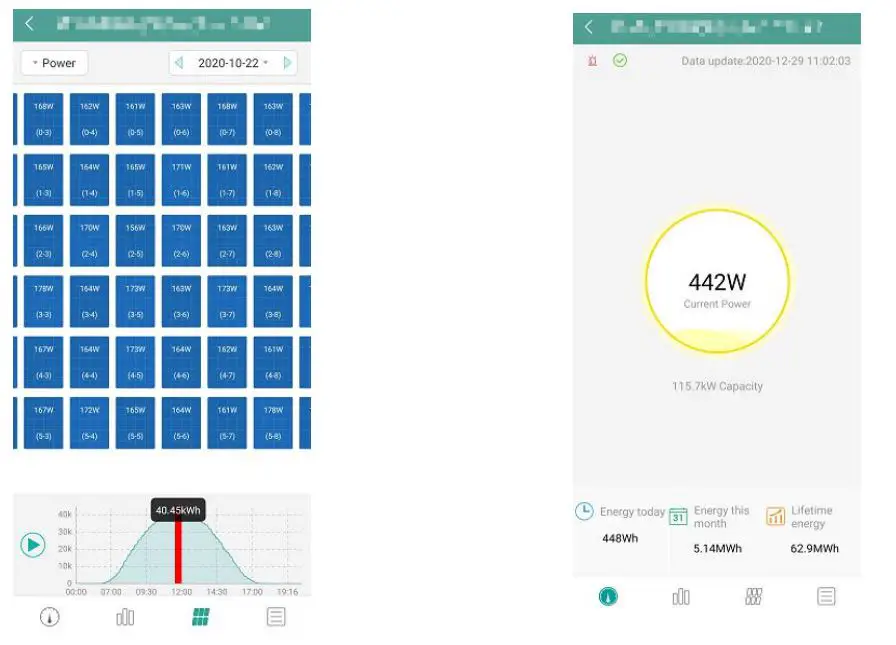
View Phone APP
Download mobile phone APP and view station information.
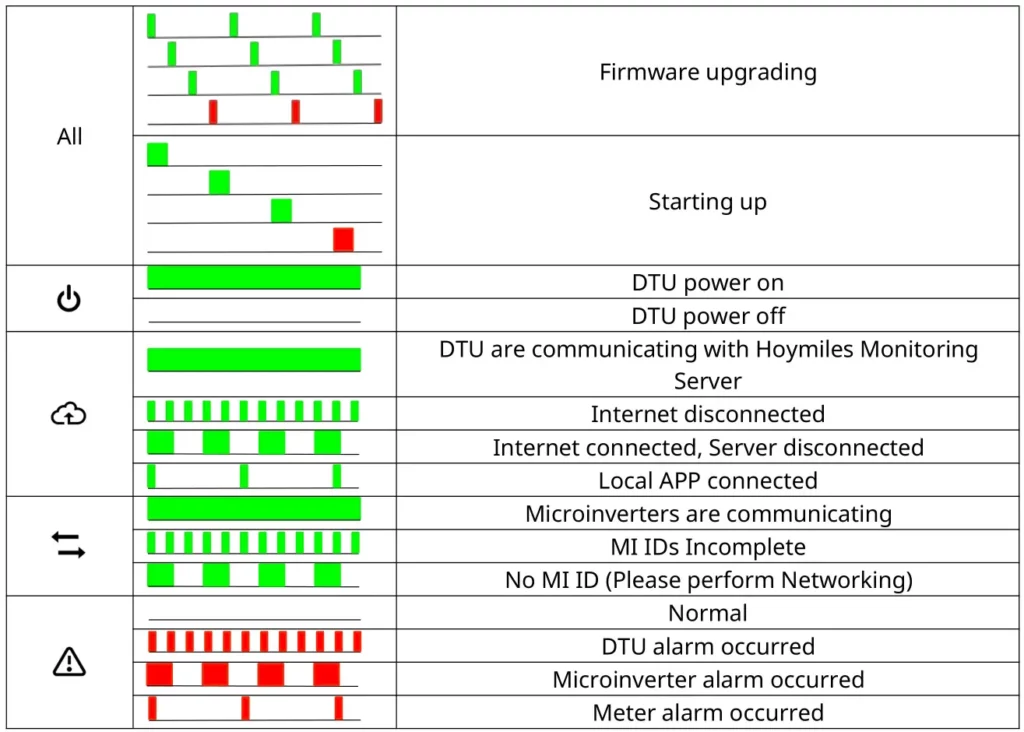
LED Indicators
The system status can be viewed by Hoymiles local APP or LED indicators.
LED States


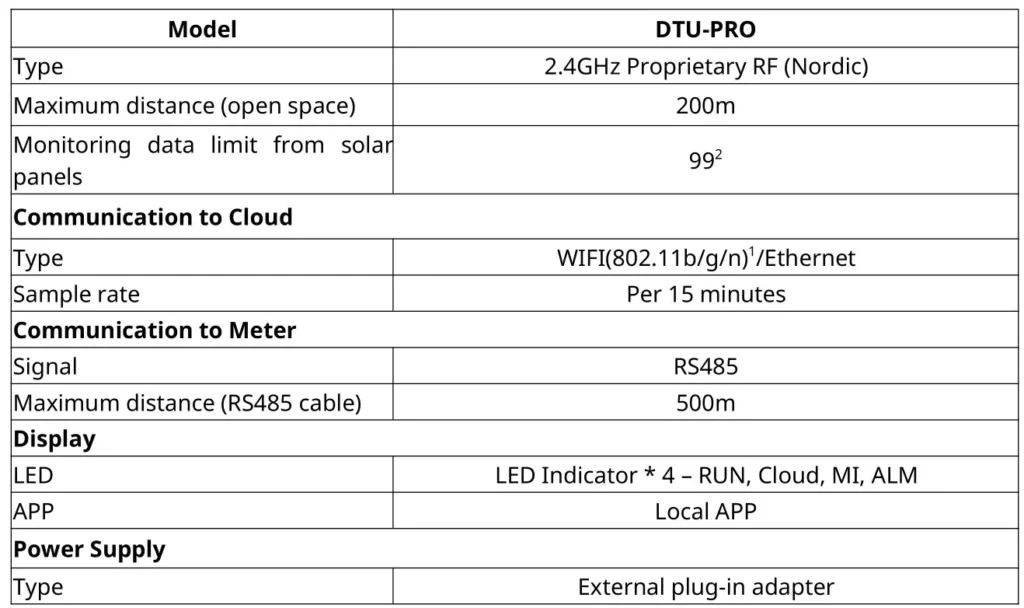
Technical Data
© 2019 Hoymiles Power Electronics Inc. All rights reserved.
