
HYPER TOUGH 8 Volt Max Lithium-Ion Cordless Rotary Tool 40PCS Accessories Instruction Manual

CALIFORNIA PROP 65
 WARNING: Some dust created by power sanding, sawing, grinding, drilling and other construction activities contains chemicals known to the state of California to cause cancer, birth defects or other reproductive harm. Some examples of these chemicals are:
- Lead from lead-based paints,
- Crystalline silica from bricks and cement and other masonry products, and
- Arsenic and chromium from chemically-treated lumber.
Your risk from these exposures varies, depending on how often you do this type of work. To reduce your exposure to these chemical: work in a well ventilated area, and work with approved safety equipment, such as those dust masks that are specially designed to filter out microscopic particles.”
For more information go to www.P65Warnings.ca.gov.
Electronic Version of this Manual Available on Walmart.com
Product Overview

- A. Collet nut
- B. LED light
- C. Shaft lock button
- D. On/off button
- E. Speed control buttons
- F. Charging socket
- G. Battery charging light
- H. Speed indicator lights
- I. Power supply
Please read before returning this product for any reason:
If you have questions or experience a problem with your Hyper Tough purchase, call 1-800-840-7856 from 8:00 a.m. to 8:00 p.m. Eastern Standard Time, Monday through Friday.
SAFETY GUIDELINES
Be sure to read and understand this manual for your safety. When using this product it is important to read and understand this information. It will protect you and help prevent any problems.
Here are the guidelines to help you understand the symbols used in this guide.
DANGER: indicates a potentially hazardous situation which could result in death or serious injury.
WARNING: indicates the situation which could result in death or serious 4, injury.
CAUTION: indicates a potentially hazardous situation which could result in mild to moderate injury.
NOTICE: When used without the Safety Alert symbol, this indicates a potentially hazardous which, if not avoided, can result in property damage.
GENERAL POWER TOOLS SAFETY WARNINGS WARNING
Read all of the instructions and pay close attention to the safety warnings. Failure to follow the warnings and instructions can result in electric shock fire and or serious injury.
SAVE THESE WARNINGS AND INSTRUCTIONS YOU MAY NEED TO REFER TO THEM LATER
The term “power tool” in the warnings refers to your mains-operated (corded) power tool or battery-operated (cordless) power tool.
SAFETY WARNINGS AND INSTRUCTIONS
- This manual contains important safety and operating instructions.
- Be sure that any attachments are recommended or sold by Hyper Tough; use of attachments by other manufacturers may not meet the same requirements and can result in fire, electric shock, or injury.
- Never pull by the cord – always pull by the plug when disconnecting.
- Never open the power tool – there are no parts inside that are serviceable by the customer.
- NEVER incinerate the power tool when it is ready to be discarded. It can explode in a fire.
Save These Instructions
WORK AREA SAFETY
- Keep your area well lit and clear of clutter that can invite accidents.
- Operate your tools in a safe area free of the presence of flammable liquids, gases, dust or potentially explosive atmospheres. Power tools can create sparks which can combust.
- Keep all distractions such as children away while operating the power tool. Distractions can cause accidents, or cause you to lose control.
ELECTRICAL SAFETY
- Avoid bodily contact with grounding services such as ranges, refrigerators, pipes, radiators ; there is a higher risk of electrical shock if your body is grounded.
- Don’t expose your power tools to wet conditions or rain. Water entering a power tool will increase the risk of electrical shock.
PERSONAL SAFETY
- Stay alert when operating this machinery to avoid the possibility of personal injury. Do not use these tools if you are under the influence of drugs, alcohol, or medication. Do not operate this machinery if you are tired.
- Use adequate personal protection – always wear eye protection. Suggested protective equipment include nonskid safety shoes, dust mask, hearing protection and/or a hard hat.
- Prevent unintentional starting – ensure that the power switch is off before plugging into a power source or connecting the battery. Don’t carry the tool by the trigger.
- Remove adjusting keys or switches before turning the tools on. A wrench or a key that is left attached to a rotating part of the tools may result in personal injury.
- Do not overreach. Keep proper footing and balance at all times. Proper footing and balance enables better control of the tools in unexpected situation.
- Dress properly. Loose clothing or long hair can become entangled in the moving parts of this machine – keep your clothes, gloves, hair or jewelry away from any moving machinery.
- Be sure to properly connect and use any devices that extract and collect dust. When used properly, dust collection can reduce situations related to dust and debris hazards.
- Do not run cordless rotary tool while holding on your side. A spinning rotary tool accessory could become entangled with clothing and injury may result.
- Disconnect the plug or remove the battery pack from tool and place the switch in the locked or “OFF” position before making any assembly adjustments, changing accessories, performing any inspection, maintenance or cleaning procedures. Such preventive safety measures reduce the risk of starting the tool accidentally.
- Do not use the tool if it has been damaged, left outdoors in the rain, snow, wet or damp environments, or immersed in liquid.
POWER TOOL USE AND CARE
- Use clamps or other practical way to secure and support the workpiece to a stable platform. Holding the work by hand or against your body is unstable and may lead to loss of control.
- Do not force tool. Use the correct tools for your application. The correct tools will do the job better and safer at the rate for which it is designed.
- Do not use tools if switch does not turn it on or off. Any tool that cannot be controlled with the switch is dangerous and must be repaired.
- Store idle tools out of reach of children and other untrained persons. Tools are dangerous in the hands of untrained users.
- Maintain tools with care. Keep cutting tools sharp and clean. Properly maintained tools with sharp cutting edges are less likely to bind and are easier to control.
- Check for misalignment or binding of moving parts, breakage of parts and any other condition that may affect the tools operation. If damaged, have the tools serviced before using. Many accidents are caused by poorly maintained tools.
- Use only accessories that are recommended by the manufacturer for your model. Accessories that may be suitable for one tool, may become hazardous when used on another tool.
- Use this power tool and accessories in accordance with the instructions; always take into account the work to be performed and the conditions in which the work will be performed. Use of this tool for anything other than what it was designed could be harmful.
Hold tool by insulated gripping surfaces when performing an operation where the cutting tool may contact hidden wiring or its own cord. Contact with a “live” wire will make exposed metal parts of the tool “live”and shock the operator.
SERVICE
- Tool service must be performed only by qualified repair personnel. Service or maintenance performed by unqualified personnel could result in a risk of injury.
- When servicing a tool, use only identical replacement parts. Follow instructions in the maintenance section of the manual. Use of unauthorized parts or failure to follow. Maintenance instructions may create a risk of electric shock or injury.
SPECIFIC SAFETY RULES
- Exposure to loud noise can cause hearing damage. Always wear ear protection when using power equipment.
WARNING: ALWAYS use safety glasses. Everyday eye glasses are NOT safety glasses. - Use face or dust mask if operation is dusty.
ALWAYS WEAR CERTIFIED SAFETY EQUIPMENT:
- ANSI Z87.1 eye protection (CAN/CSA Z94.3)
- ANSI 512.6 (53.19) hearing protection
- NIOSH/OSHA respiratory protection
- For optimum control of your power tool, always use the auxiliary handles if that come with the tool.
- Your tool has insulated gripping surfaces – be sure to hold the power tool by these surfaces to avoid electrical shock if the cutting part of the tool should make contact with a “live” wire.
- For best safety measures, lay the tool on it’s side when not in use, particularly if you’re working on a ladder or scaffold, high off the ground. If tools with large battery packs can stand upright, but they’re easily tipped over, which could cause result in an injury.
- Power tools exert extreme force – be sure the item you’re working on is firmly secured with clamps or other reliable means. Do not try to hold the item by hand or against your body – you might lose control and be injured.
- Keep hair, clothing or gloves away from air vents, as they may become entangled in the moving mechanism around these areas.
- Hold the tool firmly with both hands. Use the auxiliary handle if avail-able; if there is no auxiliary handle, grip the handle at the bottom. Losing control of the device can result in personal injury.
STAY ALERT
Watch what you are doing and use common sense. Don’t operate any tool when you are tired.
- Avoid prolonged contact with dust from construction activities like power sanding, sawing, grinding, and drilling. Always wear protective clothing and immediately wash any exposed areas with soap and water. If you allow dust to get into your eyes or mouth, or stay on your skin, you risk absorption of these harmful chemicals.
WARNING: Dust from use of this tool on construction material may cause serious and/or permanent respiratory (or other) injury. Direct the particles away from your face, and be sure to use NIOSH/OSHA approved respiratory protection against dust exposure.
WARNING: FCC Part 15 marking and instruction
Marking shall include:
This device complies with Part 15 of the FCC Rules.
Operation is subject to the following two conditions:
- This device may not cause harmful interference, and
- This device must accept any interference received, including interference that may cause undesired operation.
Instruction manual shall include:
- Warning: Changes or modifications to this unit not expressly approved by the party responsible for compliance could void the user’s authority to operate the equipment.
- NOTE: This equipment has been tested and found to comply with the limits for a Class B digital device, pursuant to Part 15 of the FCC Rules. These limits are designed to provide reasonable protection against harmful interference in a residential installation. This equipment generates uses and can radiate radio frequency energy and, if not installed and used in accordance with the instructions, may cause harmful interference to radio communications. However, there is no guarantee that interference will not occur in a particular installation. If this equipment does cause harmful interference to radio or television reception, which can be determined by turning the equipment
off and on, the user is encouraged to try to correct the interference by one or more of the following measures: - Reorient or relocate the receiving antenna.
- Increase the separation between the equipment and receiver.
- Connect the equipment into an outlet on a circuit different from that to which the receiver is connected.
- Consult the dealer or an experienced radio/TV technician for help
Symbols
For your easy reference, here are the tools symbols may see on your tool.
| V ____ Volts | A ____ amperes |
| Hz ____ hertz | W _____ watts |
| Min ___ minutes | ~ _____ alternating current |
 |
no ____ no load speed |
 |
 ____ earthling terminal ____ earthling terminal |
 |
__ /min __ revolutions or reciprocations per minute |
SAFETY RULES FOR ROTARY TOOLS
- This power tool is intended to function as a grinder, sander, wire brush, or polisher. Read all safety warnings, instructions, illustrations and specifications provided with this power tool. Failure to follow all instructions listed below may result
in electric shock, fire and/or serious injury. - Use as intended only. Operations for which the power tool was not designed may create a hazard and cause personal injury.
- Do not use accessories which are not specifically designed and recommended by Hyper Tough Tool. Just because the accessory can be attached to your power tool, it does not assure safe operation.
- The rated speed of the accessory must be at least equal to the maximum speed marked on the power tool. Accessories running faster than their RATED SPEED can break and fly apart.
- The outside diameter and the thickness of your accessory must be within the capacity rating of your power tool. Incorrectly sized accessories cannot be adequately guarded or controlled.
- The arbor size of wheels, flanges, backing pads or any other accessory must properly fit the collet of the power tool. Accessories with arbor holes that do not match the mounting hardware of the power control.
- Do not use a damaged accessory. Before each use inspect the accessory such as abrasive wheels for chips and cracks, backing pad for cracks, tear or excess wear, wire brush for loose or cracked wires. If power tool or accessory is dropped, inspect for damage or install an undamaged accessory. After inspecting and installing an accessory, position yourself and bystanders away from the plane of the rotating accessory and run the power tool at maximum no-load speed for one minute. Damaged accessories will normally break apart during this test time.
- Wear personal protective equipment. Depending on application, use face shield, safety goggles or safety glasses. As appropriate, wear dust mask, hearing protectors, gloves and workshop apron capable of stopping small abrasive or work piece fragments. The eye protection must be capable of stopping flying debris generated by various operations. The eye protection must be capable of stopping flying debris generated by various operations. The dust mask or respirator must be capable of filtering out particles generated by your operation. Prolonged exposure to high intensity noise may cause hearing loss.
- Keep bystanders a safe distance away from work area. Anyone entering the work area must wear personal protective equipment. Fragments of work piece or of a broken accessory may fly away and cause injury beyond immediate area of operation.
- Hold power tool by insulated gripping surfaces only, when performing an operation where the accessory may contact hidden wiring or its own cord. An accessory contacting a “live” wire may make exposed metal parts of the power tool “live” and shock the operator.
- Never lay the power tool down until the accessory has come to a complete stop. The spinning accessory may grab the surface and pull the power tool out of your control.
- Do not run the power tool while carrying it at your side. Accidental contact with the spinning accessory could snag your clothing, pulling the accessory into your body.
- Regularly clean the power tool’s air vents. The motor’s fan will draw the dust inside the housing and excessive accumulation of powdered metal may cause electrical hazards.
- Do not operate the power tool near flammable materials. Sparks could ignite these materials.
- Do not use accessories that require liquid coolants. Using water or other liquid coolants may result in electrocution or shock.
- Maintain labels and nameplates on the tool. These carry important safety information.
- Avoid unintentional starting. Prepare to begin work before turning on the tool.
- Do not depress the spindle lock when starting or during operation.
- Do not leave the tool unattended. Turn off the tool before leaving.
- This product is not a toy. Keep it out of reach of children.
- People with pacemaker should consult their physician(s) before use. Electromagnetic fields in close proximity to heart pacemaker could cause pacemaker interference or pacemaker failure.
SAFETY WARNINGS SPECIFIC FOR GRINDING AND ABRASIVE CUTTING-OFF
OPERATIONS
- Use only wheel types that are recommended for your power tool and the specific guard designed for the selected wheel. Wheels for which the power tool was not designed cannot be adequately guarded and are unsafe.
- Wheels must be used only for recommended applications. For example: do not grind with the side of cut-off wheel. Abrasive cut-off wheels are intended for peripheral grinding, side forces applied to these wheels may cause them to shatter.
- Always use undamaged wheel flanges that are of correct size and shape for your selected wheel. Proper wheel flanges support the wheel thus reducing the possibility of wheel breakage. Flanges for cut-off wheels may be different from grinding wheel flanges.
- Do not use worn down wheels from larger power tools. Wheel intended for larger power tool is not suitable for the higher speed of a smaller tool and may burst.
- Dress appropriately. Do not wear pants with cuffs, shirts with open pockets, or any clothing that can catch and hold molten metal or sparks.
SAFETY WARNINGS SPECIFIC FOR WIRE BRUSHING OPERATIONS
Be aware that wire bristles are thrown by the brush even during ordinary operation. Do not overstress the wires by applying excessive load to the brush. The wire bristles can easily penetrate light clothing and/or skin.
VIBRATION SAFETY
This tool vibrates during use. Repeated or long-term exposure to vibration may cause temporary or permanent physical injury, particularly to the hands, arms and shoulders. To reduce the risk of vibration-related injury:
- Anyone using vibrating tools regularly or for an extended period should first be examined by a doctor and then have regular medical check-ups to ensure medical problems are not being caused or worsened from use. Pregnant women or people who have impaired blood circulation to the hand, past hand injuries, nervous system disorders, diabetes, or Raynaud’s Disease should not use this tool. If you feel any medical or physical symptoms related to vibration (such as tingling, numbness, and white or blue fingers), seek medical advice as soon as possible.
- Do not smoke during use. Nicotine reduces the blood supply to the hands and fingers, increasing the risk of vibration-related injury.
- Wear suitable gloves to reduce the vibration effects on the user.
- Use tools with the lowest vibration when there is a choice between different processes.
- Include vibration-free periods each day of work.
- Grip tool as lightly as possible (while still keeping safe control of it). Let the tool do the work.
- To reduce vibration, maintain the tool as explained in this manual. If any abnormal vibration occurs, stop use immediately.
CHARGING THE TOOL
- Before using the battery charger, read and become familiar with all of the use instructions and caution markings on the charger and product.
- CAUTION: Always use Hyper Tough battery charger to reduce the possibility of injury; other battery charger may burst, causing potentially harmful results.
- Keep the charger out of bad elements, such as rain and snow.
- Be sure that any attachments are recommended or sold by Hyper Tough; use of attachments by other manufacturers may not meet the same requirements and can result in electric shock, or injury.
- Never pull by the cord – always pull by the plug when disconnecting the charger.
- Make sure the cord is clear and secure – do not step on, trip or otherwise damage or stress the cord.
- Use only the supplied charger when charging your tool. Using a different charger can be hazardous or damage the tool.
- Use only one charger when charging.
- Never open the charger or tool – there are no parts inside that are serviceable by the customer. Return the tool to Hyper Tough for service.
- Never attempt to open or modify battery for any reason. Released electrolyte is corrosive and may cause damage to eyes and skin. It may be toxic if swallowed.
- NEVER incinerate the tool or battery when they are ready to be discarded. The batteries can explode in a fire.
- There are certain conditions, such as extreme usage, charging or temperature conditions that can result in a small amount of leakage from the battery cells. This does not indicate a failure – however, should the outer seal get broken and the leakage touches your skin:
- a. Immediately wash with soap and water.
- b. Neutralize with a mild acid such as lemon juice or vinegar.
- C. In case the battery liquid gets in your eyes, flush your eyes with clean water for a minimum of 10 minutes and seek immediate medical attention. MEDICAL.
NOTE: the liquid is a 25-35% solution of potassium hydroxide.
Chargers are designed to use standard 120 volt AC, 60 Hz power. Do not use DC
or any other voltage.
BEFORE ATTEMPTING TO CHARGE YOUR ROTARY TOOL, THOROUGHLY READ ALL THE SAFETY INSTRUCTIONS.
- The rotary tool is not fully charged. Before first use, the tool requires 5-7 hours charge time to be fully charged. Subsequent recharging needs 3-4 hours for the tool to be fully charged.
- Longest life and best performance of the battery is obtained when charging between air temperatures of 41°F and 95°F (5°C – 35°C). DO NOT charge the battery in air temperatures below 41°F (5°C) or above 95°F (35°C). This is important and will prevent serious damage to the battery.
- Never over-discharge a battery by using the tool even after tool performance has decreased. When tool performance begins to diminish, stop the tool and recharge the battery for optimal performance.
- Allow the tool to cool down after use; avoid placing the charger and tool in a warm environment.
- The charger and battery may become warm to touch while charging. This is normal and does not indicate problem.
- Batteries will reach full performance after about five charge/discharge cycles.
- Plug the power supply (I) jack into the charging socket (F) and insert the power supply (I) plug into your standard power outlet. The battery charging light (G) will be Red ON to signal the battery is receiving a charge. (Show in Figure 1)
- The battery charging light (G) will automatically turn from Red ON to Green ON once charging is complete, normal charging time is 3 to 4 hours.
Caution:
- Place and charge the tool on a dry location in a room where the temperature is from +41°F (5°C)–95°F (35°C).
- During charging, the tool and power supply become warm when you touch it. This is a normal condition, and does not indicate a problem.
- Always unplug the power supply when charging completed.
- Be sure the tool is cool before using it.
USING THE ROTARY TOOL
WARNING: Always hold the tool away from your face. Accessories can be damaged during handling, and can fly apart as they come up to speed.
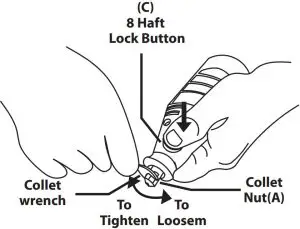
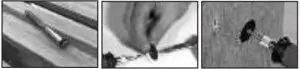
Collet Nut
To loosen the collet nut (A), first press shaft lock button (C) and rotate the shaft by hand until the lock engages the shaft preventing further rotation.
CAUTION: Do not engage lock while the Rotary Tool is running. With the shaft lock engaged, use the collet wrench to loosen the collet nut if necessary. The collet nut must be loosely threaded on when inserting an accessory. Change accessories by inserting the new one into the collet as far as possible to minimize run out and unbalance. With the shaft lock engaged, finger tighten the collet nut until the accessory shank is gripped by the collet. Using wrench, completely tighten to fully secure the accessory.
NOTE: Avoid excessive tightening of the collet nut when there is no bit inserted.
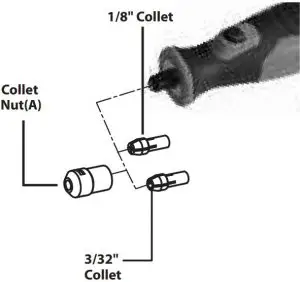
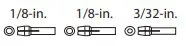
Collets Two different size collets (1/8” and 3/32”) to accommodate different shank sizes are available for your Rotary Tool. To install a different collet, remove the collet nut and remove the old collet. Insert the unslotted end of the collet in the hole in the end of the tool shaft. Tighten collet nut back on the shaft.
CAUTION: Always use the collet which matches the shank size of the accessory you plan to use. Never force a larger diameter shank into a collet.
On/Off Button
To turn the tool “ON”, press and release the on/off button. (D)
The tool will start working at a speed of 15,000 rpm and the speed indicator light will turn on. If the on/off button is pressed but not released the tool and the speed indicator light won’t turn on. To turn the tool “OFF” press and release the on/off button. (D)
Speed Control Buttons
Your rotary tool is equipped with speed control buttons (E). The speed may be adjusted during operation by pressing on the plus (+) or (-) minus buttons. Speed will increment or decrement by 5,000 rpm from a minimum of 5,000 to a
maximum of 25,000 rpm. The speed indicator lights (H) located alongside the speed control buttons will illuminate according to the chosen speed. Every time the tool is turned off the speed set goes back to the medium level (15,000 rpm) so it might be necessary to increase/decrease the speed to the level that it was being used (e.g. 25,000 rpm) before the tool was turned off to keep working on the same application.
Settings for Approximate Revolutions
*15 is the maximum speed setting for wire brushes.
Certain materials, however, (some plastics and precious metals, for example) require a relatively slow speed because at high speed the friction of the accessory generates heat and may cause damage to the material. Slow speeds (15,000 RPM or less) usually are best for polishing operations employing the felt polishing accessories. They may also be best for working on delicate projects, delicate
wood carving and fragile model parts. All brushing applications require lower speeds to avoid wire discharge from the holder. Higher speeds are better for carving, cutting, shaping, and cutting dadoes or rabbets in wood.
Hardwoods, metals and glass require high speed operation, and drilling should also be done at high speeds.
| Speed Setting | Speed Range |
| 5 | 5,000 RPM |
| 10 | 10,000 RPM |
| 15 | 15,000 RPM |
| 20 | 20,000 RPM |
| 25 | 25,000 RPM |
Some rules of thumb in regard to speed:
- Plastic and other materials that melt at low temperatures should be cut at low speeds.
- Polishing, buffing and cleaning with any type of bristle brush must be done at speeds not greater than 15,000 RPM to prevent damage to the brush from bristles flying toward operator.
- Wood should be cut at high speed.
- Iron or steel should be cut at high speed. If a high speed steel cutter starts to chatter — this normally means it is running too slow.
- Aluminum, copper alloys, lead alloys, zinc alloys and tin may be cut at various speeds, depending on the type of cutting being done. Use paraffin or other suitable lubricant on the cutter to prevent the cut material from adhering to the cutter teeth.
PUTTING ACCESSORIES IN TOOL
- Press down the shaft lock button and hold it down
- Apply the collet wrench to the flats of the collet nut and turn it counterclockwise to loosen it.
- Place the accessories shank into the collet as deep as it will go.
- Press and hold the shaft lock button
- Tighten the collet nut by turning it finger tight in a clockwise direction until the accessory is firmly clamped. Completely tighten using wrench.
ACCESSORY
Collets
Must select correct collect size for different shank before installation.
Screwdriver/Wrench

- For tightening
- For Drum Sander changes
- For Mandrel Change
Wire brushes (this kit includes Two brushes:
1pc wire brush,1pc Nylon Brush)
- Good for use on soft metal like gold,copper and brass Three different shapes of wire brushes are available.
For best results wire brushes should be used at speeds not greater than 15,000 RPM. Refer to operating speeds section for proper tool speed setting. The three shapes come in three different materials: stainless steel, brass and carbon wire. The stainless steel perform well on pewter, aluminum, stainless steel, and other metals, without leaving “after-rust”. Brass brushes are non-sparking, and softer than steel; making them. The carbon wire brushes are good general purpose cleaning.
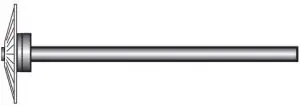
Felt wheels and mandrel

- Good for Polishing
This kit includes 4 felt wheels and a felt wheel mandrel. Felt wheels and tips should be used with a polishing a compound – similar to polishing a car. For best results, do not use these accessories at speed greater than 15,000RPM’s.
Aluminum oxide grinding stones

- Good for sharpening and grinding
We’ve included 5 of the most common shapes, These are made of aluminum oxide. Use them for sharpening lawn mower blades, screwdriver tips, knives scissors, chisels and other cutting tools. Use to remove flash from metal castings, deburring any metal after cutting, smoothing welds joints, grinding off rivets and removing rust . These grinding stones can be resharpened with dressing stone.
Cut- Off wheels

- Use for cutting, slicing
These thin discs of fiberglass are used for slicing, cutting and other tasks
Sanding accessories

- Sand, Grind, Polish
Sanding discs can be used for nearly any small sanding job, from model making to fine furniture finishing. The drum sander is a tiny drum which fits into the rotary tool and makes it possible to shape wood, smooth fiberglass, sand inside curves and other difficult places. Replace the sanding bands on the drum as they become worn and lose their grit sand paper discs. Grind and polish flat or contoured surfaces. They are used most effective as a finishing sander after heavier surface sanding and material removal is completed paper discs come in fine and coarse grades.
Diamond points

- Use on hard materials
Use for fine detail work on wood, jade ceramic, glass and other hard material. Bits are covered with diamond particles. (Not recommended for drilling)
Whetstone
- For Reshaping bits Ideal for reshaping HSS drill bits for specific applications; Bring new life back to worn HSS drill bits.
HOW TO ATTACH SANDING ,GRINDING,CUTTING.
Using the sanding & cutting mandrel
This mandrel has a small set screw at its tip and is used with cutting wheels and
sanding discs. Higher speeds, usually maximum, are best when using these types of
accessories
Using the drum sander
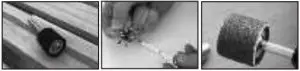
To replace a band on the drum sander, loosen the screw without removing it to contract the drum. Slide the old band off & slide the new band on. Expand the drum to tighten the band by turning the screw again.
WARNING
Before each use,check to make certain that all components are assembled to accessory shank If the drum is sufficiently expanded to secure the band during use. IF sanding band is loose on the drum during operation it may “fly”off and strike you or bystanders.
RUNNING THE TOOL
- Ensure the accessory is securely clamped in the collet.
- Hold the tool firmly. Press the on / off switch. Rotating the speed adjustment thumbwheel will increase or decrease the speed.
- To select the optimal speed for the job, use a piece of scrap material for a trial run. Keep the tool clean using a soft damp (not wet) cloth. Do not use solvents on the plastic parts. Lubrication is not necessary
MAINTENANCE
Keep the tool clean using a soft damp (not wet) cloth. Do not use solvents on the plastic parts. Lubrication is not necessary.
WARNING: To avoid accidents, always be sure the tool is turned “OFF” before cleaning.
Protect the tool and its parts and accessories from moisture and humidity. To maintain the best performance of your rechargeable battery, protect it from overheating, both from overcharging and during storage. Occasionally charge the battery for 3-4 hours. The battery may also benefit from a full discharge from time
to time.
IMPORTANT: to assure product SAFETY and RELIABILITY, all maintenance, repairs or adjustments (other than those mentioned in this manual) should be performed by authorized repair centers using identical replacement parts.
THE RBRC SEAL
THE RBRC SEAL (Rechargeable Battery Recycling Corporation) on the lithium-ion battery (or battery pack) indicates that the cost of recycling the battery or battery pack have already been paid by Hyper Tough. In some areas, it is illegal to place spent lithium-ion batteries in the trash or municipal solid waste stream and the RBRC program provides an environmentally conscious alternative. RBRC in cooperation with Hyper Tough and other battery users, has established programs in the United States and Canada to facilitate the collection of spent lithium-ion batteries. Help protect our environment and conserve natural resources by contacting your local recycling center for information on where to drop off the spent battery, or call 1-877-2-RECYCLE.
WARNING:
Do not expose battery to fire or intense heat as it may explode. Battery contains acid. If case should become cracked, dispose of immediately taking adequate safety precautions to prevent damage to persons or property.

WARNING: Only use recommended accessories-use of unauthorized accessories can be hazardous and /or result in injury or damage. This product contains lead, a chemical known to the State of California to cause cancer, and birth defects or other reproductive harm. Battery posts, terminals and related accessories contain lead and lead compounds, chemicals known to the State of California to cause cancer and reproductive harm. Wash hands after handling. This product is not intended for commercial use.
ACCESSORIES
If you need accessories for use with your tool, most recommended accessories are available from your local retailer. If you need accessory information, please call 1-800-840-7856.
2-YEAR LIMITED WARRANTY
For 2 years from the date of purchase, this product is warranted for the original purchaser to be free from defects in materials and workmanship through normal use. In order to obtain this service, please return this item to the place of purchase with valid proof of purchase and the defective product will be replaced at no charge. This guarantee gives you specific legal rights, and you may have other rights that vary from state to state.
For questions, please contact
American Customer Service: 1-800-840-7856
5805C Peachtree Corners: Item # AQ85000G
East Norcross, Phone Lines Available
GA 30092, U.S.A 30092: Monday To Friday 8:00 AM to 8:00 PM EST
Email: [email protected]
SPECIFICATIONS
Voltage Rating: 8V MAX
No Load Speed: 5,000 – 25,000 RPM
Collet Capacity: 1/8”, 3/32”
Charge Time: 3-4 hours
Power Supply Rating: 120V AC in, 500mA DC Out
Battery Type: Lithium-ion
ACCESSORIES
1 – 3-4 Hours Charger
40 – Rotary Tool Accessories
Includes:
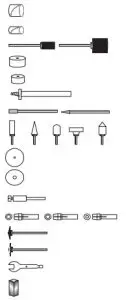
- 5pc 1/2″ Sanding Bands
- 5pc 1/4″ Sanding Bands
- 2pc Sanding Drums
- 2pc 1″ Felt Polishing Wheels
- 2pc 1/2″ Felt Polishing Wheels
- 1pc Felt Wheel Mandrel
- 2pc Diamond-point Bits
- 5pc Aluminum Oxide Grinding Stones With Shank
- 6pc Cut-off Wheels
- 2pc Grinding Wheels
- 1pc Cut-off Wheel Mandrel
- 3pc Collets, 1/8in. 1/8in., 3/32in.
- 1pc Steel Wire Brush
- 1pc Nylon Brush
- 1pc Wrench
- 1pc Whetstone