ICONE e-Bike
View Fullscreen
EN
Instruction manual for use
This manual contains important information regarding safety and performance. It is recommended to read this manual carefully before using the e-Bike ICONE, paying particular attention to the warnings and precautions to be taken in its management. If you lend the electric bicycle to others for use, let users read the instructions carefully.
REGULATIONS When using the Pedal Assisted Bicycle, it is mandatory to follow the traffic regulations enforced in your country (Highway Code). In the majority of countries, permission from the authorities and a driving license are not required to ride a pedal-assisted bicycle. However, each user is required to inquire about any driving permits and special rules for pedal assisted bicycles with local authorities. It is possible to ride the Pedal Assisted Bicycle on roads and public roads only with the addition of the equipment prescribed by law in the country of use (see the Highway Code). ICONE Assisted Pedal Bicycles comply with the provisions of Art. 50 of the New Code of the Street:: Velocipedes are vehicles with two or more wheels operating exclusively with muscular propulsion, by means of pedals, operated by the people on the vehicle; Pedal Assisted Bicycles are also considered velocipedes, equipped with an electric auxiliary motor having a maximum continuous rated power of 0.25KW whose power supply is progressively reduced and finally interrupted when the vehicle reaches 25 km / h or earlier if the cyclist stops pedaling.
EUROPEAN DIRECTIVE 2002/96 / EC
This symbol means that the bicycle is subject to the European directive 2002/96 / CE and obliges you to dispose of the bicycle parts separately from household waste, delivering it to a special return and collection center.
CE MARK CE mark on the product plate. This symbol means that the pedal-assisted bicycle meets all the basic safety requirements of the applicable European directives.
THIS ELECTRIC ASSISTED PEDAL BIKE HAS BEEN CAREFULLY DESIGNED AND PRODUCED FOLLOWING THE LATEST INTERNATIONAL QUALITY STANDARDS, INCLUDING:
EN 14764-2005 EN 15194-2009
Version 2.1
Contents
1. Important information 2. Check before the first excursion 3. Driving 4. Folding and methods of use 5. DIY technical solutions 6. Cycle computer 7. Charging and protecting the battery 8. Maintenance and repair
9. Issues requiring attention 10. Maintenance 11. Technical parameters 12. Service information 13. E-Bike ICONE Certificate 14. Warranty card 15. Delivery report
WARNING!!
DANGER!!
Important information about the Icone Bicycle The addition of incorrect or designed accessories and components for this e-Bike can cause damage to the latter and compromise the safety of its operation. This can lead to dangerous driving situations, falls and accidents. Never add equipment to your e-Bike yourself and never attempt to modify it yourself.
Accessories Always choose accessories and components for modifications together with a specialist dealer who has received special training. With regards to the accessories and the additional weight they imply, always take into account the maximum weight allowed by the bicycle. You can request the addition of the following accessories: · Equipment for transit on public roads and streets according to the regulations enforced in the country of use, if not available as standard. · Luggage rack. · Child seat when using an approved carrier for such a seat. · Luggage bags when using an approved luggage rack for these bags.
Security and behavior
Dear Customer ICONE,
congratulations on purchasing a new ICONE e-Bike. You have purchased a bicycle that will surely live up to your expectations of quality, function and riding characteristics. To ensure maximum safety when using this product, please read this instruction manual carefully. With the purchase of this ICONE e-Bike you have chosen a quality product. Your new ICONE e-Bike has been made with parts developed and produced with precision. In this manual you will find a series of tips about the use of the ICONE e-Bike as well as important information on its construction characteristics, care and maintenance. Please read this instruction manual carefully, even if you are an expert cyclist. Bicycle building technology has made great progress in recent years.
1. Important information
This manual contains important information about security service and performance. Appearance and specifications are subject to change without notice in order to constantly improve product quality.
Before using the ICONE e-Bike, please observe the warnings and precautions contained in this manual.
If you lend the electric bicycle to others for use, let users read the instructions carefully, in order to minimize the possibility of accidents.
Wear suitable and qualified helmets when using the E-bike.
Always wear at least one item with fluorescent or reflective strip when driving notes or in suboptimal light conditions. Always check that the front and rear lights are working and that the brakes are working properly. Turn on the lights in dark or low light conditions. If you cannot turn on the lights, it is recommended to walk the bike by hand. In case of rain and / or snow, brake in advance, reduce your speed, and increase the safety distance.
Acceleration is one of the main causes of bicycle accidents; do not to let go of the handlebar to operate the display, this action must be performed only with the vehicle stationary. The speed must be respected and the speed limit of 25 Km / h must never be exceeded even when going downhill.
This e-Bike is made in compliance with all current regulations and in particular: The European directive 2002/24 / EC which defines electric bicycles with pedal assistance, bicycles equipped with an auxiliary electric motor having a maximum continuous nominal power of 250 Watts whose power is reduced and finally stopped when the vehicle reaches 25 km / h or earlier if the cyclist stops pedaling.
The engine must never be running when the passenger stops pedaling.
This e-BIKE is made in compliance with all current regulations and in particular: · Activation of the motor only in the presence of pedaling (pedal assistance) · Maximum speed 25 Km/h · Power less than 250 Watt
Do not touch the parts of the bicycle power supply and the battery, or use metal objects to touch parts of the bike as this could cause a dangerous short circuit.
If you want to increase mileage, pay attention to the right tire pressure, try to pedal constantly and maintain a stable speed. Brake when necessary and do not wait to be too close to the person in front of you or to the point where you want to stop.
SAFETY AND BEHAVIOR
The driver must be at least 16 years old.
The driver must be able to ride a bicycle, that is, he must have the basic knowledge relating to the use of a bike and be equipped with the sense of balance necessary to ride and control a pedal-assisted bicycle.
The driver, when stationary, must be able to get on and off safely. This applies in particular to ergonomic saddles if the driver, while seated, cannot touch the ground with his feet. Like other bicycles, it can only carry one person.
The physical size of the driver must be suitable for the bicycle and the maximum permitted load must not be exceeded.
The driver should be in perfect physical and mental fitness.
If the driver wishes to ride the e-bike on public roads and streets, he/she must be physically and mentally capable of driving in road traffic.
PHYSICAL / MENTAL RESISTANCE
The pedal assisted bicycle allows you to develop high speeds for long periods of time. The driver must have the necessary strength to safely control the e-bike for at least two hours.
The pedal assisted bicycle does not compensate for illness or a lack of fitness.
DANGER
To recharge the battery pack of the pedal-assisted bicycle, use only the charger supplied. Keep the charger and bicycle away from children and people who cannot understand the danger. Do not allow the charger to come into contact with water or be stored in humid places. Do not charge the battery pack in the sun. Keep the battery pack and the charger away from heat sources (such as radiators). Charge the battery only in your presence.
Never use the charger or if in operation immediately disconnect the plug in the presence of the following conditions:
· If the charger shows any kind of damage.
· If the insulation of the cables or one or more plug connections are damaged. In this case, grasp the plug only at an isolated point. If necessary, deactivate the corresponding fuse in the electrical distribution box.
· If the charger heats up unusually. A negligible development of heat in the charger and battery is normal.
· If unusual noises occur (e.g. loud hum, hissing, etc.)
· If smoke develops in the charger or bicycle
Avoid exposure to strong sun and rain, avoid places where the temperature is too high or where corrosive gas is present. This is to avoid damage to the surface and chemical corrosion of the paint and electrical components which can in turn cause malfunctions and accidents.
The driver must be a person capable of understanding the danger. For the minimum driving age refer to national laws. It is absolutely not allowed to bring a second person on the e-Bike.
WE DO NOT RECOMMEND MODIFICATIONS TO THE TECHNICAL FEATURES OF THE E-BIKE!
If this brochure has failed to explain all aspects you can consult the website www.iconeway.com
2. Check before the first excursion
CHECK THE VEHICLE STATUS WELL: · Check the brakes, wheels and tires carefully, the folding connection and the quick disassembly parts, to ensure that the vehicle is in good condition. · Check that the battery charge is sufficient to support the mileage you intend to travel. · Always consider at least 25% more kilometers than you intend to travel. · Check the brake system: make sure that the braking system works correctly. If it is not possible to check and adjust the system, contact a highly qualified technician or contact our customer service. · Check the closure and safety of the wheels. · Check if all components work normally. · Check and make sure that the handlebar and seat are hooked and tightened sufficiently. Make sure that all nuts, bolts and screws are tight enough.
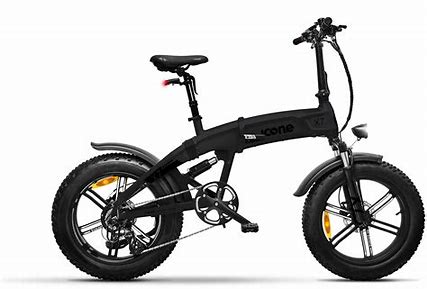
ALLROAD
13 14 15 16 17 18
1
19
2
3
4
20
5
21
6
22
23
7
24
8
9 10 11 12
Frame: 1 Saddle 2 Seat Post 3 Rear light 4 Closing the seatpost 5 Battery 6 Rear fender 7 Engine 8 Gear shift 9 Derailleur 10 Chain 11 Crank 12 Pedal
13 Cycle Computer 14 Handlebar 15 Gear shift lever 16 Brake lever 17 Bell 18 Handlebar height adjustment 19 Handlebar folding handle 20 Front light 21 Suspension fork 22 Front fender 23 Tire 24 Spoke
25 26
28 27
29 30
25 Frame folding handle 26 Security lock 27 Front brake disc 28 Rear brake disc 29 Easel 30 Reflector
3. Driving
TURNING ON: Turn on the switch, the display will turn on when connected.
EPAC / PEDELEC: Just like normal bicycles, place the bicycle and get on the saddle, place one foot on the pedal and start pedaling after everything is OK. During pedaling, once a set speed has been reached, the motor will automatically activate and start operating and making your e-Bike move. To stop the engine, stop pedaling and the engine will stop automatically. To stop the e-Bike use the brakes. The brakes have the function of interrupting operation, if both levers are operated (even individually), the energy will be automatically stopped and the engine will stop.
ASSISTED POWER CHANGE (VPA): The possibility of configuring the level of electric assistance is the proper and exclusive functionality of the pedal assisted e-bike. This feature allows you to choose between five levels of pedal assistance; in this way it is possible to adapt the level of assistance to the different conditions of the route and / or road surface, a very useful feature on long journeys.
CALIBRATE THE BATTERY LEVEL: When the battery is running low, the indicator lights will go out one by one, at this point you can turn off the switch and use the pedals as with regular bikes (NOT e-bikes). You can recharge the battery when you are in the vicinity of a power outlet and only then can you use the Pedal Assistance again, as well as after the complete recharge.
PARKING: Make sure that the switch is set to OFF so as not to accidentally start the engine. We recommend using a padlock to protect your e-Bike if necessary.
WARNING! Using the brakes frequently, turning the e-Bike on and off repeatedly, pedaling upwind, uphill or carrying a lot of weight can affect battery performance, compromising the duration and travel time.
4. Folding and methods of use
FOLDING METHOD: · Remove the lifting handle. · Release the safety clip ring, · Open the folding handle and fold the top end down · Adjust the position. The method of folding the frame is the same. Often add lubricating oil to the frame bender.
5. DIY technical solutions
PROBLEM
POSSIBLE CAUSES
Set the switch to ON, the indicator light does not light, the motor does not work, there is no electricity in the e-Bike.
1. The battery is completely discharged. 2. The battery connection electrical cable is loose. 3. The fuses are blown.
SOLUTIONS
1. Charge the battery. 2. Adjust the cable. 3. Change the fuses
The travel distance decreases.
1. Insufficient battery capacity. 2. The battery is running low. 3. Brake continuously, pedal uphill or upwind.
1. Charge the battery completely. 2. Change the battery. 3. Use more physical pedaling.
The indicator light does not come on during charging.
1. The connection cable is loose. 2. Fuses are blown. 3. The charger is damaged
1. Insert the cable appropriately. 2. Change the fuses. 3. Change the charger
Other issues
Any problem with electrical components
Contact your local vendor or service center for help.
ALLROAD
1 2 3 4
Manubrio: 1 Cycle computer 2 Bell 3 Front brake lever 4 Handlebar
5 Display gear shift 6 Gear lever up 7 Gear lever down 8 Rear brake lever
6. Cycle computer
Basic interface:
Mode
Speed Error
Travel Kilometers Total Kilometers Riding time
Light Battery indicator
Unit speed Pedal assisted level
Walk assist
Unit Numeric values
Images and / or icons relating to functions not supported by the purchased product may appear on the display. Therefore, please always refer to this manual.
WARNING! When using the display, pay attention to safety, do not connect the display when the power is turned on. Avoid use during heavy rains, snowfall and strong sunlight. If the display should be damaged, send it for repair as soon as possible.
Mode: if it’s off, it indicates that the speed shown on the display is the current speed, AVG indicates that the indicated speed is the average speed, MAX indicates that the indicated speed is the maximum speed.
Speed: when the display is on, it shows the speed.
Error: this icon flashes in the event of a system malfunction and will not be displayed during normal use.
Travel kilometers: when this icon is active, the number after the icon indicates the mileage of each journey, the unit can be miles or kilometers.
ODO: when this icon is active, the number after the icon indicates the mileage of all trips; units can be miles or Km.
Travel time: when this icon is active, the number after the icon indicates the travel time of the trip.
Lights: indicates whether the headlight is on or off.
Battery indicator: indicates the percentage of battery charge.
Speed Drive: is the drive speed, Km/h or MPH.
Assisted pedaling level: five power levels indicator. Voltage on indicator.
Walk assist: shows when the 6km/h walk assist mode is on. It is not shown in other cases.
Unit: is the unit of travel mileage and total mileage, with the Mile and KM options.
Definition of the buttons:
Up Down
Mode On/Off
Power on/off Press and hold the power button
for 1 second to turn the display on/off.
If no operation is performed and the speed is 0 for 5 minutes, the display turns off automatically.
Assisted Pedal Level Selection Press the + / – buttons to change the assistance level. 5 modes are available.
Interface shown as below:
Change display view
The information changes from average speed, maximum speed, travel kilometers, total mileage and travel time by briefly pressing M when the display is on. Exhibition: · Average speed (AVG)> Maximum speed (MAX). · Travel kilometers (TRIP)> Total mileage (ODO)> Travel time (TIME).
If no operation is performed for 5 seconds, the display will automatically return to the speed display.
Interface shown as below:
Lights on/off Press and hold the + button for 1 second to turn the headlight on / off. The engine does not work when the battery voltage is low, the display can still keep the headlight on for a while while using the e-bike. Interface shown as below:
Walk assist mode Press and hold -, the bike has entered Walk Assist mode. When the button is released – the bike exits Walk Assist mode. Interface shown as below:
Percentage of charge
While riding, the display will show the current charge value and 5 levels to indicate the power level. 0-5 level from low to high. Level 0 means no assist power.
Level 0
Level 1
Level 2
Level 3
Level 4
Level 5
Setting interface
Long press the M button (3 seconds) to access the data setting interface. In this state users can set and view the display parameters. Press the + / – button to change the parameter setting, press the M button to go to the next item. Long press the M button (3 seconds) to exit the menu.
· The display automatically exits the menu when no operation is performed for 10 seconds.
· For safety reasons, the display cannot access the MENU while driving. · The display exits MENU when it starts driving.
Reset data Press the + / – button to change no or yes. Interface shown as below:
Unit setting Press the + / – button to switch between Metric (Km/h) and Imperial (MPH). Interface shown as below:
Light brightness Press the + / – button to change the brightness of the headlight, from 1 to 5. Interface shown as below:
Auto off Press the + / – button to change the automatic switch-off time, from 0 to 15. The number represents the time (minutes) for the switch-off, OFF means to disable the automatic switch-off function, the default value is 5 minutes. Interface shown as below:
Wheel diameter settings Press + / – to change the wheel setting, from 16 to 29. The number represents the diameter, in inches, of the wheel. Set 22 Interface shown as below:
Voltage settings Press + / – to switch between 36V / 48V / UbE. UbE means setting the voltage defined by the user, this parameter can be set via computer. Do not change the voltage unless supported by your ebike. Entering a voltage other than the one set by the factory (36V) will void the warranty. Interface shown as below:
Password Press the M button to access the advanced factory settings menu (menu not available). Bypassing the password and changing the factory settings will void the warranty. Interface shown as below:
Error codes When there is a failure, the icon appears on the screen and displays the error code.
Interface shown as below:
Error code table:
ERROR CODE 21 22 23 24 25 30
ERROR DESCRIPTION Abnormal current PAS sensor failure Motor phase failure Engine failure Brake failure
Controller communication error
VERIFICATION METHOD Check battery
Check PAS sensor Check the engine Check the engine
Check brakes Check the controller connector
7. Charging and protecting the battery
Use the charger that corresponds to your e-Bike (never use a charger of a different model). Before recharging, set the switch to OFF and remove the key. Keep the charger in a dry and ventilated place when not in use.
The charger is designed for indoor use. Keep the charger away from water to avoid short circuit. Do not use in humid and flammable environments. Do not remove the connector by pulling on the cable, always disconnect the charger from its metal body.
Connect the charger’s output plug to the battery socket correctly, only after inserting the input plug into the wall socket.
When the light changes from Red to Green it means that the battery is fully charged. Usually it takes 4-6 hours to recharge the battery. However, it is advisable to recharge the battery for an additional 2 hours to safeguard the life of the battery.
Do not recharge the battery for more than 10 hours to avoid overcharging and damaging the battery. After the light turns green the charger remains in maintenance mode. If you plan to be away from home for a long time, disconnect the charger to avoid overheating.
The charger will become hot while charging, so keep it away from heat sources. Always keep the charger clean and dry. The charger contains high voltage electronic elements, so please do not disassemble the charger yourself.
After charging, first remove the plug from the electrical socket and then from the battery of the e-Bike. Do not leave the connector inserted in the battery and in the power socket for a long time, it could damage the battery and cause a fire.
When charging, keep out of the reach of children. Do not place anything above the charger during use, do not allow any liquid or metal to enter the charger.
You can also remove the battery from the e-bike and recharge it.
The battery can be removed by folding the bike and accessing the battery compartment located in the central part of the display, releasing it using the key supplied. After charging, replace the battery by inserting it in its housing and then lock the battery again with the key.
Do not touch any of the poles of the battery case with your hands when the battery is removed. In addition, the battery poles must not come into contact with any metal or other conductive materials, as it may cause a short circuit.
If you have not been cycling for a long time, the battery should be charged at least once a month. This will ensure a good battery life.
DO NOT USE when the battery level is low. Do not leave the battery discharged for a long time. The battery will continue to discharge on its own causing damage.
Avoid any contact with liquids during charging. If the connector or power outlet is wet, dry completely before use.
If you experience a particular smell or extremely high temperatures during charging, stop charging and contact your local distributor or Customer Service Center.
ALLROAD
1 2 3 4 5
Battery: 1 Handle 2 Charging socket 3 Battery lock and block 4 Battery docking track 5 Battery case
1. The bike must be charged by its specific battery charger. Charging a not standard or not approved battery can cause loss of battery life or battery failure.
2. Battery detection method: Press the battery status button to know the current battery level: · The first three lights, green in color, indicate the battery charge; · The last light, red, turns on only if the battery is completely discharged.
If the battery is charged, this light goes out.
3. The fully discharged battery can be charged with more than 95% electrical quantity in 5 hours and 100% electrical quantity in 8 hours.
4. When charging, it is forbidden to use metal parts to connect positive and negative cables.
5. Upon delivery of the product, the battery is approximately 80% and new products must be charged for 3-10 hours before being used.
6. If the bike has been set aside for more than 1 month, the electric battery can be reduced by 5%. Therefore, it is recommended to load before use.
7. During charging, the battery can be heated and it is normal if the temperature is below 60°C.
8. During charging, the battery and the battery must be placed in a stable and dry place, away from flammable, combustible products or things and away from the presence of children or pets.
9. Avoid generating short circuit in the charging port.
10. The battery can be used for this ebike model and cannot be used for any other purpose.
11. It is strongly discouraged to store the battery with insufficient voltage for a long time.
12. the outdoor temperature must be between -10 ° C and 55 ° C. Otherwise, it can affect the capacity and life of the battery. If used at low temperatures, its mileage can be reduced and recovered after the soul of the temperature itself.
13. If the battery needs to be replaced, contact a professional maintenance center. The discharged battery cannot be disposed of in one case or dismantled arbitrarily. It must necessarily be recycled by the competent department.
ALLROAD
1
3
4
2
Charger: 1 Charger case 2 Power plug 3 Charge gauge 4 Battery charging plug
It is necessary to carefully check whether the nominal input voltage of the battery charger is consistent with the mains voltage. The battery can be charged directly on the bike or removed from the bike and taken inside and in other appropriate places for recharging. It should be loaded indoors in cool areas. Always connect the charger’s output plug to the charging socket first, then connect the charger’s input plug to AC power and the red light will turn on. This procedure cannot be done in reverse. When the red charge indicator of the battery charger is on, it means that the battery is charging; if the green light is on, it means that the battery has been fully charged. The charging time is approximately 3-8 hours (the specific charging time should depend on the residual electrical quantity of the battery). The maximum continuous charging time must not exceed 12 hours.
Battery charger instructions 1. Follow the charging instructions carefully. Otherwise, all the consequences must be assumed by the user independently. 2. Use only the original battery charger. 3. Pay attention to the type and applicable voltage of the battery and charger. Mixed use is strictly prohibited. 4. During charging, the e bikes must be positioned in a ventilated area; it is strictly forbidden to load in an enclosed space or in the sun and environments with high temperatures. 5. It should be recharged for 1-2 hours after the green light turns on and therefore the power supply must be interrupted. During non-charging, it is prohibited to connect the battery charger to AC power for an extended period of time without charging. 6. During charging, if the warning light is abnormal, has a particular odor or the battery charger case overheats, you must immediately stop charging and repair or replace the battery charger. 7. During the use and storage of the battery charger, be careful to prevent the entry of foreign bodies, in particular to avoid water or other liquids, in order to avoid short circuits inside the battery charger. the charger must be transported in the car as little as possible. If it is necessary to transport it, it must be placed inside the box. 8. The battery charger components must not be dismantled or replaced randomly. If the battery charger is replaced, its model must match the battery model.
Regular inspection and simple maintenance In order to guarantee a long life of the bike and to ensure safe and comfortable riding, regular inspection and maintenance is necessary. If the bike is not used for a long time, it should be checked regularly.
Sufficient attention should be paid to safety during the inspection The main stand should be installed in a large, flat place. If inspection while driving is required, it should be conducted in a safe place. If an anomaly is detected through the inspection, please drive again after troubleshooting. Any anomaly must be checked in a maintenance station to avoid further damage.
Solving common e-bike problems
N. TROUBLE
POSSIBLE CAUSES
1 Speed adjustment fails or the maximum speed is low.
1. The battery voltage is too low.
TROUBLESHOOTING 1. Charge the battery completely.
2 Engine hub does not work after ignition.
1. The battery harness is loose. 2. During shutdown, the left and
right brake handles do not work. 3. Connection plug, the motor hub is
loose or damaged.
1. Repair and connect again. 2. Repair and assemble again;
3. Ask a professional for repair or repair at a maintenance station.
3 The mileage after charging is insufficient.
4 The charger does not work.
5 Noisy chain. 6 Faulty gearbox. 7 Inefficient brakes.
8 Other failures
1. The tire pressure is insufficient.
2. Insufficient charge or charger failure.
3. The battery is aging or damaged. 4. Different factors: ascent, strong
wind, brake at start and heavy load.
1. Inflate referring to the pressure range marked on the tire or check for possible punctures.
2. Fully charge or inspect if the charger plug is inserted correctly.
3. Replace the battery. 4. Use the hand pedal in these conditions
1. Battery charger socket not connected properly, the socket is loose.
2. The fuse in the charger has blown.
3. Battery wiring is loose.
1. Secure the connector properly.
2. Replace the fuse. 3. Connect the cables correctly.
1. Chain not properly greased.
1. Grease the chain and rotate the pedals to spread the grease onto the drive system.
1. Limit switches not set correctly. 2. Cable not properly tensioned.
1. Set limit switches, if necessary contact a service center.
2. Tension the cable properly.
1. Cable not properly tensioned. 2. Pads worn out. 3. Defective brake lever.
1. Tension the cable properly.
2. Replace pads, if necessary contact a service center.
3. Replace the brake lever, if necessary contact a service center.
1. In the event of a fault that cannot be resolved independently.
2. Motor hub, controller, battery charger and batteries are damaged.
In case of what is indicated, please ask the supplier for assistance. Please do not open components arbitrarily, otherwise they will not be covered by the warranty.
8. Maintenance and repair
The front and rear wheels of the vehicle must be in the center of the front fork and chassis. The tension of each radius of the rim must be similar, keeping the rim of normal shape, without breaking or bending. The edge of the bicycle must be smooth, carrying flat objects from the front increases the aerodynamic resistance to driving and therefore the danger while riding. Regularly check the wear of the brake pads, to ensure safety. Avoid walking in humid or snowy conditions, if it cannot be avoided, drive at low speed and keep a greater safe distance from the vehicle in front. Check the tires regularly, if an accidental breakage of tires has occurred, contact professional technicians for repair or replacement.
9. Issues requiring attention
Whenever you ride your bicycle, you need to check the braking distances, the power and efficiency of the brake.
Warning: if the brake works abnormally, the engine can stop working. · Respect traffic laws and regulations, never go in reverse unless in absolute safety. · Contact professional technicians to keep the electric bicycle in maximum efficiency conditions, adjust the brake, transmission and other components regularly.
The maintenance of your e-Bike is essential to extend its life.
Always keep in mind that: · The locking mechanism of the wheel units must not move. · The quick release lever must be closed. · You shouldn’t hear squeaks or creaks. · The seat tube and handlebar tube are correctly positioned in the frame and referring to the
indications engraved on the surfaces of the seat tube and the handlebar tube. · Tires – valve position control. · Due to the stresses and insufficient tire pressure, the tire and inner tube could move on the
rim and give rise to an oblique position of the valves. In this case, the valve base can tear while driving, causing a sudden loss of tire pressure. · Check the tires.
Check for the absence of external damage, foreign bodies and wear on the tires: · The entire surface of the tire must have the original profile. · The texture of the tire under the rubber layer must not be glimpsed. · There must be no dents or cracks. · Remove any foreign items (thorns, small stones, glass fragments or the like) with your hands,
or carefully using a small screwdriver. Check if air escapes after this operation. In the event of an air leak, the inner tube must be replaced. You can replace the inner tube yourself by following the corresponding instructions. · Check the pressure by referring to the interval marked on the tire.
10. Maintenance
WARNING! Before carrying out any type of maintenance, turn off and remove the key and perform physical pedaling and safety checks like a normal bicycle. For the battery poles, if they are dirty, clean the poles in order not to reduce the efficiency of the battery or burn the poles themselves.
CHAIN TENSION ADJUSTMENT: The chain may come loose after a certain period of time, please follow the instructions below: loosen the bolts of the rear axle, if the chain is too slow, adjust the chain bolts on both sides clockwise and put them in position. If the chain is too tight, adjust the bolts counterclockwise. Keep the crankset and the wheel aligned. If you are unable to adjust the chain properly, contact your nearest dealer.
ADJUST THE BRAKES: Correct adjustment of the brakes ensures control and offers safety to the driver: the brakes are adjusted like any other bicycle. To be in good condition it is important to make sure that the brakes are working and that the power supply is interrupted. Once the brakes have been adjusted, make sure that the wheels turn, that there are no obstacles and that once the brakes are applied, the engine stops working.
LUBRICATION: For a long hold on your e-Bike the following parts of the bicycle should be regularly lubricated every six months: front axle, chain, rear axle, freewheel (oversize joint), front fork, stand joint and other rotating parts. No electrical lubrication is required for electrical parts, as they are already factory lubricated. If you experience any problems, contact your nearest dealer for help.
CLEANING: The e-Bike should be cleaned with a damp sponge, taking care not to wet the electrical parts (battery, connectors, motor, cables, handlebar controls, etc.). Dry with a cloth. When cleaning the e-Bike, do not use continuous jet steam or direct water. Use a cloth to avoid a short circuit for electrical components. The e-Bike has a durable finish and does not need wax. Clean with a mild detergent and rub to restore the original shine if necessary.
11. Technical parameters
Max speed 25 km/h Wheels 20×4.0″ KENDA Mechanical disc brake front / rear Suspended fork LCD display Gear SHIMANO 6 speed LED lights activated from the display Comfort seat Foldable and height adjustable handlebar Folding saddle for battery extraction Motor 250W – 36V Brushless Maximum load 115 kg Sidestand Fenders front/rear Folding frame Folding pedals SAMSUNG 36V-396Wh Lithium Battery Charging time 4 – 6 hours Autonomy Max 30-40 km* Battery weight 2.8 kg Total weight 25 kg Weight without battery 22,2 kg Dimension open 1700x1150x590 mm Dimensions folded 1000x740x400 mm Packaging 1070x830x580 mm
Gear Shift
Battery
Tyres
* The maximum range may vary depending on the weight of the driver, the type of driving and the route traveled
© SHIMANO, SAMSUNG, KENDA, TEKTRO, SELLE ROYAL are registered trademarks. All rights reserved.
12. Service information
Users must operate according to this product manual, in case of production defects, according to the provisions of the law, the company meets its warranty obligations. Once the guarantee period for the main components has expired, all interventions will be subject to payment. If the battery is replaced beyond the warranty period, it will be supplied at the current price, but the battery must be recycled 1: 1, the battery must be disposed of or returned to the battery manufacturer to ensure safety, so as not to pollute the environment.
WARRANTY 24 MONTH on all mechanical, cycling and electrical parts. 6 MONTHS on the battery WARRANTY EXCLUDES all parts subject to normal wear (by way of example but not limited to, brakes, handles, tires and other similar parts). Failures caused by improper user packaging, accidents or natural causes, such as floods and fires etc.
ATTENTION THEY ARE NOT WARRANTY: Accessories installed after purchase. Malfunctions caused by improper use or accessories not indicated. Damage caused by the installation or installation of improper accessories. Collision damage caused by external forces. Any other damage also to components under warranty where caused by improper use. Any other damage caused by wear is excluded from the warranty. In the event of a defect, the following must be provided: complete packaging, product, all accessories attached, invoice.
THIS MANUAL CONTAINS IMPORTANT SAFETY AND PERFORMANCE INDICATIONS. IT IS RECOMMENDED TO READ CAREFULLY BEFORE USING THE ICONE E-BIKE, PAYING SPECIAL ATTENTION TO THE WARNINGS AND PRECAUTIONS TO BE ADOPTED IN ITS MANAGEMENT. IF YOU LEND THE ELECTRIC BIKE TO OTHERS FOR USE, ALLOW USERS TO READ THE INSTRUCTIONS CAREFULLY.
13. E-bike certificate
Model Color Special features / accessories Rear parcel rack, front and rear light kit
Brake lever assignment
Left lever front wheel brake rear wheel brake
Right lever front wheel brake rear wheel brake
Stamp and signature of the ICONE specialist dealer
14. Warranty card
Customer Surname, Name Address Postcode / Locality Tel / Fax E-mail
Model
This form is necessary in case of technical assistance which, together with the purchase document, must be presented to the after-sales service.
15. Delivery report
The delivery to the customer of the ICONE e-Bike mentioned above carried out after the final assembly in running condition and the verification or control of the regular operation of the points indicated below (further necessary operations are shown in parentheses).
Lighting Front and rear brakes Wheels (centering / spoke tension / inflation pressure) Handlebar / stem (position control / screws) Pedals (pedal closure control)
Saddle / seatpost (adjust seat height and position according to customer needs) Gearbox (limit stop) Screws of components Test ride performed Other operations carried out
ICONE specialist dealer
Name Address Locality Tel. Fax E-mail Delivery date Signature of the ICONE specialist dealer
Stamp
With his signature, the customer confirms that he has received the ICONE e-Bike mounted accordingly and confirms that he has been instructed on the operation of the ICONE e-Bike.
Customer Surname, Name Address Postcode / Location Tel / Fax E-mail Place Signature
Date
NOTES
Photograph the QR code with a smartphone or tablet and discover the ICONE world. Connection costs based on the mobile phone contract.
#iconeway www.iconeway.com
© 2020 ICONE è un marchio registrato. Tutti i diritti sono riservati.