![]()
MOTO A1 Plus User Manual

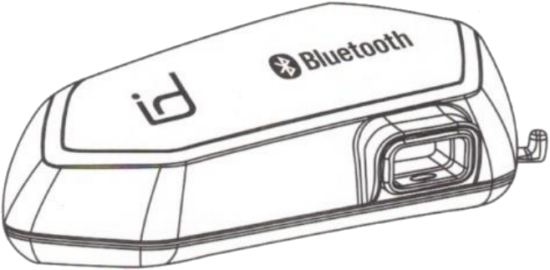
MOTO A1 Plus Introduction

- LED Indicator
- Multi-Function Button(MFB)
- Volume Joystick
- Speaker /Charging Socket
Accessories


Control Unit Case


Speakers Velcro for Speakers


USB Charging Cable 3/4 Helmet Microphone


Velcro for full face and Speaker Foam Pads
3/4 Helmet Microphone


Full Face Microphone Bracket A


Bracket B 3M Sticker for Bracket B
Basic Function
Power On

Press and hold the MFB for 3 seconds
Power Off

Press and hold the MFB for 5 seconds
Paring

When the MOTO A1 Plus is off, press and hold the MFB for 5 seconds
Volume Up

Push the volume joystick up
Volume Down

Push the volume joystick down
Reset

Press and hold the MFB and push and hold the volume joystick up for 12 seconds
Phone Call Function
Answering Incoming Call

Auto answer: Automatically answer while incoming call
Manual answer: Press the MFB once while incoming call
End Phone Call
Press the MFB once while phone call
Reject Incoming Call
Double click the MFB
Last Number Redial
Double click the MFB in standby mode
Activate Voice Assistant

Push the volume joystick up twice in standby mode
Remarks:
Manual answering incoming calls is the factory default setting. If you want to switch to automatic answering, press and hold MFB and push and hold the volume joystick down for 5 seconds in the standby mode. You will hear “du” “du” sound if the setting is successful.
Music Function
Play
Press the MFB once
Pause
Press the MFB once
Volume Up

Push the volume joystick up
Volume Down

Push the volume joystick down
Track Forward
Push and hold the volume joystick up
Track Backward
Push and hold the volume joystick down
Install MOTO A1 PLUS
Install Bracket A

Buckle bracket A to the selected position of the helmet, Install MOTO A1 PLUS onto the bracket A, and then check whether the machine is firmly fastened to the bracket.
Install Bracket B

Stick bracket B on the selected position of the helmet, Install MOTO A1 PLUS on the bracket B, and then check whether the machine is firmly fastened to the bracket.
Remarks:
When installing the bracket B, please reserve enough space for inserting the speaker connector plug. Otherwise, the speaker connector plug will push up the MOTO A1 PLUS when the helmet is placed on a flat surface, it may damage the MOTO A1 PLUS or speakers.
Install Speakers and Microphone

Peel off the protective films at the back of the speaker foam pads and adhere the pads to the ear cavities on both sides of the helmet.
Attach the speakers to the foam pads on both sides.
Hide the speaker cable into the helmet cushion pads, adjust the position of the speakers.
Remarks:
If the ear cavities of your helmet is not deep enough to install the ear pads, you can only use the speaker Velcro instead.
Install Microphone: 3/4 Helmet

- Open the left-inner cushion pad of the helmet and paste the velcro onto the inner surface of the helmet
- Attach the 3/4 helmet microphone to the velcro
- Connect speakers and microphone
- Adjust the distance between the microphone and the mouth
Install Microphone: Full Face Helmet

- Select the position next to the mouth inside the helmet and paste the velcro
- Attach the full face microphone onto the velcro
- Connect speakers and microphone
- Completed
Specifications
| Bluetooth | V5.0 |
| Profiles | HFP/HS, A2DP, AVRCP |
| Battery | Lithium Polymer Battery |
| Design Type | Rain and Snow Resistant |
| Operation Temperature | -20°C to 60°C (-4°F-140°F) |
| Standby Time | Up to 2 Weeks |
| Operation Time | Up to 12 Hours |
Note:
Long exposure in high sound level may cause hearing damage. Users must not adjust the sound level higher than the ambient level. Users have to bear their own risk when using this product. id221 will not liable to any user safety issue and property damage.
A1 Plus and A1 Plus Intercom Operation
(1) A1 Plus Master and A1 Plus Slave pair with their respective phones

Turn off the master machine after successful pairing, and don’t turn off the Bluetooth of the master phone.

Turn off the slave machine after successful pairing, and don’t turn off the Bluetooth of the slave phone.
(2) A1 Plus Master and A1 Plus Slave pairing

When the master machine is off, press and hold MFB and push and hold the volume joystick up for 5 seconds to enter into the intercom pairing mode, the LED indicator will blink red and blue alternately.

When the slave machine is off, press and hold MFB and push and hold the volume joystick down for 5 seconds to enter into the intercom pairing mode, the LED indicator will blink red and blue alternately.

In the pairing mode the master and slave machine close to each other for pairing. When the pairing is completed, the LED indicator will blink blue slowly instead of blinking red and blue alternately. Turn off both machines after pairing.
A1 Plus Slave using Intercom when connected to the mobile phone
(1) Turn on the slave machine to re-connect to the phone

When the slave machine turned off, press and hold the MFB for 3 seconds, the slave machine will automatically connect to the paired mobile phone.
(2) Turn on the master machine to re-connect to the slave machine and the master mobile phone

When the master machine is turned off, press and hold MFB and push and hold the volume joystick up for 3 seconds, the master machine will automatically connect to the paired slave machine and the master mobile phone.
(3) Activate Intercom

Push and hold the volume joystick of the master machine up for 2 seconds to activate intercom, and you will hear “du” sound.

Or push and hod the volume joystick of the slave machine down for 2 seconds to activate intercom, and you will hear “du” sound.
(4) Terminate Intercom

Push and hold the volume joystick of the masker machine up for 2 seconds to terminate intercom, and you will hear “du” sound.

Or press the MFB of the slave machine once to terminate intercom, and you will hear “du” sound.
Remarks:
If the intercom connection always disconnected during intercom operation, or the master and slave machines will not automatically re-activate the intercom, please reset both machines to the factory default setting and then repeat the pairing operation.
Signal disconnect and reconnect
If the A1 Plus is disconnected from the phone or intercom due to long distance and obstacle, A1 Plus will actively reconnect to the mobile phone or intercom within 5 minutes. If the intercom is not activated after reconnection, you may have to manually activate the intercom (push and hold the volume joystick of the master machine up for 2 seconds / push and hold the volume joystick of the slave machine down for 2 seconds)
A1 Plus Slave using intercom when not connected to mobile phone
(1) Turn on the master machine to reconnect to the slave machine

- When the master machine is turned off, press and hold MFB and push and hold the volume joystick up for 3 seconds, the master machine will automatically connect to the paired slave machine.
- When the slave machine is turned off, press and hold the MFB for 3 seconds, the slave machine will automatically connect to the paired master machine.
(2) Activate Intercom

Push and hold the volume joystick of the master machine up for 2 seconds to activate intercom, and you will hear “du” sounds.

Or push and hold the volume joystick of the slave machine down for 2 seconds to activate intercom, and you will hear “du” sounds.
(3) Terminate Intercom

Push and hold the volume joystick the master machine up for 2 seconds to terminate intercom, and you will hear “du” sounds.

Or press the MFB of the slave machine once to terminate intercom, and you will hear “du” sounds.
Answer/End Incoming Call during A1 plus intercom
Answering Incoming Call

Press the MFB once while incoming call

Press the MFB once while incoming call
End Phone Call

Press the MFB once while phone call

Press the MFB while phone call
A1 Plus and A1 Intercom Operation
(1) A1 Plus Master and A1 Slave Pairing

When the master machine is off, press and hold MFB and push and hold the volume joystick up for 5 seconds to enter into the intercom pairing mode, the LED indicator will blink red and blue alternately.

When the slave machine is off, press and hold MFB for 8 seconds to enter into the intercom pairing mode the LED indicator will blink red and blue alternately.

In the pairing mode, the master and the slave machines are close to each other for pairing. When the pairing is completed, the LED indicator will blink blue slowly instead of blinking red and blue alternately.
(2) Activate Intercom

Push and hold the volume joystick of the master machine up for 2 seconds to activate intercom, and you will hear “du” sound.

Or Push the volume joystick of the slave machine up for twice to activate intercom, and you will hear “du” sound.
(3) Terminate Intercom

Push and hold the volume joystick of the master machine up for 2 seconds to terminate intercom, and you will hear “du” sound.

Or press the MFB of the slave machine once to terminate intercom, and you will hear “du” sound.
A1 Plus and other Brand Intercom Operation
A1 Plus Mater and other Brand Slave Intercom

When the master machine is off press and hold MFB and push and hold the volume joystick up for 5 seconds to enter into the intercom pairing mode, the LED indicator will blink red and blue alternately.
| Other Brand slave can activate intercom by calling the voice assistant. |

Activate Intercom: Push and hold the volume joystick of the master machine up for 2 seconds, and you will hear “du” sound.

Terminate Intercom: Push and hold the volume joystick of the master machine up for 2 seconds, and you well hear “du” sound.
Remarks:
For the operation of other brands slave to activate the intercom, please refer to the relevant manual.
A1 Plus Slave and other Brand Master Intercom

When the slave machine is off press and hold MFB for 5 seconds to enter into the intercom pairing mode, the LED indicator will blink red and blue alternately.