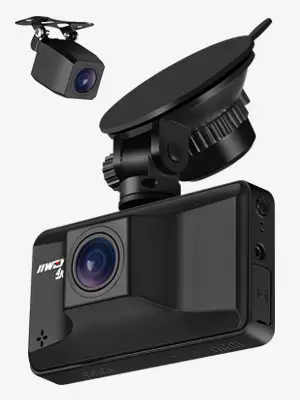
IIWEY S2 4K Dash Cam

REMINDER
(Please read the manual carefully before use).
After-sale service team e-mail:[email protected]
- 32GB SD card is installed in the front camera, please check the card slot.
- Please connect to power and charge the S2 dashcam for 5 minutes at least before use. The dashcam will turn off within5 seconds when you turn off the engine, it is the default setting to save power for parking monitoring and emergency video backup.
- After stop recording each time, please wait for 2-3 seconds until the dashcam saves all the videos before performing other operations. The high-frequency operation may cause the screen to freeze, if you encounter this problem, you can reset the camera (tap the rest hole). When the dashcam is recording, we can’t operate the dashcam through the touchscreen, useless we press the OK button to stop recording first, then we can use the touchscreen to operate.
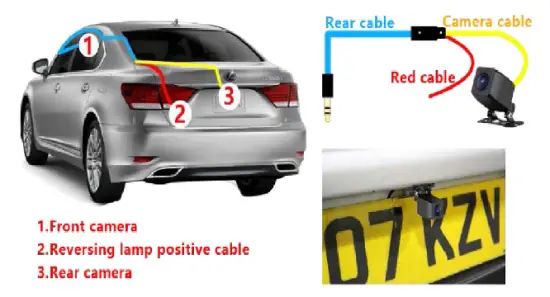
- The dashcam comes with Reversing Aid function. If you need this function, please connect the Red Wire of the rear camera to the live wire of the reverse lamp. If you don’t need this function, please ignore the red wire and hide it, just connect the rear camera to the main camera, these two cameras will work well without any problem. Since the reversing lamps are different for each car, we cannot provide precise installation guidance for the red wire. It is recommended to consult a professional if you need to install the red wire.
The dashcam has GPS function. After installing the GPS, you needn’t to set the time manually. You just need to set the time zone according to your location and choose the summertime (If in summer). Then the time will rectify itself.
The video Guide shows How to install the S1 dashcam, S2 is the upgraded version of S1 model. It gets a great improvement in chip, image sensor and system. But the installation method of the two models is the same, the only difference is that we choose a different rear-view camera for S2 kit to satisfy more people’s demand. The rear-view camera of S2 is waterproof, you can refer to the video guide to install it in the car, you can also install it outside the car. The rear camera installed outside has a better video performance than installed inside the car.
Format on the Windows. Please format it to ‘exFAT’
Reminder: Set the ‘Allocation unit size’ to 32KB or 64KB
do not use U1 class. Because the S2 model with a high configuration, the SD card needs a high read and write speed to work well. U1 can’t meet this demand very well. If you use a U1 memory card, the camera will prompt ‘card slow’ after a period of use (choose the SD card like below). Please format the SD card on the dashcam and computer before the first use.
- Format the memory card on your S2 dash camera.
[Carefully insert the memory card into the camera’s card slot until it clicks. To remove the card, power off the camera first, then push the card into the slot until it clicks again.]
Insert the memory card and connect to power, if the dashcam start recording automatically please click the Start/Stop Recording icon (the icon in the lower-left corner of the screen) to stop recording first, then click the MENU Setting icon (Icon in the lower right corner of the screen) to enter the MENU setting page, swipe your finger UP on the screen to find the Format function.
If you meet ‘Card error’ ‘Memory error’ after you format it on the camera, please format the memory card again on the computer. - Format MicroSD card on the computer If you use a 128GB or 256GB memory card and meet a ‘memory error’, this step is very necessary.
Format on the Mac. Please format it to ‘exFAT’

Format on the Windows. Please format it to ‘exFAT’
Reminder: Set the ‘Allocation unit size’ to 32KB or 64KB
Reminder:
1. Ideally, the MicroSD card should be formatted every 2 weeks to maximize the lifetime of the memory card.
2. Please do not remove the card while the camera is recording to prevent data loss/corruption.
What’s in the box?
| IIWEY S2 Dash Cam Main Camera | |
| 1080P Rear Camera | Suction Mount |
| USB Data Cable | User Manual |
| Warranty Card | GPS |
| Car Charger with Built-in Mini USB Cable | |
Camera overview
Button Function Explanation
| Name | Function Explanation |
|
Power button |
1. Short press to power it on
2. Press 3 seconds it powers off when it powers on 3. Press it a short time to extinguish the screen and light it up again |
|
Reset button hole |
When the device is out of control or destroyed, please press this button by reset needle or other tools to restore the
device |
|
Mini USB Port |
Mini 5pin port |
LED indicator
Charge Indicator Red light. It always light on when the device is charged, and it goes off when it is fully charged.
Active Indicator Blue light. Flashes during recording, and always on when recording stops.
Install dashcam
Install dashcam without GPS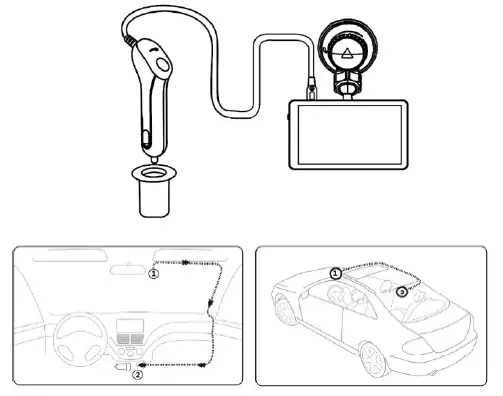
- Turn off the car engine.
- Fix the IIWEY Dash Cam onto the suction mount.
- Stick the car mount onto your car windshield (ideally right in the middle).
- Connect the USB cable to the micro USB port of the Dash Cam. Run the cable along the edge of the windshield, tucking it away in the seams, and extend it all the way to the USB port of the Car Charger. Be sure to keep it away from the airbag area.
- Insert the Car Charger into your cigarette lighter, connect the Dash Cam to the Car Charger.
- Plug the rear camera connecting cable into the rear camera connecting port, and install the rear camera properly.(NOTE: the rear camera can be installed inside or outside, it is waterproof. We recommend you install it outside to get a batter video quality)
- Adjust the Dash Cam to keep the lens level with the ground.
- Start the car engine to check if the Dash Cam is working properly.
Install dash cam with GPS
Stick the GPS on the windshield, then connect to the car charger and main camera. NOTE: GPS symbol will keep flashing if there is no GPS signal or the dashcam has not received a GPS signal. It will become stable status and stop flashing once it receives a GPS signal (Under normal circumstances, the GPS receiver will detect the GPS signal within 2 minutes as soon as the car running on the road).
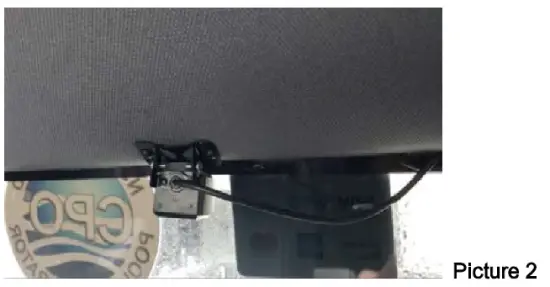
Rear Camera Installation
- Remove the protective film on the bracket;
- Install the bracket on the camera and adjust it to a suitable position;
- Press the bracket firmly on the windshield, and turn the bracket knob to the specified position
- Video Lock Button
- Folder
- WIFI
- Recording Status
- Remaining Recording Time
- WIFI OFF
- GPS Symbol
- Loop Recording
- WDR
- Parking Monitor
- Current Video is Locked
- Motion Detection
- Audio ON
- MicroSD Card Installed (Package not include SD card)
- Power Connected
Reminder: You can swipe left and right on the screen to switch the front and rear lens view.
Basic Operation
REMINDER: Touch and swipe to complete all settings, please remember some convenient operations:
Switch display mode: swipe to right Menu function search: swipe to left after entering the MENU setting to switch to the next setting page.
There are two ways to power ON/OFF the camera
A. Manually
Single press the Power Button to power ON the camera unit, long-press the button to power it OFF.
B. Automatically
When connected to the car charger, the camera will auto-power ON after starting your car and the battery charging will commence. The camera will power OFF in 5 seconds after you turn off the car engine.
MENU Settings
After power ON the camera, click the MENU icon to enter the setup process.
-Video Resolution: By default (SINGLE FRONT mode) the front camera will record at 4K (3840*2160P @30fps), you can choose
2.5K (2560*1440P@30fps), 1920x1080P@60fps or 1920x1080P@30fps. In DUAL CAMERA RECORDING MODE (FRONT CAM+REAR CAM), you can choose 4K (2160P@24fps)+1080P or 2.5K+1080P@30fps. REMINDER: when you set the dash cam recording mode to SINGLE FRONT, the dash cam will automatically cut off the rear camera signal, the display will only show the front camera view, when you switch it to DUAL CAMERAS MODE, it will restore to two cameras view.
- Photo Resolution: Default is set to12M 4032×2034. Other options: 10M 3648×2736; 8M 3264*2448; 5M 2992X1696; 3M 2048X1536; 2MHD 1920X1080; VGA 640*480; 1.3M 1280X960
- Loop Record: By default the camera will cycle record at 3minutes per video clip. Click icon to change the duration: 1, 3, 5, or OFF. When the SD card is full, the dashcam will overwrite the oldest video for continues recording.
- Exposure: Default is set to 0.0. +2, +5/3, +4/3, +1.0, +2/3, +1/3, +0.0, -1/3, -2/3, -1.0, -4/3, -5/3, -2. Adjust the amount of light entering the lens.
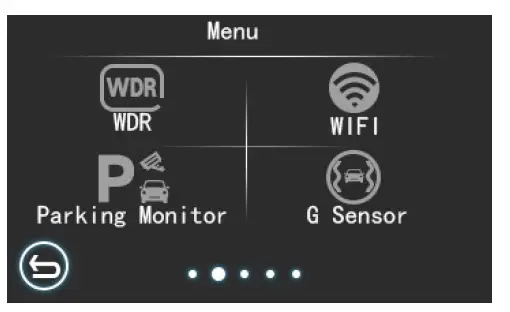
- WDR: Wide Dynamic Range. Default is ON.
- WIFI: Default is set to OFF. Please turn off the WIFI if you don’t use App. Turning on WIFI for a long time when the dashcam is recording will cause unnecessary power consumption and affect the video recording.
The dashcam WIFI is AP mode, also named Local mode, NOT an IP/4G Dash Cam – It does NOT allow you to view your recording remotely. The dashcam WIFI can only work when the dashcam is ON and you are close to the dashcam within 10-ft. NOTE: after connect to WIFI, you cannot operate on the screen except Start or Stop recording, Lock or unlock video, and turn off WIFI. If you do other operations, the dashcam will prompt ‘please disconnect WIFI’. - Parking Monitor: Default is set to OFF. If you set the parking guard to ON, there are two different situations after the parking guard is triggered: if the camera remains connected to the power source even after turning off the engine (such as you connect it to the power bank with a USB cable or you have hardwired your S2 dash cam), the dashcam is continued recording under this situation; if you turn off the dash cam manually (long-press the POWER button) after parking, the dashcam will automatically power on the and start to record a 30s emergency video when it detects a collision and shakes, and the dashcam will continue recording after the 30s emergency video (Emergency video will be locked). if the dashcam does not connect to any external power, it will automatically shut off usually after you turn off the engine. At that time the dash cam will auto power on and record a 30s emergency video when it detects collision and shake, then auto shut off after that. So we recommend hardwiring your dashcam if you want to use the Parking monitor function well.
- G-sensor: Default is set to Low. You can choose off/ Low/ Medium/ High. We recommend you set it to Low-level sensitivity.
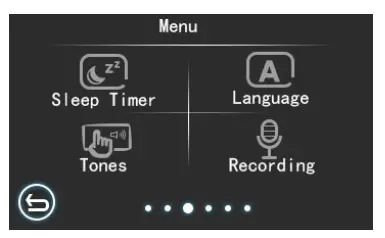
- Sleep Timer: Default is set to 3 Minutes. You can choose to off/ 1 minutes/ 3 minutes/ 5 minutes/ 10 minutes. If you set it to 1 minute, the screen will auto shut down if there is no operation within 1 minute. We recommend you set the Screen to save to 1 minute or 3 minutes to reduce power consumption and heat, to extend camera and memory card life.
- Language: Default is set to English.
- Tones: Default is set to off.
- Recording: Default is set to ON.

- Motion Detection: Default is set to off. When you turn it on, the dashcam will automatically start recording when the front camera detects an object moving. The front and rear cameras will record at the same time but please note: the motion sensor is installed in the main camera, so the dashcam does record only when the front camera detects motion.
The dashcam will record a 22 seconds videos normally if the motion detection is triggered. If the front camera does not detect the object moving after the 22 seconds of video recording is finished, the dashcam will stop recording, otherwise, the dashcam will continue to record. - REMINDER: We recommend turning off the motion detection function when driving, and turn it on after parked. This function only work when the dash cam is Turned ON, so we recommend you connect the dash cam to external power or hardwire it after parked if you want to use the Motion Detection and Parking Monitor function well.
- Frequency: The default is 50Hz. Options: 50Hz/60Hz To set or reset the frequency of the AC power to reduce interference of fluorescent lights (We recommend to set it to 50Hz).
- Reverse Power: Default is set to ON. You can switch the rear camera from Mirror mode to Normal mode. Mirror Mode: when you watch the rear camera video on the display, the things on the right are actually on the right side behind you, but when you playback the video on your PC, it will show the things on the right are actually on the left side behind you. If you need the Reversing function, please set the mode to Mirror Mode.
- Normal Mode: This mode is exactly the opposite of Mirror Mode, when you watch the rear camera video on the display, the things on the right are actually on the left side behind you, but when you playback the video on your PC, it will show the things on the right are actually on the right side behind you.
Only when you connect the GPS it will show on the MENU setting page. GPS symbol will be turn green when it receives the signal.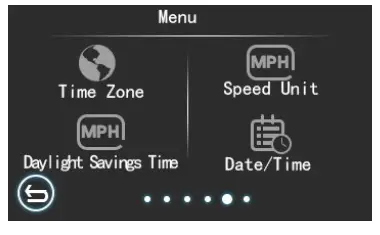
(These functions shows on the MENU setting when you connect to the GPS module)
- Time Zone: Default is set to GMT+0:00. From GMT-12:00 TO GMT+12:00. Please set it to correct one according to your location, because the GPS will automatically correct the time, so if the Time Zone is incorrect, it will affect the time you set.
- Speed Unit: Default is set to KM/H. off/ MPH/ KM/H.
- Daylight Saving Time: Default is set to off. Please turn it on when your location uses summertime.
- Date/Time: You can set the time here. When setting the Year, the year setting will flash. You can select the correct year by clicking the up and down arrows. After completing the year setting, click on the month to switch to the month setting. The setting method is the same as Year setting. After all the settings are completed, click the confirm button.
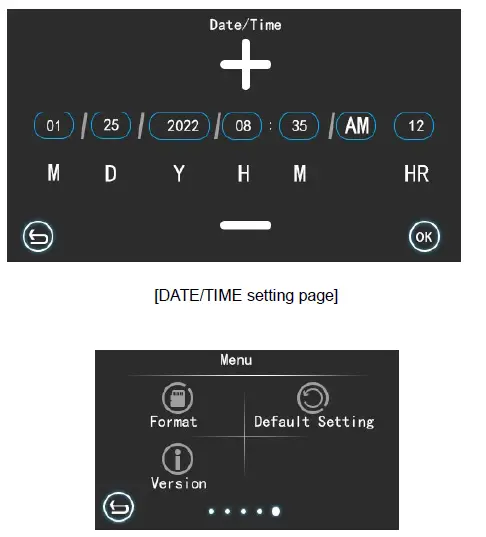
- Format: Options: No/Yes All data will be deleted when you click yes. This function will format (erase all data) the MicroSD Card.
- Default Setting: Restore factory settings, this option will erase all your previous settings.
- Version: To check the device version.
Viewing Video/Photos on the Camera
Please confirm the camera is stopped recording, click the Video Folder to find all the videos (including front and rear cameras videos) and photos. You can playback, delete, lock and unlock the videos in this mode. Swipe up or down on the screen or swipe left or right to see more videos.
The Exclamation Mark sign means this video is locked, when you playback the locked videos on the camera, you can see a symbol of small ‘KEY’ on the top of the screen. Download APP
Android
- Download APP “WitCam Pro” from Google Play.
- Download APP “WitCam” from App Store
If you cannot find the App in the play store, please download APK file from Google cloud: https://bit.ly/3zh2aBb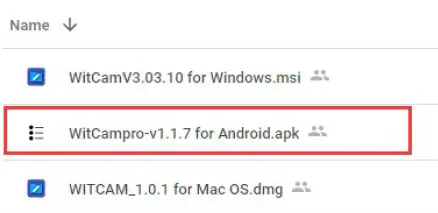
How to install apps outside of Google-play)
https://www.nextpit.com/install-apps-outside-of-google-play
(Please use the second way to install App if you can’t find “WitCam Pro” from Google Play) IOS
Connect the phone to S2
- Click the WI-FI button on the screen to turn on the WI-FI, it will show SSID name and password, SSID name is like:
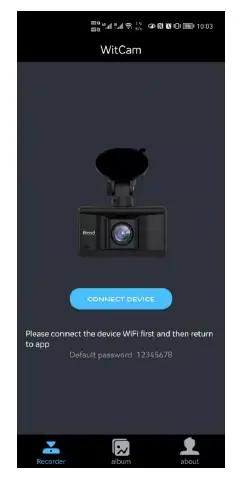
IIWEY-CARDV000b6, Default Password: 12345678 (Each device has a separate WIFI name, but all start with IIWEY-)
- Turn on the WIFI function of your smartphone, find your SSID name, input your password, and connect WIFI.
REMINDER: After you connect to the WIFI, the android smartphone will have a prompt ‘the WLAN network has no internet access. Connect anyway?’, please select ‘CONNECT’ otherwise you cannot use the App well. IOS smartphone doesn’t have this prompt.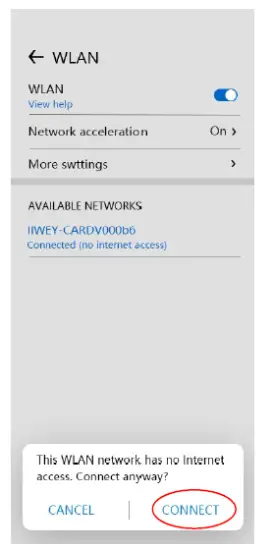
- Open “Witham” on the phone, the App will show the dashcam model you are using. You can press the CONNECT button to connect the dashcam now.
ALBUM PAGE
All the downloaded photos and videos will be saved here.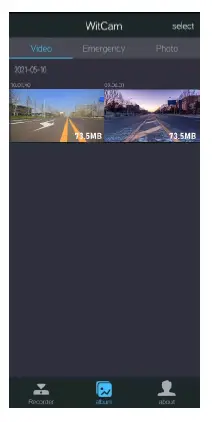
APP GUIDE
- A: Resolution
- B: Record mode & Photo mode switch button
- C: Start/ Stop Record button
- D: Folders
- E: Setting
PHOTO MODE
- Photo resolution
- Take Photo
FOLDERS
Download and playback the video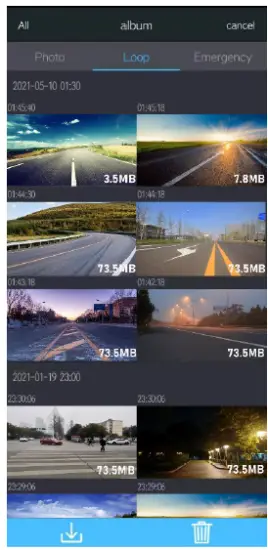
Three folders: Photo Loop, and Emergency Photo: Saved all the photos Loop: Saved all the loop recording videos Emergency: Saved all the locked videos When you enter the Loop folder, click the ‘select’ button on the upper right corner or long-press the video file, you can download or delete the video you want. When you enter the Emergency folder, you can only download the locked video, cannot delete the videos.
You can playback the videos on the folders directly or download it to your phone, then back to the Home page of App, enter the Album to playback, edit, or share the videos downloaded. Edit and share the videos After you download the video, please return to the Home Page of the App, enter the Album, click the video to playback, AND edit. You can check the GPS logs and share the video from here.
Click the Clip button to enter the Edit page:
This is an extended function, if you are interested you can try it. It is used to intercept video clips and add background music When you finish the Edition, click ‘next step’ to share the video.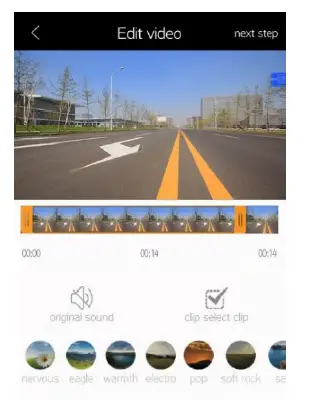
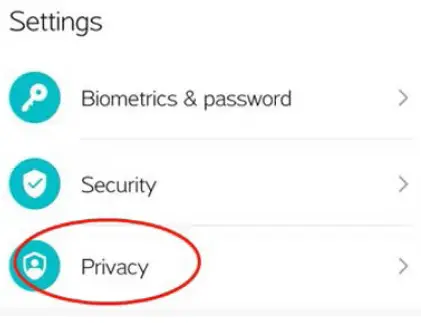
REMINDER: If it stops at 95% progress during the download process, rectify by the following method:
- Please make sure that your phone is always connected to WIFI. (Please note: If the phone screen shut down during the download process, the camera’s WIFI connection may be disconnected, so please keep the phone during the download process. The screen keeps on);
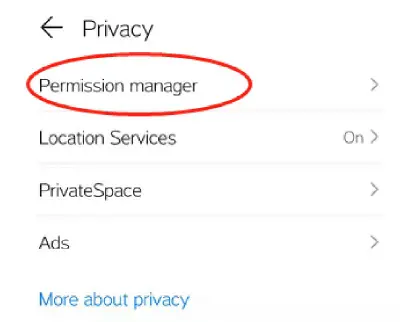
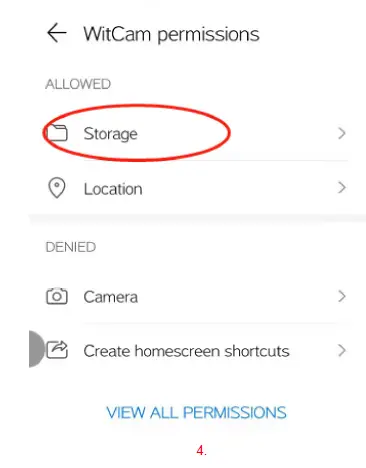
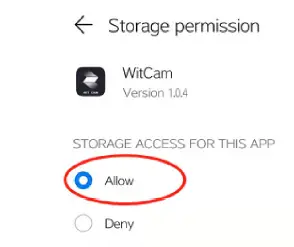
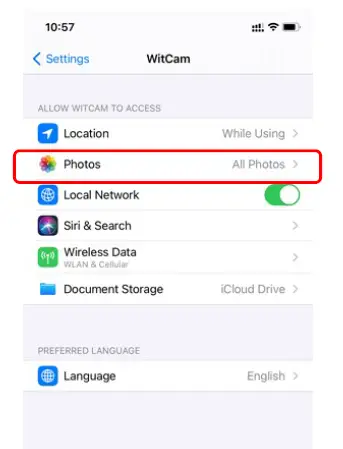
- Please confirm that the Storage Permission of the APP is allowed. The below shows how the Android phone and IOS to set the permission of the APP:
NOTE: Since the WIFI transmission rate is limited so it will takes a while to download the entire video by WIFI. You can also export the video to your computer to check the videos.
How to view GPS logs?
The GPS carried by the S2 model dash camera is a trajectory tracking device that can only display the driving track and does not have positioning function and the real-time path feature, in other words, when you view the real-time video through the APP while the
the camera is working, you cannot view the GPS track.
You have two ways to view the GPS LOGS: View on the APP: . Download the video to your phone . Return to the Home page of the App, open the album to playback the video.
(NOTE: if you use an Android phone, please disconnect the dash cam WI-FI on your phone and turn on the SIM data (or you can connect your family WIFI) when playback videos, because the Android phone is a Single Signal Channel device, you need to ensure your mobile phone can access the internet when viewing the GPS logs).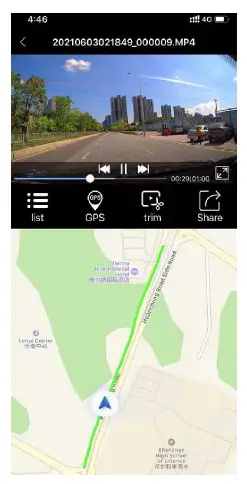
View on the PC: You can export the video to your computer and play it using the ‘WITCAM’ PC Version.
WITHAM PC Version downloaded address: Google cloud drive: https://bit.ly/3zh2aBb
Export the videos & photos to the PC
- Turn off the dashcam first. Connect the supplied USB Connection Cable to the Mini USB Port on the side of the unit.
- Connect the full-size USB end of the cable to a USB Port on the Computer.
- The unit will automatically power on and display ‘PC Camera’ ‘Mass Storage’ (NOTE: When connected to your computer under ‘Mass Storage’ status, standard camera setup and operations will be disabled; if you select ‘PC camera’, the dashcam will be recognized by the Camera of your computer instead of Storage, you can use your computer camera to take photo through the S2 dashcam when under the ‘PC camera’ mode).
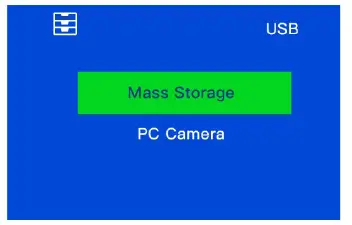
- Click the ‘Mass Storage’ and wait a few moments, the storage folder for the unit will appear on the computer screen. Enter the secondary directory, you will see all the folders:
- Open the videos by the GPSplayer, you can check the GPS logs. If you don’t want to use the GPS player and just want to layback the videos and cannot find a compatible player on your PC, please search and download this player:VLC Player
NOTE:
GPS player (If your PC is Windows) Compatible computer operation system: Windows XP; Windows Vista; Windows 7; Windows 8 and Windows 10.
specification
| Processor | NTK96670 |
| Display Screen | 3.0 inch 360 x 640 HD touch screen |
| Video Resolution | 4K
2.5K 1080P |
| Image Sensor | Front: Sony IMX 335
Rear: GC2053 |
| Sensor Pixel | 2M |
| View Angle | Front 170° Rear 150° |
| Memory Card | MicroSD Card 32GB-256GB U3 |
| Car Charger | DC 5V 2A |
| USB port | Mini USB 2.0 |
| Lens | f/1.8 6G |
| Storage | Video: MP4 Photo: JPEG |
| Working voltage | 5V |
| Working temperature | -4 -149 |
To avoid damage:
In hot weather, do not expose the camera directly to the sun when the car is parked.
In extreme winter conditions, i.e. 4°F (-20°C) or lower, detach the camera from the windshield when not in use, and store in the glove box.
warranty and support
Warranty
The IIWEY S2 Front and Rear Dash Cam come with a full 12 months warranty.
Support
If you have any questions regarding your product, please do not hesitate to contact us at s[email protected], or drop us a message through the message chat box at Amazon, you can find it from your order details page. Queries are typically answered within
12-24 hours. Reminder: There will be slight heat on the back of the dashcam and touch screen when you use it. This is a normal phenomenon, almost all electronic products will be hot, just like if you use your smartphone when charging, it will get heat. The dashcam is also the same. A high-configuration dashcam generates more heat than low configuration ones because it processes faster and processes more content. But please don’t worry, we use the VO grade fireproof material (high-temperature resistance) and high-performance processors (NTK 96670) to solve this problem well, 100% guaranteeing the experience and safety of the dashcam.
troubleshooting
Can’t turn on the dashcam.
Please connect to power and charge the dashcam for 5 minutes at least, and then reset the dashcam to restart it. If it still can’t turn on, please update your dashcam (check the tips of the 15th). Dashcam screen freezes. Operation speed is too fast or high-frequency operation will cause
this issue in some cases, you need to reset the dashcam with a tool needle.
There is a prompt of ‘memory error’ when playback the videos on the camera, or some rear camera video can’t show pictures when playback on the PC.
You can update the dash cam to solve this problem easily (check the tips of 15th)
Can’t connect to WIFI or disconnect frequently.
- Please confirm your phone setting is correct – when the mobile phone is connected to a WLAN that cannot connect to the Internet (because the dashcam WI-FI cannot connect to the internet), please confirm that it will not automatically switch to another network.
- Close the mobile data before connecting to the WIFI.
- Choose ‘USE’ if your phone prompts the WLAN cannot connect to the internet.
- If you still can’t connect to the WIFI, please reset the dash cam or update the system.
(Note: After connecting WIFI, if you start to operate on the dashcam screen, you need to disconnect the wifi first)
Dashcam automatically turn it on and off frequently
If you come to this problem during use:
A: 1) Please confirm that you have the correct memory card. We recommend using a Samsung or Kingston U3 model memory card.
2) It may cause by poor contact of the cigarette lighter socket, please make sure that the cigarette lighter is inserted deep enough. And you can move the dash cam to another car, and test if this problem is caused by your car cigarette lighter socket. If you meet this problem after you turn off the engine.
Please format the memory card according to the guideline ‘Install a MicroSD card’ on the computer. And then turn off the motion detection and park monitor function to try again. (Because when you turn on these functions after parking, the dashcam will automatically
turn it on and record emergency video when it detects collisions and shocks. At this time, if the dashcam’s built-in small battery can’t support the dashcam to record, it will turn off immediately, so the camera will switch on and off repeatedly. Due to the built-in battery is used to back up emergency videos, so if you want to use the dash cam after turn off the engine, the external battery is needed, like a power bank.)