
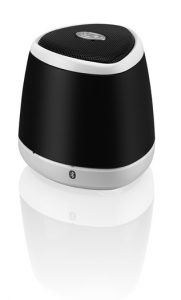
iLive ISB23 Bluetooth Wireless Speaker
Warnings and Precautions
- WARNING: To prevent fire or shock hazards, do not expose this unit to rain or moisture.
- WARNING: Do not place this unit directly onto furniture surfaces with any type of soft, porous, or sensitive finish. As with any rubber compound made with oils, the feet could cause marks or staining where the feet reside. We recommend using a protective barrier such as a cloth or a piece of glass between the unit and the surface to reduce the risk of damage and/or staining.
- WARNING: Where the mains plug or appliance coupler is used as the disconnect device, such disconnect device shall remain readily operable.
- Note: This device uses an internal rechargeable lithium-ion battery that should last the lifetime of the device. If you suspect your battery may be dead after several attempts to charge, please contact 1-888-999-4215 for support.
- Never disassemble the unit or attempt to remove the battery as that could cause leakage of an electrolytic substance.
Pairing a Bluetooth Device
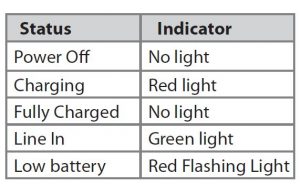
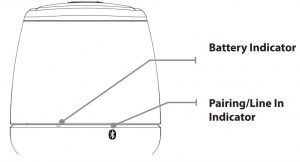
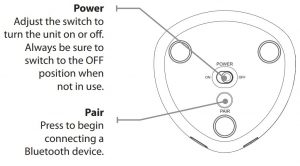
- Turn on the unit using the Power switch. The Pairing/Line In Indicator will flash blue quickly, and the unit will enter pairing mode. When pairing, remain within 3 feet of the unit.
- Using the native controls on your Bluetooth device, select the “ISB23” in your Bluetooth settings to pair. If your device requests a password, enter the default password “ 0 0 0 0”. Refer to the user’s manual for your specific device for instructions on pairing and connecting Bluetooth devices.
- When successfully paired and connected, the Pairing/Line In Indicator will display a solid blue light and a beep will sound from the unit. After initial pairing, the unit will stay paired unless unpaired manually by the user. If problems arise with pairing, press the Pair button to begin pairing again.
Playing Audio Wirelessly
- Follow the instructions for Pairing a Bluetooth Device.
- Use the native controls on the connected Bluetooth device to select a track.
- To play, pause or skip the selected track, use the native controls on the connected Bluetooth device.
- Audio played through the connected Bluetooth device will now be heard through the speakers.
Using the 3.5mm Audio Input
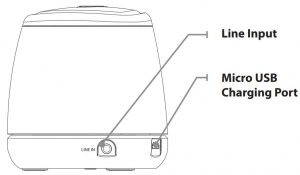
- Plug one end of a 3.5 mm audio input cable (not included) into the 3.5 mm Audio Input on the unit.
- Plug the other end of the cable into the audio output/ headphone output on an MP3 Player or other audio source.
- Turn on the unit using the Power switch.
- Audio played through the connected device will now be heard through the speakers.
Features
- Supports Bluetooth v2.0
- Supports profile A2DP (Advanced Audio Distribution Profile)
- Wireless range: 33 feet
- Supports automatic device pairing
- 3.5mm audio input
- Built-in speaker
- Micro-USB port for battery recharge
- LED pairing indicator
- Pairing button
- On/off switch
- DC battery power: built-in rechargeable lithium ion battery
- Battery life: ~2 hours
Power
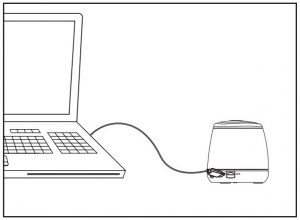
USB Power
Requires a Micro USB to USB cable (included). Note: PC must not be in sleep mode.
Introduction
Warranty
For Warranty Information and the most up-to-date version of this User’s Guide, go to: www.iLiveElectronics.com
International Support
To download this User’s Guide in English, Spanish, or French, or to get answers to frequently asked questions, visit the support section at www.iLiveElectronics.com

Contact Information
Phone Support: 1-888-999-4215
Website: www.iLiveElectronics.com
]]>
Wireless Noise Canceling Headphones
User’s Guide for Model IAHP87 v1924-01
FCC Warnings
Warning: Changes or modifications to this unit not expressly approved by the party responsible for compliance could void the user’s authority to operate the equipment.
NOTE: This equipment has been tested and found to comply with the limits for a Class B digital device, pursuant to Part 15 of the FCC Rules. These limits are designed to provide reasonable protection against harmful interference in a residential installation. This equipment generates, uses, and can radiate radio frequency energy and, if not installed and used in accordance with the instructions, may cause harmful interference to radio communications. However, there is no guarantee that interference will not occur in a particular installation. If this equipment does cause harmful interference to radio or television reception, which can be determined by turning the equipment off and on, the user is encouraged to try to correct the interference by one or more of the following measures:
- Reorient or relocate the receiving antenna.
- Increase the separation between the equipment and receiver.
- Connect the equipment into an outlet on a circuit different from that to which the receiver is connected.
- Consult the dealer or an experienced radio/TV technician for help.
Additional Warnings and Precautions
- To avoid hearing damage, make sure that the volume on your music player is turned down before connecting your headphones. After placing headphones in/on your ears, gradually turn up the volume until you reach a comfortable listening level.
- Lithium batteries, like all rechargeable batteries, are recyclable and should be recycled or disposed of according to state and local guidelines. They should never be disposed of in normal household waste, and they should never be incinerated, as they might explode. Contact your local government for disposal or recycling practices in your area.
- WARNING: This product may contain chemicals known to the State of California to cause birth defects, or other reproductive harm (California Prop 65). Wash hands after handling.
- This product meets and complies with all Federal regulations.
Overview
Features
- Supports Bluetooth
- Wireless range: 33 feet
- Built-in microphone
- Aux in (3.5mm audio input)
- Folding adjustable headband
- On-ear controls
- Voice prompts announce headphone operations
- DC battery power: built-in rechargeable lithium-ion battery
- Micro-USB port for battery recharge
- Battery life: approx. 8 hours
Includes
- Micro-USB to USB charging cable
- 3.5mm audio cable
- 3.5mm female to 2 x 3.5mm male audio adapter
- Travel case
Charging the Battery
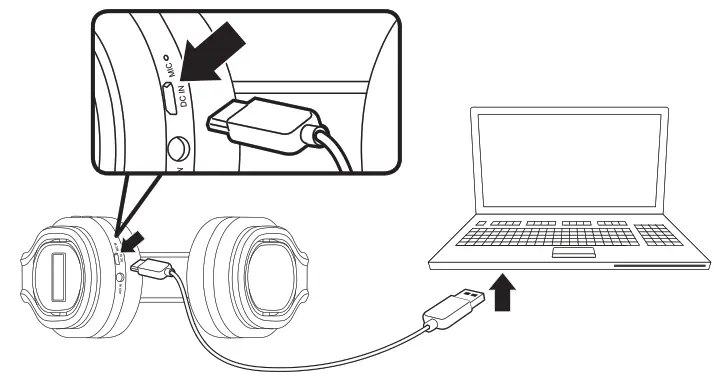
Requires a Micro-USB to USB cable (included). The low battery indicator will flash for 1 minute, then the unit will automatically power OFF.
1. Using a Micro-USB to USB cable (included), connect the headphones to the USB port of a powered-on computer or USB power adaptor (not included).
Noise Canceling
The Noise Canceling feature will electronically mute background noise. It can be used with the Bluetooth or Aux In modes to enhance the quality of any music or audio that is playing through the headphones.
Noise Canceling mode will function even if the headphones are not powered ON. To conserve battery power, it is recommended to power the headphones OFF if you want to use the Noise Canceling feature without playing audio.
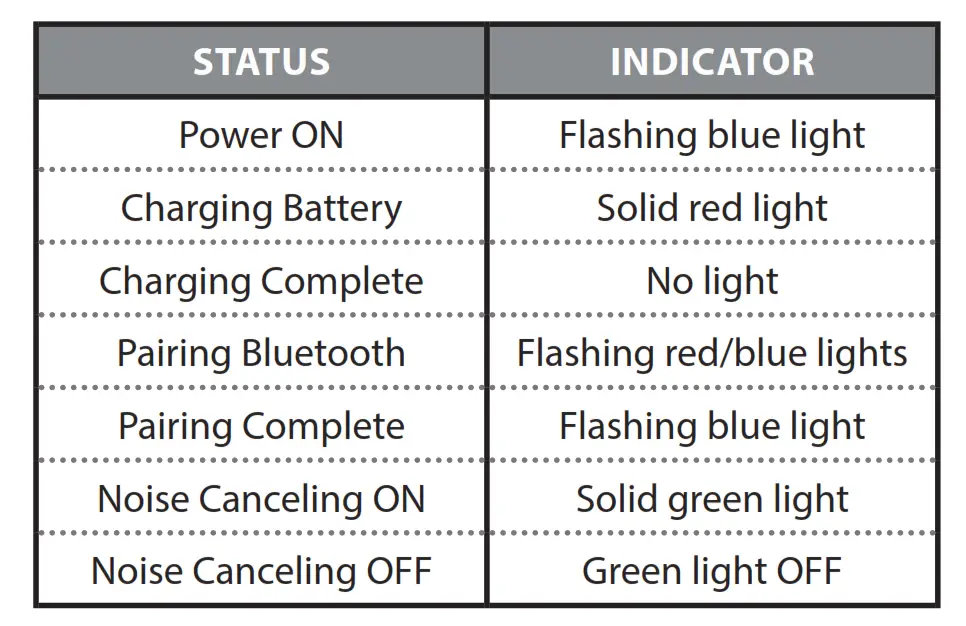
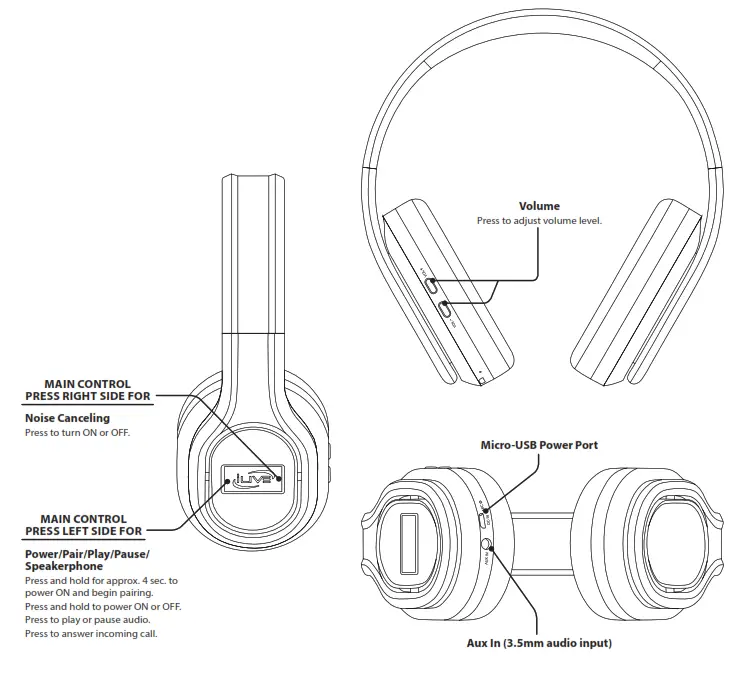
1. To activate noise canceling, press the right side of the Main Control button. A green LED light in the button will turn ON.
2. To deactivate noise canceling, press the right side of the Main Control button again. The green LED light in the button will turn OFF.
Bluetooth Wireless Audio
Pairing to a Device and Playing Audio
After initial pairing, the unit will stay paired unless unpaired manually by the user, or erased due to a reset of the device. If your device should become unpaired or you find it is unable to connect, repeat the steps listed here.
- Press and hold the left side of the Main Control button for approximately 4 seconds to power ON and begin pairing. LED lights in the button will begin flashing red and blue. When pairing, remain within 3 feet of the unit.
- Using the controls on your Bluetooth device, select the IAHP87 in your Bluetooth settings/device menu. If your device requests a password, enter the default password 0 0 0 0. If need be, refer to the user’s manual for your specific device for instructions on pairing and connecting Bluetooth devices.
- When successfully paired, the LED lights will only flash blue and a chime will sound through the unit. Audio played through the connected Bluetooth device should now be heard through the headphones.
- Use the controls on your Bluetooth device to select and begin playing audio. To play or pause audio using the headphone controls, press the left side of the Main Control button.
Using the Speakerphone
- When a call is received, a ringtone will sound through the unit.
- To accept the call, press the left side of the Main Control button, or use the controls on the connected phone.
- To refuse the call, press and hold the left side of the Main Control button, or use the controls on the connected phone.
- To call back, double press the left side of the Main Control button.
Aux In
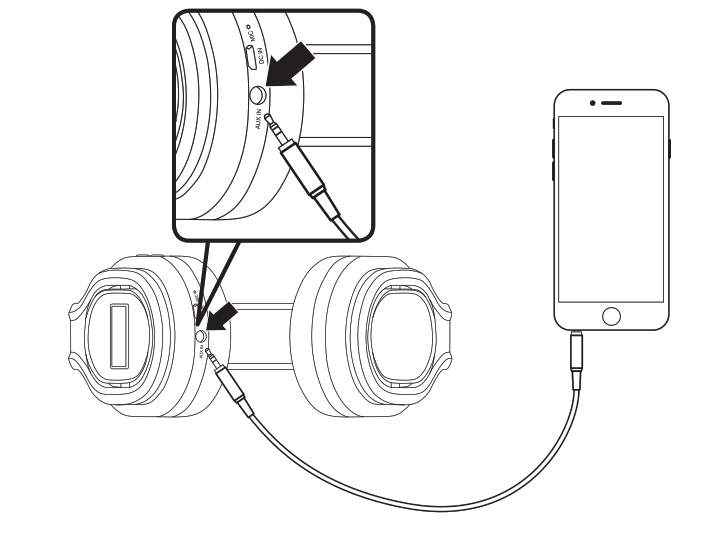
Aux In mode will function even if the headphones are not powered ON. To conserve battery power, keep them powered OFF when using Aux In. Requires a 3.5mm audio cable (included).
- Connect a 3.5mm audio cable to the Aux In on the unit and the audio output on an audio device.
- Use the controls on the connected device to select and play audio.
International Support
To download this User’s Guide in English, Spanish, or French, or to get answers to frequently asked questions, visit the support section at: www.iLiveElectronics.com
For Warranty Information and the most up-to-date version of this User’s Guide, go to www.iLiveElectronics.com
Customer Service: 1-888-999-4215 | Email Support: [email protected] | Email Parts: [email protected]
Copyright © 2017 Digital Products International (DPI, Inc.) All other trademarks appearing herein are the property of their respective owners. Specifications are subject to change without notice.
iLIVE ITB259 37-Inch HD Sound Bar with Bluetooth Wireless User Guide

Safety Instruction & Warnings

WARNING: To reduce the risk of electric shock, do not remove cover (or back). No I user-serviceable parts inside. Refer servicing to qualified service personnel.

The exclamation point within an equilateral triangle is intended to alert the user to the presence of important operating and maintenance (servicing) instructions in the literature accompanying the appliance.

The lightning flash with arrowhead symbol, within an equilateral triangle, is intended to alert the user to the presence of uninsulated “dangerous voltage” within the product’s enclosure that may be of sufficient magnitude to constitute a risk of electric shock to persons.

This symbol indicates that this product incorporates double insulation between hazardous mains voltage and user accessible parts.
WARNING: DO NOT INGEST BATTERY, AL BURN HAZARD.

WARNING : This product can expose you to chemicals including lead, which is known to the State of California to cause cancer and birth defects or other reproductive harm. For more information go to www.P65 Warnings. ca.gov. This product meets and complies with required Federal product guidelines
Important Safety Instructions
- Read these Instructions.
- Keep these Instructions.
- Heed all Warnings.
- Follow all instructions.
- Do not use this apparatus near water.
- Clean only with a dry cloth.
- Do not block any ventilation openings. Install in accordance with the manufacturer’s instructions.
- Do not install near any heat sources such as radiators, heat registers, stoves, or other apparatus (including amplifiers) that produce heat.
- Do not defeat the safety purpose of the polarized or grounding – type plug. A polarized plug has two blades with one wider than the other. A grounding type plug has two blades and a third grounding prong. The wide blade or the third prong are provided for your safety. When the provided plug does not fit into your outlet, consult an electrician for replacement of the obsolete outlet.
- Protect the power cord from being walked on or pinched particularly at plugs, convenience receptacles, and the point where they exit from the apparatus.
- Only use attachments/accessories specified by the manufacturer.
- Unplug this apparatus during lightning storms or when unused for long periods of time.
- Refer all servicing to qualified service personnel. Servicing is required when the apparatus has been damaged in any way, such as power-supply cord or plug is damaged, liquid has been spilled or objects have fallen into the apparatus, the apparatus has been exposed to rain or moisture, does not operate normally, or has been dropped.
- Use only with a cart, stand, tripod, bracket, or table specified by the manufacturer, or sold with the apparatus. When a cart is used, use caution when moving the cart/apparatus combination to avoid injury from tip-over.

Setup
Features & Specifications
- 37″ length
- Supports Bluetooth: range 60 ft.
- 2 channel stereo sound
- Digital volume control
- Full-function remote
- Optical audio input
- Aux In (3.5mm audio input)
- RCA stereo audio inputs
Power
Plug the power cord into the DC Input on the back of the speaker and a standard wall outlet.
Includes
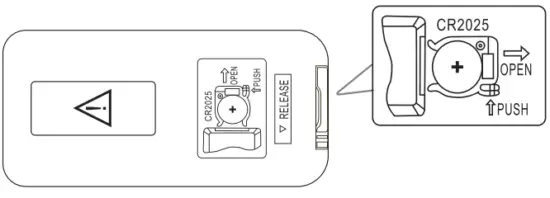
- Remote control with 1 CR2025 battery pre-installed
- Optical audio cable
- AC/DC power adapter
- Wall-mount hardware and instructions
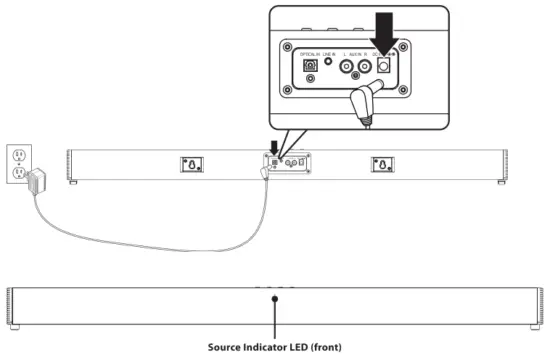
Source Mode Indicator LED
| STATUS |
|
|
| Power Off | Red Light | |
| Line In Mode | Green Light | |
| Optical Mode | Amber Light | |
| RCA/Aux In Mode | White Light | |
| Bluetooth Pairing | Flashing Blue Light | |
| Bluetooth Connected | Blue Light |
Orientation
Rear View

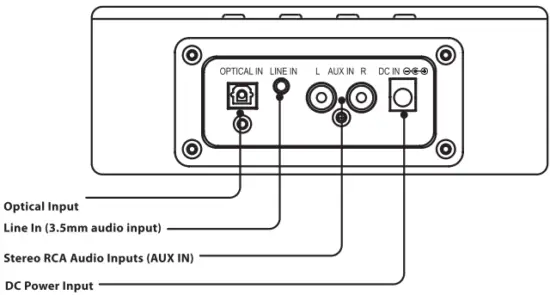
Speaker Inputs Detail (Rear)
Speaker Control (Top)
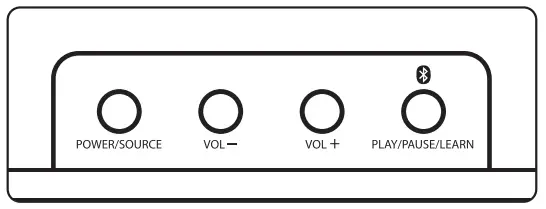
Power/Source
Press to power the unit ON or OFF. Press to switch audio source to Bluetooth, Optical, Aux In, or Line In modes.
Volume
Press to adjust volume.
Pair/Play/Pause/Learn
Press and hold to begin pairing to a Bluetooth device. Press to play or pause audio (BLUETOOTH MODE). With the unit powered OFF, press to begin using the learn function.
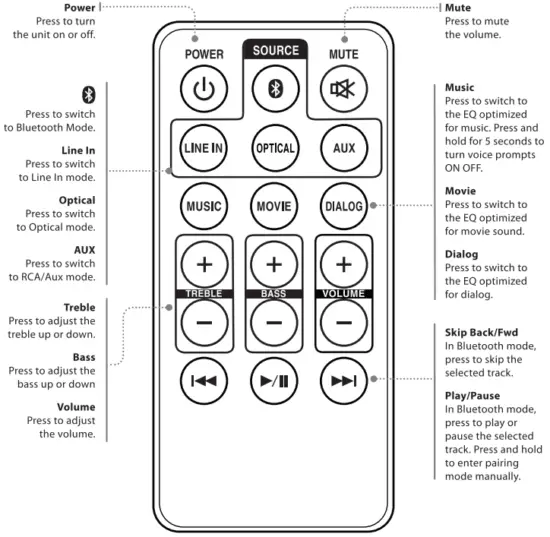
Remote
Functions & Controls
Remote Batteries
Bluetooth Wireless
Pairing a Bluetooth Device for the First Time
- When first powered on the sound bar defaults to Bluetooth mode. A voice will say, “Bluetooth”, and the LED indicator will slowly flash blue. When pairing, remain within 3 feet of the Bluetooth device.
- Using the controls on your Bluetooth device, select 178259 in the Bluetooth Settings to pair. If need be, refer to the user’s manual for your specific device for more information.
- When successfully paired, a voice will announce, ‘Bluetooth is connected °, and the LED indicator will turn solid blue. Audio from the connected Bluetooth device will now be heard through the speaker.
- Use the controls on the connected Bluetooth device to select and play audio. Use the speaker controls or the connected Bluetooth device to play, pause, and adjust the volume level.
- After initial pairing, whenever the sound bar is powered on, the sound bar will automatically connect to the last Bluetooth device used. Note: If your device should become unpaired or you find it is unable to connect, press & hold the Play button on remote or press the Pair/Learn button on the soundbar to enter pairing mode. A voice will announce, “Bluetooth is connecting”, and you can connect to the speaker manually.
Playing Audio Wirelessly
- After pairing to a Bluetooth device, use the controls on the connected Bluetooth Device to select a track.
- Play, pause or skip a selected track using the controls on the connected Bluetooth Device or the soundbar’s remote.
- Audio played through the connected Bluetooth device will now be heard through the speakers.
Party Plus Mode
If you have another 178259 soundbar, you can pair and play the two together for a surround sound effect, or have two playing in different rooms.
- To enter Party Plus Mode, please make sure the unit is in Bluetooth mode. Quickly press the Pair/Learn button twice on one of the soundbars..
- When the two soundbars are paired together a voice will announce the connection.
- Connect your Bluetooth device to the bars using the steps from the”Pairing a Bluetooth Device for the First Time” section above.
- Use your device to select and play tracks. The audio will now be heard through both soundbars.
- To disconnect the soundbars, quickly press the Pair/Learn button twice.
Note: To use Party Plus Mode, please make sure that you connect the soundbars before pairing to your Bluetooth device. You will not be able to connect the two soundbars if you are already paired to a Bluetooth device.
Remote Learning
What Is the Learn Feature?
The Learn feature captures remote commands from your television remote, and teaches your soundbar to operate when these commands are pressed. Power, volume and mute are a few examples of commands that the bar speaker can learn.
Why Use the Learn Feature?
Teaching the bar speaker remote commands will reduce the number of remotes needed, save time searching for remote codes, and improve the ease of operation.
Note: Not all functions of the sound bar will be available through your own remote control, such as bass and treble. Use the included remote for these functions. While your 1T8259 sound bar is able to learn most IR protocols, not all can be programmed.
Using the Learn Feature
- With the power Off, press the Learn button on the unit. An indicator will flicker red.
- Press the button you desire to be learned on the included remote. For example: Volume +
- The red light will continue to flicker, and another indicator will display a blue light.
- Press the corresponding button on your remote.
- The red light will continue to flicker, and another indicator will display a green light.
- When the green light turns off, the button command is saved.
- The programmed button on your remote will now be able to control your sound bar.
Note: It is necessary to program each button i.e. channel and volume + and – separately. - To start over, press and hold the Learn/Pair button for 5 seconds. If the sound bar has failed to learn a command, the LED indicator will display an orange light. Please try again with a different remote
Audio Inputs
Optical Input
Requires an audio source with an Optical Audio Output and a Digital Optical Audio Cable (included).
- Using a Digital Optical Audio Cable, connect the Optical Input on the sound bar to the Optical Output on your audio source (TV, amplifier, etc.).
- Power ON the sound bar and press Optical on the remote or Source on the sound bar to select Optical Mode. A voice will announce the source mode and the indicator will turn orange.
- On the connected audio source (TV, amplifier, etc.), be sure the audio settings are set to PCM or Optical Audio.
- Audio played through the connected audio source (TV, amplifier, etc.) should now be heard through the speaker.
Important tips for optical audio:
- Use the correct optical audio cable and make sure that it is firmly seated in both source and sound bar sockets.
- Optical audio output is activated from the audio source (a red light should be visible from the optical socket). It may be labeled SPDIF in the settings menu of the source.
- The optical output source should be set to output PCM and not Dolby Digital.
Stereo RCA Inputs (Aux In)
Requires RCA stereo audio cable (not included). When connecting RCA stereo audio plugs (Red/White), match them to their corresponding color coded ports.
- Connect an RCA stereo audio cable to the Aux In ports on the sound bar and the RCA audio outputs on a television or other audio source.
- Power ON the sound bar and press Source on the sound bar or Aux In on the remote to select Aux In Mode. A voice will announce the source mode and the indicator will turn white for Aux In.
- Audio played through the television or other source should now be heard through the speakers.
Line In
Requires a 3.5mm audio cable (not included).
- Connect a 3.5mm audio cable to the Line In on the unit and the audio output/headphone jack on an audio device.
- Power ON the sound bar and press Source on the sound bar or Line In on the remote to select Line In Mode. A voice will announce the source mode and the indicator will turn green.
- Use the controls on the connected device to select and play audio. Be sure the volume on your connected device is audible when you begin playing.
Optical Input-Detail
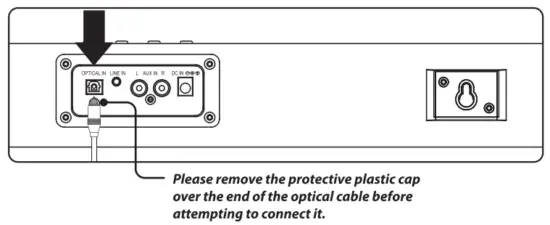
Stereo RCA Inputs (Aux In)-Detail

Line in-Detail

Company Information
Contact Information
Website: www.iLiveElectronics.com
Email Support: [email protected]
Email Parts: [email protected]
Phone Support: 1-888-999-4215
Warranty
For Warranty Information and the most up-to-date version of this User’s Guide, go to: www.iLiveElectronics.com
International Support
To download this User’s Guide in English, Spanish, and French, or to get answers to frequently asked questions, visit the support section at: www.iLiveElectronics.com
FCC Warnings
Warning: Changes or modifications to this unit not expressly approved by the party responsible for compliance could void the user’s authority to operate the equipment. NOTE: This equipment has been tested and found to comply with the limits for a Class B digital device, pursuant to Part 15 of the FCC Rules. These limits are designed to provide reasonable protection against harmful interference in a residential installation. This equipment generates, uses, and can radiate radio frequency energy and, if not installed and used in accordance with the instructions, may cause harmful interference to radio communications. However, there is no guarantee that interference will not occur in a particular installation. If this equipment does cause harmful interference to radio or television reception, which can be determined by turning the equipment off and on, the user is encouraged to try to correct the interference by one or more of the following measures:
- Reorient or relocate the receiving antenna.
- Increase the separation between the equipment and receiver.
- Connect the equipment into an outlet on a circuit different from that to which the receiver is connected.
- Consult the dealer or an experienced radio/TV technician for help.
FCC Radiation Exposure Statement
This equipment complied with FCC radiation exposure limits set forth for an uncontrolled environment. This equipment should be installed and operated with minimum distance 20cm between the radiator & your body.
Additional Warnings and Precautions
- CAUTION: TO PREVENT ELECTRIC SHOCK, MATCH WIDE BLADE OF PLUG TO WIDE SLOT, FULLY INSERT.
- Mains plug is used as disconnect device and it should remain readily operable during intended use. In order to disconnect the apparatus from the mains completely, the mains plug should be disconnected form the mains socket outlet completely.
- WARNING: Shock hazard – Do Not Open.
- Caution and marking information is located at the rear or bottom of the apparatus.
- WARNING: To reduce the risk of fire or electric shock, do not expose this apparatus to rain, moisture, dripping, or splashing.
- Objects filled with liquids, such as vases, shall not be placed on the apparatus.
- CAUTION: Use of controls or adjustments or performance of procedures other than those specified may result in hazardous radiation exposure.
- WARNING: Changes or modifications to this unit not expressly approved by the party responsible for compliance could void the user’s authority to operate the equipment
- WARNING: Do not place this unit directly onto furniture surfaces with any type of soft, porous, or sensitive finish. As with any rubber compound made with oils, the feet could cause marks or staining where the feet reside. We recommend using a protective barrier such as a cloth or a piece of glass between the unit and the surface to reduce the risk of damage and/or staining.
- WARNING: Use of this unit near fluorescent lighting may cause interference regarding use of the remote. If the unit is displaying erratic behavior move away from any fluorescent lighting, as it may be the cause.
- CAUTION: Danger of explosion if battery is incorrectly replaced. Replace only with the same or equivalent type.
- Battery shall not be exposed to excessive heat such as sunshine, fire or the like.
- Keep new and used batteries away from children. If the battery compartment does not close securely, stop using the product and keep it away from children.
- If you think batteries might have been swallowed or placed inside any part of the body, seek immediate medical attention.
- Do not mix old and new batteries.
- Completely replace all old batteries with new ones.
- Do not mix alkaline, standard (carbon-zinc), or rechargeable (ni-cad, ni-mh, etc) batteries.
- Batteries should be recycled or disposed of as per state and local guidelines.
Copyright it) 2022 Digital Products International (DPI, Inc.) All other trademarks appearing herein are the property of their respective owners. Specifications are subject to change without notice.
]]>

5.1 Home Theater System with Bluetooth
User’s Guide for Model IHTB138 v1972-01
For the most up-to-date version of this User’s Guide, go to www.iliveelectronics.com
Safety Instructions & Warnings
Important Safety Instructions
- Read these Instructions.
- Keep these Instructions.
- Heed all Warnings.
- Follow all instructions.
- Do not use this apparatus near water.
- Clean only with a dry cloth.
- Do not block any ventilation openings. Install in accordance with the manufacturer’s instructions.
- Do not install near any heat sources such as radiators, heat registers, stoves, or other apparatus (including amplifiers) that produce heat.
- Do not defeat the safety purpose of the polarized or grounding-type plug. A polarized plug has two blades with one wider than the other. A grounding-type plug has two blades and a third grounding prong. The wide blade or the third prong are provided for your safety. When the provided plug does not fit into your outlet, consult an electrician for the replacement of the obsolete outlet.
- Protect the power cord from being walked on or pinched particularly at plugs, convenience receptacles, and the point where they exit from the apparatus.
- Only use attachments/accessories specified by the manufacturer.
- Unplug this apparatus during lightning storms or when unused for long periods of time.
- Refer all servicing to qualified service personnel. Servicing is required when the apparatus has been damaged in any way, such as power-supply cord or plug is damaged, liquid has been spilled or objects have fallen into the apparatus, the apparatus has been exposed to rain or moisture, does not operate normally, or has been dropped.
- Use only with a cart, stand, tripod, bracket, or table specified by the manufacturer, or sold with the apparatus. When a cart is used, use caution when moving the cart/ apparatus combination to avoid injury from tip-over.
FCC Warnings
Warning: Changes or modifications to this unit not expressly approved by the party responsible for compliance could void the user’s authority to operate the equipment.
NOTE: This equipment has been tested and found to comply with the limits for a Class B digital device, pursuant to Part 15 of the FCC Rules. These limits are designed to provide reasonable protection against harmful interference in a residential installation. This equipment generates, uses, and can radiate radio frequency energy and, if not installed and used in accordance with the instructions, may cause harmful interference to radio communications. However, there is no guarantee that interference will not occur in a particular installation. If this equipment does cause harmful interference to radio or television reception, which can be determined by turning the equipment off and on, the user is encouraged to try to correct the interference by one or more of the following measures:
- Reorient or relocate the receiving antenna.
- Increase the separation between the equipment and receiver.
- Connect the equipment into an outlet on a circuit different from that to which the receiver is connected.
- Consult the dealer or an experienced radio/TV technician for help.
Battery Warnings
- WARNING: Do not ingest battery, Chemical Burn Hazard.
- If the remote control supplied with this product contains a coin/button cell battery and the coin/button cell battery is swallowed, it can cause severe internal burns in just 2 hours and can lead to death.
- Keep new and used batteries away from children. If the battery compartment does not close securely, stop using the product and keep it away from children.
- If you think batteries might have been swallowed or placed inside any part of the body, seek immediate medical attention.
- CAUTION: Danger of explosion if battery is incorrectly replaced. Replace only with the same or equivalent type.
- WARNING: There is a danger of explosion if you attempt to charge standard Alkaline batteries in the unit. Only use rechargeable NiMH batteries.
- Battery shall not be exposed to excessive heat such as sunshine, fire, or the like.
- Do not mix old and new batteries.
- Completely replace all old batteries with new ones.
- Do not mix alkaline, standard (carbon-zinc), or rechargeable (ni-cad, ni-mh, etc) batteries.
- Batteries should be recycled or disposed of as per state and local guidelines.
Additional Warnings and Precautions
- Do not look directly into the projector light.
- CAUTION: TO PREVENT ELECTRIC SHOCK, MATCH WIDE BLADE OF PLUG TO WIDE SLOT, FULLY INSERT.
- Mains plug is used as disconnect device and it should remain readily operable during intended use. In order to disconnect the apparatus from the mains completely, the mains plug should be disconnected from the mains socket outlet completely.
- CAUTION: Use of controls or adjustments or performance of procedures other than those specified may result in hazardous radiation exposure.
- WARNING: Changes or modifications to this unit not expressly approved by the party responsible for compliance could void the user’s authority to operate the equipment.
- WARNING: Use of this unit near fluorescent lighting may cause interference regarding use of the remote. If the unit is displaying erratic behavior move away from any fluorescent lighting, as it may be the cause.
- WARNING: Shock hazard – Do Not Open.
- Caution and marking information is located at the rear or bottom of the apparatus.
- WARNING: To reduce the risk of fire or electric shock, do not expose this apparatus to rain, moisture, dripping, or splashing.
- Objects filled with liquids, such as vases, shall not be placed on the apparatus.
- This product meets and complies with all Federal regulations.
CAUTION RISK OF ELECTRIC SHOCK DO NOT OPEN
WARNING: To reduce the risk of electric shock, do not remove cover (or back). No user-serviceable parts inside. Refer servicing to qualified service personnel.
 The exclamation point within an equilateral triangle is intended to alert the user to the presence of important operating and maintenance (servicing) instructions in the literature accompanying the appliance.
 The lightning flash with the arrowhead symbol, within an equilateral triangle, is intended to alert the user to the presence of an un-insulated “dangerous voltage” within the product’s enclosure that may be of sufficient magnitude to constitute a risk of electric shock to persons.
 This symbol indicates that this product incorporates double insulation between hazardous mains voltage and user-accessible parts.
![]() WARNING: This product can expose you to chemicals including lead, which is known to the State of California to cause cancer. For more information go to: www.P65Warnings.ca.gov
WARNING: This product can expose you to chemicals including lead, which is known to the State of California to cause cancer. For more information go to: www.P65Warnings.ca.gov
Setup
Features
• Bluetooth Wireless – range 60 ft.
• 6 5.1 surrounds sound audio inputs
• 2 stereo audio inputs
Includes
• Subwoofer (main unit)
• 26″ central speaker with 4 satellite speakers
• Remote control: requires CR2025 battery (included)
• 1 RCA to 3.5mm stereo audio cable
• 3 RCA to RCA audio cables
Power
Plug the AC power cord into a standard wall outlet.
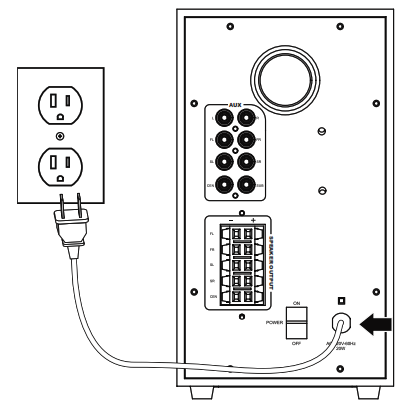
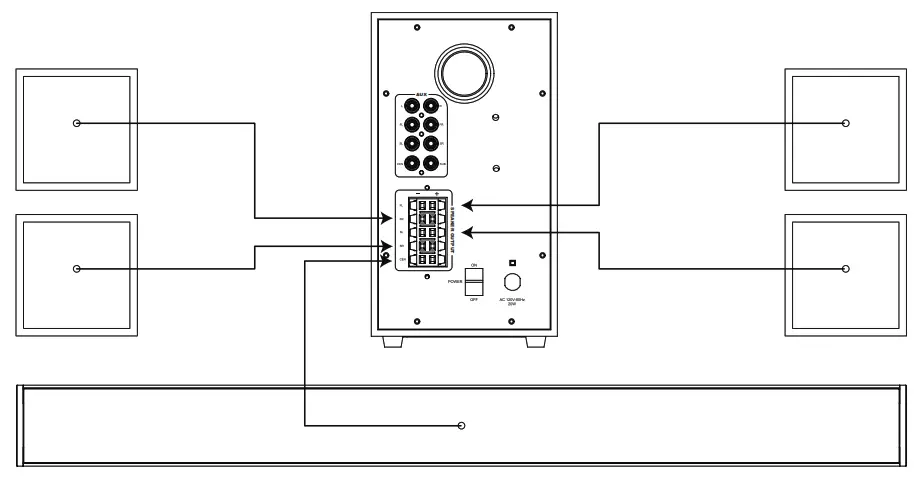
Speakers
Connect each speaker wire with the corresponding port on the rear of the subwoofer. Be sure to match the positive (+) and negative (-) wire leads to the correct port or the speakers will not function properly.
Orientation
Subwoofer Rear View
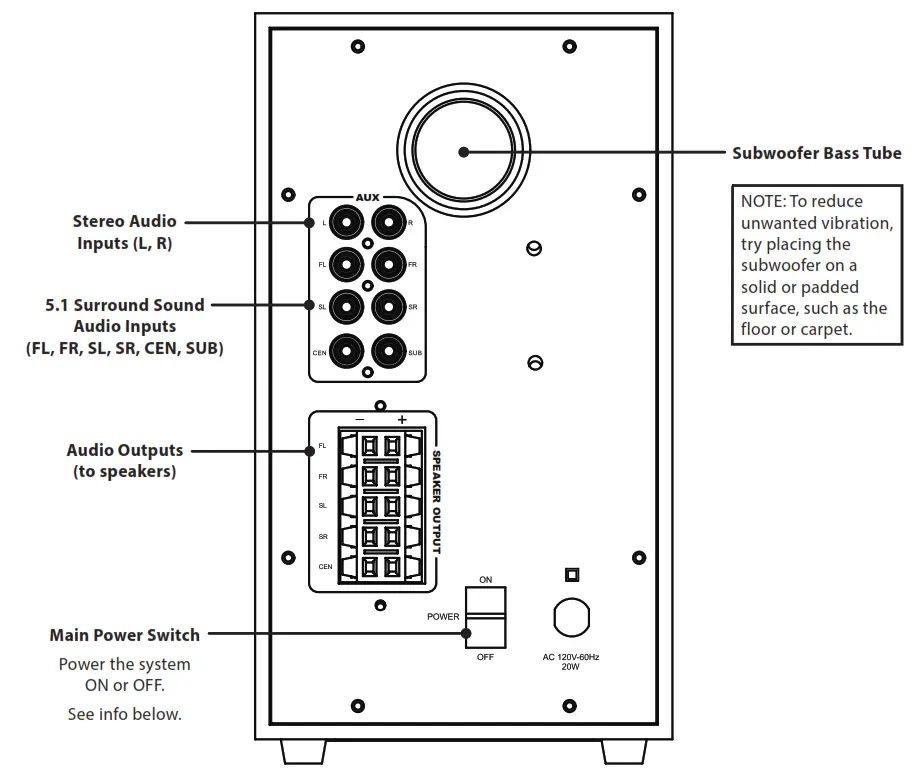
| Power Status | Switch Position | Indicator Light |
| Power OFF | Switch OFF | No Lights |
| Standby Mode | Switch ON | Power indicator ON, all other indicators OFF |
| Power ON | Switch ON + ON signal from remote | Power Indicator OFF, Volume / Source indicators ON |
For most instances, leave the switch in the ON position, the system will be in Standby Mode. It is not necessary to use the Main Power Switch every time. Use the remote to fully power ON and begin listening to audio. Use the remote again to place the system back in Standby Mode.
Subwoofer Front View
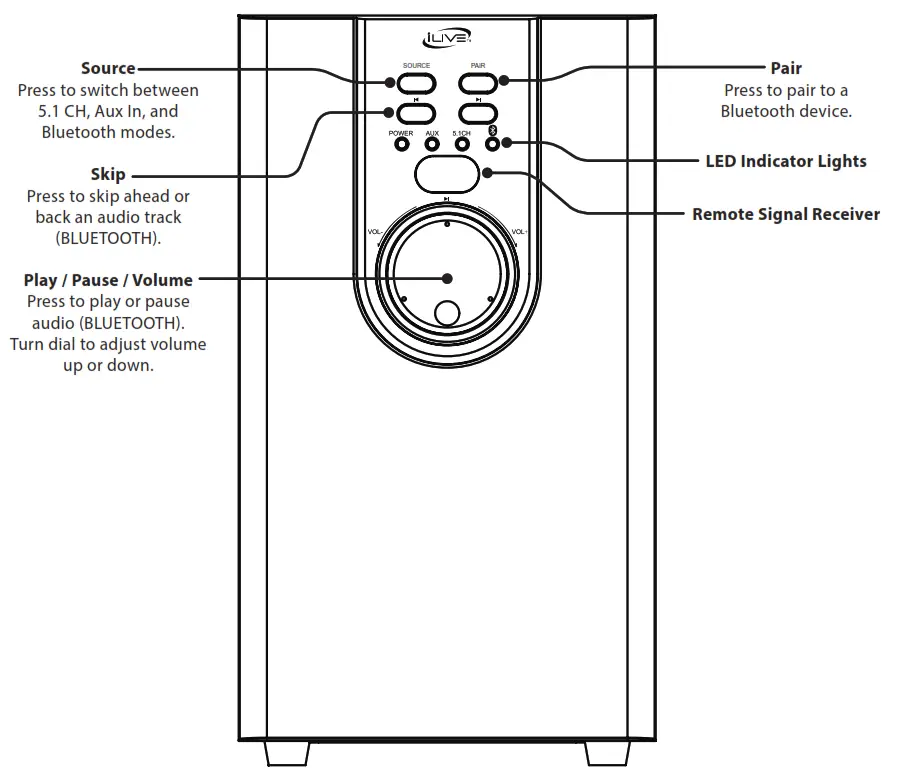
| Speaker Status | Indicator Light |
| 5.1 CH Mode (Surround) | Orange Light |
| AUX Mode (Stereo) | White Light |
| Bluetooth Mode (not connected) | Slow Flashing Blue Light |
| Bluetooth Pairing | Rapid Flashing Blue Light |
| Bluetooth Connected | Solid Blue Light |
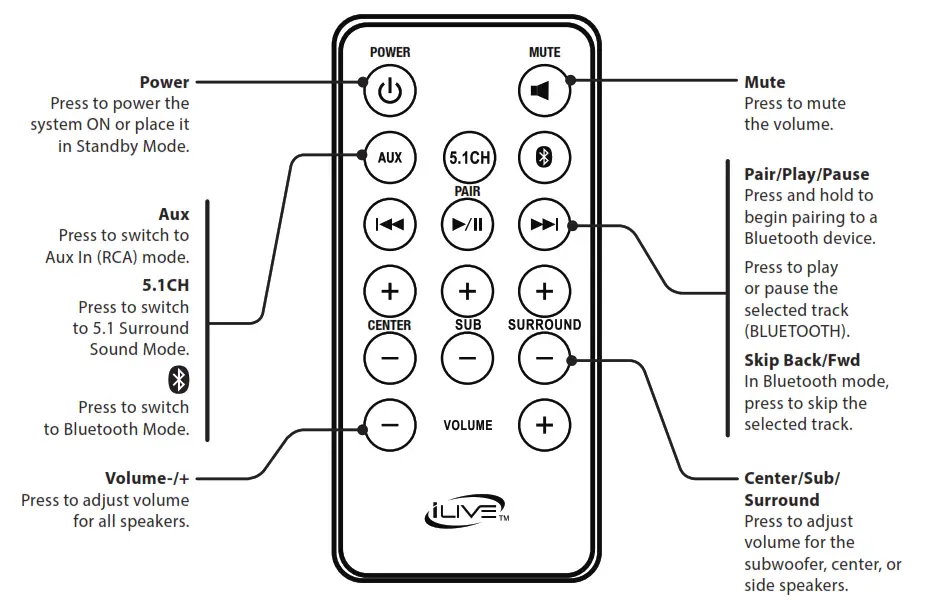
Remote
Functions
Note: When using the remote, be sure to aim at the remote signal receiver located on the front of the subwoofer.
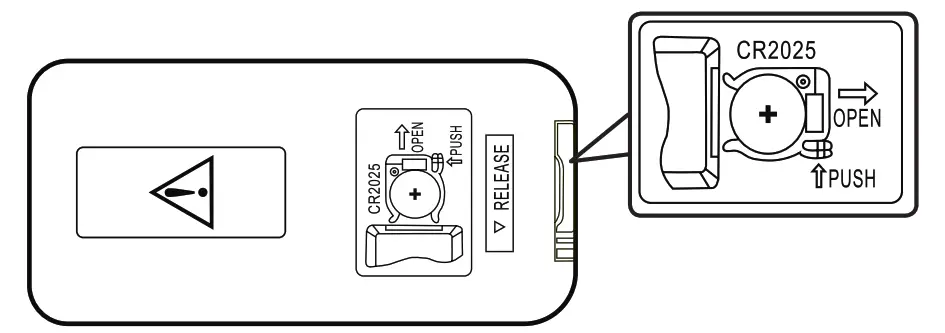
Remote Batteries
Requires 1 CR2025 battery (pre-installed).
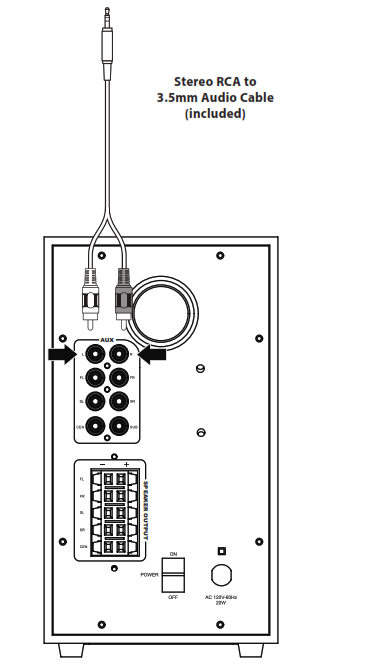
Audio Inputs
2 Port Stereo RCA Inputs (Aux)
If your TV, DVD, or other media player has a 3.5mm audio line output, use the top 2 audio inputs (Left/Right channel) on the rear of the subwoofer for stereo audio. While connected to the Aux inputs, the unit will send audio signal to all of it’s speakers to simulate a surround sound effect. Requires a 3.5mm stereo audio cable (included).
1. Connect the RCA stereo audio cable to the RCA Stereo Inputs on the subwoofer and the audio line outputs on your TV, DVD player, etc.
2. Power ON the speaker and press Source (subwoofer) or AUX (remote) to select Aux Mode, indicated by a white light.
Audio Inputs
6 Port 5.1 Surround Sound RCA Inputs (5.1 CH)
To use the 5.1 input on this system will require a source (TV, DVD, Blu-Ray, or other media player) with 5.1 Surround Sound analog audio outputs. If your media source is so equipped, use the lower 6 audio inputs on the rear of the subwoofer.
Requires 6x RCA audio cables (included).
1. Connect the RCA audio cables to the RCA Inputs on the subwoofer and the audio outputs on your TV, DVD player, etc. When connecting the audio cables, match the colored plugs to the same colored input ports.
2. Power ON the speaker and press Source (subwoofer) or 5.1CH (remote) to select 5.1 Surround Sound Mode, indicated by an orange light.
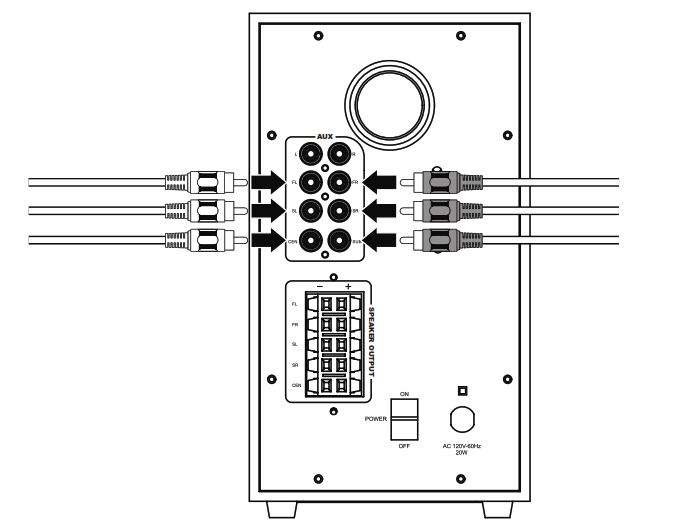
| Audio Input | Audio Channel |
| FL / FR | Front Left / Front Right |
| SL / SR | Surround Left / Surround Right |
| CEN | Center |
| SUB | Subwoofer |
Bluetooth Wireless
Pairing to a Bluetooth Device and Playing Audio Wirelessly
After initial pairing, the unit will stay paired unless unpaired manually by the user or erased due to a reset of the
device. If your device should become unpaired or you find it is unable to connect, repeat these steps.
1. With the unit powered ON, press Source (subwoofer) or (remote) to select Bluetooth Mode, indicated by a slowly flashing blue light.
2. Press the Pair button on the subwoofer until the pairing indicator begins quickly flashing blue. When pairing, remain within 3 feet of the unit.
3. Use the controls on your Bluetooth device to select IHTB138 in your Bluetooth settings. If your device requests a password, enter the default password 0 0 0 0 . Consult the user’s manual for your specific device for more detailed instructions on pairing Bluetooth devices.
4. When successfully paired, a chime will sound and the pairing indicator will change to a solid blue. Audio should now be heard through the speakers. Use the controls on the connected Bluetooth Device to select and begin playing audio.
5. Play, pause or skip audio using the controls on the connected Bluetooth Device or the subwoofer or remote.
Customer Support
Contact Information
Website: www.iLiveElectronics.com
Email Support: [email protected]
Email Parts: [email protected]
Phone Support: 1-888-999-4215
Warranty
For Warranty Information and the most up-to-date version of this User’s Guide, go to: www.iLiveElectronics.com
International Support
To download this User’s Guide in English, Spanish, and French, or to get answers to frequently asked questions, visit the support section at:
www.iLiveElectronics.com
Copyright © 2017 Digital Products International (DPI, Inc.) All other trademarks appearing herein are the property of their respective owners. Specifications are subject to change without notice.
]]>
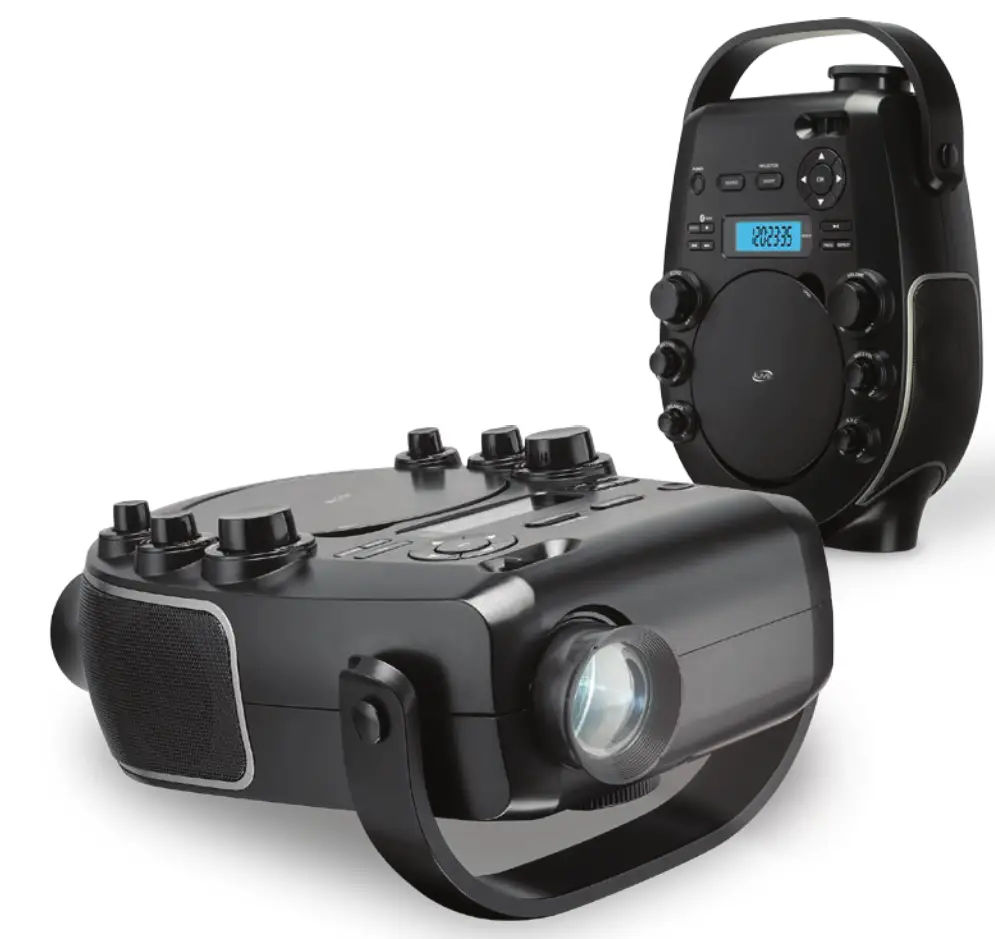
Party Projector · Karaoke · Movie · Music System
User’s Guide for Model IJP557 v1905-01
For the most up-to-date version of this User’s Guide, go to www.iliveelectronics.com
Safety Instructions & Warnings
Important Safety Instructions
- Read these Instructions.
- Keep these Instructions.
- Heed all Warnings.
- Follow all instructions.
- Do not use this apparatus near water.
- Clean only with a dry cloth.
- Do not block any ventilation openings. Install in accordance with the manufacturer’s instructions.
- Do not install near any heat sources such as radiators, heat registers, stoves, or other apparatus (including amplifiers) that produce heat.
- Do not defeat the safety purpose of the polarized or grounding-type plug. A polarized plug has two blades with one wider than the other. A grounding type plug has two blades and a third grounding prong. The wide blade or the third prong are provided for your safety. When the provided plug does not fit into your outlet, consult an electrician for replacement of the obsolete outlet.
- Protect the power cord from being walked on or pinched particularly at plugs, convenience receptacles, and the point where they exit from the apparatus.
- Only use attachments/accessories specified by the manufacturer.
- Unplug this apparatus during lightning storms or when unused for long periods of time.
- Refer all servicing to qualified service personnel. Servicing is required when the apparatus has been damaged in any way, such as power-supply cord or plug is damaged, liquid has been spilled or objects have fallen into the apparatus, the apparatus has been exposed to rain or moisture, does not operate normally, or has been dropped.
- Use only with a cart, stand, tripod, bracket, or table specified by the manufacturer, or sold with the apparatus. When a cart is used, use caution when moving the cart/ apparatus combination to avoid injury from tip-over.

FCC Warnings
Warning: Changes or modifications to this unit not expressly approved by the party responsible for compliance could void the user’s authority to operate the equipment.
NOTE: This equipment has been tested and found to comply with the limits for a Class B digital device, pursuant to Part 15 of the FCC Rules. These limits are designed to provide reasonable protection against harmful interference in a residential installation. This equipment generates, uses, and can radiate radio frequency energy and, if not installed and used in accordance with the instructions, may cause harmful interference to radio communications. However, there is no guarantee that interference will not occur in a particular installation. If this equipment does cause harmful interference to radio or television reception, which can be determined by turning the equipment off and on, the user is encouraged to try to correct the interference by one or more of the following measures:
- Reorient or relocate the receiving antenna.
- Increase the separation between the equipment and receiver.
- Connect the equipment into an outlet on a circuit different from that to which the receiver is connected.
- Consult the dealer or an experienced radio/TV technician for help.
Battery Warnings
- WARNING: Do not ingest battery, Chemical Burn Hazard.
- If the remote control supplied with this product contains a coin/button cell battery and the coin/button cell battery is swallowed, it can cause severe internal burns in just 2 hours and can lead to death.
- Keep new and used batteries away from children. If the battery compartment does not close securely, stop using the product and keep it away from children.
- If you think batteries might have been swallowed or placed inside any part of the body, seek immediate medical attention.
- CAUTION: Danger of explosion if battery is incorrectly replaced. Replace only with the same or equivalent type.
- WARNING: There is a danger of explosion if you attempt to charge standard Alkaline batteries in the unit. Only use rechargeable NiMH batteries.
- Battery shall not be exposed to excessive heat such as sunshine, fire, or the like.
- Do not mix old and new batteries.
- Completely replace all old batteries with new ones.
- Do not mix alkaline, standard (carbon-zinc), or rechargeable (ni-cad, ni-mh, etc) batteries.
- Batteries should be recycled or disposed of as per state and local guidelines.
Additional Warnings and Precautions
- Do not look directly into the projector light.
- CAUTION: TO PREVENT ELECTRIC SHOCK, MATCH WIDE BLADE OF PLUG TO WIDE SLOT, FULLY INSERT.
- Mains plug is used as disconnect device and it should remain readily operable during intended use. In order to disconnect the apparatus from the mains completely, the mains plug should be disconnected from the mains socket outlet completely.
- CAUTION: Use of controls or adjustments or performance of procedures other than those specified may result in hazardous radiation exposure.
- WARNING: Changes or modifications to this unit not expressly approved by the party responsible for compliance could void the user’s authority to operate the equipment.
- WARNING: Use of this unit near fluorescent lighting may cause interference regarding use of the remote. If the unit is displaying erratic behavior move away from any fluorescent lighting, as it may be the cause.
- WARNING: Shock hazard – Do Not Open.
- Caution and marking information is located at the rear or bottom of the apparatus.
- WARNING: To reduce the risk of fire or electric shock, do not expose this apparatus to rain, moisture, dripping, or splashing.
- Objects filled with liquids, such as vases, shall not be placed on the apparatus.
- This product meets and complies with all Federal regulations.
 WARNING: To reduce the risk of electric shock, do not remove cover (or back). No user-serviceable parts inside. Refer servicing
to qualified service personnel.

The exclamation point within an equilateral triangle is intended to alert the user to the presence of important operating and maintenance (servicing) instructions in the literature accompanying the appliance.

The lightning flash with arrowhead symbol, within an equilateral triangle, is intended to alert the user to the presence of uninsulated “dangerous voltage” within the product’s enclosure that may be of sufficient magnitude to constitute a risk of electric shock to persons.

This symbol indicates that this product incorporates double insulation between hazardous mains voltage and user-accessible
parts.
 WARNING: This product can expose you to chemicals including lead, which is known to the State of California to cause cancer. For more information go to: www.P65Warnings.ca.gov
Setup
Features
- Bluetooth Wireless – range 60 ft.
- CD/CD+G/DVD player
- USB port – supports MP4, AVI, and MPEG 1,2 files
- Composite video output
- RCA stereo audio outputs
- Line In (3.5mm audio line input)
- HDMI input
- Built-in speakers
- DC power input – requires AC/DC power adapter (included)
Includes
- Remote control with CR2025 battery pre-installed
- 1 microphone
- AC/DC power adapter
Power
Plug the AC/DC power adapter (included) into a standard wall outlet and the DC power input on the top of the unit. After connecting power, please allow approximately 5 seconds to pass before powering the unit ON.
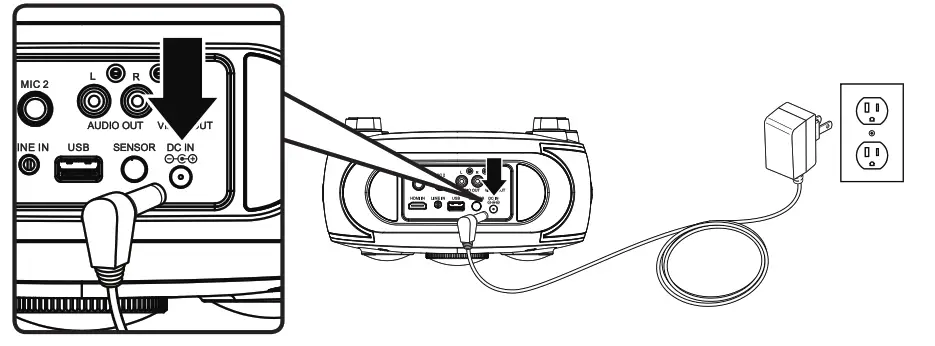
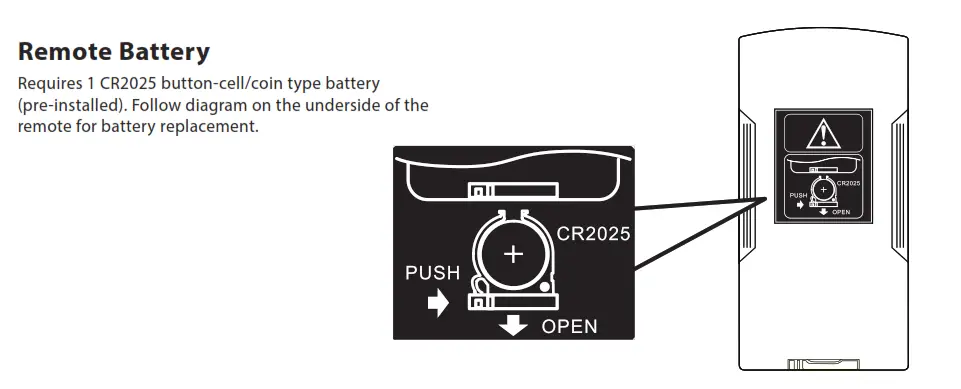
Device Overview
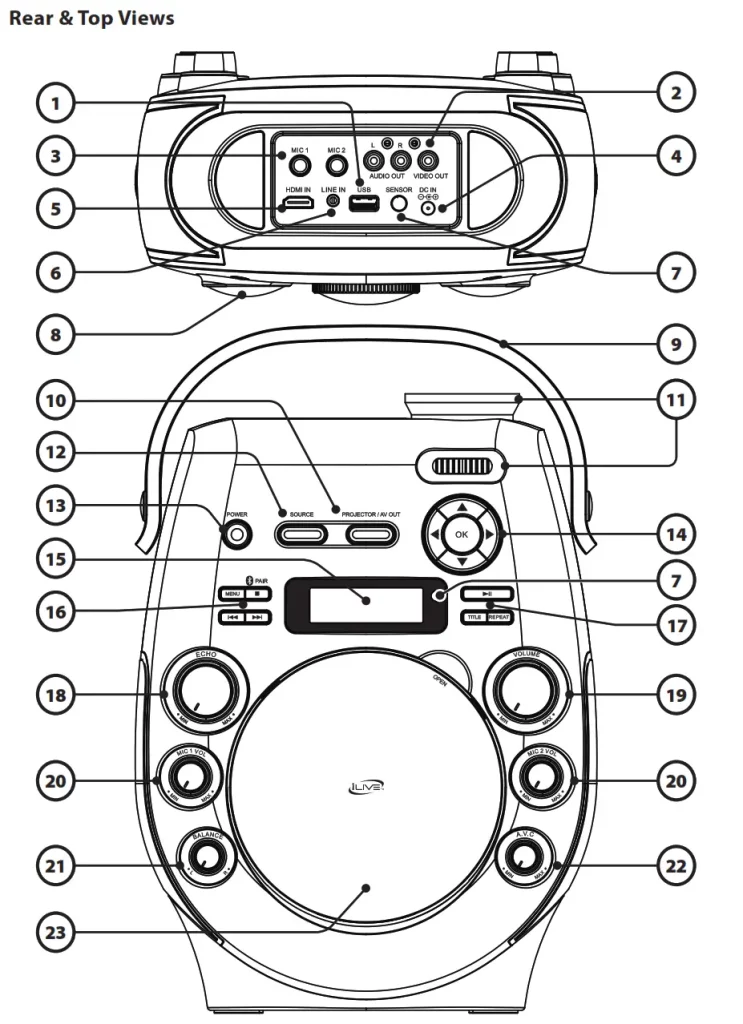
- USB Port
- Audio/Video Outputs
- Microphone Inputs
- DC Power Port
- HDMI Input
- Line In (3.5mm audio input)
- Remote Sensor
- Rubber Feet
Rotate forward foot for height adjustment. - Carry Handle
- Projector / AV Out
Press to play media through the projector lens or the AV Outputs. - Projector Lens / Tilt Angle Adjustment
- Source
Press to switch between Bluetooth, Line In, HDMI, CD/DVD, and USB modes. - Power
Press to power ON or OFF. - Arrows / OK
Press arrow buttons for menu navigation.
Press OK to confirm selections. - Display
- Menu / Stop / Pair / Skip
Press to access DVD menus.
Press to stop audio or video (USB, CD, DVD,
Bluetooth Modes).
Press and hold to pair to a Bluetooth device.
Press to skip tracks or chapters. - Play / Pause / Title / Repeat
Press to play/pause audio or video (USB, CD, DVD, Bluetooth Modes).
Press to access title menu on a loaded DVD, press again to play DVD from beginning.
Press to repeat audio or video. - Echo
Turn to adjust echo effect. - Master Volume
Turn to adjust volume of the built-in speakers. - Microphone 1 & 2 Volume
Turn to adjust microphone volume. - Balance L / R
Turn to adjust left/right balance. - Automatic Voice Control
Turn to adjust AVC effect. - CD/DVD Player & Disco Door
Pull upwards at “Open” to open the disc door and load a disc.
Remote Overview
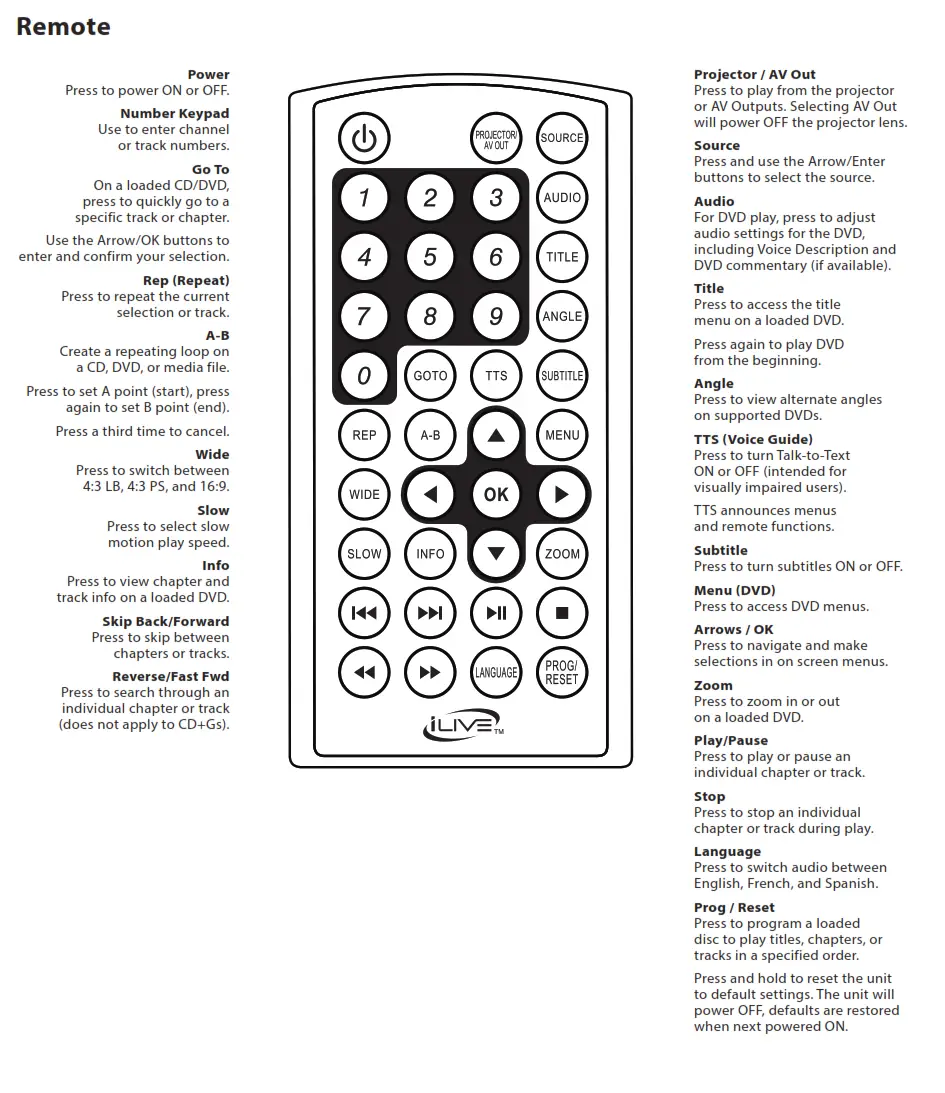
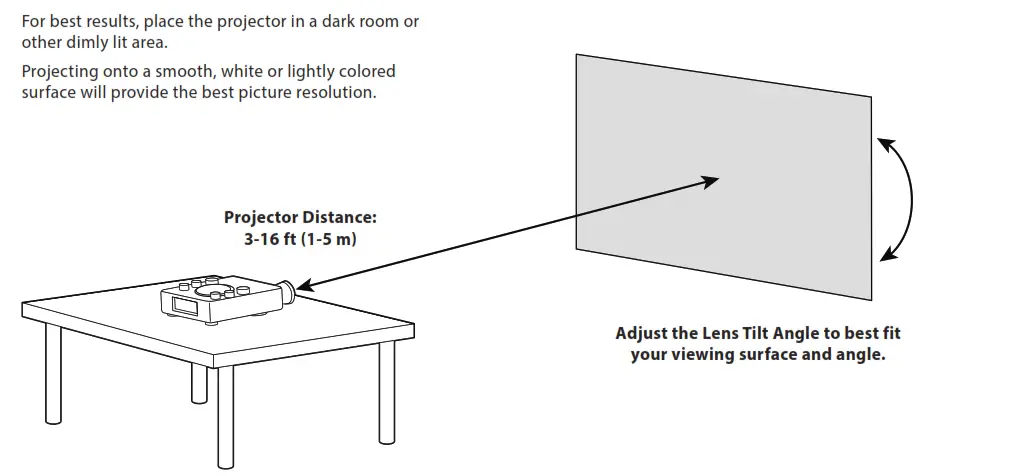
Projector Setup
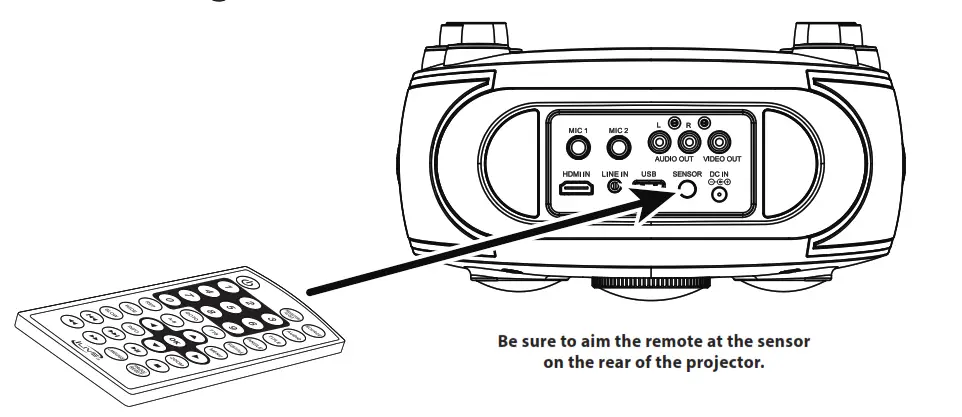

Playing Media from Other Devices
Playing Media from a Connected USB Storage Device
Supports USB drives up to 32GB.
1. Load a USB drive into the USB Port on the rear of the projector.
2. Press the Projector/AV Out button on the projector to turn the lens ON.
3. Set the Source to USB Mode.
4. Use the Arrow/OK buttons to select and play content from the connected USB thumb drive.
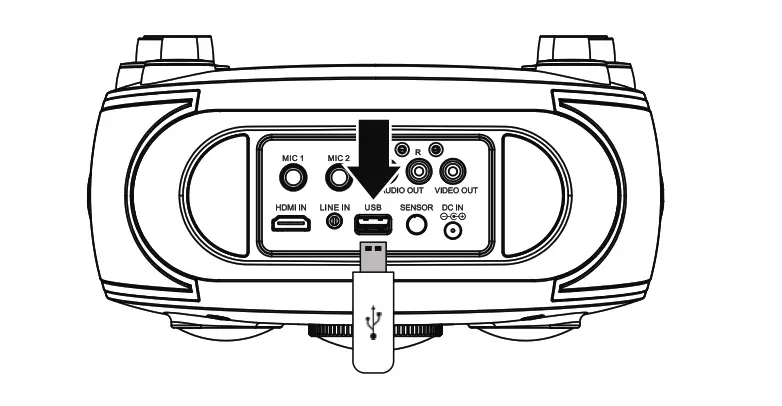
Playing Media Through an HDMI Connection
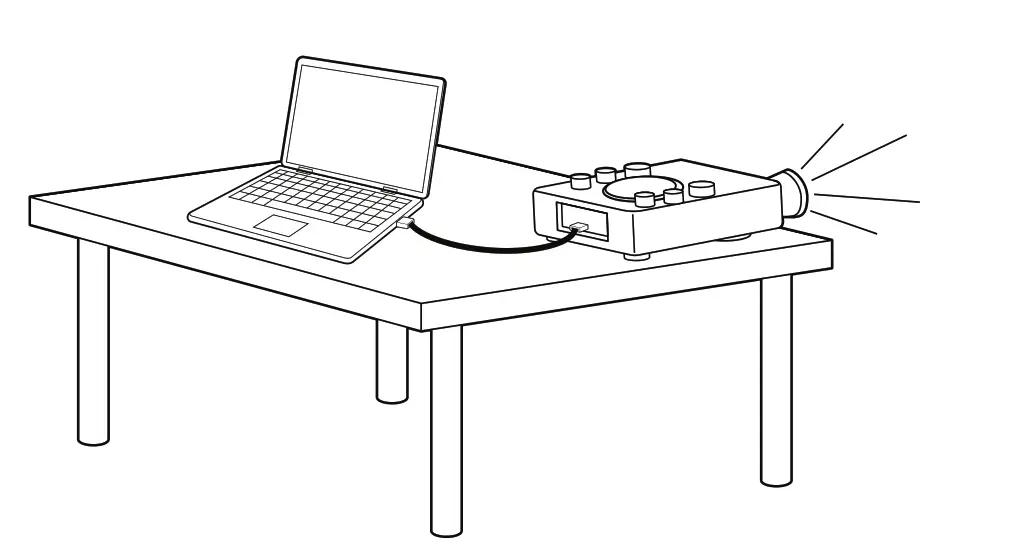
HDMI offers superior sound and picture quality, and is the easiest way to play media from a laptop, gaming console, or other device with an HDMI output.
Requires a HDMI cable (not included) and a device with an HDMI output.
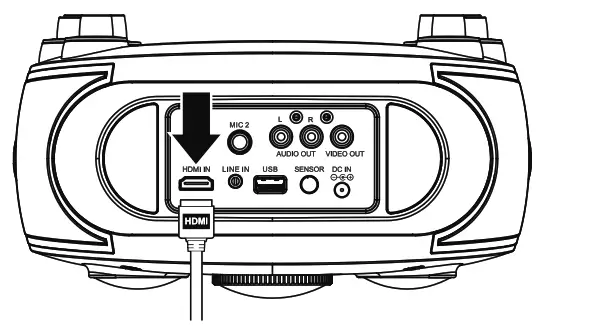
- Using an HDMI cable, connect the HDMI input on the projector to the HDMI output on your external media player, streaming, or gaming device.
- Press the Projector/AV Out button on the projector to turn the lens ON.
- Set the Source to HDMI and use the controls on the connected device to select and play media through the projector. Use the projector’s controls to adjust the volume level.
Playing Media from Other Devices
Pairing to a Bluetooth Device and Playing Audio Wirelessly
After initial pairing to a Bluetooth device, the unit will stay paired unless unpaired manually by the user, or erased due to a reset of the device. If your device should become unpaired or you find it is unable to connect, repeat these steps.
- Set the Source to Bluetooth Mode, indicated by “bt” and a slowly flashing blue light on the display.
- Press and hold the Pair button until the pairing indicator begins flashing quickly. When pairing, remain within 3 feet of the unit.
- From your smartphone or other Bluetooth devices, access Bluetooth settings, and search for nearby devices. Select IJP557 when it is discovered.
- When successfully paired, a chime will sound and the pairing indicator will change to solid blue. Audio played from the connected device should now be heard through the speaker. Use the controls on the connected Bluetooth device to select and begin playing audio.
Playing Audio Through the 3.5mm Audio Line Input
Requires a 3.5 mm audio input cable (not included).
- Plug a 3.5 mm audio input cable into the Line In on the rear of the projector and the headphone jack on a smartphone or other audio source.
- Set the Source to Line In Mode and use the controls on your connected audio device to select and play audio.
- Audio played through the connected device should now be heard through the projector’s speakers.

Sending Media to Other Devices
Playing Media on an External Television
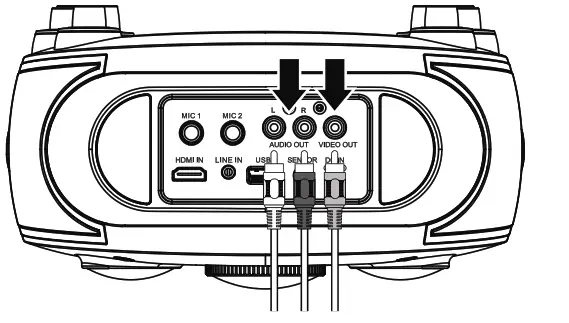
Requires RCA Composite AV cables (red/white/yellow, not included).
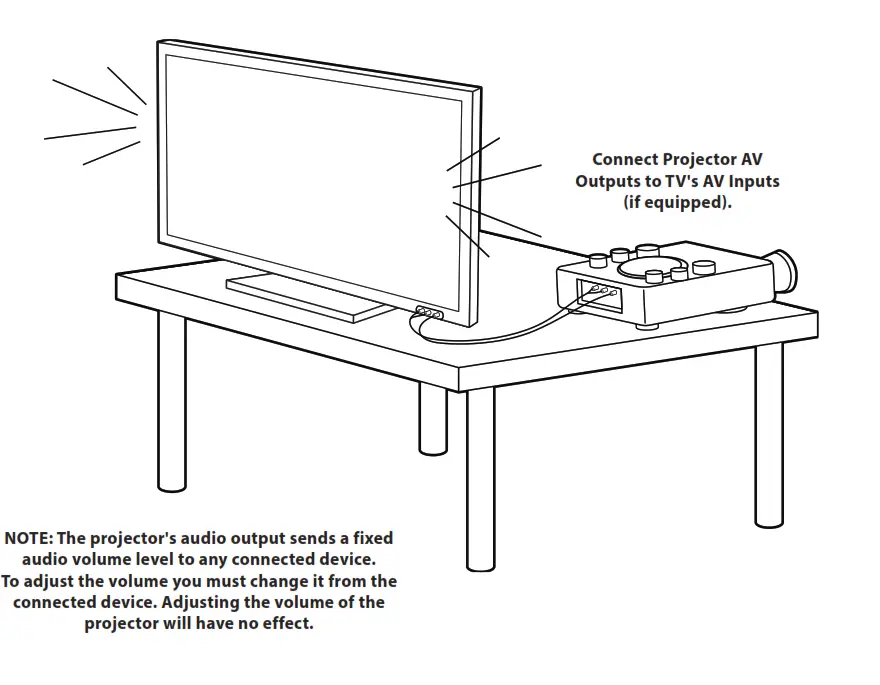
- Press the Projector/AV Out button on the projector to turn off the lens and play from the AV Outputs.
- Using RCA Composite cables, connect the Audio/Video Outputs on the rear of the projector to the corresponding RCA Audio/Video Inputs on a television or other external system. Be sure to correctly match the red/white/yellow plugs on the RCA cables to their sockets.
- Set the television’s input source to the connected output from the projector.
- Audio and video played from the projector will now be sent to the connected television. Use the controls on the projector and remote to select and play media. Use the controls on the television to adjust volume.
DVD
Loading and Playing a DVD
- With the unit powered ON, set the Source to DVD Mode.
- Open the disc door and load a DVD into the projector, label side facing up.
- Close the disc door. The unit will automatically detect the disc and start playing. Use the remote for play controls, menu navigation, and device options.
Programming a DVD
Note: The procedure for programming CDs, CD+Gs, and DVDs is the same.
- Press the Prog button on the remote.
- Use the Arrow/OK buttons to select and add tracks to the program. Up to 16 tracks may be added.
- When you are ready to play, use the Arrow/OK buttons to select the “Play” symbol in the menu.
- Press the Prog button at any time to exit and cancel a program.
CD, CD+G & Karaoke
CD vs. CD+G
CD+Gs (CD+Graphics) are CDs that are specially formatted for use with karaoke machines. In addition to the audio tracks, they contain graphics and text for lyrics that will appear while the CD is playing. The unit will automatically detect the type of disc to be played.
Loading and Playing a CD or CD+G
Note: This unit is not compatible with MP3 CDs.
- With the unit powered ON, set the Source to DVD Mode.
- Open the disc door and load a CD/CD+G into the projector, label side facing up.
- Close the disc door. The unit will automatically detect the disc and start playing.
- Use the remote to navigate and make selections within the disc menu.
For Use as a Karaoke Machine
5. The projector will display video and song lyrics from the disc. Plug a microphone (1 included) into the Mic 1 or 2 inputs and use the controls on the unit to adjust microphone volume and effects.
Programming a CD, CD+G
Note: The procedure for programming CDs, CD+Gs, and DVDs is the same.
- Press the Prog button on the remote.
- Use the Arrow/OK buttons to select and add tracks to the program. Up to 16 tracks may be added.
- When you are ready to play, use the Arrow/OK buttons to select the “Play” symbol in the menu.
- Press the Prog button at any time to exit and cancel a program.
Automatic Voice Control
Automatic Voice Control allows the projector to compensate for irregularities in the microphone voice input.
It also serves to blend or separate the user’s voice from the recorded vocals on an audio track. Turn the AVC dial to adjust the Automatic Voice Control effect.
NOTE: AVC only works when someone is actively singing into the microphone.
To manually adjust voice control, use the Echo and Balance knobs on the front of the unit.
Customer Support
Contact Information
Website: www.iLiveElectronics.com
Email Support: [email protected]
Email Parts: [email protected]
Phone Support: 1-888-999-4215

Warranty
For Warranty Information and the most up-to-date version of this User’s Guide, go to: www.iLiveElectronics.com
International Support
To download this User’s Guide in English, Spanish, and French, or to get answers to frequently asked questions, visit the support section at: www.iLiveElectronics.com
iLIVE IAEBT209 Truly Wire-Free Earbuds

Charging the Earbuds
- Open the cover and place the earbuds in their docking stations. Be sure to press down so the earbuds make contact with the charging contacts.
- When charging, the indicator LEDs on the earbuds will turn red. When charging is complete, the indicators will turn blue.
Notes On Charging and Use
- Each earbud must be powered on separately.
- Once the earbuds are linked, powering off one earbud will power off both.
- Placing the earbuds in the charging case will automatically power them off.
- Removing the earbuds from the case will automatically power them on, link them, and connect to the last used Bluetooth device. The earbuds must have been linked and connected to a bluetooth device beforehand.
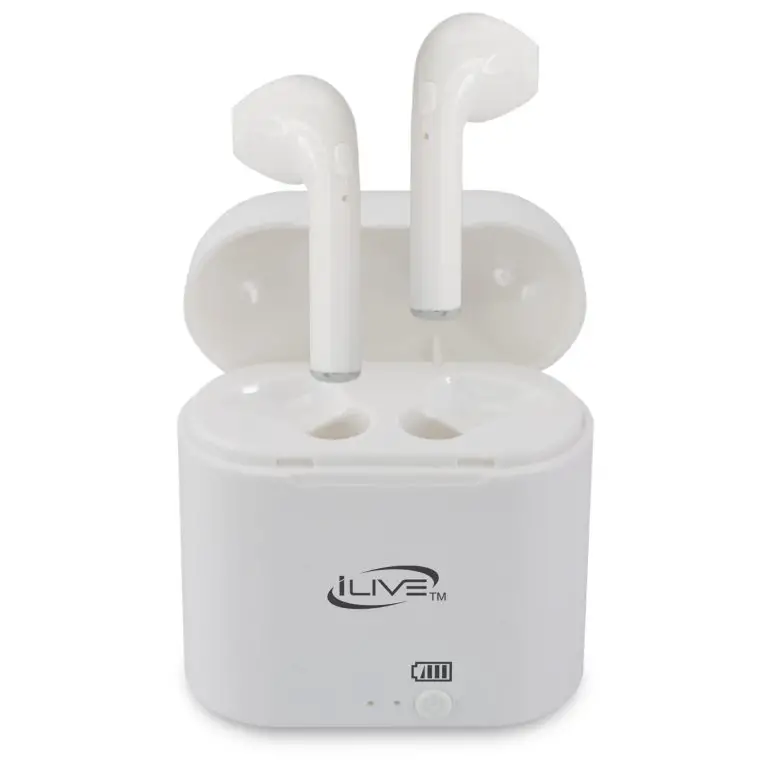
Charging the Case
Using a Micro-USB to USB cable, connect to the USB port of a powered on computer or USB power adaptor (not included) to charge the case.
Charging Case & Auto-On Feature
- Placing the earbuds in the charging case will automatically power them off and begin charging.
- Removing the earbuds from the case will automatically power them on, link them, and connect to the last used Bluetooth device (earbuds must have been linked and connected to a Bluetooth device already).
Initial Linking of Earbuds & Pairing to a Bluetooth Device
- To link the earbuds manually, press and hold the Function button on both earbuds until they start blinking blue and red. They will automatically pair with each other, when successfully linked, one of the earbud’s indicator LEDs will begin blinking blue and red. A voice prompt will also announce the connection.
- With the earbuds linked, you can now connect to your Bluetooth device. The LED indicator on one of the earbuds will flashing blue and red, indicating it is ready to pair to a Bluetooth device.
- On your Bluetooth device, access Bluetooth Settings and search for nearby devices. Select IAEBT209 when it is discovered. When successfully connected to your Bluetooth device, the LED indicator will slowly flash blue and a voice prompt will announce the connection.
- Audio played through the connected Bluetooth device will now be heard through both earbuds. Use the controls on the connected device to play audio and adjust volume.
PLEASE NOTE: Due to the nature of truly wireless earbuds, you may experience slight interruptions with your audio in areas with multiple 2.4Ghz bands or in high wireless traffic areas.
Speakerphone
- To accept a call, press the Function button, or use the controls on the connected phone. To end a call, press the Function button again.
- To re-dial the last dialed number, press the Function button twice.
Customer Support
Customer Service: 1-888-999-4215
Email Support: [email protected]
Email Parts: [email protected]
For Warranty Information and the most up-to-date version of this User’s Guide, go to www.iLiveElectronics.com
To download this User’s Guide in English, Spanish, or French, or to get answers to frequently asked questions, visit the support section at: www.iLiveElectronics.com
Copyright © 2019 Digital Products International (DPI, Inc.) All other trademarks appearing herein are the property of their respective owners. Specifications are subject to change without notice.
FCC Warnings
WARNING: Changes or modifications to this unit not expressly approved by the party responsible for compliance could void the user’s authority to operate the equipment.
NOTE: This equipment has been tested and found to comply with the limits for a Class B digital device, pursuant to Part 15 of the FCC Rules. These limits are designed to provide reasonable protection against harmful interference in a residential installation. This equipment generates, uses, and can radiate radio frequency energy and, if not installed and used in accordance with the instructions, may cause harmful interference to radio communications. However, there is no guarantee that interference will not occur in a particular installation. If this equipment does cause harmful interference to radio or television reception, which can be determined by turning the equipment off and on, the user is encouraged to try to correct the interference by one or more of the following measures:
- Reorient or relocate the receiving antenna.
- Increase the separation between the equipment and receiver.
- Connect the equipment into an outlet on a circuit different from that to which the receiver is connected.
- Consult the dealer or an experienced radio/TV technician for help.
THIS DEVICE COMPLIES WITH PART 15 OF THE FCC RULES. OPERATION IS SUBJECT TO THE FOLLOWING TWO CONDITIONS:
- THIS DEVICE MAY NOT CAUSE HARMFUL INTERFERENCE
- THIS DEVICE MUST ACCEPT ANY INTERFERENCE RECEIVED, INCLUDING INTERFERENCE THAT MAY CAUSE UNDESIRED OPERATION.
Additional Warnings
- WARNING: To prevent fire or shock hazards, do not expose this unit to rain or moisture.
- WARNING : Where the mains plug or appliance coupler is used as the disconnect device, such disconnect device shall remain readily operable.
- Lithium batteries, like all rechargeable batteries, are recyclable and should be recycled or disposed of according to state and local guidelines. They should never be disposed of in normal household waste, and they should never be incinerated, as they might explode. Contact your local government for disposal or recycling practices in your area.
- This product meets and complies with all Federal regulations.
- To avoid hearing damage, make sure that the volume on your music player is turned down before connecting your headphones. After placing headphones in/on your ears, gradually turn up the volume until you reach a comfortable listening level.
“WARNING : Cancer and Reproductive harm – www.P65Warnings.ca.gov.
For Earbuds, FCC ID: 2AHI6IAEBT209
]]>