![]()
KW66 User Manual
Read this manual carefully before use, and retain it for future reference.
Product Introduction
Wearing
Wear the wristband about one finger away from the wrist bone and adjust the tightness of the wristband to a comfortable position.
Tip: If you wear the strap too loose, the data acquisition of the heart rate sensor may be affected.
- Scan the QR code on the watch display (Settings-APP Download) by your mobile phone, and then install the APP Run to Sport. You can also scan the QR code below to download and install GloryFit from the mobile APP store.

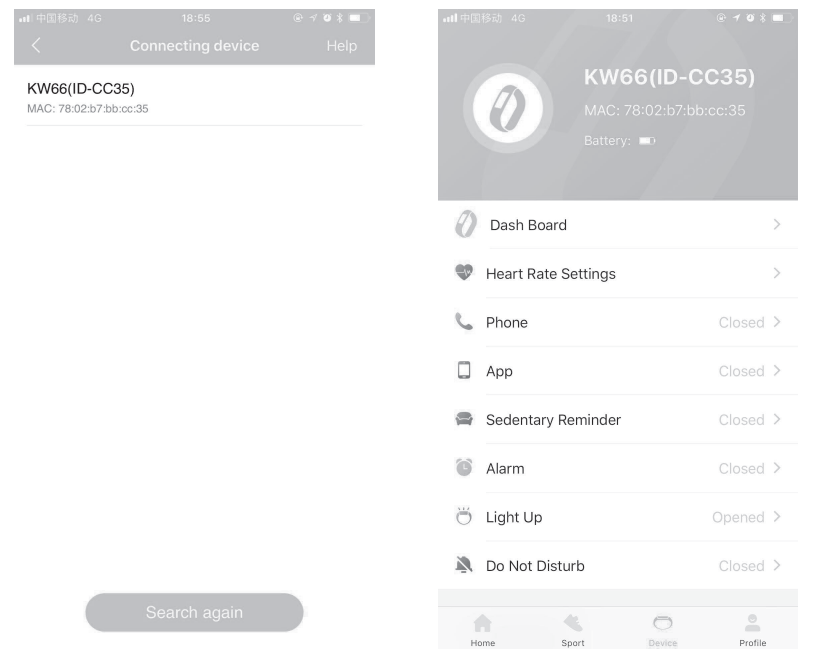
- After installing the APP, open and log in GloryFit, then select (device KW66 to be added) on the device page so as to connect it.


Tips:
- In the process of pairing, check if the Bluetooth function on your mobile phone is enabled so that the watch can be connected to your mobile phone.
- If the device cannot be found in the pairing process, or the device cannot be connected during use, please click “Settings – Reset” on the watch, then try to start the pairing again.
- If the watch still can not be found, please exit and re-open the APP.
- The connection status of the watch is as shown in the figures below :
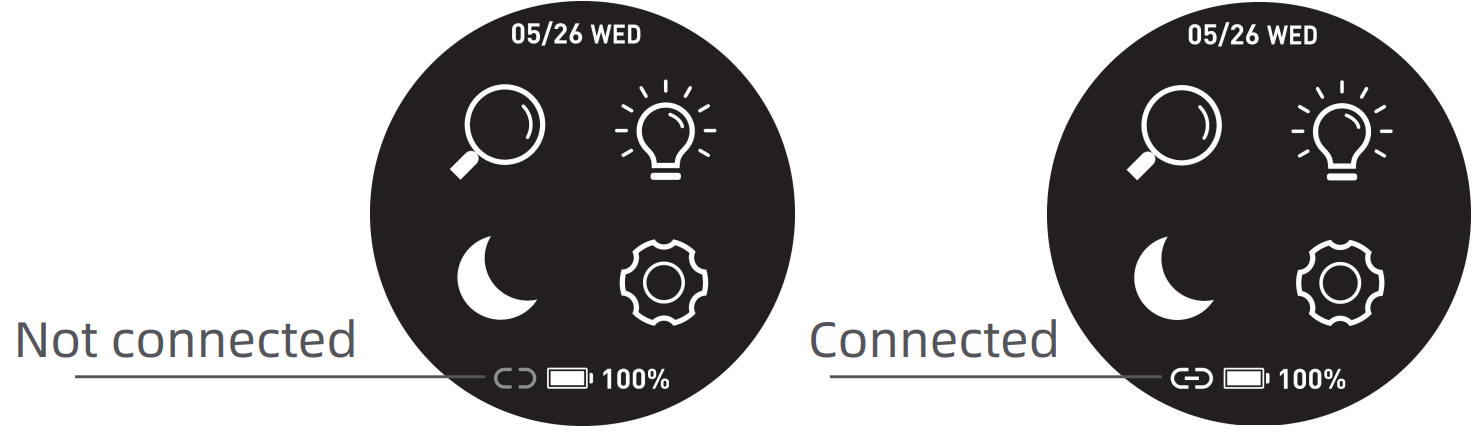

Note: The battery power will be shown as 5 different levels on the watch (0%-25%-50%-75%-100%)
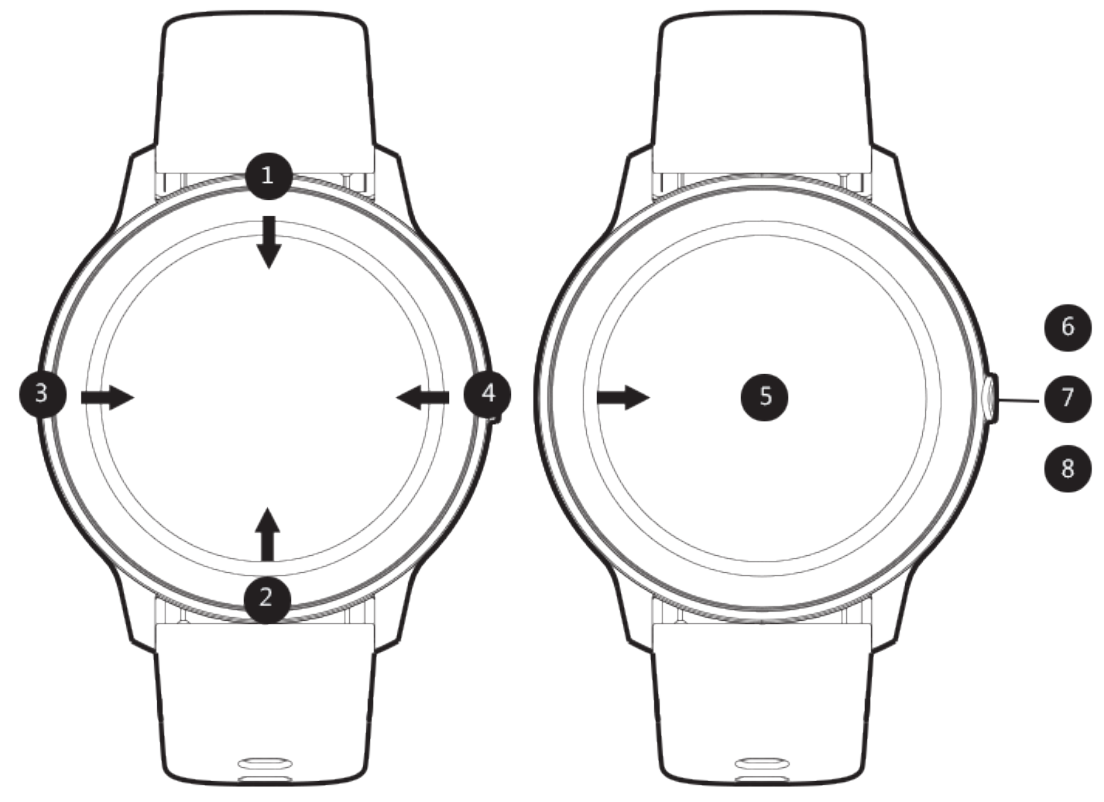
Operation
- Open the control panel: Swipe the screen on the main interface downwards from the top
- Open the messages/notifications: Swipe the screen on the main interface upwards from the bottom
- Open the main menu:Swipe the screen on the main interface from left to right (Note: On other interfaces, slide your finger from left to right to return to the previous interface)
- Open the status interface: Swipe the screen on the main interface from right to left
- Quick dial change: Press and hold the dial interface for 3 seconds, and the watch vibrates once; then you can slide your finger to left or right to select the dial.
- Power on: Press and hold the Power button for 5 seconds to switch it on (Power off: You need to press and hold the button for 3 seconds when the display is on to select whether to power off)
- Quick sports pause/continue: Press the power button.
- Press the power button to return to the homepage (Note: If you are on the level 2 interface, you will return to the level 1 interface).

Features
13 sport modes (Running, Walking, Cycling, Alpinism, Yoga, Skipping, Tennis, Baseball, Basketball, Badminton, Football, Rugby, Table Tennis) 

Heart Rate Monitor: The watch will continuously track your heart rate for 24 hours(Need to turn on the “Heart rate monitoring” in the APP at first), you can also view the historical heart rate data in the APP.
Note: When this feature is enabled, the power consumption will be increased, and the battery endurance will be reduced.
Status Interface: The steps, distance, and calories will be recorded in detail and displayed on watch every day.
Sleep: The watch will monitor your sleep status from 6:00 pm to 11:59 am of the next day. Note: The sleep data on the watch will be cleared at 6:00 pm every day. But you still can check the historical sleep data in the GloryFit APP.
Music: The watch can be used to control the music player of the mobile phone, you can use it to play/pause or skip songs (it is only compatible with the in-built music player of the mobile phone, may not be compatible with third party’s player, and the volume cannot be adjusted on the watch)
Stopwatch: The watch can be used to count time (slide your finger to the right after pressing the pause button to exit and return to the previous menu)
Message: The watch will receive and display texts/ messages/ social media notifications from your phone.
Setting: You can shut down or reset the watch from the setting, and you can also check the info about the watch and App download QR code.
Charging
- Place the watch on the magnetic charger, please make sure the charging contacts on the back of the watch are fully adsorbed to the metal contacts of the charger. It can be fully charged within about 3.5 hours.
- Plug the charging cable into a standard USB charger purchased via official channels. The output voltage is 5V and the output current is 1A. If the watch cannot be turned on after being out of use for a long time, please wipe the charging contacts of the charging cable when using it again to remove the sweat or moisture residue. Note: (If you do not use the watch often, please charge it once every month.)

Basic parameters
| Hardware parameters | |
| Display | 1.28inch TFT 240*240 |
| Touch screen | Capacitive full touch screen |
| Material of shell | Zinc alloy with vacuum plating |
| Material of strap | Silicone rubber |
| Battery and battery life | 340mAh lithium polymer battery |
| Standby time>30 days | |
| Service time: 7 days (with all features on) | |
| Button | The power button on the side |
| Charging mode | Magnetic charging |
| Water-proofing | IPX8 waterproof level |
FAQ
- The watch can not be connected to the APP.(Or the watch cant be found by the APP)
- Please make sure the software version of your smartphone is over Android 4.4 Or iOS 7.0.
- Please check whether the watch was connected to another phone or not, if yes please unbind it at first.
- Please make sure you have enabled the Bluetooth function of your phone. (If it’s still not working, we recommend you to exit all of the other APP and reopen the Bluetooth function)
- If the watch still cant be connected even after trying the above steps, please exit the GloryFit APP and restart the mobile phone and the watch.
*Note: Some smartphones will not be connected to the watch in low battery mode.
2. Can’t get any text/message on the watch
- First, please make sure the Bluetooth function is enabled on your mobile phone, and check whether the watch is connected successfully with your phone through the GloryFit APP. Then turn on the “Notifications reminders” in the APP.
- Then please check whether you give this APP the permission to keep running in the background on your mobile phone. If not, please allow it to keep running in the background.
EN-0 - And also check if the message can show up on your phone’s notification bar or not. If not, please allow the APP notifications to pop up in the notification bar in the system setting: SettingNotifications- Notification style-Tick the “Banners”.
- If the messages can still not be displayed on the watch even after trying the above steps, please exit the GloryFit APP and restart the mobile phone and the watch.
3. How to synchronize the watch data to my phone?
- Auto synchronization: When the watch is connected to the APP, it will automatically synchronize data;
- Manual synchronization: After the watch is connected to the APP successfully, you can manually synchronize the data by swiping down the screen from the APP homepage or data interface;
- If the data cannot be synchronized, please try to disable and enable the Bluetooth function again on your mobile phone, or restart your mobile phone;
(Note: In case of any common problems in operation, please refer to the Common problem in My profile of the APP, which can help you solve some problems) As shown in the figure below:

NOTE: This equipment has been tested and found to comply with the limits for a Class B digital device, pursuant to part 15 of the FCC Rules. These limits are designed to provide reasonable protection against harmful interference in a residential installation. This equipment generates uses and can radiate radio frequency energy and, if not installed and used in accordance with the instructions, may cause harmful interference to radio communications. However, there is no guarantee that interference will not occur in a particular installation. If this equipment does cause harmful interference to radio or television reception, which can be determined by turning the equipment off and on, the user is encouraged to try to correct the interference by one or more of the following measures:
– Reorient or relocate the receiving antenna.
– Increase the separation between the equipment and receiver.
-Connect the equipment into an outlet on a circuit different from that to which the receiver is connected.
-Consult the dealer or an experienced radio/TV technician for help
Changes or modifications not expressly approved by the party responsible for compliance could void the user’s authority to operate the equipment.
This device complies with Part 15 of the FCC Rules. Operation is subject to the following two conditions:
(1) this device may not cause harmful interference, and
(2) this device must accept any interference received, including interference that may cause undesired operation.
Radiation Exposure Statement
This equipment complies with FCC radiation exposure limits set forth for an uncontrolled environment. This transmitter must not be co-located or operating in conjunction with any other antenna or transmitter.
Imilab Technology Company Pty Ltd For further information: www.imilab.net.au
Support:
For Business:
FCC ID: 2APA9-MILAB-KW66
Model: KW66
MADE IN CHINA
![]()