imperii Opixturize SQ8 Full HD 1080P Mini DV

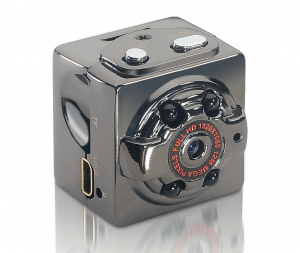
Product Overview
- ON/ OFF button
- MODE button
- Infrared light
- Super wide angle
- Microphone
- Sling
- Mini USB port
- LED Indicator
- TF card port
- Reset Port
Product Features
- High quality HD images FULL HD1080P DV DC
- OV9712 import and HD camera
- Compact, hand-held design
- You can record video in low light conditions
- Video format: 1280x720P
- Video format: 1920×1 OB0P
- Picture capture mode: 12M (4032×3024)
- Motion detection video: 720P and 1 0B0P
- High-speed USB 2.0 interface
- Supports TF card up to 32GB
- Supports video connection with TVs and monitors
- Built-in lithium battery for up to 100 minutes of recording
Instructions For Use
Charging:
The device has a built-in rechargeable lithium battery. The first time you use it, please fully charge it. You can do this by following these steps:
- Connect the USB cable to your computer for charging.
- You can charge while recording video. It can also be charged with an external USB portable.
- During charging, the blue and red lights will light up. When the charge is complete, only the blue light will remain. Please, if both lights come on after charging, charge again for about 30 minutes.
Note:
- When the battery is insufficient, the blue and red lights will turn on for 5 seconds and then the device will go into security off: it will save the video that was being recorded and it will automatically turn off, after which it will have to be charged.
- If you turn on the device without a card inside, the blue and red lights will blink for 5 seconds and the device will turn off.
- If you do not use the device within one minute of power up, it will turn off automatically.
A cable with three functions:
USB cable with TV output:
- It can be inserted into the computer to load the device and transmit the data.
- It can be plugged into a TV screen.
- Can be inserted into an external DV 5V charger.
Video 720p without flash:
Press the ON/ OFF button to turn on the device, the blue light will tum on indicating that the device is on. Press the MODE button, the blue light will blink 3 times and video recording will start at 720p. Continuous segments of video will be recorded in 5-minute cycles, and pressing MODE again will stop the recording, leaving the blue light still indicating the stand-by mode.
Video 1080p without flash:
With the device in stand-by and with the blue light fixed, hold down the MODE button, the blue and red lights will tum on indicating the video mode at 1080p. Pressing MODE again, the blue light will disappear and the red light will blink three times indicating that the recording starts. 5-minute video segments will be recorded cyclically. Pressing MODE again will stop the recording and return to the stand-by mode.
12 million pixel photos:
In stand-by mode, press MODE twice in a row and a steady red light will come on. Press the button again to take a picture of 12 million pixels (4032×3024) that will be saved automatically.
Open and close infrared light:
Open: In stand-by mode, press and hold the ON/ OFF button for 2 seconds, the red light will blink twice and the infra red night-vision lamp will open to record.
Close: With the infrared light on, press and hold ON / OFF for 2 seconds, the red light will blink three times and the infrared will turn off.
Motion detection mode (720P-1080P):
Motion detection at 720p: in stand-by mode, hold the MODE button for 3 seconds and the red light will flash, entering video mode with motion detection at 720p. When motion is detected, the camera will record 5-minute video cycles that will be saved without being overwritten. When there is no movement the camera will remain in stand-by until the battery is exhausted or the TF card is full.
1080p Motion Detection: With blue and red lights on, displaying the video mode at 1080p, hold down the MODE button for 3 seconds and both lights will flash indicating that they are entering motion detection mode. When motion is detected, the camera will record 5-minute video cycles that will be saved without being overwritten. When there is no movement the camera goes into standby until the battery runs out or the TF card is full.
Filling in recordings:
With the TF card inside, by inserting an external USB TV cable, or an external SV USB charger, the device will enter directly into video mode at 720p and can record on the card whether or not it has a battery. You can also stop recording or switch to another mode.
TV out mode:
By connecting the USB-TV cable, when you boot the device you can view the images on the TV screen, as well as take pictures, record videos or activate motion detection.
Reset:
When the device hangs or the buttons do not function, you can use a fine, sharp object in the reset hole to reset the device. Then it should work normally.
Off:
When in video, picture or motion detection mode and you want to turn the device off, press and hold ON/ OFF for 6 seconds and you will see how the blue and red lights turn off, indicating that the device has turned off.
When in stand-by without using any function for more than 1 minute, the device will automatically turn off.
Change the time:
From the desktop of your computer, right click with your mouse and select new text document 
In the bet, enter the date and time following the format: Year-Month-Day-Hour-Minute-Second, and followed by Y or N depending on whether you want to see the date and time in the image or not.
For example: 20150908182568 And (see date in image) OR
20150908182568 N (date not shown in image).
Then save the file named TIMERSET 
Then disconnect the cable and touch any button to activate the date and time stamp.
Notices:
a. Please be sure to confirm that you have inserted a TF or MicroSD card into the device or it will not work normally.
b. In normal and sufficient conditions of light the camera must be at least 50cm of the target to be recorded for a correct and stable image, with clear scenes and natural colors.
Connect to your computer:
Both off and standby the camera can connect directly to the computer and function as an external disk from which you can copy, paste or delete files.
When you connect the device to the USB port on your computer, an external disk icon appears after a few seconds.
The blue light will indicate that the device is ready for data transmission, and the red light will indicate that it is being charged and the latter will be extinguished when the charge is complete.
Reminder:
a. After connecting the device to the computer, if the computer can not identify it or the corresponding icon does not appear after 30 seconds, please unplug it and try again.
b. We suggest using a TF card reader to play the video files, or pass them to the computer. If executed by direct USB connection from the same camera, the video playback will be choppy due to the very large data volume and limited data transmission.
Product Parameters
| PARAMETER | RELEVANT CHARACTERISTICS |
| Video format | AVI |
| Video encoding | M-JPEG |
| Video Resolution | 1280x720P 1920x1080P |
| Frame rate | 30fps |
| Playback software | Standard video players |
| Image format | JPG |
| Aspect ratio | 4:3 |
| Operating Systems | Windows ME/2000/XP/2003/Vista, MacOS and Linux |
| Battery capacity | 200mAH |
| Time of use | About 100 minutes |
| Changing Voltage | DC-5V |
| Interface | MiniUSB 8 pin |
| Storage | TF Card |
| Battery Type | High-Capacity lithium Polymer |
Note:
After each use you must recharge the battery. It takes 2·3 hours to fully charge it, the blue and red lights will turn on after 30 minutes but you should let it fully charge.
Because this product records in high quality HD mode, the power consumption is higher than usual. The product is also manufactured with a zinc alloy housing, so when using the product it can be heated. This is a normal phenomenon that does not mean any malfunction. All our products are tested thoroughly before distributing them.
Important Notices
- Use with caution: Please always comply with the legal regulations of your country and do not use this device for illegal purposes. Otherwise, the responsibility will be solely on you.
- Temperature of use: Please use the device in normal temperatures, do not use it in temperatures that are not tolerable for a human being.
- Humidity: Please use the product in environments with normal humidity and acceptable for humans. Do not use in excessively humid environments, or expose it to rain or water, this product is not waterproof.
- Lighting: please use the device in normal light conditions, do not use excessively powerful light sources or focus the camera directly in the sun to avoid damage to the optical elements of the device.
- Cleaning: Do not use the device in dusty environments to prevent dust from entering or damaging lenses or internal components.
- Waste treatment: please take care of the environment and do not throw this product. Never throw it into the fire as it may explode.
TECHNICAL SERVICE : http://imperiielectronics.com/index.php?controller=contact
![]()
