

ingenico Move 5000 Payment Terminal User Guide
GETTING STARTED
- Set up your base unit in a convenient location close to a power source and an Ethernet socket.
- To connect the Ethernet cable, connect one side to your Ethernet socket or router and the other side to the socket located on the rear of your base unit.
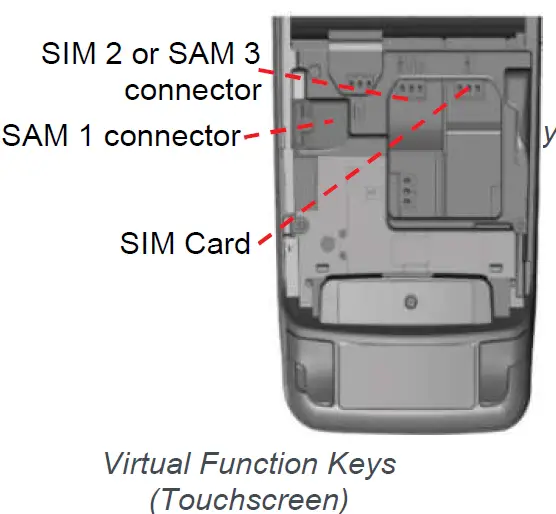
- To connect the base unit to a telephone point, remove the back panel as shown in the diagram. Connect one end of the telephone cable to the modem socket on your base unit

Connectivity
The Move/5000 is a Multi-Comms terminal meaning you
can connect via Ethernet, Mobile Network or
WiFi/Bluetooth.
To setup a mobile connection on the terminal, you simply need to insert the SIM card into the back of the Terminal
and reboot using the dot key and yellow key.
Function Keys
Virtual Function Keys: These appear on the Touchscreen interface when they may be used as shortcuts eg. F1 to print a duplicate receipt.
Menu key: To enter the application menus press the Menu key from the idle (READY) screen. Pressing the key again moves to the next menu (if available).
Correction keys: When entering numbers or letters, the yellow key deletes one character at a time; while the red key deletes the entire line (this key also cancels transactions). Confirmation key: The green key is used to confirm anything that has been typed into the terminal.
Paper feed key: To test the feeding of the paper through the printing press and hold the paper feed key.

BLUETOOTH BASE SETUP
Bluetooth terminals should already be paired with the base unit provided; your terminal can only use the telephone and Ethernet connections when it is paired to the base unit.
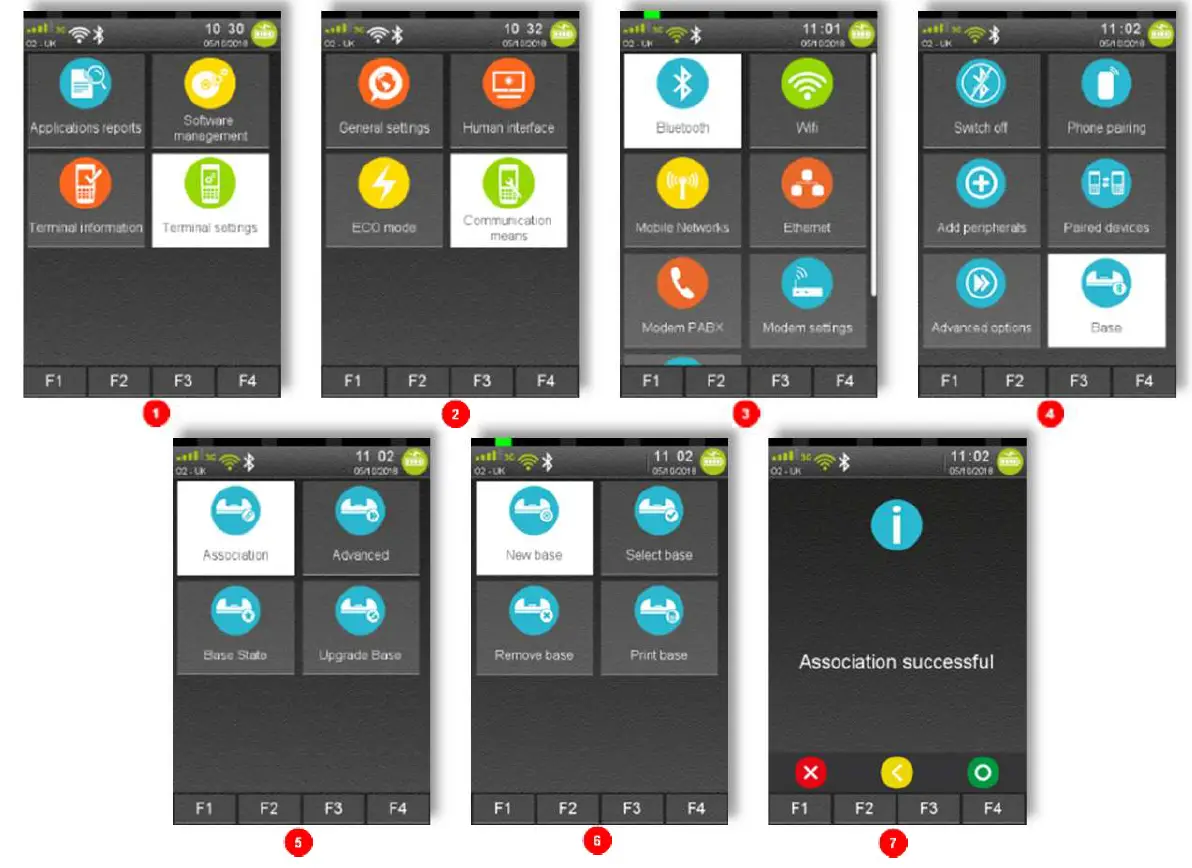
To associate your terminal to a Bluetooth base go to Terminal Control panel by pressing F3 key on the ‘Ready’ screen, then select as follows: ‘Control Panel’, ‘Terminal Settings’, ‘Communication means’, ‘Bluetooth’.
Once in Bluetooth configuration select ‘Base’, ‘Association’ and ‘New Base’.
Please find the full process shown below:
WI-FI SETUP
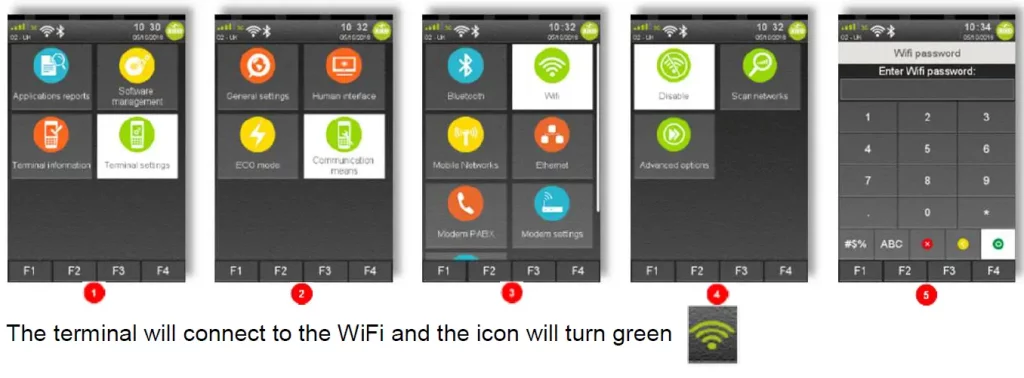
To connect to WiFi, press F3 and then select ‘Control Panel’. Then select ‘Terminal settings’ ‘Communication Means’, ‘WiFi’, ‘Scan Networks’, ‘Choose your selected Network’, ‘Enter Password’.
The terminal will connect to the WiFi’and the icon should turn green
Follow the steps shown in the images to choose a network.
 WARNING
For security reasons, the Wi-Fi network has to comply with the PCI DSS v2 Wireless Guidance.
The Wi-Fi service will refuse to create profiles for unsecured networks (open or WEP networks).
Please note: login via landing pages is not supported (For networks that require login via web page)
Once all 3 are methods are connected, you will then see them enabled (green) in the bar below

SUPERVISOR PASSWORD
The default supervisor password is 01483.
Please note: The terminal will require you to change this to a new code of your choosing before you can process any transactions.
THE CHIP CARD READER
Customer cards must be inserted as shown, with the chip upwards. Push the card fully into the slot below the keypad and follow the instructions on screen.
If you see a “BAD READ” message, check the card orientation and try again. After three bad reads the terminal will prompt you to swipe the card.
DO NOT remove the card until instructed to do so b the terminal.

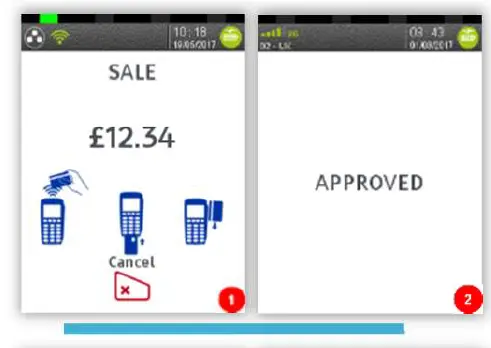
CHIP & PIN TRANSACTIONS – SALE
From the idle screen, insert the customer’s card into the card reader. Enter the sale amount for the transaction and press the green key. For example enter £12.34 as 1234.
The customer must enter their PIN code.
NEVER ASK THE CUSTOMER TO DIVULGE THEIR PIN CODE
After the customer has entered their PIN and pressed the green key they will be prompted to return the terminal to you. The terminal will now connect to the acquirer for authorization, if the transaction is authorized then an “AUTH CODE” will be shown. The terminal will print two receipts. The merchant copy will be printed first, then once you press the green key, the customer
copy will be printed.

CHIP & PIN TRANSACTIONS – REFUND
From the idle screen, press the menu, then choose “REFUND”. Enter the Supervisor’s password and confirm with green key. Now insert the customer’s card into the card reader. Enter the refund amount for the transaction and press the green key.
The terminal will now connect to the acquirer for authorization, if the refund is authorized then “REFUND ACCEPTED” will be shown.
The terminal will print the merchant copy which the customer
must sign. Remove the card.
Check the signature on the merchant copy with that on the card. If the signature is valid then choose “YES”, otherwise choose “NO”. The terminal will then print the customer copy.

TRANSACTION RECEIPT – (MERCHANT COPY – CHIP & PIN CARD)
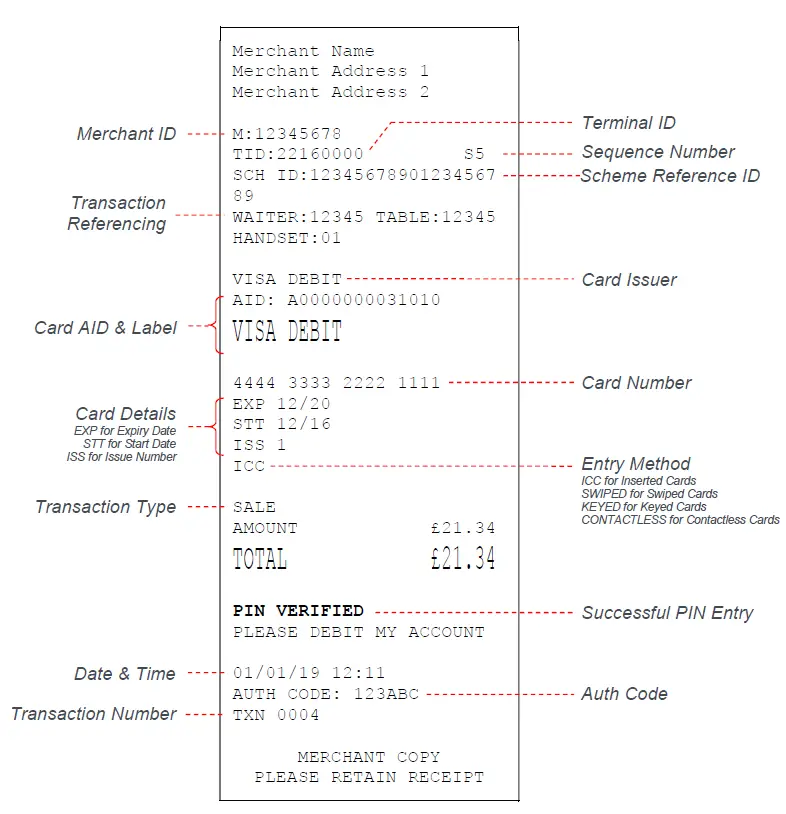
Please refer to the user guide for other examples of transaction receipts.
CONTACTLESS – SALE
From the idle screen, enter the sale amount for the transaction and press the green key. For example enter £12.34 as 1234. If you make a mistake, press the clear key and re-enter the amount.
The cardholder should present their card/payment device
against the contactless symbol on the terminal display.
The terminal will now print the merchant receipt.
Note: If the customer requests a receipt this must be done before the next transaction takes place. From the idle screen press the (F1) key to print a duplicate receipt
MAIL ORDER TRANSACTIONS – SALE
Press the menu key, then “MAILORDER”. Choose either “REFUND” or “SALE”. When prompted type in the customer’s card number and confirm by pressing the green key.
Enter the expiry date, the start date (if required), the issue number (if required), pressing green key after each entry.
Enter the card security code (CSC), the numbers from the cardholder’s postcode (e.g. GU7 1LG is 71), and the numbers from the cardholder’s address (e.g. Flat 1, 28 High Street is 128), pressing green key after each entry.
If you do not know any of these then you can press green key without entering anything to bypass the check when appropriate.
Enter the sale/refund amount and press green key.
The terminal will connect to gain authorisation and will prompt you to choose “Decline” or “Accept”, the result of the CSC/AVS check is then shown. The terminal will print off the two receipts.

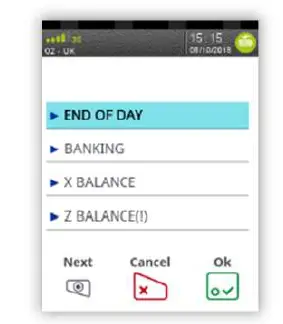
END OF DAY REPORTS
To access the reports menu press the menu key twice, then “REPORTS”. Enter the Supervisor password and press green key. END OF DAY: One touch function that prints both the “Z REPORT” and the “BANKING” report. This MUST be done at the end of each day that you trade.
BANKING: Indicates total value of transactions that have been processed and shows that the totals have been confirmed by the acquirer. X REPORT: Shows the breakdown of transactions in different ways enabling you to check off against individual receipts and the “BANKING” report. Z REPORT: Exactly the same as the “X REPORT”, except that the “Z REPORT” resets the totals ready for the next day’s trade.
CHANGING THE PAPER ROLL
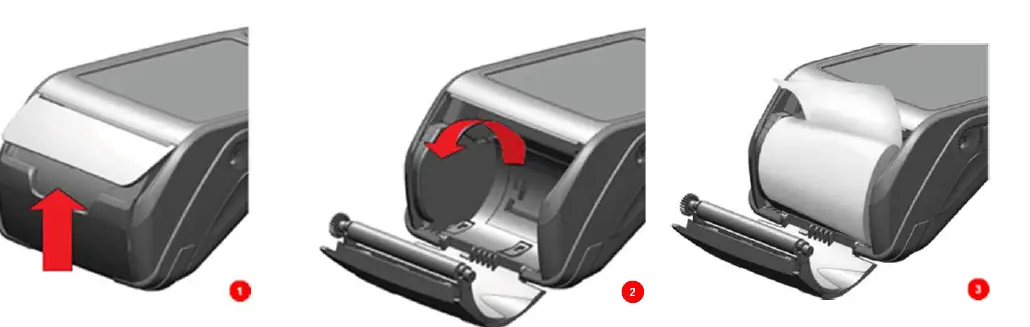
Hold the terminal securely in one hand. With the other hand, and by using two fingers, lift the printer cover release as shown. Fully open the printer cover and remove the old roll of paper.
Unstick the end of the new roll, leaving the end free, hold the paper roll and carefully place into the printer compartment.
Holding the free end of the paper and the terminal, close the printer cover and push it firmly until it locks. While your terminal is displaying the idle screen, press and hold the paper feed key to ensure that the paper feeds correctly.
ONLY OPEN THE PRINTER COVER AS SHOWN – DO NOT FORCE THE PRINTER COVER
TIPS AND ADVICE
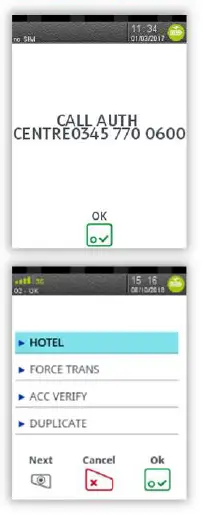
- REFERALS: If the terminal displays “CALL AUTH CENTRE” or “PLEASE WAIT” with a telephone number, then you must refer the transaction and phone for authorisation for that card.
- PIN TRIES EXCEEDED: If the terminal displays this message then the cards PIN has been locked by the cardholder. They must contact their card issuer or use an ATM to unlock the PIN if they know the PIN.
- DUPLICATES: To print a duplicate of the last transaction processed press the menu key three times, then select “DUPLICATE” and press green key.
Copyright © 2021 Ingenico (UK) Ltd
This Quick Start Guide relates to Move5000 Tetra terminals – TMS/MATSU software Whilst every effort has been made to ensure that the content of this document is accurate, Ingenico will not accept responsibility for any loss, damage or injury that may be incurred as a result of any errors or inaccuracies. The product is varied to suit requirements and as such some features may vary or be disabled. This document should be accepted as a guide only to the use of the product. In the effort for continued improvements in design and quality, products features and information regarding setting up, installation and use of all Ingenico products is subject to change without prior notice.
FAQS
What is Ingenico payment terminal?
Ingenico’s desktop range was designed to allow merchants to accept all payment methods and enhance the consumers’ point of sales experience. With their limited footprint and high reliability, our desktop terminals can easily be integrated on a counter and meet the needs of even the most demanding situations.
What is terminal ID or ATM ID?
A Terminal ID (TID) is a unique identifier that can be used to identify the source of the transaction. TIDs can be used in a Card Present as well as a Card Not Present (ecommerce) set up.
What is merchant Key?
Merchant Key – This is a unique secret key used for secure encryption of every request. This needs to be kept on server-side and should not be shared with anyone.
What is merchant name?
Merchant is an Anglo-Saxon surname, meaning a merchant or trader, and was originally given as an occupational name to a buyer or seller of goods. It is shared by the following people: Ajit Merchant (died 2011), Indian composer. Ali Merchant (born 1988), Indian actor. Andy Merchant (born 1950), American baseball player.
What is a merchant transaction?
Merchant Transaction means the purchase by a cardholder of goods or services from a Merchant by use of a Bank Card.
What do you put in a merchant name?
If a merchant’s full name is not customarily displayed to customers, the shorter, advertised version should be the merchant name for Visa receipts and processing. Merchant names longer than 25 characters (including letters, spacing and symbols) will not fit in the Merchant Name field and must be abbreviated.
How do I find my ATM ID number?
Step 1: Look up from the ATM slip, which you received upon withdrawing some cash from an ATM. Step 2: Scan the ATM slip properly and diligently to find out the ATM slip number. Usually, all the ATMs have it at the top right corner in the ATM slip.
How does a merchant account work?
A merchant account is a type of business bank account that allows businesses to process electronic payments such as debit and credit cards. The merchant account acts as the middleman between the swiping of the card and the deposit of the money into a business account.
What are cash codes?
cash code means an identifier (within the meaning of the ePayments Code) which we issue to you on your request which is to be used to make Cardless Cash withdrawals.
How can someone use my debit card without having it?
Fraudsters can get ahold of your card details in a few different ways—one of them being through an ATM card skimming device. Nefarious parties can also gain access to old bank statements or debit cards, or direct you to make a payment on a fraudulent website that collects your details
How do thieves steal card numbers?
Thieves install skimmers on ATMs, gas pumps, and other publicly available card readers. Shimmers are the natural evolution of card skimmers. But instead of stealing data from your card’s magnetic strip, they go inside the reader and steal your chip information.
How do hackers get your debit card number?
Identity thieves can retrieve account data from your card’s magnetic strip using a device called a skimmer, which they can stash in ATMs and store card readers. They can then use that data to produce counterfeit cards. EMV chip cards, which are replacing magnetic strip cards, can reduce this risk.
Where should you never write your debit card PIN?
Always memorise your PIN. Never write your PIN on your card – even if you somehow disguise the number, and don’t store your PIN in something like a wallet or purse that could be lost or stolen along with your card. Here’s how to pick a rock solid PIN to protect your cash.
What do credit card thieves buy?
So what do fraudsters do with stolen credit card information? It’s valuable data, so many sell it to someone else. If they do use it for themselves, they may buy anything from physical, luxury items and electronics, to online goods like video game credits and business services. Gift cards are a popular choice.
Who pays when a credit card is used fraudulently?
Liability rests with the bank that issued the cardholder’s card, and if the purchase is later deemed to be fraudulent, the merchant is not responsible for refunding the customer.
Where do I find my PIN number?
If you forgot the debit card PIN, you may be able to find it on a letter that your bank sent around the time you got the card. Otherwise, you’ll need to contact your bank to find out which options they provide for recovering or changing the number.