Setup Guide

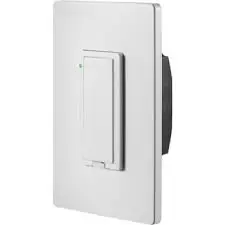
INSIGNIA NS-CH1XS8/ NS-CH1XIS8 Smart In-Wall Switch
We recommend that you use a professional electrician to install the in-wall switch. For information about electrical specifications, see ELECTRICAL REQUIREMENTS.
PACKAGE CONTENTS
- Smart In-Wall Switch
- Face plate
- Mounting screws (2)
- Wire nuts (4)
- Quick Setup Guide
FEATURES
- Remotely control a light with a smartphone or tablet
- Set schedules and timer to automate your home
- Designed for quick installation
- Insignia Connect app (for Apple and Android) controls your home devices
SYSTEM REQUIREMENTS
- Home Wi-Fi network
- Insignia Connect app (free download at connect.bestbuy.com/setup) The Insignia Connect app tracks status information for all your Insignia smart home devices in one place. Signing into a Best Buy account is required for remote access and to keep your data secure.
- To control this HomeKit-enabled accessory, iOS 10.3.2 or later is recommended Compatibility: iOS 10.3.2 or later Android 6.0.1 Marshmallow or later
ELECTRICAL REQUIREMENTS
You must have:
- A neutral wire inside your light switch’s wall box
- A light that can only be controlled by one switch
OTHER SMART HOME APPS
You can also control your Smart switch with the Amazon Alexa (not available in Canada), Google Assistant, or Apple Home app. Follow the instructions provided with these apps to connect.
Your HomeKit Code:
Both the Insignia Connect app and Apple Home apps provide HomeKit functionality and Siri support. Controlling this HomeKit-enabled accessory automatically and away from home requires an Apple TV with tvOS 10.2.2 or later and iPad with iOS 10.3.1 or later set up as a home hub. The Insignia Connect app will let you control your smart plug anywhere.
YOU’LL NEED:
- Screwdriver
- Electrical tape
SAFETY INFORMATION
- Install and/or use in accordance with appropriate electrical codes and regulations.
- Exercise extreme caution when installing the device and always turn off electrical power at the main circuit breaker before removing or installing devices.
- The controllable in-wall switch should only be connected and used to control lighting and never used to supply power to, or control the on/off status of any other equipment.
- The in-wall switch is intended for dry, indoor use only.
INSTALLING YOUR SWITCH
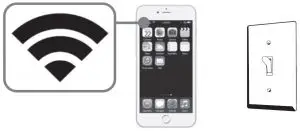
- Before installing, connect a mobile device to your Wi-Fi network, then hold it next to where you plan to install your new switch. Make sure that the Wi-Fi signal is strong at that location before continuing.
- WARNING: DISCONNECT POWER. Turn off power at the circuit breaker. Failure to do so can result in severe injury or death.
- Remove the old switch’s wall plate and mounting screws.
- Pull the old switch from the wall box and identify the wires attached to it:
• Neutral wire – Usually inside the wall box with a wire nut on the end. Not all light switches have this wire. DO NOT install the switch without this wire. This wire is typically white.
• Line wire – Typically a black wire that often comes from the bottom of the wall box.
• Load wire – Typically a red or black wire that often comes from the top of the wall box. This is the wire that connects to your light.
• Ground wire – Normally a copper or green color. You can still install the switch if you don’t have this wire.
Tip: Take a picture of the old switch’s wiring for later reference. - Disconnect your old light switch.
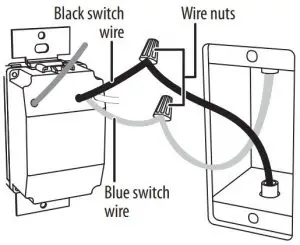
- Use a wire nut to connect the black wire from your switch to the line wire (typically black) in the wall box. This wire must always have power to it.
- Use a wire nut to connect the blue wire from your switch to the load wire in your wall box (typically a red or black wire).
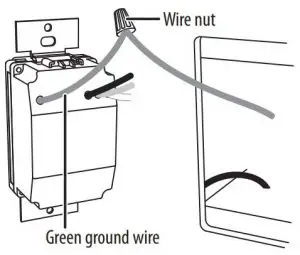
- If you have a ground wire, attach it to your switch’s green wire with a wire nut.
 OR
OR
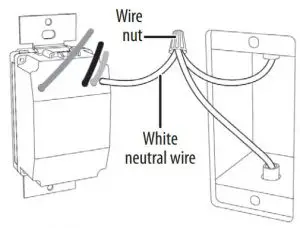
If you don’t have a ground wire, cover your switch’s green wire with a wire nut or electrical tape. - Unscrew the wire nut holding the neutral wires (typically white) together, add the switch’s white neutral wire, then screw the wire nut back on.
- Wrap electrical tape around the wire nuts to make sure that the conductors are covered.
- Push the wires back in and to the sides to clear room for the switch.
- Screw the switch into the wall and attach the wall plate.
Notes:
• If your switch is installed in a row of multiple switches, you will need to purchase a new face plate.
• Metallic wall plates may block the Wi-Fi signal from the switch. - Turn your circuit breaker on. The switch’s LED blinks green.
SETTING UP YOUR IN-WALL SWITCH
Install your switch before following these instructions.
- Connect your mobile device to a Wi-Fi network.
- Type connect.bestbuy.com/setup in the search bar of your device’s browser and follow the on-screen instructions to download the app.
- Open your app and follow the on-screen instructions to complete setup.
Note: If you plan to access your switch on multiple devices, you must sign into the same Best Buy account.
USING YOUR SWITCH
USING YOUR APP
Use your Insignia Connect app to:
- Control lights remotely
- Set schedules and a timer
SPECIFICATIONS
- Dimensions (W×H×D): 1.69 × 2.64 × 1.68 in. (43 × 67.1× 42.7 mm) (not including mounting yolks)
- Electrical Rating: 15A, 120V AC, 60Hz
- Resistive: 1800W
- Tungsten: 960W
- Electronic Ballast: 500VA
- General Use
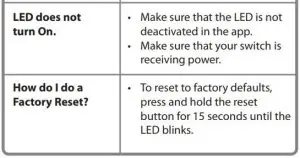
TROUBLESHOOTING


LEGAL NOTICES
FCC Statement
This device complies with Part 15 of the FCC Rules. Operation is subject to the following two conditions: (1) this device may not cause harmful interference, and (2) this device must accept any interference received, including interference that may cause undesired operation. Any changes or modifications not expressly approved by the grantee of this device could void the user’s authority to operate the equipment.
FCC Caution
Changes or modifications not expressly approved by the party responsible for compliance could void the user’s authority to operate this equipment.
Note: This equipment has been tested and found to comply with the limits for a Class B digital device, pursuant to Part 15 of the FCC Rules. These limits are designed to provide reasonable protection against harmful interference in a residential installation. This equipment generates, uses, and can radiate radio frequency energy and, if not installed and used in accordance with the instructions, may cause harmful interference to radio communications.
However, there is no guarantee that interference will not occur in a particular installation. If this equipment does cause harmful interference to radio or television reception, which can be determined by turning the equipment off and on, the user is encouraged to try to correct the interference by one or more of the following measures:
- Reorient or relocate the receiving antenna.
- Increase the separation between the equipment and receiver.
- Connect the equipment into an outlet on a circuit different form that to which the receiver is connected.
- Consult the dealer or an experienced radio/TV technician for help.
CAUTION:
To assure continued FCC continued FCC compliance: Any changes or modifications not expressly approved by the grantee of this device could void the user’s authority to operate the equipment.
Industry Canada Compliance
IC Statement
This device complies with Industry Canada’s licence exempt RSSs.
Operation is subject to the following two conditions:
- This device may not cause interference; and
- This device must accept any interference, including interference that may cause undesired operation of the device.
This equipment complies with IC radiation exposure limits set forth for an uncontrolled environment. This equipment should be installed and operated with minimum distance 20 cm between the radiator and your body.
CAN ICES-3 (B) NMB-3(B)
Use of the Works with Apple HomeKit logo means that an electronic accessory has been designed to connect specifically to iPod touch, iPhone, or iPad, respectively, and has been certified by the developer to meet Apple performance standards. Apple is not responsible for the operation of this device or its compliance with safety and regulatory standards.
ONE-YEAR LIMITED WARRANTY
Visit www.insigniaproducts.com for details.
CONTACT INSIGNIA:
For customer service, call 877-467-4289 (U.S. and
Canada) or 01-800-926-3000 (Mexico)
www.insigniaproducts.com
Apple and the Apple logo are trademarks of Apple Inc., registered in the U.S. and other countries. App Store is a service mark of Apple Inc. Google Play and the Google Play logo are trademarks of Google Inc.
INSIGNIA is a trademark of Best Buy and its affiliated companies
Distributed by Best Buy Purchasing, LLC
7601 Penn Ave South, Richfield, MN 55423 U.S.A.
©2017 Best Buy. All rights reserved
Made in China