![]()
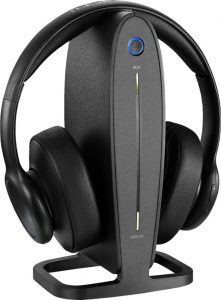
INSIGNIA NS-HAWHP2 Digital Wireless Headphones

INSIGNIA NS-HAWHP2 Digital Wireless Headphones
Before using your new product, please read these instructions to prevent any damage.
![]()
- Go to www.insigniaproducts.com.
- Use the search bar to find NS-HAWHP2.
- Select Support & Downloads.
- Next to User Guide, select the language you want.
PACKAGE CONTENTS

FEATURES
- Listen to your TV or music wirelessly without disturbing others
- Works with all of your audio components (TV, CD/DVD Player, MP3 Player, Mobile device)
- Strong 5.8 GHz digital wireless signal up to 33 feet (10 m)
- Built-in lithium ion rechargeable battery with convenient docking station
- Lightweight, comfortable over-the-ear design, fully adjustable headband
- Available digital optical input for best sound quality

SETTING UP YOUR HEADPHONES
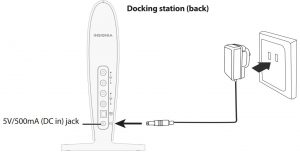
Powering the docking station
- Connect one end of the AC power adapter to the docking station’s 5V/500mA (DC in) jack and the other end to a power outlet.
- The Power/Pairing indicator on the docking station begins to blink (blue).
NOTES:
- To enter standby mode: Press and hold the

- To enter normal mode: Press the
OR
Place the headphones onto the docking station’s charging contacts. The Power/Pairing indicators turn solid red while the headphones are charging.

Charging the headphones
Important: Before using the wireless headphones for the first time, make sure that the batteries are charged for at least four hours. The docking station Power/Pairing indicator turns solid green when the batteries are fully charged.
- Connect one end of the AC power adapter to the docking station’s 5V/500mA (DC in) jack and the other end to a power outlet. The Power/Pairing indicator on the docking station blinks (blue).
- Place the headphones onto the docking station. Make sure that the headphone charging contacts and the docking station charging pins make contact when you put the headphones in the charging station.
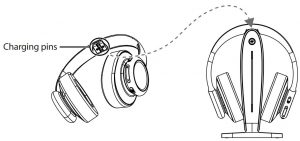
- The indicators on the docking station and the headphones turn solid red to indicate the headphones are charging.
- When the headphones are fully charged, the docking station Power/Pairing indicator turns solid green and the Power/Pairing indicator on the headphones turns off.
- When the headphone battery charge is low, the Power/Pairing indicator on the docking station blinks red three times every minute.


Notes:
- It can take up to two hours to charge the batteries. The batteries can last up to ten hours with continuous use (depending on the headphone volume level and distance from the docking station).
- The headphones cannot be charged when the docking station is unplugged.
- If the charge on the headphone batteries is low, the Power/Pairing indicator on the headphones blinks red. You should charge the headphones.
- The headphones will automatically power off if the battery is not charged after emitting a low-battery warning.
CONNECTING THE HEADPHONES
Locate the AUDIO OUT port on your audio source device, such as a TV, stereo system, home theater, smartphone, computer, or tablet. Choose the connection option below that fits your audio source device.

TIPS:
- TV speakers may continue to produce sound or may be muted, depending on the settings on your TV. Refer to your
- TV’s user guide for more information.
- To get sound from all devices connected to your TV, you will need to connect to an audio out port on the TV. If you connect to another source device, you will only get sound from that device.
– PICK ONE –
OPTICAL connection
- Connect one end of an optical cable to the DIGITAL OPTICAL IN jack on the docking station.
- Connect the other end into the OPTICAL OUT jack of your TV or any other audio source device with optical audio output.
TIP: To get optical audio output from your TV, you must change your TV’s audio format to PCM. Refer to your TV’s user guide for more information.

RCA connection
- Connect one end of the RCA cable to the red and white AUDIO IN ports on the docking station.
- Connect the other end into the red and white AUDIO OUT ports on your audio source device.

– OR –
3.5 mm connection
- Connect one end of the RCA cable to the red and white AUDIO IN ports on the docking station.
- Connect the other end into the red and white connectors on the 3.5 mm-RCA adapter cable.
- Connect the 3.5 mm audio cable into the 3.5 mm headphone or AUDIO OUT jack on your audio source device.

– OR –
Multiple connections (Optional)
If your audio source device (a TV in the example shown) only has one audio output, but you want to connect it to both the docking station and a stereo system or home theater, do this.
- Connect one end of the RCA cable (included) to the red and white AUDIO IN ports on the docking station.
- Connect the other end to the red and white AUDIO OUT ports on your audio source device.
Note: Use the 3.5 mm-to-RCA cable adapter to connect to a headphone jack, if necessary. - Connect one end of an RCA cable (not included) to the red and white AUDIO OUT ports on the docking station.
- Connect the other end to the red and white AUDIO IN ports on your stereo system or home theater. The audio should now play through your home theater speakers.

USING YOUR HEADPHONES
Turning on and pairing your headphones
- Connect the AC power adapter to the 5V/500mA (DC in) jack. The Power/Pairing indicator on the docking station blinks (blue).
- Press and hold (for more than two seconds) the

-OR If the headphones are on the docking station, they will be powered on when you take them off the station.
- When the Power/Pairing indicator on the headphones and the Power/Pairing indicator on the docking station turns solid blue, an active link is established between the headphones and the docking station. Your headphones are ready to use.
- To change the audio input to match the device connected to the docking station:
• Press the
• Press and hold the
The selected source indicator lights white.

Listening to your headphones
- Turn on the headphones. Make sure that your docking station and headphones are wirelessly paired.
- Set the headphone volume level to the minimum.
- Put your headphones on your head. Adjust the fit until you feel comfortable.
- Turn on your audio source and begin playback. Depending on the audio source, you may need to turn up the volume on the audio source.
- Adjust the headphone volume to your normal listening level.
Caution: Continuous use at high volume may permanently damage your hearing.
Notes:
- If the system is connected to a TV, you may want to turn off the TV speakers. Refer to your TV manual.
- If the docking station does not have audio input for more than 15 minutes, the headphones will power off automatically.
- If the headphones are unpaired from the docking station for more than 15 minutes, the headphones will power off automatically.
- If the docking station is unpaired for more than five minutes, the docking station LED will turn off.
Turning off your headphones
Press and hold (more than two seconds) the 
Note: Turn the headphones off when not in use to conserve the battery.
Turning off your docking station
Disconnect the AC power adapter to turn off the docking station.
TROUBLESHOOTING
No power
- Make sure that the headphones’ battery is charged.
- Make sure that your headphones are turned on.
No sound or low volume
- Shorten the distance between the docking station and your source device.
- Make sure that your source device is turned on.
- Turn up the volume on your headphones and source device. Make sure that your source device is not muted.
Cannot pair the headphones
- Shorten the distance between the docking station and your headphones.
- Make sure that the docking station is in pairing mode.
- Turn on the docking station, then place the headphones onto the station. They will enter auto pairing mode (this may take 2-20 seconds).
Tip: If the power indicators on the headphones and docking station continue to blink after 20 seconds, they are no longer paired to each other. If this happens, follow these steps:
- Make sure that the headphones and docking station are within range of each other (ideally in the same room).
- Turn off the headphones and the docking station.
- Turn on both the headphones and the docking station. The lights will initially blink, then turns solid blue when connected.
SPECIFICATIONS
- Headphone dimensions (H × W × D): 7.5 × 3.0 × 6.7 in. (191.2 × 76.8 × 171.2 mm)
- Docking station dimensions (H × W × D): 8.5 × 3.8 × 4.7 in. (214.7 × 96.5 × 119.9 mm)
- Input: AC 100-240V~ 50/60 Hz 0.3 A
- Output: 5V, 500mA
- Battery Life: Up to 10 hours
- Range: 33 feet (10 m)
- Charging time: 2 hours
- Audio resolution: 48Khz @ 24bits
- Audio Source Port:
- Analog: RCA *1
- Digital: Optical *1 PCM (does not support DTS and Dolby Audio)
LEGAL NOTICES
FCC statement
This device complies with Part 15 of the FCC Rules. Operation is subject to the following two conditions:
- this device may not cause harmful interference.
- this device must accept any interference received, including interference that may cause undesired operation.
FCC Caution: Changes or modifications not expressly approved by the party responsible for compliance could void the user’s authority to operate the equipment.
Note: This equipment has been tested and found to comply with the limits for a Class B digital device, pursuant to Part 15 of the FCC Rules. These limits are designed to provide reasonable protection against harmful interference in a residential installation. This equipment generates, uses, and can radiate radio frequency energy and, if not installed and used in accordance with the instructions, may cause harmful interference to radio communications.
However, there is no guarantee that interference will not occur in a particular installation. If this equipment does cause harmful interference to radio or television reception, which can be determined by turning the equipment off and on, the user is encouraged to try and correct the interference by one or more of the following measures:
- Reorient or relocate the receiving antenna.
- Increase the separation between the equipment and receiver.
- Consult the dealer or an experienced radio/TV technician for help.
- Connect the equipment into an outlet on a circuit different from that to which the receiver is connected.
RSS-Gen & RSS-210 Statement:
This device complies with Industry Canada license-exempt RSS standard(s).
Operation is subject to the following two conditions: (1) this device may not cause interference, and (2) this device must accept any interference, including interference that may cause undesired operation of the device.
RSS-102 Statement
This equipment complies with Industry Canada radiation exposure limits set forth for an uncontrolled environment.
ONE-YEAR LIMITED WARRANTY
- Visit www.insigniaproducts.com for details.
CONTACT INSIGNIA
For customer service, call 1-877-467-4289 (U.S. and Canada) or 01-800-926-3000 (Mexico)
www.insigniaproducts.com
INSIGNIA is a trademark of Best Buy and its affiliated companies.
Distributed by Best Buy Purchasing, LLC
7601 Penn Ave South, Richfield, MN 55423 U.S.A.
©2018 Best Buy. All rights reserved.
Made in China
FAQ’S
What is the difference between the docking station and the headphones?
The docking station is a wireless audio transmitter. It transmits audio from your TV, CD/DVD Player, MP3 Player, or Mobile Device to your headphones. The docking station is not a battery charger for the headphones.
How do I charge my headphones?
The docking station has a built-in lithium ion rechargeable battery. To charge your headphones, plug the AC power adapter into the docking station’s DC in jack and then into an electrical outlet. The Power/Pairing indicator on the docking station will begin to blink (blue).
How long does it take to charge my headphones?
It takes approximately 2 hours to fully charge your headphones. The Power/Pairing indicator on the docking station will turn off when the battery is fully charged. You can also check if they are fully charged by pressing and holding the Power button for 3 seconds. If they are fully charged, you will hear two beeps.
How long do my headphones last on one charge?
It depends on how often you use them and how loud you listen to them. On average, you can listen for up to 10 hours before needing to recharge them again. This can vary depending on volume level and usage patterns.
Can I use headphones with Insignia TV?
Connecting your headphones is easy; just place the headphones and TV in pairing mode, and they will connect. Now that you know you can hook up your favorite pair of Bluetooth headphones to your Insignia TV, you are probably wondering the best way to do it.
How do I connect my Insignia digital wireless headphones to my TV?
OPTICAL connection
Connect one end of an optical cable to the DIGITAL OPTICAL IN jack on the docking station.
Connect the other end into the OPTICAL OUT jack of your TV or any other audio source device with optical audio output.
How can I listen to my TV with wireless headphones?
And transmits it using bluetooth. So all you need to do is connect this to your television pair some Bluetooth headphones.
Where is the headphone jack on my Insignia TV?
Look at the back side of the Insignia TV. There is one audio output located towards the bottom of all the connection ports.
How do you put headphones in pairing mode?
So as you can see it’s quickly blinking blue that means that it’s in pairing. Mode. So really you just want to hold down the power button for about three to four seconds.
Why is Bluetooth not finding devices?
Even if Bluetooth is turned on, your phone itself might not be ‘discoverable’. This means that a Bluetooth device you haven’t yet paired cannot see your phone. To make it visible to other devices, open the main Bluetooth settings. On Android, phones remain discoverable so long as you stay on that screen
How do you reset Bluetooth headphones?
Unplug the headphones from their charging port. Press and hold the power button for 10 seconds. Wait for the LED light to blink to indicate that you have successfully reset your headphones.
Where is the power button on Bluetooth headphones?
It is the middle of the “3” that you are referring to. It’s great because all functions are on the same side. The middle button also acts as the “answer and hangup” button if you are choosing to connect to your phone.
INSIGNIA NS-HAWHP2 Digital Wireless Headphones
www://insigniaproducts.com/