INSIGNIA 4-Slice Toaster Oven
Introduction
Congratulations on your purchase of a high-quality Insignia product. Your NS-TO15SS0 represents the state of the art in toaster oven design and is designed for reliable and trouble-free performance.
IMPORTANT SAFEGUARDS
WARNING: To reduce the risk of fire or electric shock, do not expose this system to rain or moisture.
When using this appliance, basic safety precautions should always be followed:
- Read all instructions carefully before using your toaster oven.
- To protect against any electrical hazards, DO NOT place the unit or power cord in water or other liquids.
- Do not touch any hot surfaces. Use oven mitts for removing or touching any hot parts. Always place the toaster oven on heat-resistant surfaces. Use handles or knobs.
- Leave about 4–6 in. (10–15 cm) of open space around the exterior of the toaster oven.
- Unplug the unit from the outlet when it is not in use and before cleaning.
Always allow the toaster oven to cool before attaching or removing any parts. - Use of accessory attachments is not recommended by the appliance manufacturer because they may cause injuries.
- Do not let the power cord hang over the edge of a table or counter or touch a hot surface.
- Do not place the toaster oven inside of a heated oven or near a hot gas or electric burner.
- Do not use outdoors.
- Do not use your toaster oven if the cord or plug has been damaged or after your toaster oven has malfunctioned or been damaged in any other way.
Return your toaster oven to the nearest authorized service facility for repair or adjustment. - Store only the accessories that were provided inside of your toaster oven when it is not in use. Do not store any other materials.
- Do not put any items on top of the toaster oven when it is in use or place the toaster oven close to curtains, draperies, walls, or other flammable materials. A fire may occur if the toaster oven is covered or touching flammable material.
- Do not place any cardboard, paper, or plastic inside of the toaster oven.
- Make sure that all containers placed inside of the toaster oven are not airtight and have enough room to allow for expansion of fluids.
- Clean your toaster oven regularly. A buildup of grease may cause a fire.
- Do not clean your toaster oven with metal scouring pads. Pieces of the pad can break off and touch electrical parts, which increases your risk of electric shock.
- In order to prevent accidental burns, always use the handle and knobs to operate your toaster oven.
- Do not touch the exterior of the toaster oven when it is in use. The temperature of the door or the housing may be hot.
- Do not place oversized food or metal utensils inside of your toaster oven.
Doing so may result in a fire or in risk of electric shock. - Do not cover the crumb tray or any other part of the toaster oven with metal foil. This will cause the toaster oven to overheat.
- Use extreme caution when moving something containing hot oil or other hot liquids and when removing a tray or disposing of hot grease.
- Do not allow someone with reduced physical, sensory, or mental capabilities; someone with a lack of experience and knowledge; or children to use your toaster oven unless they have been given supervision or instruction regarding use of the toaster oven by a person that is responsible for their safety.
- Supervise children to make sure that they do not play with your toaster oven.
- Do not use an external timer or separate remote control system with your toaster oven.
- Do not touch hot surfaces to move or pickup your toaster oven, use the handles or knobs.
- Turn any knob to “OFF” before unplugging your toaster oven.
- Do not use your toaster oven for anything other than its intended use.
- Use extreme caution when handling objects that are not made of metal or glass.
- Close supervision is necessary when any appliance is used by or near children.
- To disconnect, turn any control to “OFF,” then remove plug from wall outlet.
CAUTION: HOT SURFACES
SAVE THESE INSTRUCTIONS
A short power cord is provided to reduce the risks of becoming entangled or tripping over a long cord. An extension cord may be used if care is exercised.
- If an extension cord is used, the marked electrical rating of the extension cord must be at least as great as the electrical rating of the appliance, and the longer cord should be arranged so that it will not drape over the countertop or tabletop, where it can be tripped over or pulled on by children.
- The power cord should only be repaired by a qualified electrician.
- This appliance has a polarized plug (one blade is wider than the other). To reduce the risk of electric shock, this plug is intended to fit into a polarized outlet only one way. If the plug does not fit fully into the outlet, reverse the plug. If it still does not fit, contact a qualified electrician. Do not attempt to modify the plug in any way.
Features
- Toast, bake, and broil functions let you cook meat, vegetables, bread, and other foods
- Two rack positions let you fit more items, including pizzas up to 9″
- Slide-out crumb tray makes cleanup easy
- Auto shut-off provides a safe way to cook
Package contents
- Toaster oven
- Food tray
- Wire rack
- Crumb tray
- User Guide
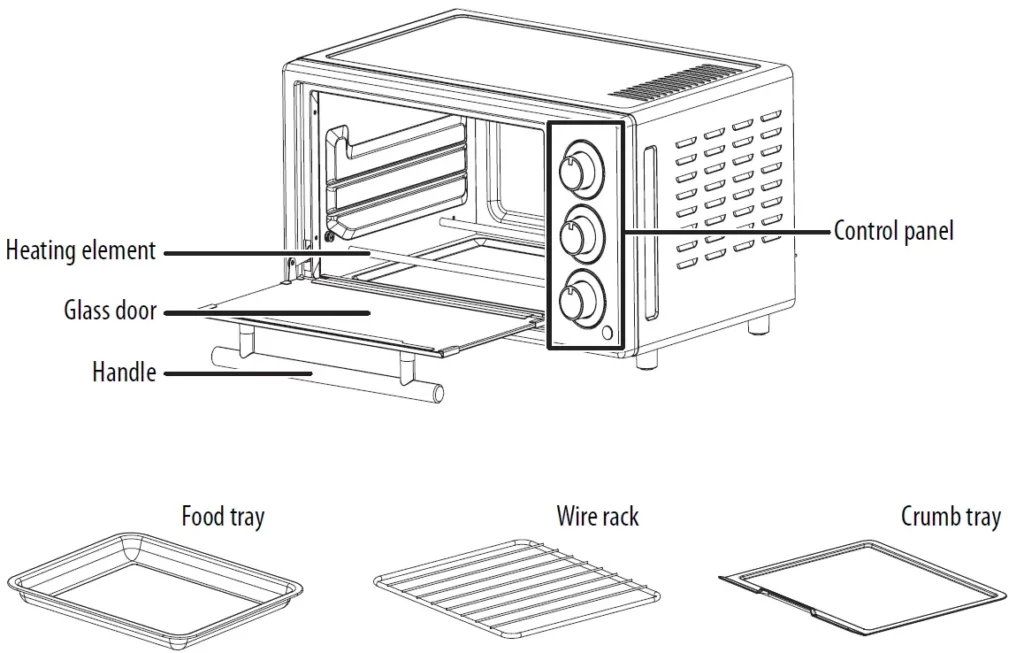
Components

Control panel
Before using your toaster oven
If you are using your toaster oven for the first time:
- Remove any stickers from the surface of the toaster oven.
- Open the oven door and remove all printed documents and paper from inside the toaster oven.
- Clean the rack and pan with hot water, dish soap, and a nonabrasive cleaning pad. DO NOT IMMERSE THE BODY OF THE TOASTER OVEN IN WATER.
- Dry the unit thoroughly before using.
- Place the toaster oven on a flat counter in an open area where the plug can reach a power outlet.
- Plug the power cord into a power outlet.
Note: During initial startup you may notice a slight smell and/or smoke. This is normal. Turn the temperature to max and let run for approximately five minutes.
WARNING: When your toaster oven is in use or cooling down, make sure that there is at least 6 inches (15 cm) between the toaster oven and any other surface (including cords). Make sure that the cord is not resting against the back of the toaster oven.
Using your toaster oven
- Place your food inside the toaster oven, then close the door.
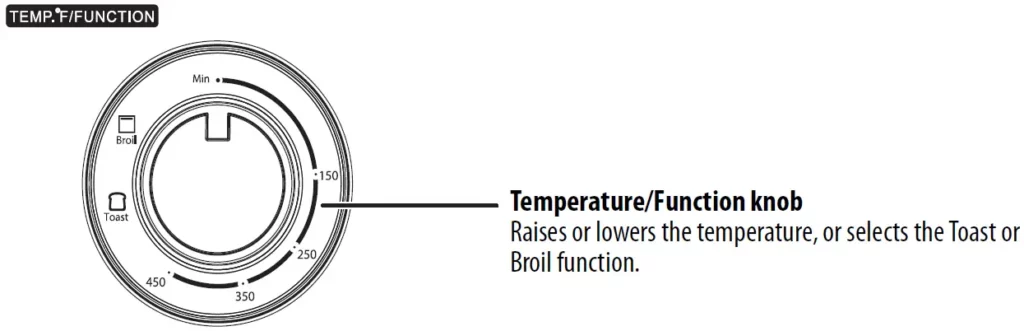
- Turn the TEMP.(°F)/FUNCTION knob to select a heat setting (Toast or Broil) or the temperature you need:
- Bake: Select a temperature between 150-450°F (65-232°C)
- Warm: Select 150°F (65°C)
- Defrost: Select 150°F (65°C)
- If you selected a temperature or Broil, turn the TIME Min knob to set the cooking time. Your toaster oven heats and the Power indicator lights.
- If the time is less than 15 minutes, turn the knob past the 15-minute mark, then turn it backward to the time you want.
- To turn on the toaster oven without a countdown, turn the Timer knob to Stay On.
When the timer reaches “OFF,” a bell rings, and the toaster oven turns off.
- If you selected Toast, turn the TOAST-TIMER knob to set the darkness of your toast. Your toaster oven heats and the Power indicator lights. If you select lighter toast, turn the knob past the halfway point, then turn it backward to the darkness you want. When the timer reaches “OFF,” a bell rings, and the toaster oven turns off.
- Open the door completely and remove your food.
Tip: Lighter breads and waffles need less toasting time. Darker breads, muffins, and English muffins need more time. Set the timer to the first toast icon for the lightest shade and the last toast icon for the darkest shade.
WARNING: The cooked food and metal rack may be very hot. Handle with care. Do not leave your toaster oven unattended.
Cleaning your toaster oven
- Turn the TIME Min and TOAST-TIMER knobs to OFF, unplug the power cord, then wait for the toaster oven to cool.
- Wipe the toaster oven’s housing with a damp cloth and mild soapy water.
CAUTION:- DO NOT IMMERSE YOUR TOASTER OVEN IN LIQUIDS.
- Do not use abrasive cleaners, scrubbing brushes, or chemical cleaners. They will damage the toaster oven’s housing.
- Pull the crumb tray out of the toaster oven, then clean it with a damp cloth.
- Clean the wire rack and food tray with a damp cloth and mild soap, or place them in the top rack of your dishwasher.
Storing your toaster oven
- Let the toaster oven cool completely before storing.
- Store the toaster oven in a dry location such as on a table, countertop, or cupboard shelf.
- If storing the toaster oven for long periods of time, make sure that the toaster oven is clean.
Troubleshooting
Check this list for a possible solution before calling for service.
| PROBLEM | SOLUTION |
| Overcooked / Undercooked foods | You may have to adjust the time and temperature to the desired cooking level. |
| Because your toaster oven is smaller than your regular oven, it heats up faster and generally cooks quicker. | |
| You may need to adjust the racks/trays to achieve the cooking level you want. | |
| If you use your toaster oven several times in a row, the additional items may be browner because your toaster oven is already hot. Adjust the toaster oven settings. | |
| Burnt food smell | Before using your oven for the first time, we recommend that you heat it to 450°F (232°C) for five minutes to eliminate any manufacturing residue that may remain after shipping. |
| You may have food buildup inside the toaster oven, on heating elements, or in the crumb tray. See “Cleaning your toaster oven” on page 9. | |
| Your toaster oven does not turn on or stay on | Your toaster oven may be unplugged. Plug the toaster oven into a 120-volt AC electrical outlet. |
| If the electrical circuit is overloaded with other appliances, your toaster oven may not operate properly. Your toaster oven should be operated on an electrical circuit that is separate from other operating appliances. | |
| Heating element does not stay on | Heating elements turn on and off to maintain the temperature you selected. This is normal. |
| The heating element may not glow when heating. | |
| My toaster oven smokes | A small amount of smoke is normal the first couple of times your toaster oven is used. If your toaster oven continues to smoke, unplug it, let it cool, then empty the crumb tray. Stop using your toaster oven and contact an authorized service representative if your toaster oven still continues to smoke. |
Any other servicing should be performed by an authorized service representative.
Specifications
| External dimensions (H × W × D) | 9.0 × 16.8 × 13.3 in.
(22.8 × 42.7 × 33.7 cm) |
| Internal dimensions (H × W × D) | 7.2 × 11.4 × 10.7 in.
(18.2 × 29.0 × 27.1 cm) |
| Weight | 9.6 lbs. (4.4 kg) |
| Rated power | 1,300 W |
| Rated voltage | 120 V |
| Power cord length | 23.6 in. (.6 m) |
| Certifications | UL-certified |
| Temperature range | 150°~450°F (65.6~232.2°C) |
ONE-YEAR LIMITED WARRANTY
Definitions:
The Distributor* of Insignia branded products warrants to you, the original purchaser of this new Insignia-branded product (“Product”), that the Product shall be free of defects in the original manufacturer of the material or workmanship for a period of one (1) year from the date of your purchase of the Product (“Warranty Period”).
For this warranty to apply, your Product must be purchased in the United States or Canada from a Best Buy branded retail store or online at www.bestbuy.com or www.bestbuy.ca and is packaged with this warranty statement.
How long does the coverage last?
The Warranty Period lasts for 1 year (365 days) from the date you purchased the Product.
Your purchase date is printed on the receipt you received with the Product.
What does this warranty cover?
During the Warranty Period, if the original manufacture of the material or workmanship of the Product is determined to be defective by an authorized Insignia repair center or store personnel, Insignia will (at its sole option): (1) repair the Product with new or rebuilt parts; or (2) replace the Product at no charge with new or rebuilt comparable products or parts.
Products and parts replaced under this warranty become the property of Insignia and are not returned to you. If service of Products or parts are required after the Warranty Period expires, you must pay all labor and parts charges. This warranty lasts as long as you own your Insignia Product during the Warranty Period. Warranty coverage terminates if you sell or otherwise transfer the Product.
How to obtain warranty service?
If you purchased the Product at a Best Buy retail store location or from a Best Buy online website (www.bestbuy.com or www.bestbuy.ca), please take your original receipt and the Product to any Best Buy store. Make sure that you place the Product in its original packaging or packaging that provides the same amount of protection as the original packaging.
To obtain warranty service, in the United States and Canada call 1-877-467-4289. Call agents may diagnose and correct the issue over the phone.
Where is the warranty valid?
This warranty is valid only in the United States and Canada at Best Buy branded retail stores or websites to the original purchaser of the product in the county where the original purchase was made.
What does the warranty not cover?
This warranty does not cover:
- Customer instruction/education
- Installation
- Set up adjustments
- Cosmetic damage
- Damage due to weather, lightning, and other acts of God, such as power surges
- Accidental damage
- Misuse
- Abuse
- Negligence
- Commercial purposes/use, including but not limited to use in a place of business or in communal areas of a multiple dwelling condominium or apartment complex, or otherwise used in a place of other than a private home.
- Modification of any part of the Product, including the antenna
- Display panel damaged by static (non-moving) images applied for lengthy periods (burn-in).
- Damage due to incorrect operation or maintenance
- Connection to an incorrect voltage or power supply
- Attempted repair by any person not authorized by Insignia to service the Product
- Products sold “as is” or “with all faults”
- Consumables, including but not limited to batteries (i.e. AA, AAA, C, etc.)
- Products where the factory applied serial number has been altered or removed
- Loss or Theft of this product or any part of the product
- Display panels containing up to three (3) pixel failures (dots that are dark or incorrectly illuminated) grouped in an area smaller than one tenth (1/10) of the display size or up to five (5) pixel failures throughout the display. (Pixel based displays may contain a limited number of pixels that may not function normally.)
- Failures or Damage caused by any contact including but not limited to liquids, gels or pastes.
REPAIR REPLACEMENT AS PROVIDED UNDER THIS WARRANTY IS YOUR EXCLUSIVE REMEDY FOR BREACH OF WARRANTY. INSIGNIA SHALL NOT BE LIABLE FOR ANY INCIDENTAL OR CONSEQUENTIAL DAMAGES FOR THE BREACH OF ANY EXPRESS OR IMPLIED WARRANTY ON THIS PRODUCT, INCLUDING, BUT NOT LIMITED TO, LOST DATA, LOSS OF USE OF YOUR PRODUCT, LOST BUSINESS OR LOST PROFITS. INSIGNIA PRODUCTS MAKES NO OTHER EXPRESS WARRANTIES WITH RESPECT TO THE PRODUCT, ALL EXPRESS AND IMPLIED WARRANTIES FOR THE PRODUCT, INCLUDING BUT NOT LIMITED TO ANY IMPLIED WARRANTIES OF AND CONDITIONS OF MERCHANTABILITY AND FITNESS FOR A PARTICULAR PURPOSE, ARE LIMITED IN DURATION TO THE WARRANTY PERIOD SET FORTH ABOVE AND NO WARRANTIES, WHETHER EXPRESS OR IMPLIED, WILL APPLY AFTER THE WARRANTY PERIOD. SOME STATES, PROVINCES AND JURISDICTIONS DO NOT ALLOW LIMITATIONS ON HOW LONG AN IMPLIED WARRANTY LASTS, SO THE ABOVE LIMITATION MAY NOT APPLY TO YOU. THIS WARRANTY GIVES YOU SPECIFIC LEGAL RIGHTS, AND YOU MAY ALSO HAVE OTHER RIGHTS, WHICH VARY FROM STATE TO STATE OR PROVINCE TO PROVINCE.
Contact Insignia:
1-877-467-4289
www.insigniaproducts.com
INSIGNIA is a trademark of Best Buy and its affiliated companies.
*Distributed by Best Buy Purchasing, LLC
7601 Penn Ave South, Richfield, MN 55423 U.S.A.
©2019 Best Buy. All rights reserved.
Made in China
![]()