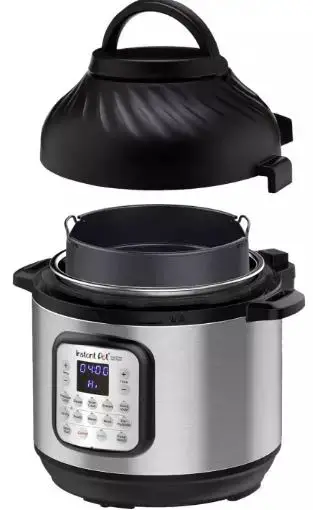
Instant Pot Duo Crisp Multifunction Cooker

WHAT’S IN THE BOX
Pressure Cooker Lid
Stainless Steel Inner Cooking Pot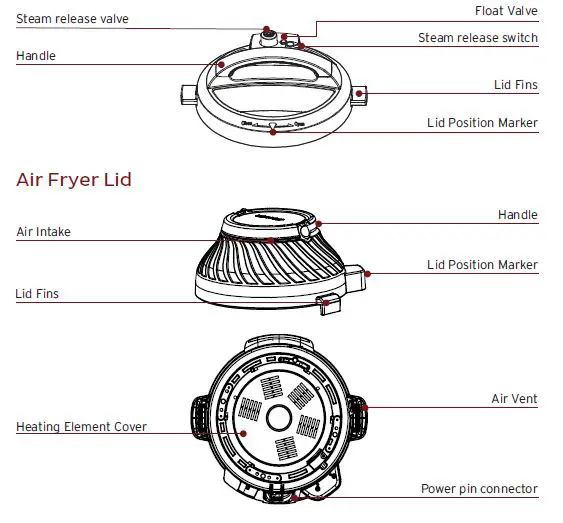
Cooker Base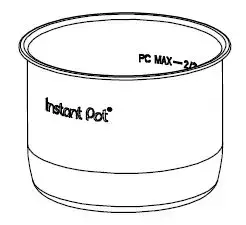
Parts + accessories
- Sealing Ring (installed in pressure cooker lid)
- Condensation Collector
- Cooking Rack with Handles (Mini steam rack may not have handles)
- Air Fryer Basket
- Air Fryer Basket Base
- Protective Pad and Storage Cover
Illustrations are for reference only and may differ from the actual product.
Remember to recycle!
We designed this packaging with sustainability in mind. Please recycle everything that can be recycled where you live.
USING YOUR DUO CRISP
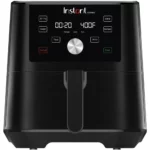
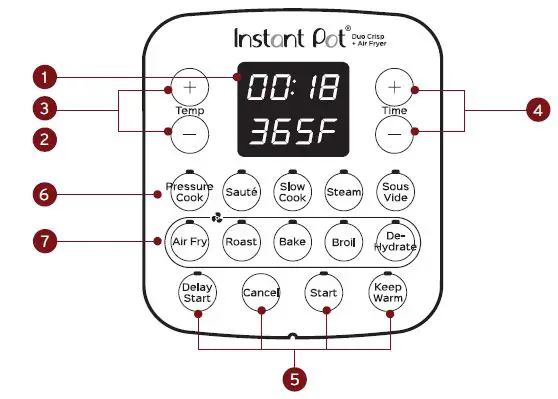
Control panel
We’ve designed the control panel to be simple to use and easy to read.
Need new illustration here?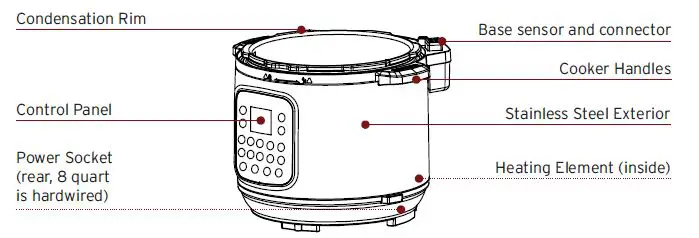
- Time
- Cooking time
- Delay Start time
- Keep Warm time
- Temperature/Pressure
- Cooking temperature
- Low or High pressure
- Temperature Control
- Increase or decrease cooking temperature
- Time Control
- Increase or decrease cooking time
- Smart Program Settings
- Start
- Keep Warm On/Off
- Delay Start On/Off
- Cancel
- Pressure and Slow Cooking Smart Programs
- Light shows the active Smart Program
- Air Frying Smart Programs
- Light shows the active Smart Program
Status messages
The control panel shows the information you need to know when using your Instant Pot Duo Crisp.
Using the pressure cooker lid
You’ll use the stainless steel lid for most cooking programs, and especially for pressure cooking. Always use the pressure cooking lid that came with this Instant Pot Duo Crisp cooker base.
Open the Lid
- Turn the lid handle to align the arrow symbol on the lid with the unlock symbol on the cooker base.
- Lift the lid up and off the cooker base.
Close the Lid
- Align the arrow symbol on the lid with the unlock symbol on the cooker base and lower the lid onto the track.
- Turn the lid until the arrow symbol on the lid aligns with the lock symbol on the cooker base. Using the air fryer lid You’ll use the air fryer lid for all air frying. Always use the air fryer lid that came with this Instant Pot Duo Crisp cooker base.
Open the Lid
- Turn the lid handle to align the arrow symbol on the lid with the unlock symbol on the cooker base.
- Lift the lid up and off the cooker base.
Close the Lid
Align the arrow symbol on the lid with the unlock symbol on the cooker base and lower the lid onto the track. Press the lid down slightly to ensure that the lid sensor connector contacts the base sensor connector.
Store the Lid
- Place the protective pad on the counter with the grooved side facing up.
- Align the back of the air fryer lid with OPEN on the protective pad, then turn the air fryer lid clockwise to the LOCK position.
Turning the sound On/Off
Turn sound on
When in Standby mode, press and hold + button until the display shows S On.
Turn sound off
When in Standby mode, press and hold – the button until the display shows SOFF. Audible safety alerts (beeps) cannot be turned off.
Choosing the temperature scale
You can choose to show the cooking temperature in either Fahrenheit or Celsius.
- When in Standby mode, press and hold Temp + until the display shows °F or °C.
The cooking temperature will now show in the scale you chose.
Delay the start of cooking
You can set a Delay Start timer for a minimum of 10 minutes or a maximum of 24 hours. Delay Start is available for the Pressure Cook, Sauté, Slow Cook, Steam and Sous Vide Smart Programs, but not for the air fry Smart Programs.
- Select a Smart Program, adjust the settings as you want, then press Delay Start. Once Delay Start has been selected, there is no way to return to the cooking settings. To adjust Smart Program settings, press Cancel and enter new selections.
- When the hours field flashes, use the Time – / + buttons to adjust the delay time hours.
- Press Delay Start again to toggle to the minutes field and adjust the delay time minutes.
- Delay Start begins automatically and the timer counts down.
- When Delay Start ends, the Smart Program begins, and the display indicates On.
Save Custom Temperatures
You can set and save custom temperatures for the Sous Vide, Air Fry, Roast, Bake, Broil and Dehydrate Smart Programs.
- Select the Smart Program you want to set.
- Use the Temp – / + buttons to adjust the temperature in °F or °C.
- Press Start to start the program and save the temperature. The next time you use that Smart Program, the new temperature is used. Adjustments made after cooking begins are not saved.
Reset Smart Programs to original settings
Reset Individual Smart Programs
- With the cooker in Standby mode, press and hold one Smart Program button until the cooker returns to Standby and shows OFF. The Smart Program’s pressure level, cooking time and temperature are restored to the factory default setting.
Reset All Smart Programs - 2. With the cooker in Standby mode, press and hold Cancel until the cooker beeps.
INITIAL SET UP
Clean before use
- Wash the inner cooking pot with hot water and soap. Rinse and use a soft cloth to dry the outside. Or you can wash the inner cooking pot in the dishwasher
- Wipe the heating element inside the cooker base with a soft cloth to ensure there are no stray packaging particles.
- Wash the accessories with hot water and dish soap. Rinse with warm, clear water and use a soft cloth to dry.
Setting up the condensation collector
The condensation collector sits at the back of the cooker base and accumulates overflow moisture from the condensation rim. It should be installed before cooking, then emptied and rinsed out after each use.
Remove the condensation collector
Pull the condensation collector away from the cooker base; do not pull down. Note the tabs on the cooker base and the grooves on the condensation collector.
Install the condensation collector
Align the grooves on the condensation collector with the tabs on the back of the cooker base and slide the condensation collector into place.
Test run
Setting up your new Instant Pot Duo Crisp for a test run is a great way to familiarize yourself with how the unit works before you actually cook a meal.
To perform a test run:
- Follow the instructions for pressure cooking on page 11.
- Use 3 quarts water, but no food.
- Set the cooking time to 5 minutes.
- After the cooking session is done, discard any remaining water.
- Wash and dry the inner cooking pot.
Now you’re ready to cook a meal in your Instant Pot Duo Crisp!
PRESSURE COOKING
Pressure cooking uses pressurized steam to quickly and evenly cook foods.
Pressure cooking programs
Your Instant Pot Duo Crisp includes 4 Smart Programs for pressure cooking: Steam, Rice, Oatmeal and Pressure Cooking.
| Default Pressure | Default Cooking Time | Min Cooking Time | Max Cooking Time | |
| Pressure Cook | High | 35 minutes
(00:35) |
0 minutes
(00:00) |
4 hours
(04:00) |
| Steam | High | 30 minutes
(00:30) |
0 minutes
(00:00) |
4 hours
(04:00) |
| Rice | Low | 12 minutes
(00:12) |
1 minute
(00:30) |
1 hour
(01:00) |
| Oatmeal | High | 5 minutes
(00:05) |
1 minute
(00:30) |
1 hour
(01:00) |
How to pressure cook
Prep
Cut, chop, season or marinate your ingredients according to your recipe.
Preheat
- Place the inner cooking pot into the cooker base.
- Add ingredients to the inner cooking pot.
- Place the pressure cooker lid on top of the cooker base and lock the lid making sure the sealing ring is installed properly. See ‘How to lock the pressure cooker lid’ below
- Choose a Smart Program for cooking and press its button on the Control Panel. See ‘About pressure cooking programs’ above
- Press the Smart Program again to toggle between temperature options: Low or High.
- If you want to increase or decrease the cooking time exactly, press + or –.
- Press Pressure Level to toggle between pressure options: High or Low.
- Keep Warm setting is ON by default. Press Keep Warm again to turn it off.
- After 10 seconds, the display shows On and the Instant Pot Duo Crisp is building pressure.
It can take 10–15 minutes to reach the pressure setting for cooking. Frozen foods increase the preheating time.
The pressure level and time you choose will be the new settings the next time you use that Smart Program
Cook
- When the pressure is ready, your Instant Pot Duo Crisp starts cooking and the steam float valve rises to the up position.
- The cooking timer starts counting down.
- When the timer reaches 00:00, cooking stops. You can press Cancel to stop a Smart Program at any time.
Release steam
Choose from the steam release method that works for your recipe. See ‘How to release steam’ below for full details
Using liquid to create steam
Pressure cooking requires liquid in the inner cooking pot to produce the steam needed. Depending on the size of your Instant Pot Duo Crisp, here are the minimum amounts you’ll need:
| Instant Pot Size | Minimum Liquid for Pressure Cooking* |
| 3 Quarts / 2.8 Litres | 1 cup (8 oz / 250 mL) |
| 6 Quarts / 5.7 Litres | 1 1⁄2 cups (12 oz / 375 mL) |
| 8 Quarts / 7.6 Litres | 2 cups (16 oz / 500 mL) |
*Unless otherwise specified in recipe.
Pressure cooking liquids should be water-based, such as broth, stock, soup or juice. If using canned, condensed, or cream-based soup, add water as directed above.
How to lock the pressure cooker lid
For pressure cooking, the lid must be securely locked into place to prevent steam from escaping. When you place the lid on the cooker base:
- Line up [triangle symbol] on lid with [open padlock symbol] on the cooker base.
- Turn lid clockwise until [triangle symbol] on lid lines up with [triangle symbol] on cooker base.
How to release steam
Instant Pot Duo Crisp can release steam in 3 different ways. Use the one that best fits the type of food you’re cooking.
Natural steam release
Releases steam gradually over time (up to 40 minutes or more) as after cooking stops. Use for: Foods that can simmer, like stews, chili, pasta, oatmeal, beans and grains.
- After cooking, leave the steam release switch in the Sealing position until all pressure is released.
- The float valve drops into lid when all steam is released.
- After steam release, turn lid counterclockwise and remove the lid.
Quick steam release
Quickly releases steam after you press the steam release switch. Use for: Foods that tend to overcook, like vegetables and seafood.
- After cooking, press down on Vent button to release steam and wait for all pressure to release.
- Float valve drops into lid when all steam is released.
- After steam release, turn lid counterclockwise and remove the lid.
Timed steam release
Allows food to continue cooking as steam releases for a specific time that you set.
Use for: xxx
- After cooking, leave the steam release switch in Sealing position for the set time. [how?]
- When timer reaches 00:00, set the steam release switch to the Venting position and wait for all pressure to release.
- Float valve drops into lid when all steam is released.
- After steam release, turn lid counterclockwise and remove the lid. You can insert the handle into the cooking base vertically for easy storage.
Pressure Cooking Caution
This appliance uses pressure to cook. Allow the appliance to release all excess pressure and steam before opening the pressure cooker lid. Opening the lid before pressure is released may result in burns, injury and/or property damage. Read more in the Safety, Maintenance and Warranty document.
SAUTÉING
Use Sauté in place of a frying or saucepan. Sautéing can deepen the flavors of your food, or can simmer, thicken or reduce sauces. Choose from these settings in the Sauté Smart Program:
| Setting | Low | High |
| Cooking time | 15 minutes
(00:15) |
30 minutes
(00:30) |
| Best for | Simmering, thickening, and reducing liquids | Stir-frying or browning meat |
How to sauté
Prep
Cut, chop, season or marinate your ingredients according to your recipe.
Preheat
- Place the inner cooking pot into the cooker base.
- Press Sauté.
- Cycle through temperature presets to select Low or High.
- Press – / + to adjust cooking time.
- Keep Warm setting is on by default. Press Keep Warm again to turn it off.
- After 10 seconds, the display shows On and displays timer.
Cook
- When the display shows Hot, add ingredients.
- When the timer ends, display shows End.
- Press Cancel if you want to finish cooking before timer runs out.
Deglazing
Deglazing is the process of adding a liquid to a hot pan, releasing all of the delicious, caramelized pieces stuck to the bottom.
- Remove food from inner pot
- Add water, broth, or wine
- Use a wooden spoon or silicone spatula to loosen food stuck to the bottom of the inner cooking pot
Deglazing
Deglazing is the process of adding a liquid to a hot pan, releasing all of the delicious, caramelized pieces stuck to the bottom.
Sautéing before Pressure or Slow Cooking
Quite often, you’ll want to sauté foods to brown them before further cooking them.
- Sauté ingredients
- Press Cancel You can deglaze the inner cooking pot now before switching to Pressure Cook or Slow Cook (see Deglazing Inner Pot)
- Select from the Smart Program
SLOW COOKING
Slow Cook lets you make your favorite simmering and stewing recipes – just like grandma used to make. This program does not use pressure to cook food. Make sure steam release is set to Venting or use a glass lid with a venting hole. Choose from these settings in the Slow Cook Smart Program:
| Setting | Low | High |
| Best for | ‘Low and Slow’ cooking | High setting equivalent on traditional slow cookers |
| Cooking Time | 10 hours
(10:00) |
4 hours
(04:00) |
How to slow cook
Prep
Cut, chop, season or marinate your ingredients according to your recipe.
Cook
- Place the inner cooking pot into the cooker base
- Add ingredients to the inner cooking pot
- Place pressure cooker lid on top of the cooker base and lock the lid
- Press Slow Cook
- Cycle through temperature presets to select Low or High
- Press – / + to adjust cooking time
- Keep Warm setting is On by default. Press Keep Warm again to turn it off
- After 10 seconds, the display shows On and displays timer
Keep Warm
When cooking completes, the display shows End if Keep Warm is turned off. If not, the timer begins counting from 00:00 up to 10 hours (10:00).
Keep warm
The Keep Warm setting turns on automatically after cooking on all Smart Programs except Sauté and Yogurt. You can also use Keep Warm to reheat food.
Keep warm after cooking
- When automatic warming begins, the timer shows the time passed, up to 10 hours.
- To turn automatic warming off (either during cooking or during automatic warming), press Keep Warm and the light above the button turns off.
Reheat and keep warm
- When in Standby mode, press Keep Warm.
- Press again to cycle through Less, Normal and More temperature levels.
- Press the – / + buttons to set a timer for up to 99 hours and 50 minutes.
AIR FRYING
The Duo Crisp uses the Air Fry lid to produce rapid air circulation to crisp or cook food, giving your meals all the rich, crispy flavor of deep frying, with little to no oil.
There are two options for air frying:
- Give your food a crisp finish after cooking with the Pressure Cook, Slow Cook, Steam or Sous Vide Smart Programs.
- Cook your dish entirely with the Air Fry, Roast, Bake or Broil Smart Programs.
What to cook in
For best results use the provided air fryer basket or you can also cook directly in the inner cooking pot if your recipe calls for that.
Prep
Cut, chop, season, marinate or batter your ingredients according to your recipe.
Cook
- Place your food into the air fryer basket or directly in the inner pot, according to your recipe.
- Insert the inner pot into the cooker base.
- Place the lid on the cooker base.
- Press Air Fry.
- Use the Temp + / – buttons to adjust the temperature.
- Use the Time + / – buttons to adjust the cooking time.
- Press Start to begin. The display shows On to indicate that pre-heating has started.
Note: Adjustments to the cooking time and temperature are saved when you press Start. - When the cooker reaches the target temperature, the cooking countdown timer starts.
Turn
- Partway through the cooking cycle the display shows Turn Food. Some food does not require turning. If you do not remove the lid after Turn Food displays, cooking will proceed after 10 seconds.
- Lift the air fryer lid off the cooker base and place it on the protective pad.
Lifting the lid automatically pauses cooking for 3 minutes. After 3 minutes the program will stop, and the air fryer lid will go into Standby mode. - Carefully turn, flip, or rotate your food.
- Close the lid again. Cooking continues.
Finish
When the Smart Program completes, the lid beeps, and the display shows End. The air fryer lid beep after 5 minutes, 20 minutes, and 60 minutes to remind you that cooking has completed.
Roast
You can roast foods like beef, lamb, pork, poultry, vegetables and scalloped potatoes, for a deliciously tender inside and browned outside.
| Setting | Default | Minimum | Maximum |
| Temperature | 380°F / 193°C | 180°F / 82°C | 400°F / 204°C |
| Cooking Time | 40 minutes
(00:40) |
1 minutes
(00:01) |
1 hour
(01:00) |
To roast
- Follow the basic instructions for Air drying.
- Select “Roast” as the Smart Program.
Bake
You can bake foods like bread, cakes, pastries and buns, with the Duo Crisp acting like your own “mini oven”.
| Setting | Default | Minimum | Maximum |
| Temperature | 400°F / 204°C | 400°F / 204°C | 400°F / 204°C |
| Cooking Time | 30 minutes
(00:30) |
1 minute
(00:01) |
1 hour
(01:00) |
To bake
- Follow the basic instructions for Air Frying.
- Select “Bake” as the Smart Program.
- There is no need to turn the food partway through cooking.
Leave approximately 1”/ 2.5 cm of space around all sides of the baking dish to allow heat to circulate evenly.
Broil
Broiling cooks using direct top-down heating, and broiled foods are best when placed close to the heating element.
| Setting | Default | Minimum | Maximum |
| Temperature | 400°F / 204°C | Not adjustable | Not adjustable |
| Cooking Time | 30 minutes
(00:30) |
1 minute
(00:01) |
1 hour
(01:00) |
To broil
- Follow the basic instructions for Air Frying.
- Place food in the broil/dehydrating tray in the air fryer basket.
- Select “Broil” as the Smart Program.
- There is no need to turn the food partway through cooking.
CLEANING
Clean your Instant Pot Duo Crisp after each use. Always unplug the unit and let all parts cool to room temperature before cleaning. Before use or storing, make sure all surfaces are dry.
| Part | Cleaning instructions |
| Pressure Cooker Lid and parts
• Anti-Block Shield • Sealing Ring • Steam Release Valve • Float Valve • Silicone Cap |
• Hand wash with hot water and mild dish soap or wash in the dishwasher, top rack
• Remove all small parts from lid before washing. • With steam release valve and anti-block shield removed, clean interior of steam release pipe to prevent clogging. • To drain water from the lid after dishwashing, grasp the lid handle and hold the lid vertically over a sink, then turn it all the way around • After cleaning, store the lid upside down on the cooker base • Store sealing rings in a well-ventilated area to disperse odor • To eliminate odors from sealing ring, add 1 cup (8 oz / 250 mL) water and 1 cup (8 oz / 250 mL) white vinegar to inner cooking pot, and run Pressure Cook for 5–10 minutes, then use Quick Steam Release |
| Air Fryer Lid | • Allow the air fryer lid to cool to room temperature, then clean the heating element and surrounding area with a soft, damp cloth or sponge. Ensure it is free of food debris and/or grease splatter.
• Wipe the exterior clean with a soft damp cloth or sponge. • Do not remove the heating element cover. |
| Part | Cleaning instructions |
| Inner Cooking Pot | • Wash after each use.
• Hand wash with hot water and mild dish soap or wash in dishwasher* • Hard water stains may need a vinegar-dampened sponge and scrubbing to remove • For tough or burned food residue, soak in hot water for a few hours before cleaning • Dry all exterior surfaces before placing in cooker base |
| Accessories
• Steam Rack • Condensation Collector • Protective Pad and Storage Cover • Multi-Level Air Fryer Basket • Air Fryer Basket Base • Broil/ Dehydrating Tray |
• Wash after each use
• Hand wash with hot water and mild dish soap or wash in the dishwasher, top rack • Never use harsh chemical detergents, powders or scouring pads on accessories • Empty and rinse condensation collector after each use |
| Power cord | • Use a barely damp cloth to wipe any particles off cord |
| Cooker base | • Wipe the inside of the cooker base as well as the condensation rim with a barely damp cloth, and allow to air dry
• Clean the outside of the cooker base and the control panel with a soft, barely damp cloth or sponge |
*Some discoloration may occur after machine washing, but this will not affect the cooker’s safety or performance.
In the manual
For full details about removing pressure cooker lid parts for cleaning, read the User Manual, available at instanthome.com
LEARN MORE
There’s a whole world of Instant Air Fryer information and help just waiting for you. Here are some of the most helpful resources.
- Get the full User Manual
Instanthome.com - Register your product
Instanthome.com/register - Contact Consumer Care
Instanthome.com
[email protected] - Instant Recipe App with 1000+ recipes
Instanthome.com
iOS and Android app stores - Cooking charts and more recipes
instanthome.com - How-to videos, tips and more
Instanthome.com - Replacement parts and accessories
kInstanthome.com
Product specifications
| Volume | Wattage | Power | Weight | Dimensions | |
| DUCO6002 | 6 Quart
5.7 Litres |
1500
watts |
120V/
60Hz |
8.9 kg
19.62 lbs. |
Pressure Cooking Lid
in: 13.58Lx13.58Wx12.99H |
| cm: 34.5 L x 34.5 W x 33 H | |||||
| Air Frying Lid | |||||
| in: 13.58 L x 13.58 W x 13.97 H
cm: 34.5 L x 34.5 W x 35.5 H |
|||||
| DUCO8002 | 8 Quart
7.6 Litres |
1500
watts |
120V/
60Hz |
10.06 kg
22.18 lbs. |
Pressure Cooking Lid
in: 14.76 L x 13.58 W x 14.17 H cm: 37.5 L x 34.5 W x 36 H |
| Air Frying Lid | |||||
| in: 14.76 L x 13.58 W x 15.28 H |
Instant Brands Inc.,
495 March Road, Suite 200 Kanata, Ontario, K2K 3G1 Canada
instanthome.com
© 2021 Instant Brands™ Inc
140-0045-01-0301