INTERMATIC HB880R Outdoor 7 Day Digital Timer Instruction
Operating and User Instructions
WARNING Risk of Fire or Electrical Shock
- Connect only to an outdoor receptacle protected by a Ground Fault Circuit Interrupter (GFCI).
- Connect only to an outdoor receptacle with a “while in use” weatherproof cover.
- Mount at least 24 inches (0.6 meters) above ground level with receptacles facing downward.
- Unplug timer power cord before opening the battery compartment.
- Replace battery cover and retaining screw before plugging in timer cord.
- Do not use timer if battery cover and/or retaining screw is missing or damaged.
- Do not exceed rated capacity of connected extension cord or timer.
Specifications
- Input Voltage: 120 VAC, 60 HZ
- 15 Amps General Purpose
- 1000 Watts Tungsten
- 1/2 Horsepower
- 8.3 Amps Ballast (Standard) (Inductive)
- 500 VA Electronic Ballast
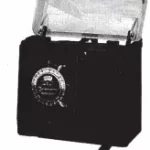
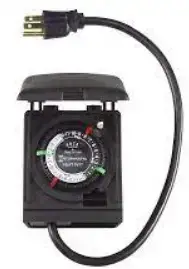
Description
The HB880R Time Switch is a programmable digital timer for outdoor applications. Astronomic settings adjust for seasonal changes. Automatic Daylight Saving Time adjustment. Follow these instructions to complete the programming for the HB880R time switch.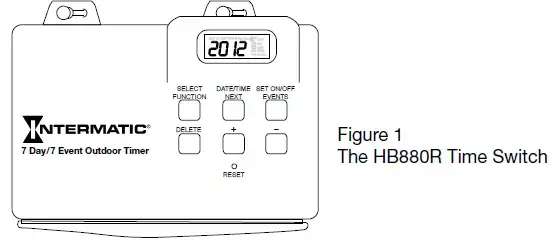
Enable the Battery
- On the back of timer, pull out the pull tab (if present) from the battery holder. See Figure 2.
- Verify that the controller display activates.
- Take one of these actions.
- IF THE DISPLAY Activates Does not activate
- THEN… Go to Setting the Calendar, Clock and Astro Time Replace Battery. See Replacing Battery on page 2.
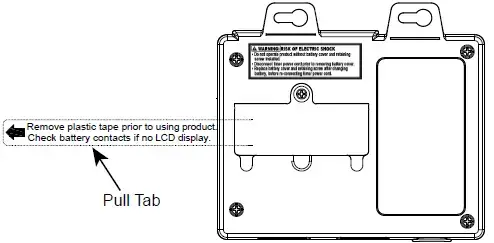
- Removing pull tab from battery holder
Setting the Calendar, Clock and Astro Time
NOTE: The timer does not have to be plugged in to set the timer.
- Press DATE/TIME/NEXT. The year flashes.
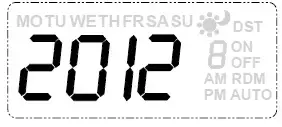
- Press + or – to scroll to the current year, then press DATE/TIME/NEXT. The month digit flashes.
NOTE: The months start with 01 (Jan) through 12 (Dec). - Press + or – to select the current month, then press DATE/TIME/NEXT. The day of the month digit and the corresponding day of the week flashes.
- Press + or – to select the current day of the month and then press DATE/TIME/NEXT.
- From the DST (Daylight Saving Time) screen, press + or – to set the DST function to Auto (ON) or OFF, then press DATE/TIME/NEXT. The hour digit in the current time flashes on the screen.
- Press + or – to set the current hour (AM/PM), then press DATE/TIME/NEXT. The minute digit flashes.
- Press + or – to set the current minute, then press DATE/TIME/NEXT. A flashing “nor” and the Astro icon appears.
- Using the map in Figure 3 as reference, press + or – to select your Astro zone then press DATE/TIME/NEXT to save the zone. The AM sunrise screen appears.
NOTE: nor denotes NORTH, CEN denotes CENTER, and SOU denotes SOUTH.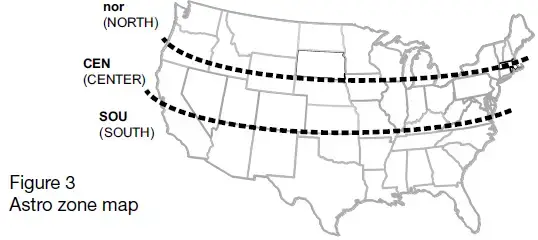
- From the AM sunrise screen, press + or – to set the sunrise time, then press DATE/TIME/NEXT. The PM Sunset screen appears.
NOTE: The setting range is a maximum of +/- 2 hours.
NOTE: Press DELETE to restore calculated sunrise time. - Press + or – to set the sunset time, then press DATE/TIME/NEXT. The time of day screen (flashing colon) appears.
NOTE: The setting range is a maximum of +/- 2 hours from
the automatically calculated sunrise time.
NOTE: Press DELETE to restore calculated sunset time.
Setting Events
This section provides instructions for setting pairs of ON/OFF events. To set an event pair, you must first set the ON event and then repeat the procedure to set the OFF event. You can set up to seven pairs of ON/OFF events (14 total) in the timer. Follow this procedure to set timer events.
- Press SET ON/OFF EVENTS. Dashed lines appear to indicate no event is set for the event number.

- Press DATE/TIME/NEXT to set an ON event. The screen displays 1200 AM 1 ON (for ON event 1).
- Press + or – to scroll to the days of the week that the event will run.
NOTE: To set the event to run every:- Week: Select MO, TU, WE, TH, FR, SA, SU
- Weekday: Select MO, TU, WE, TH, FR
- Weekend: Select SA, SU
- Press DATE/TIME/NEXT. The hour flashes.
- Press + or – to scroll to the desired hour or AM Sunrise or PM Sunset for the event.
NOTE: The hour can be set with the 12-hour AM/PM format or at Sunrise or Sunset. - Take one of these actions.
- IF YOU SELECTED… A specific hour, Sunrise or Sunset,
- THEN… Go to step 6. Press SET ON/OFF EVENTS to advance to setting OFF time for event and go to step 8.
- Press DATE/TIME/NEXT. The minute digit flashes.
- Press + or – to set the minute for the event.
- Press SET ON/OFF EVENTS to set the OFF Event. Dashed lines appear to indicate no event is set for the event number.
- Press DATE/TIME/NEXT. The screen displays 12:00 AM 1 OFF (OFF Event 1).
- Press + or – to scroll to the days of the week that the program will run.
- Press DATE/TIME/NEXT. The hour flashes.
- Press + or – to scroll to the desired hour or AM Sunrise or PM Sunset for the event.
- Take one of these actions.
- IF YOU SELECTED… A specific hour, Sunrise or Sunset,
- THEN… Go to step 14 Go to step 16
- Press DATE/TIME/NEXT. The minute digit flashes.
- Press + or – to set the minute for the event.
- If you want to set another ON/OFF pair, repeat steps 1 to 16.
- If you are finished setting events, press and hold SET ON/OFF EVENTS until the time of day screen appears.
NOTE: If you leave the timer idle in Calendar or Event setting modes for 5 minutes, the timer will automatically switch to AUTO operating mode after saving your settings.
Daily Operation
Once the initial settings are completed, follow this procedure to select the operation mode in the timer.
| TABLE 1. Description of Modes | |
| Mode | Description |
| AUTO | Switches ON/OFF events at programmed times. |
| RDM
(Random) |
Varies each event up to 30 minutes from the programmed time |
| MANUAL | Programmed events are ignored but are saved in memory. |
Press SELECT FUNCTION to scroll to the desired operation mode. See Table 2 for selection of modes.
NOTE: In order for the time switch to run the programmed events, the operation mode must be set to AUTO or RDM.
| TABLE 2. Selecting Operating Mode. | |
| Mode | Description |
| ON | Load is ON permanently in MANUAL mode. |
| ON AUTO | AUTO has been selected, load is ON, and will stay ON until the next scheduled OFF event. |
| ON RDM | RDM mode has been selected, load is ON, and will stay ON until the next scheduled RDM OFF event |
| OFF | Load is OFF permanently in MANUAL mode |
| OFF AUTO | AUTO mode is selected, load is OFF, and will stay OFF until the next scheduled ON event. |
Reviewing or Modifying an Event
Follow this procedure to modify an event.
- Press SET ON/OFF EVENTS to scroll to the desired event.
- Press DATE/TIME/NEXT to select the event setting that you want to modify.
- Press + or – to adjust the setting, then press DATE/TIME/NEXT to save and advance to the next setting.
- Repeat step 3 as needed for this event.
- If you want to modify another event, press SET ON/OFF EVENTS to scroll to the desired event.
- When the modifications are complete, press SET ON/OFF EVENTS to scroll through all 7 ON/OFF events (including blank events) and return to the time of day screen (flashing colon).
Deleting an Event
Follow this procedure to delete an event.
- Press SET ON/OFF EVENTS to scroll to the unwanted ON or OFF event.
- Press DELETE. The screen displays dashes to indicate the ON or OFF event is deleted.
NOTE: If necessary, repeat this procedure to delete both ON and OFF settings for the event. - When the modifications are complete, press SET ON/OFF EVENTS to scroll through all 7 ON/OFF events (including blank events) and return to the time of day screen (flashing colon).
Resetting the Timer
In case of a time malfunction or to delete all previous settings, the unit can be reset. To reset the timer, use a pen or blunt object to Press RESET. The timer resets and deletes all the settings in the unit.
Replacing the Battery
One AA size alkaline battery is needed to complete this procedure.
- Unplug the timer power cord.
- From the rear of the timer, remove the retaining screw and battery cover.
- Install the new AA battery (observe polarity).
- Verify that the controller display activates.
- Take one of these actions.
- IF THE DISPLAY… Activates Does not activate,
- THEN… Go to step 6. Make sure the battery is not dead and is installed with the proper polarity. Adjust as needed to get the screen to activate.
- Replace the battery cover and retaining screw.
- Go to Setting the Calendar, Clock and Astronomic Time. NOTE: If the timer is going to be stored for an extended period of time, it is recommended to remove the battery to preserve the life of the battery.
Troubleshooting
| Symptom | Possible Cause | Solution |
| The timer is losing settings | Low battery not holding memory | Replace the battery. See Replacing the Battery. |
| Output does not switch or output switches at wrong time | Auto or RDM mode is not properly selected. | Select the desired mode. See Daily Operation. |
| There are extra or incorrect event settings. | Press SET ON/OFF EVENTS to scroll through the events to find the event that needs to be changed or deleted.
See Reviewing or Modifying an Event. |
|
| Astro Events have seasonally adjusted beyond fixed time. | Make sure the fixed timed events are not set anywhere in the range of earliest to latest sunrise and sunset. |
Warranty service is available by either (a) returning the product to the dealer from whom the unit was purchased or (b) completing a warranty claim online at www.intermatic.com. This warranty is made by: Intermatic Incorporated, 1950 Innovation Way, Suite 300, Libertyville, IL 60048. For additional product or warranty information go to: http://www.Intermatic.com or call 815-675-7000.