
IRULU MP3 Player User Manual
Read Before Use
Thank you for your purchasing our F20 music player. Please read the manual carefully before using the player.

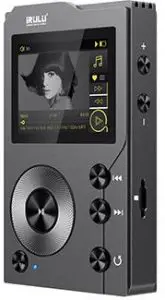
Buttons and Controls
- Power Button; Screen ON/OFF
Hold to power on/off the player;
Press to turn on/off the screen. - Display Screen
- Scroll Wheel
Scroll to select menu items; 
Executes the desired items;
Starts/pauses the playing music
Press to select menu items; switch to previous/next song; fast backward/forward during music playing- “M” Button
Menu; on “All songs” playlist interface, long press to quickly search the target song. 
Go back; on any other interface, long press button- Power Indicator Light
Light up when powered on and go out when powered off. - Volume Button
Press to increase/decrease volume - Micro SD Card Slot
- Earphone Jack
- USB/OTG Port
- Line-out Port
Quick Guide
- Charge the Playe
- Charge by Computer
Use USB cable to connect this player with a running computer. The USB cable can be used for both data transferring and player chargin - Use 5V/500mA~1000mA Charger (Charger not included)
Plug one end of the USB cable into the charger and the other end into your player. Normally, it needs about 4 hours for fully charged.
- Charge by Computer
- Power ON/OFF
Long press the power button for about 3 seconds to turn on/off the player; Blue indicator light will be on when powered on and light goes out when powered off. Please Note: When the system crashes or has no response, please hold the power button for 8 seconds to restart the player. - Screen on/off
You can short press the power button to turn on/off the screen. When the screen is off, the volume button, play/pause button and the previous/next song button will not available while music playing in the background. - Insert/Remove Micro SD Card
Insert the Micro SD card into its slot, and the deck will automatically lock the SD card. When remove the micro SD card, push the card inward and then let it go, the card will automatically pops up. - Data Transfer
Use USB cable connect the player with computer, copy the music and other needed files in the computer, and then paste them in the player, or just drag and drop the files directly when connected to computer. - Main Interface
There are 4 parts on the main interface: Category, Explorer, Music Setting and System Setting. Scroll the wheel or press
On any other interface, long press button
Music Playing Interface
You can find music files in both “Category” and “Explorer”. On any song list interface, scroll the wheel or press


- Basic Operations
- Press
- Press the 2pcs side buttons on the right to adjust volume;
- Short press
- Press button
- On “All Songs” interface, long press “M” button to quickly search the target song by alphabetical order;
- On main interface, press button
- Press
- Playing Setting
When you are on music playing interface, press “M” button to have a quick access to the following instructions displayed on the right of the screen. Including: Collection, Play Mode, EQ, Bluetooth, and Wallpaper. Scroll the wheel or press- Collection: Add /remove the song to/from “My Favorite” song list;
- Play Mode: Set the order in which songs are played: (Play in order / repeat all / repeat 1 / shuffle);
- EQ (Equalizer): Choose the playing music style: (Rock / Classic / Jazz / Pop / Dance / Vocal / Blues / Heavy Metal / Custom / OFF);
- Bluetooth: Turn on/off the Bluetooth function;
- Wallpaper: Choose to display or turn off the wallpaper.
Category
After scanning music from Micro SD card, you can see related music files sorted by different classification criteria in “category” which includes “All songs”, “My favorite”, “Playlist”, “Recent played songs”, “Artist”, “Album”, “Genre”… If you want clear all recently played records, you can enter “Clear records” and choose “Yes”.
- Add song to “My Favorite” list
On any song list interface except “My favorite”, scroll the wheel and press to enter the target song, then press “M” button and choose “Add to my favorite” with button to confirm. - Add to playlist / Centralized Playback / Create Playlist
- Add to playlist: On any song list interface except the lists in “Playlist”, choose the target song, then press “M” button and choose “Add to playlist” with button to enter the list options, choose the target list with the button to confirm;
- Centralized Playback:
Enter the “Playlist” and choose the target list, then press “M” button and choose “Play” to play all songs in the chosen list; - Create Playlist:
You can create playlist synchronously via Hiby music APP on Android devices.
- Clear Records
If you choose “Clear records”, all the records in “Recently played songs” will be deleted.
Setting
“Setting” is where you conduct music settings and operations that are directly related to music playing. This includes: Music scan, Equalizer, Play mode, Gain setting, Replay gain, Balance control, Album cover, Wallpaper, Display Lyric, Gapless playing, Memory play setting, Volume setting, and Customized powered-on volume. You can scroll the wheel or press
- Music Scan:
scan data from Micro SD memory card, identify and classify music, create
music index in “Category”. If you choose “Automatic”, the system will scan the music files from Micro SD card and classify them automatically right after disconnecting from the computer; Choose “Manually” to scan manually and then press “M” button to scan music files.
Please Note: During the scanning process, do not press - Gain Setting
The “High” and “Low” gain switching can adjust the player’s output in order to adapt to different hardware (headphones, amp, etc) for auditory needs. The default setting is “Low”. - Replay Gain
Sometimes, different songs have different volume level. Turn on “Replay Gain” on to automatically adjust the level to the same, you can choose: Track / Album / OFF. - Balanced Control
Press - Album Cover/Display Lyric
Press button - Wallpaper
Choose whether to display wallpaper. The default setting is “ON”. - Gapless Play
Choose whether to reduce the time intervals while switching one song to another. The default setting is “OFF”. - Memory Play:
set the way to continue playing the music:- Back to last song (Play from last song from its beginning);
- Back to last position (Resume playing from the position of the last song);
- Close (Disable memory playback function).
- Powered-on Volume Setting:
set the music playing volume each time after you turn on the player:- Memory: The default value you set last time when you use the player;
- Default: The default volume value setting is 30;
- Customize: customize powered-on volume value. To set the specific value, find “Customize powered-on volume” on “Music setting” interface and press
System Setting
On system setting interface, you can scroll the wheel or press 
- Language / Theme Selection
There are 9 available system languages (English / German / French / Italian / Japanese / Spanish / Chinese / Korean) and 3 optional theme interfaces; - Front Size
Set system front size to Big / Medium / Small; - Display Setting: setting relevant to screen display:
- Backlight time: the backlight will be out when it reaches the set time (press power button to turn on the screen); the maximum value is “30 min”. The default setting is “1 min”;
- Brightness: press
- Idle shutdown: if there is no operation on the device, it will power off automatically when reaches the setting time. The default setting is “5 min”;
- Scheduled powered off time: the device will power off automatically when reaches the setting time. The default setting is “OFF”.
- Bluetooth Setting
While it’s on Bluetooth setting interface, choose “Bluetooth” and press- Bluetooth name: the name of the device as a Bluetooth transmitter;
- Hibylink: when Hibylink is on, Android users can control the device remotely on Hiby music APP, such as play the music files, edit playlist, and add songs to “My favorite”, etc…
Please note: A: Please visit our website to download the Hiby APP: www.surfans.net -> Driver -> “F20 MP3 ->
HibylinkAPP”, or please input link: https://bit.ly/3arsXgo; B: HibyLink function currently only supports Android system (4.1 and above) smart phone. It does not support IOS system. - High quality: turn on “high quality” for lossless sound quality transmission;
- Bluetooth scanning: search the nearby devices that have turned on its Bluetooth. And the searched device will be listed under “available device”;
- Paired device: the devices that have successfully connected with the player. Scroll the wheel or press
- Available device: the searched available Bluetooth devices. Scroll the wheel or press button
- USB Mode:
when use USB cable connect player with PC, there are 2 optional modes:- USB mode: in USB mode, when player connected to computer, the cable can be used to charge the player or transfer data;
Please Note: If you want to play music while charging via computer, please long press button - DAC mode: in DAC mode, the player can be used as USB-DAC. For the first time, you need to install USB-DAC driver software on your Windows computer. Please visit website to download the driver: www.surfans.net -> Driver -> “F20 MP3 DAC Driver”, or please input link: https://bit.ly/3aqVJ0S. Please Note: MAC system can directly identify the device without having to install the software
- USB mode: in USB mode, when player connected to computer, the cable can be used to charge the player or transfer data;
- Reset
The choice “Format TF card” will delete all the files in micro SD card. If you choose “factory default”, the player’s system setting will be restored to factory defaults (The files in Micro SD card will be retained). - Firmware Update
- Insert the TF card into the card slot, and use USB cable to connect player with PC;
- Format the device and set the format to FAT32 on computer and copy the update.upt to the TF card root directory; Please contact us to get software and the instruction: [email protected]
- On the player, choose “Firmware Update” on “System setting” interface with the button to confirm and then the system will automatically restart and upgrade.
Please Note : Do not operate the player during the upgrade process.
- About the Player
You can see the used space, available space and firmware version.
Explorer
In “Explorer”, you are allowed to check all the files in the Micro SD card or OTG device.
Please Note: To view files on OTG device, you need to connect OTG device to the player first. You can’t add song to “my favorite” list on OTG device.
Line Out

- F20 audio player with built-in mini-USB On The Go (OTG) port, it can read tracks and data from OTG devices via USB-OTG cable (not included);
- Under USB/DAC mode, this mp3 player can be used as a computer decoding amp;
- With the lineout port, you can connect this player with amp like car stereo, vehicle audio system and home audio via Auxiliary Audio Cable (not included).
The player can support analog audio output (line out). Connect one end of the standard 3.5mm audio cable to the Line-out port of your player and the other end to the external audio player device. At this time, when there is music playing on the player, the audio signal can be transmitted to the external audio device.
Specifications
| Item Name | F20 HIFI Music Player | |
| Dimension | 94 * 57 * 15mm | |
| Weight | 108g | |
| Display | 2.0 inches TFT Display (320 * 240) | |
| Power | 1500mA / 3.7V Lithium Battery | |
| Charging Power | Input: 5V / 1A (Micro USB) | |
| Audio Format | 5V / 500 ~ 1000mA | |
|
Audio Parameter |
Audio Format |
APE (192kHz / 24 bit); WAV (192kHz / 32 bit); WMA (192kHz / 24 bit);
Wma Lossless (96kHz / 24 bit); FLAC (192kHz / 24 bit); DSD (5.6MHz / 1 bit); DFF (5.6MHz / 1 bit); Aiff / M4A / AAC / OGG / MP2 / MP3 |
| Distortion | < 0.008% | |
| SNR | 103dB ±2dB | |
| Frequency | 20Hz – 20KHz | |
| Dynamic Range | 98dB | |
| Earphone
Impedance |
8Ω – 15Ω | |
| Analog Output | 3.5mm | |
|
Interface |
Line Out Output | 3.5mm |
| Data Interface | USB 2.0 | |
| Card Slot | Micro SD card up to 256GB | |
| Working
Temperature |
-5 ~ 40℃ | |
| OS | Windows XP / Vista / Win7/8.1 / Mac OS 10 / Linux 2.4.2 and above | |
If you have any problem about this player, please feel free to contact us: [email protected], we’ll reply you within 24 hours.
FAQ and Troubleshooting
- Can’t turn on the device?
- Please check if your operation is right: long press the power button for about 3 seconds;
- Please check whether the playing has run out of the power: connect the player to an adapter and try again after charging 10 minutes; If still can’t work, please contact our customer service: [email protected].
- Player freezes?
- Please press the power button for 8 seconds to restart the player. The blue indicator light will be on and then light up again during the process.
- Can’t hear anything when playing music?
- Please check if the volume is too low;
- Please check whether the headset has plugged in or whether headset damaged;
- Please ensure that you plug headphone in headphone port, not line-out port;
- Please check whether your music format is supported or whether it damaged
- Can’t download music files from computer?
- Please check if the player has connected to computer;
- Please check whether the player in USB mode:
Enter F20 player > system setting > USB mode, please choose USB - Please check whether the Micro SD card is correctly inserted and that the card not damaged;
- Please check if the Micro SD card has enough storage space.
- How to find the exact needed song quickly?
- Enter F20 player > Category > Songs Here long press “M” button, and you can quickly search to find exact song in alphabetical order.
- Can I load and play audible books?
- If the books are on your PC/laptop in a compatible file, the yes, you can load and play it.
- Is there a song limit?
- The player comes with 16GB SD card, and the player supports SD card up to 256GB. In this way, the player can store about 15000 songs.
- Can you adjust the volume on the device when using Bluetooth?
- If your headphones are Bluetooth and have volume adjusting button, then yes.
- Can this player work with iTunes? Is it compatible?
- No, unfortunately, it is doesn’t compatible with iTunes. This functions more like an external hard drier. You simply plug it in, an option to open it as a folder pops up, and you simply drag and drop your music.
- Please visit the website for your question:
https://www.lifewire.com/do-i-need-an-ipod-to-play-itunes-songs-243842
- How can the battery be replaced?
- This player is sealed, and you can’t change the battery yourself. If you have any trouble about battery, please always contact us: [email protected]
- How to set shuffle playing mode?
- Enter F20 player > Setting > Play mode Here you can choose to play in order / repeat all / repeat 1 / shuffle
- How to enable the Bluetooth function?
- Enter F20 player > System setting > Bluetooth setting > turn on Bluetooth function. Turn on Bluetooth function on other Bluetooth device, and pair the device, you’ll see the paired devices listed below.
- Scroll the wheel or press
- Does the player have a bookmark?
- Yes, the player does support bookmark function: Enter F20 player > setting > memory play. Here you can choose last song / last position / close this function.
- Is it possible to create a playlist on the go without a computer?
- Yes, but you can only add songs to “My favorite” list, and you can’t customize the playlist name without a computer.
- When would you adjust the gain setting rather than volume?
- I have my gain setting on high and use the volume to control the audio output from aero to max. High setting gives you a higher output. I think the gain setting is to adjust for different headphones used with this player. Headphone impedance can range from 8 ohms to 64 ohms. The 8 ohms would be louder at the same gain setting as 64 ohms.