JBL Wireless Microphone System User Guide
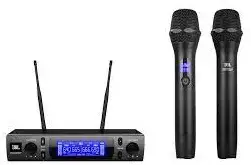
ABOUT VM300
Thanks for purchasing JBL VM300 wireless microphone system.
JBL VM300 boasts ultra clarity and reliable performance, and meets the highest standard from either professional or entertainment sound applications with the following features:
- Preset frequency/channel module for Ch-A and Ch-B
- Auto Scan
- SHAKE TO SYNC (frequency range: 2400 MHz – 2483.5 MHz)
- Synchronization through IR
- Auto Mute
- Auto Sleep
- Auto Wakeup
Each JBL VM300 system includes one SR300 receiver and two HT300 hand-held transmitters.
PACKING LIST
- 1 × SR300 receiver
- 2 × HT300 hand-held transmitters
- 2 × Antennas
- 1 × Power adapter
- 1 × Audio cable (with 6.35 mm plug)
- 2 × Anti-rolling rubber rings
- 4 × AA batteries
- 1 × Quick Start Guide
USER INTERFACE
- SR300 – Front

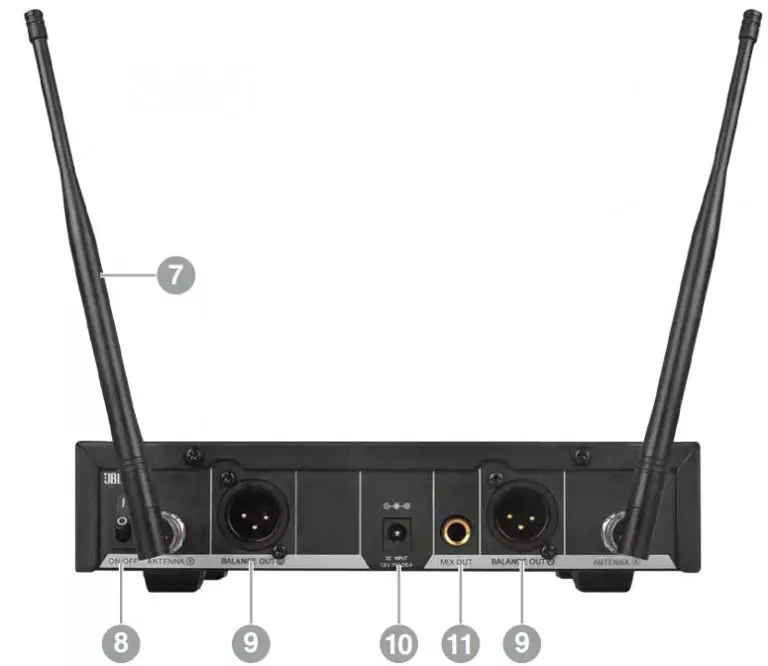
- SR300 – Rear

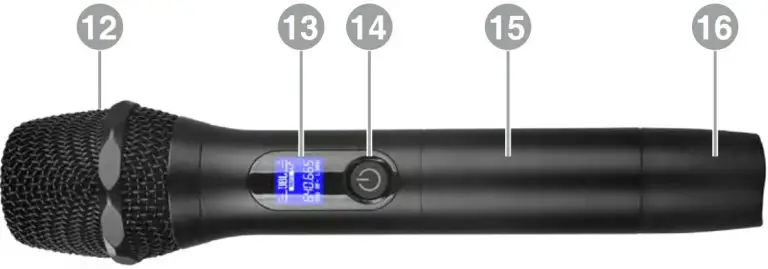
- HT300 – Front
- HT300 – Rear
- Volume (A/B):To lock/unlock SR300, adjust channel volume, or configure channel settings, etc.
NOTE: Settings of each channel include: SET FRQ (to set the channel frequency), SET RF (to set RF output of HT300), SET AUD (to set auto attenuation of the output gain of the channel), SET DIS (to set the display mode). - Auto Scan: To enable or disable automatic search for available frequencies. Only effective when SR300 is unlocked.
- Auto Sync: To enable or disable automatic frequency synchronization between SR300 and HT300. Only effective when SR300 is unlocked.
- IR Sensor: For frequency synchronization with HT300
- LCD: Shows status of Ch-A and Ch-B: audio signal level, RF signal level, frequency/ channel, mute, etc.
- Frequency/Channel Module:To select preset frequency/channel module for Ch-A and Ch-B. Only effective when SR300 is unlocked.
- Antenna: Connect the UHF antennas provided.
DON’T block this area when using SR300 - On/Off button: To turn SR300 on or off.
- Balance Out (A/B): 3-pin balanced XLR connector, for connection of professional-grade audio devices.
- Power Input:Power requirement: 12 VDC, 1.25A. Connect the power adapter provided.
- Mix Out: 6.35 mm unbalanced TS connector. Use the 6.35 mm audio cable supplied and connect it to downstream audio devices (e.g. audio processors).
- Pick-up:For vocal or instrument sound pick-up.
DON’T hand hold or block this area when using HT300. - LCD: Shows status of HT300: battery level, frequency/channel, mute, etc.
- On/Off button: Long press the button to turn HT300 on or off. This button can also be used to activate or deactivate its auto mute function.
- Grip/Battery compartment: Hold this area when using HT300. Twist it off to install or replace the batteries or prepare HT300 for frequency/channel synchronization with SR300 through IR.
- Antenna: For wireless transmission of RF signal.
DON’T block this area when using HT300.
OPERATION INSTRUCTIONS
Lock/Unlock SR300
- Long press the Volume knobs (1) of both Ch-A and Ch-B to lock or unlock SR300
- When SR300 is locked, its LCD shows “LOC ON”; When SR300 is unlocked, its LCD shows “UNLOC”.
Adjuct Channel Volume
- Unlock SR300.
- Rotate the Volume knob (1) of Ch-A or Ch-B to adjust the volume of the channel.
Select Frequency/Channel Module
- Unlock SR300.
- Short press the Module buttons (6) to select preset frequency/channel group for Ch-A and Ch-B. When selection is done, the system stores the selection automatically.
Configure Channel Settings
- Unlock SR300.
- Long press the Volume knob (1) of Ch-A or Ch-B to start setting of the selected channel. The LCD shows “SET FRQ”.
- Rotate the Volume knob (1) to select the target setting.
- Short press the Volume knob (1) to see parameters of the setting.
- Rotate the Volume knob (1) again to select the target parameter.
- To confirm the selection, short press the Volume knob (1). The LCD shows “EXIT” or “STORE”.
Start Auto Scan
- Short press the Auto Scan button (2). The LCD shows “SCAN”.
- Short press the Volume knob (1) of Ch-A or Cha-B to start searching for available frequency/channel for the channel
- When searching is done, the LCD shows the available frequency/channel for the channel.
Shake to Sync
- Unlock SR300.
- Select a preset frequency/channel module for Ch-A and Ch-B using the Module buttons (6).
- Hold one HT300 each hand. Long press the On/Off buttons (14), and at the same time,gently shake each HT300.
- When synchronization is successful, the LCDs of each HT300 display the correspondingfrequency/channel as those shown on SR300.
Ensure that the distance between HT300 and SR300 is no more than 10-meters and that there’s no block nor interference in between.
Alternate Method:
- Unlock SR300.
- Select a preset frequency/channel module for Ch-A and Ch-B using the Module buttons (6).
- Hold the first HT300. Long press its On/Off button (14), and at the same time, gently shake the HT300.
- When synchronization is successful, the LCD (13) of this HT300 displays the frequency/ channel as the Ch-A of SR300.
- Keep the HT300 powered on
- Repeat ③ and synchronize for the second HT300.
- When synchronization is successful, the LCD (13) of the second HT300 displays the frequency/channel as the Ch-B of SR300.
Synchronize through IR
- Unlock SR300.
- Short press Auto Sync button (3). The LCD shows “SYNC”.
- Short press the Volume knob (1) of Ch-A or Cha-B to start automatic synchronization for the channel. The LCD shows the frequency/channel by flashing.
- Turn one HT300 on. Twist its Grip (15) off.
- Place the HT300 near SR300, and ensure that its front or LCD is facing the IR Sensor (4) of SR300.
- When synchronization is successful, the LCD (13) of the HT300 displays the same frequency/channel as shown on SR300.
Activate / Deactivate Auto Mute of HT300
- When HT300 is on, long press its On/Off button (14) for 10 seconds to activate or deactivate the auto mute function of HT300.
MENU TREE (SR300)
Settings
- SET FRQ (set frequency of the channel)
- SET RF (set RF output of HT300 of the channel)
- SET AUD** (set auto attenuation of the output gain of the channel)
- SET DIS (set channel display mode of the channel)
(Short press the Volume knob (1) of the channel)
Parameters
- CH-000 : 640.000 MHz
(OR) (STORE) - CH-099 : 664.750 MHz
- RF HI (set RF output of HT300 to high) (STORE)
- RF LO* (set RF output of HT300 to low)
- 00 (auto attenuation by 0 dB)
- 01 (auto attenuation by -1 dB)
- 02* (auto attenuation by -2 dB) (STORE)
- 03 (auto attenuation by -3 dB)
- 04 (auto attenuation by -4 dB)
- DS-CHN* (display the channel in “Channel”)
- DS-FRQ (display the channel in “Frequency”) (EXIT)
(Short press the Volume knob (1) of the channel, then LCD display (5)shows)
SAFETY INSTRUCTIONS
- Read these instructions.
- Keep these instructions.
- Heed all warnings.
- Follow all instructions.
- Do not use this apparatus near water.
- Clean only with dry cloth.
- Do not block any ventilation openings. Install in accordance with manufacturer’s instructions.
- Do not install near any heat sources such as radiators,heat registers stoves or other apparatus that produce heat.
- Do not defeat the safety purpose of the grounding type plug. A polarized plug has two blades with one wider than the other. A grounding type plug has two blades and a third grounding prong. The wide blade or the third prong is provided for your safety. If the provided plug does not fit into your outlet, consult an electrician for replacement of the obsolete outlet.
- Protect the power cord from being walked on or pinched particularly at plugs, convenience receptacle and the point where the power cord connects to the apparatus.
- Only use attachments/accessories specified by the manufacturer.
- Unplug this apparatus during lightning storms or when unused for long periods of time.
- Refer all servicing to qualified service personnel. Servicing is required when the apparatus has been damaged in any way, including: power-supply cord or plug is damaged, liquid has been spilled or objects have fallen into the apparatus, the apparatus has been exposed to rain or moisture, does not operate normally, or has been dropped.
- The appliance coupler of the power supply cord is used as the ultimate disconnect device from the mains. The appliance coupler shall remain readily operable.
- The apparatus shall be connected to mains socket outlet with a protective earthing connection.
- Any changes or modifications not expressly approved by the party responsible for compliance could void the user’s authority to operate the equipment.
SPECIFICATIONS
| System | |
| Frequency Band: | 640 MHz – 690 MHz |
| Channels: | 200 |
| Operating Range: | ≈ 50 meters |
| Frequency Increment: | 250 kHz |
| Frequency Bandwidth: | 50 MHz |
| S/N Ratio: | ≥ 50 dB (including pickup, according to China GB standard) |
| Shipping Weight: | 2.5 kg |
| Dimensions (L×W×D): | 480 × 340 × 70 mm |
| SR300 | |
| Frequency Deviation | ±10 kHz |
| Frequency Preparation: | PLL synthesized control |
| Receiving Mode: | CPU controlled selection + Pilot tone detection |
| Mute Mode: | Mute & Lock Loop Circuit |
| Display: | LCD |
| Power Requirement: | 12 VDC, 1.25 A |
| Audio Output Connector: | 2 × balanced XLR 1 × 6.35mm unbalanced TS |
| HT300 | |
| Frequency Preparation: | PLL synthesized control |
| Transmission Power: | ≤ 30 mW |
| Transmission: | CPU controlled selection + Pilot tone detection |
| Frequency Deviation: | ±10 kHz |
| Display: | LCD |
| Pickup Cartridge: | Dynamic |
| RF Output power: | High, Low |
CONTACT
PROFESSIONAL CONTACTS
Contact the JBL Professional Distributor in your area. A complete list of JBL Professional international distributors is available at www.jblpro.com.
PRODUCT REGISTRATION
Register your product online at www.jblpro.com/registration.
CUSTOMER SERVICE
400 166 7806
Monday – Friday
9:00am – 6:00pm
WEBSITE
WARRANTY
The JBL Limited Warranty on VM300 Wireless Microphone System is in effect for limited period of time (refer to its warranty card) from the date of the first consumer purchase.
WHO IS PROTECTED BY THIS WARRANTY?
Your JBL Warranty protects the original owner and all subsequent owners so long as: A) Your JBL product has been purchased in China Sales Area (This Warranty does not apply to JBL products purchased elsewhere. Other
purchasers should contact the local JBL distributor for warranty information. and B) The original dated bill of sale is presented whenever warranty service is required.
WHAT DOES THE JBL WARRANTY COVER?
Except as specified below, your JBL Warranty covers all defects in material and workmanship. The following are not covered: Damage caused by accident, misuse, abuse, product modification or neglect; damage occurring during shipment; damage resulting from failure to follow instructions contained in your Instruction Manual; damage resulting from the performance of repairs by someone not authorized by JBL; claims based upon any misrepresentations by the seller; any JBL product on which the serial number has been defaced, modified or removed.
WHO PAYS FOR WHAT?
JBL will pay all labor and material expenses for all repairs covered by this warranty. Please be sure to save the original shipping cartons because a charge will be made if replacement cartons are requested. Payment of shipping charges is discussed in the next section of this warranty.
HOW TO OBTAIN WARRANTY PERFORMANCE?
If your JBL product ever needs service, please contact your local JBL distributor or our Customer Service (Hotline: 400 166 7806). You’ll need to present the original bill of sale to establish the date of purchase. Please do not ship your JBL product to our Customer Service Center without prior authorization. You are responsible for transporting your product for repair or arranging for its transportation and for payment of any initial shipping charges. However, we will pay the return shipping charges if repairs are covered by the warranty.
LIMITATION OF IMPLIED WARRANTIES
ALL IMPLIED WARRANTIES, INCLUDING WARRANTIES OF MERCHANTABILITY AND FITNESS FOR PARTICULAR PURPOSE, ARE LIMITED IN DURATION TO THE LENGTH OF THIS WARRANTY.
EXCLUSION OF CERTAIN DAMAGES
JBL’S LIABILITY IS LIMITED TO THE REPAIR OR REPLACEMENT, AT OUR OPTION, OF ANY DEFECTIVE PRODUCT AND SHALL NOT INCLUDE INCIDENTAL OR CONSEQUENTIAL DAMAGES OF ANY KIND. SOME STATES DO NOT ALLOW LIMITATIONS ON HOW LONG AN IMPLIED WARRANTY LASTS AND/OR DO NOT ALLOW THE EXCLUSION OF INCIDENTAL OR CONSEQUENTIAL DAMAGES, SO THE ABOVE LIMITATIONS AND EXCLUSIONS MAY NOT APPLY TO YOU. THIS WARRANTY GIVES YOU SPECIFIC LEGAL RIGHTS, AND YOU MAY ALSO HAVE OTHER RIGHTS, WHICH VARY, FROM STATE TO STATE.