Kalawen
Weather Station
User Manual
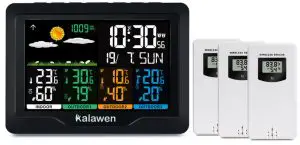
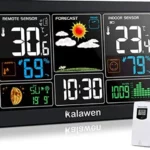
Thank you for purchasing the Kalawen color screen weather station. The device can receive signals from up to three sensors. If you have any questions about the product, please feel free to contact us via Amazon messages or email to [email protected]. We’ll reply to you as soon as possible and offer you the best shopping experience.
Features:
- WWVB Radio controlled clock function
- Radio control function can be switched on or off
- Time in optional 12/24 hour format
- Perpetual Calendar Up to Year 2099
- Daily Alarm Function Snooze function
- Low battery indicate Indoor comfort indicator
- Humidity: Indoor & Outdoor measurable range: 20%RH ~ 95%RH
Temperature:
— Indoor temperature measurement ranges: -9.9°C (14.2°F) ~ 50°C (122°F)
— Outdoor temperature measurement ranges: -40°C (-40°F) ~ 70°C (158°F)
— Temperature alternatively in °C or °F - The temperature, humidity, and comfort of the 3 remote sensors displayed alternately on the screen
- Ice alert
- Maximum /minimum value record of temperature and humidity Wireless Outdoor Sensor:
— Wall Mount or Table Stand
–3 Channel selectable
— 433.92MHz RF transmitting frequency
— 60-meter transmission range in an open area - Weather forecasting and air pressure detect
- Power Supply:
Weather Station:
Battery: 2 x LR06 AA (Not included in the package)
Adapter: AC5V150mA (Included in the package)
Remote Sensor: Battery:2 x LR06 AA (Not included in the package)
Frequently Asked Questions:
Q1: Why does the screen turn off after powering on the weather station? And sometimes during the night? What is RCC / WWVB? A: After powering on the weather station, it will soon activate the RCC function (Radio-controlled automatic time-calibration, abbr. RCC / WWVB). During the process, the display screen will automatically turn off to reduce other interference. After the process(in 7 minutes), the screen will light up again. Every night, at 1:00am, 2:00am, 3:00am, it will start RCC. If the reception of the RCC signal fails due to signal interference or a weak signal, it will start again at 4:00 am. If fails again, it will start again at 5:00 am. After 5:00 am, whether successful or not, it will not automatically start RCC. During the RCC process (in 7 minutes), if you want to light up the screen, please press “SNOOZE”, at the same time RCC will continue. If you want to stop RCC, please press “-“, RCC will stop and the screen will light up. If you want to activate RCC manually, please hold “-” for 2-3 seconds, the station will start RCC.
Q2: Why does the weather station not display the outdoor temperature? Why is there a horizontal line on the screen? Why do the temperature and humidity data on the screen show inconsistencies? A: In order to ensure that the device can receive signals quickly, please follow the steps below: (1)Power on the weather station first. (2)Then power on the sensor. (3)Confirm that the clock and the sensor are in the same channel. (4)After establishing a connection, the sensor transmits data every 60 seconds to update the temperature and humidity data. (5)If the connection failed, please hold”CH”for 2-3 seconds to clean up the data and restart to receive the data. And press the button “TX” on the back of the sensor to transmit a signal. The connection will be re-established. If there is a horizontal line on the screen (not displaying the temperature and the humidity), please ensure your station and the sensor are in the same channel. Please note that the transmitting distance is within about 60m/196feet. The displayed temperature and humidity will be more accurate after 3 hours. If there is some error, please wait about 3 hours. Indoor and outdoor temperature error within ±1, indoor and outdoor humidity error within ±5%.
Q3. Does it run on batteries during a power outage so that the alarm clock will still wake you up? AYes, the alarm clock will wake you up also when powered by batteries. The weather station can be used with a power adapter(in the package) or batteries(not included in the package). If powered by the adapter, the screen will be brighter and stay always bright. If powered by batteries, the screen will be darker and it will be off after about 15 seconds to save battery power.
ATTENTION:
- If the weather station is powered by batteries, the brightness of the screen will be in low brightness and the brightness cannot be adjusted. The screen of the weather station will turn off after about 15 seconds to save power.
- If you want the screen to be constantly lit and bright, or if you want to adjust it to your preferred brightness, please use the adapter to power it (cable adapter in the package). Note: batteries are no included in the package.
Appearance description:

RX
- Weather forecast pattern and air pressure
- Time
- Date and day of week
- Indoor temperature/humidity/comfort
- Remote sensor 1 data
- Remote sensor 2 data
- Remote sensor 3 data
- Adapter input socket
- Battery compartment cover
- Stand cover
- Operation button area
TX
A1: Remote sensor temperature
A3: Channel number
A5: Remote sensor low battery indicate
B1: °C /°F unit transfer button
B3: Channel switch
C1: Transmit indicating lamp
C3: Wall mounting hole
C5: The battery compartment
A2: Emission symbols
A4: Remote sensor humidity
B2: Manual transmitter button
C2: Battery compartment cover
C4: Stand cover
Initial operation:
- Open the Weather Station battery compartment cover
- Insert 2 x AA batteries observing polarity [ “+” and ” ” marks]
- When you insert the batteries, all icons on the LCD will light up for 3 seconds, and you will hear a beep tone, and the weather clock will begin to detect the room temperature and humidity.
- Insert the output terminal of the adapter into the DC power socket on the back of the product, then insert the adapter into the AC socket, the backlight of the product will always be lit.
- The Weather Station will now start to make a connection to the outdoor remote sensor. This process lasts for a maximum of 3 minutes and will be displayed by a flashing reception antenna symbol
 in the “OUTDOOR” display area on the receiver.
 - This now, Open the remote Sensor battery compartment cover, push the channel switch to the “1” position,
- Insert 2 x AA batteries observing polarity [“+” and “” marks], close the battery cover. According to the same method, push the channel switch to the “2” or “3” position, establish another 2 remote sensor connections.
After the receiver is connected to 3 remote sensors, it will enter radio control reception mode.
Reception of the Radio signal:
- The clock will automatically search the WWVB signal after 3 minutes of any restart or changing of new fresh batteries. The radio mast icon starts to flash.
- At 1:00 /2:00 / 3:00 AM, the clock automatically carries out the synchronization procedure with the WWVB signal to correct any deviations to the exact time. If this synchronization attempt is unsuccessful (the radio mast icon disappears from the display), the system will automatically attempt another synchronization at the next full hour. This procedure is repeated automatically up to total 5 times.
- To start manual WWVB signal reception, press and hold the “-” button for 3 seconds. If no signals are received within 7 minutes, then the WWVB signal search stops (the radio mast icon disappears) and starts again at the next full hour.
- During RC reception to stop searching for the radio signal, press the “-” button once.
F.Y.I.:
- A flashing radio mast icon indicates that the WWVB signal reception has started
- A continuously displayed radio mast icon indicates that the WWVB signal was received successfully
- We recommend the product be placed at a minimum distance of 2.5 meters (8.2Feet) to all sources of interference, such as televisions or computer monitors or switching power adapter.
- When receiving the RCC radio wave, it will automatically turn off the backlight.
- Radio reception is weaker in rooms with concrete walls (e.g.: in cellars) and in offices. In such extreme circumstances, place the system close to the window.
- During the RC receive mode, only the “Light/SNZ” and “-” buttons have a function, other buttons are not functional, If you want to carry out other functions of operation, please press “-” button to exit the RC receiving mode.
Manual time setting:
- Press and hold the “SET” button for 2 seconds, the ” ON/OFF ” starts to flash. Now use “+” and “-” buttons to set the radio control function ON or OFF. Press the “SET” button to confirm your setting, the 12/24HR start to flash. Now use “+” and “-” buttons to set the 12/24 hour mode you need.
- Press “SET” to confirm your setting, the Time zones start to flash, Now use “+” and “-” buttons set a correct time zone (P / M / C / E).
- Press “SET” to confirm your setting, the “DST ON/OFF” start to flash, Now use “+” and “-” buttons set the DST ON or OFF. Press “SET” to confirm your setting, the Hour starts to flash. Now use “+” and “-” buttons to set the correct hour.
- Press “SET” to confirm your setting, the Minute starts to flash. Now use “+” and “-” buttons to set the correct minute.
- Press “SET” to confirm your setting, the Month and Date icon starts to flash. Now use “+” and “-” buttons to select date display on Month/Date or Date/Month. Press “SET” to confirm your setting, the “year” is display and starts to flash. Now use “+” and “-” buttons to set the correct year.
- Press “SET” button to confirm your setting, the “month” starts to flash. Now use “+” and “-” buttons to set the correct month. Press “SET” button to confirm your setting, the “date” starts to flash. Now use “+” and “-” buttons to set the correct date.
- Press “SET” button to confirm your setting, the weather forecast pattern starts to flash. Now use “+” and “-” buttons to select the current weather pattern.
- Press “SET” button to confirm your setting, the air pressure unit will display and starts to flash. Now use “+” and “-” buttons to choose the air pressure unit you need. Press “SET” button to confirm your setting, the air pressure value will display and starts to flash. Now use “+” and “-” buttons set to local standard pressure value. Press “SET” button to confirm your setting and to end the setting procedures, then it will return to the normal mode.
F.Y.I.:
- If there is no valid operation within 20 seconds, it will automatically return to normal time mode from the set mode.
Setting the daily alarms:
- Press once
 button, LCD will display
  , press again to display
 , press again to display
 , each to represent Alarm1ON (Alarm2 OFF), Alarm2 ON (Alarm1 OFF), Alarm1&Alarm2 ON. Press button again to Alarm1 and Alarm2 all OFF (no” “and”“display).
 - Press once “ALARM” button, LCD display alarm1 time, press “ALARM” button again, LCD display alarm2 time, press “ALARM” button again, return to time display.
- Press and hold ALARM button for 3 seconds, until the hour of the Alarm1 time starts to flash. Use the “+” 5 and “-” buttons to set the required hour.
- Press ALARM button to confirm your setting, the Minute of the Alarm1 time starts to flash. Use the “+” and “-” buttons to set the required minute.
- Press ALARM button to confirm your setting, the hour of the Alarm2 time starts to flash. Use the “+” and “-” buttons to set the required hour.
- Press ALARM button to confirm your setting, the minute of the Alarm2 time starts to flash. Use the “+” and “-” buttons to set the required hour.
- Press ALARM button to confirm your setting and to end the setting procedure. F.Y.I.: If there is no valid operation within 20 seconds, it will automatically return to normal time mode from the alarm time set mode.
- The alarm will sound for 2 minutes if you do not deactivate it by pressing any button. In this case the alarm will be repeated automatically after 24 hours.
- Rising alarm sound (crescendo) changes the volume 4 times whilst the alarm signal is heard.
Switching off the alarm signal
- When the alarm is ringing, press any button except the “Light/SNZ” button to stop the alarm signal. It is not necessary to reactivate the alarm. It will ring again this time the next day.
Snooze function
- When the alarm is ringing, press the “Light/SNZ” button the alarm mode will to get to snooze mode. The alarm signal sounds again after 8 minutes.
RF Transmission Procedure
- The weather station automatically starts receiving a transmission from the outdoor remote sensor for outdoor temperature & humidity after batteries are inserted. The remote sensor will automatically transmit temperature and humidity data to the Weather Station after batteries are inserted.
- If the Weather Station failed to receive a transmission from the outdoor remote sensor (“- -.-“display on the LCD), Press the CH button to select the channel, the number of selected channels will flash, then press and hold the CH button for 3 seconds, RF icon will be flashing the weather station will rescan the launch signal of the channel.
Query Maximum/minimum numerical value
- When the temperature/humidity are shown in the LCD, The weather station began to record temperature/humidity maximum and minimum numerical value.
- Press once “MEM” button, the LCD will display the maximum value of temperature/ humidity, The LCD will display the minimum value of temperature/humidity if press once “MEM” button again when the maximum value is displayed. at the same time, there are “MAX” or “MIN” displayed on the LCD.
- The temperature/humidity maximum/minimum value will RE recorded after pressing and holding the “MEM” button 3 seconds. The memory value of the day will be automatically cleared at AM12:00 every night. F.Y.I.: If the temperature reading is below ranges, the LL.L will be displayed. If the temperature reading is above range, the HH.H will be displayed.
°C /°F unit transfer
Press the button to select or units.
Ice alert
The ice alert symbol  to + 37.4. appears and flashing when the outdoor temperature at 1 to + 3 or +30.2
Weather forecasting function

- Please take the weather forecast from your local weather forecasting service into account as well as the forecast from your weather station. If there are discrepancies between the information from your device and from the local weather forecasting service, please take the advice of the latter as authoritative.
- The weather forecast is calculated from the evaluation of fluctuations in the barometric pressure and may deviate from the actual weather conditions.
- The weather station displays the following weather symbols:
- The weather symbols indicate the weather fluctuation over the next 8 hours and not the current weather.
Comfort level
![]() The temperature and humidity are dry (When the humidity is below 40%.)
The temperature and humidity are dry (When the humidity is below 40%.)
![]() The temperature and humidity is comfortable (When the temperature in 20~28 and the humidity in 40~70%)
The temperature and humidity is comfortable (When the temperature in 20~28 and the humidity in 40~70%)
![]() The temperature and humidity is wet (When the humidity is above 70%)
The temperature and humidity is wet (When the humidity is above 70%)
F.Y.I.: When the humidity in 40~70% and the temperature is not in 20~28, The comfort level icon will not be displayed.
Barometric pressure trend display
↑The barometric pressure is rising.
↓The barometric pressure is falling.
If there is no arrow trend, it means the barometric pressure is steadying.
Background lighting
In battery-powered mode, press the “Light/SNZ” button, the backlight illuminates for 15 seconds. In adapter-powered mode, the backlight will be on all the time, press the “SET” button to adjust the brightness of the backlight.
www.kalawen.vip
[email protected]