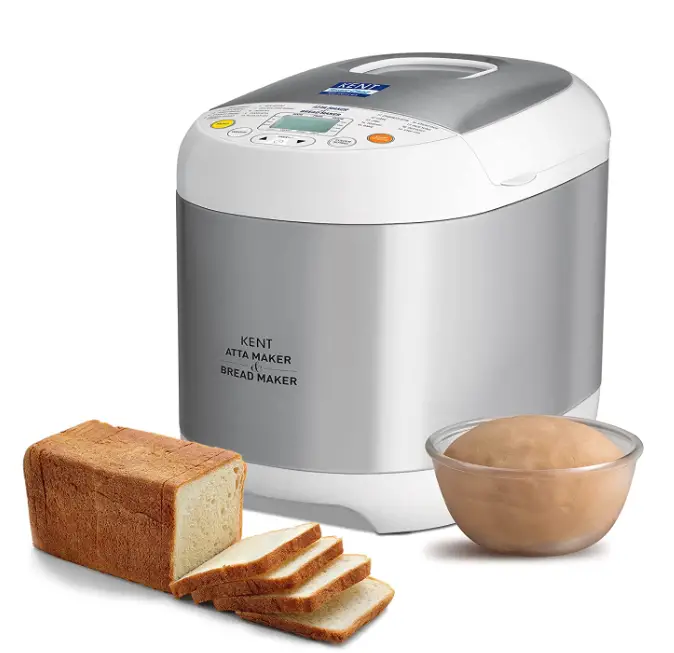
- Fully-automatic Process.
- To make Dough. Add Water, Atta and Ingredients select 9 or 11 menu settings.
- To make Bread. Add Water, Atta and Ingredients select 1 – 5 menu settings.
- Multipurpose Appliance with 19 Program Menus.
Welcome to KENT
Dear Customer,
Congratulations on your purchase and welcome to KENT! At the outset, allow us to thank you for your trust in KENT Smart Chef Appliances. At KENT, we take pride in our reputation for quality products and industry-proven performance. We are certain that you will be more than satisfied with KENT Atta Maker & Bread Maker’s performance and that it will serve you and your family’s need without any compromise. This guide would help you in getting the best out of your appliance. Please go through the booklet to familiarize yourself with its operation and maintenance. With its robust quality, you can look forward to years of trouble-free service. To ensure that the warranty of your appliance is effective, it is important that you fill-up the enclosed warranty card and mail it to us within 15 days of purchase. In case you require any further information, please contact your nearest KENT dealer/ branch.
- Bon Appetit
- KENT RO Systems Ltd.
WHY KENT ATTA MAKER and BREAD MAKER?
We, at KENT, have always believed that a clean and healthy life is the right of every individual. This ethos is what made us embark on the journey to develop innovative solutions for purifying the water that we drink, vegetables and fruits that we eat, homes, we live in an air that we breathe.
With use of innovative technology and supported by a competent service network, we have been able to create a brand that has become synonymous for well-being and health. Continuing the tradition, we now present KENT Atta Maker & Bread Maker for a home-made, hygienic & healthy diet.
We all love chapattis & pooris, but kneading dough for it is a tedious and time-consuming job. Moreover, kneading done with bare hands may not be hygienic. KENT Atta Maker & Bread Maker prepares dough for chapattis & pooris in the most hygienic way and without creating any mess.
FEATURES OF KENT ATTA MAKER and BREAD MAKER
Snack time becomes fun time.
- Enjoy fresh and hygienically prepared chapattis & pooris.
- Prepare dough from any kind of flour.
Automatic mixing & kneading.
- KENT Atta Maker & Bread Maker automatically mixes and kneads atta for perfect dough.
Freshly prepared dough in no time.
- Knead dough for chapattis & pooris within 15 minutes.
Adding different ingredients to personalize flavor.
- Treat yourself to different varieties of bread including French Bread, Wheat Bread, Brown Bread, etc.
One-touch automatic operation.
- Its automatic and time-based function makes it user-friendly.
Easy to use, clean, and store.
- KENT Atta Maker & Bread Maker is easy to clean and store.v
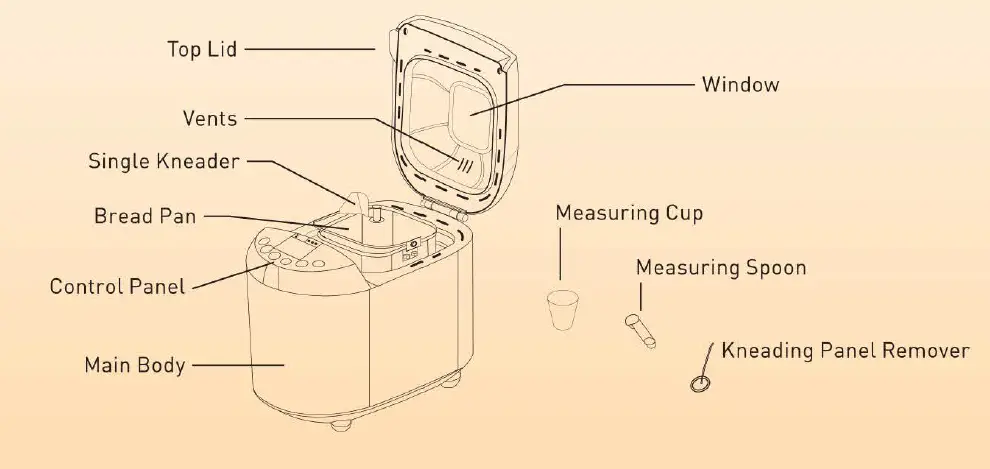
KNOW YOUR PRODUCT
ITEMS IN THE BOX
- KENT Atta Maker & Bread Maker 01
- Instruction Manual 01
- Measuring Cup 01
- Measuring Spoon 01
- Kneading Panel Remover 01
USING KENT ATTA MAKER and BREAD MAKER FOR THE FIRST TIME
- Remove stickers that can prevent unit operation.
- Check the unit for damages. Do not use in case of any damage.
- Before switching on the appliance, make sure that your home’s main voltage corresponds to the unit’s operating voltage.
- Clean all parts [refer “Cleaning & Maintenance’).
- Attach the kneading paddle properly to the bread pan.
- sing the handle, attach the bread pan by turning it anticlockwise.
- Plug in the appliance, set it on the ‘Bake’ mode and bake it empty for 10 minutes. Let it cool and clean all the parts again.
- Dry all the parts and reassemble.
- he appliance is now ready to use.
Note: Do not use metal utensils in bread pan. Doing so may damage the non-stick bread pan surface. Ensure sufficient ventilation space for the appliance. Do not place the appliance near the platform edge. Place it in the center.
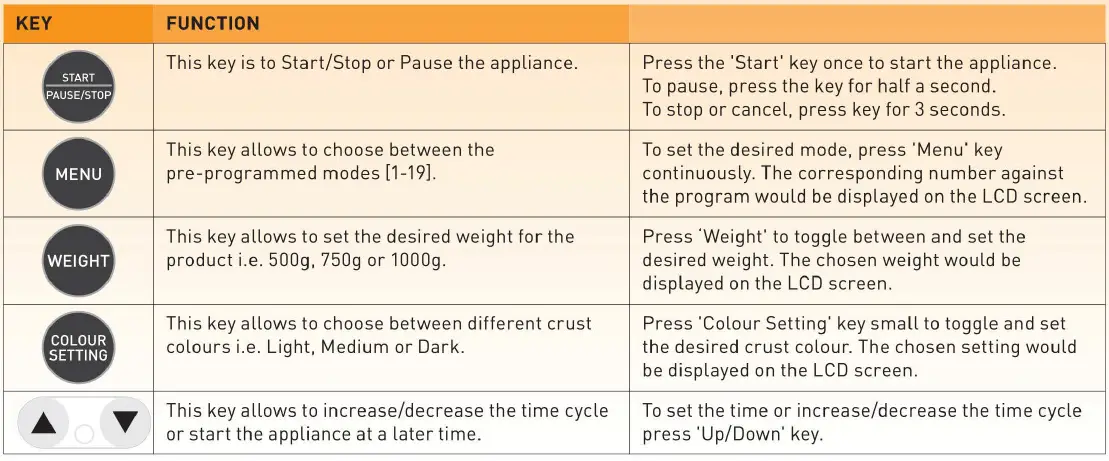
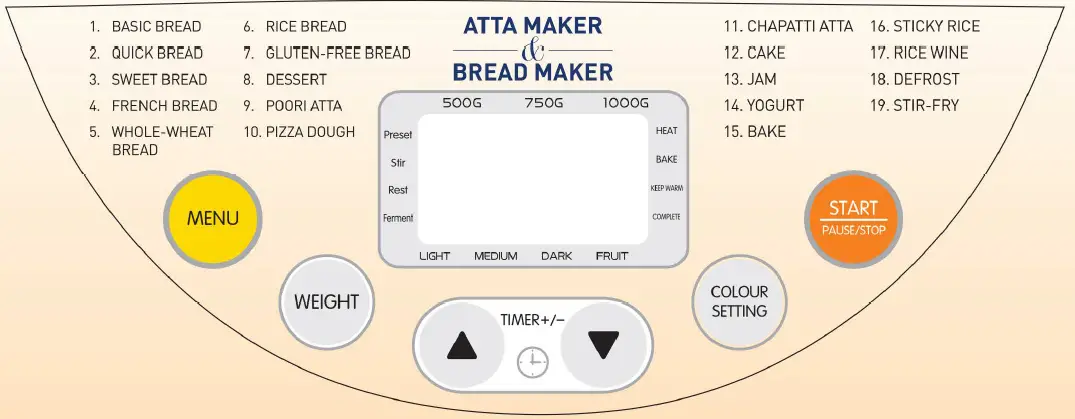
OPERATIONS PANEL EXPLAINED

PROGRAM MENU EXPLAINED
To select the desired program, press the “Menu· key continuously till the desired program number is displayed on the LCD screen. 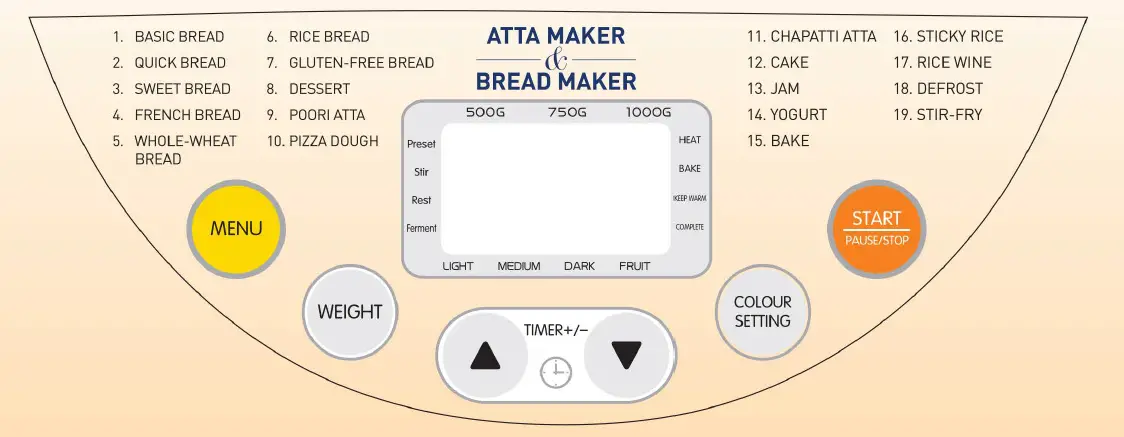
| FUNCTION | USAGE |
| Basic Bread | Makes common type of bread |
| Quick Bread | Makes bread quicker than basic function |
| Sweet Bread | Ideal for making bread with additives like fruit juice |
| French Bread | Ideal for making breads from fine flour |
| Whole-wheat Bread | For making whole wheat bread |
| Rice Bread | An ideal setting to make bread from a mix of wheat and rice flour |
| Gluten-free Bread | For making bread without using Gluten |
| Dessert | Ideal setting for kneading and baking dessert |
| Poori Atta | Makes dough for pooris |
| Pizza Dough | Ideal for making dough for buns & pizza base |
| Chapatti Atta | Makes dough for chapattis |
| Cake | Ideal setting for kneading and baking |
| Jam | An ideal setting for making fresh fruit jams and marmalades |
| Yogurt | For making yogurts |
| Bake | Ideally used for extra baking of bread |
| Sticky Rice | For making rice |
| Rice Wine | For preparing rice wine |
| Defrost | For defrosting frozen food |
| Stir-fry | For baking of nuts |
Tip: Use French Bread setting while preparing bread, for the best results.
USING KENT ATTA MAKER and BREAD MAKER
KENT Atta Maker & Bread Maker can only be used when all the parts are correctly installed.
PREPARING DOUGH FOR CHAPATTI OR POORI:
- STEP 1: Using the bread pan handle, turn the bread pan anticlockwise and then pull it out.
- STEP 2: Clean bread pan with water and dry with a soft cloth.
- STEP 3: Attach the kneading paddle to the drive shaft in bread pan.
- STEP 4: Place the bread pan in the appliance. Ensure that it fits properly. Close the lid.
- Note: The bread pan must be locked for proper mixing and kneading.
- STEP 5: Add the desired ingredients as listed in the recipe section.
- Note: Always add liquids followed by solid ingredients.
- STEP 6: Plug in the appliance. You will hear a short beep and the appliance would set to default program i.e. ‘Program 1 ·.
- STEP 7: Press ‘MENU” button until the desired program is displayed. al To make dough for ‘Pooris’, press menu button to select ·9·_ bl To make dough for ‘Chapatti’, press menu button to select ’11’
- STEP 8: Press the START/STOP button to start program. The appliance with give a single beep and a number will be displayed on the LCD screen. The appliance would start kneading the dough.
Note: lf ‘Delay Timer· is activated, the appliance will not mix ingredients until program is set to begin. - STEP 9: Once the process is complete, the appliance will give ·10· beeps and it would automatically stop.
- STEP 10: Unplug it and open the lid. Remove the pan by turning anticlockwise.
- STEP 11: Wash the components [refer ‘Cleaning & Maintenance· section) and store them dry.
Note: Before using the appliance for the first time, it is important to read the instruction manual thoroughly to make yourself fully aware of its functionality.
PREPARING BREAD:
- STEP 1: Using the bread pan handle, turn the bread pan anticlockwise and then pull it out.
- STEP 2: Clean bread pan with water and dry with a help of a soft cloth.
- STEP 3: Attach the kneading paddle to the drive shaft in bread pan.
- STEP 4: Place the bread pan in the appliance. Ensure that it fits properly. Close the lid.
Note: The bread pan must be locked properly for proper mixing and kneading. - STEP 5: Add the desired ingredients as listed in the recipe section.
Note: Always add liquids followed by solid ingredients. - STEP 6: Plug in the appliance. You will hear a short beep and the appliance would set to default program i.e. ‘Program 1″.
- STEP 7: Press “MENU” button until the desired program is displayed.
- STEP 8: Press the ‘WEIGHT’ button to set the desired weight of 500g, 750g or 1000g.
Note: WEIGHT function is not available for programs 8 to 19. - STEP 9: Press the ‘COLOUR SETTING” button to choose between Light, Medium and Dark crust.
Note: Colour Setting function is not available for programs 8 to 19. - STEP 10: If required, use the ‘TIMER’ button to increase/decrease the cycle time.
Note: Delay function is not available for programs 11 to 19. - STEP 11: Press the ‘START/STOP’ button to start program. The appliance give a single beep and a number
will be displayed on the LCD screen. The appliance will start the process of making bread.
Note: If ‘Delay Timer· is activated, the appliance will not mix ingredients until program is set to begin. STEP 12: Once the process is complete, the appliance would give ·10· beeps and will automatically go in ‘KEEP WARM’ mode. To cancel it, press ‘START/STOP’ key for 3 seconds. - STEP 13: Unplug it and open the lid. Using baking gloves remove the bread pan by turning it anticlockwise.
- STEP 14: Turn the bread pan upside down and shake gently to extract the bread.
- STEP 15: Let the bread cool for 20 minutes before slicing it.
- STEP 16: Use bread knife to make slices.
- STEP 17: Wash the components (refer “Cleaning & Maintenance· section] and store them dry.
Note: Before using the appliance for the first time, it is important to read the instruction manual thoroughly to make yourself fully aware of its functionality.
INGREDIENTS AND TIPS
- Bread Flour
Bread flour is the most important ingredient of making bread and is recommended in most yeast-bread recipes. It has a high gluten content (also called refine flour which contains high protein]. and keeps the size of the bread from collapsing after rising. Flour varies by region. The gluten content is higher than the all-purpose flour, so it can be used for making bread with larger size and higher inner fibre. - All-purpose Flour
Flour that contains no baking powder, suitable for ‘Quick· breads or bread made with the ‘Quick· setting. - Whole-wheat Flour
Whole-wheat flour is ground from the entire wheat kernel. Bread made with all or part whole-wheat flour has higher fibre and nutritional content. Whole-wheat flour is heavier and as a result, loafs may be smaller in size and have a heavier texture. It contains wheat skin and gluten. Many recipes usually combine with whole-wheat flour or bread flour to achieve the best result. - Black Wheat Flour
Black Wheat Flour, also named as “Rye Flour·, is a kind of high fibre flour, and is similar to whole-wheat flour. To obtain large size after rising, it must be used in combination with high proportion of bread flour. - Self-rising Flour
Flour that contains baking powder. Use especially for making cakes. Do not use self-rising flour in combination with yeast. - Corn Flour and Oatmeal Flour
Corn flour and oatmeal flour are ground from corn and oatmeal separately. They are added ingredients of making rough bread , which are used for enhancing the flavour and texture. - Sugar
Sugar is “food’ for yeast and also increases the sweet taste and colour of bread. lt is a very important element for making the bread rise. White sugar is normally used; however, brown sugar, powdered sugar or cotton sugar may also be used in some recipes. - Yeast
Yeast is a living organism and should be kept in the refrigerator to remain fresh . It needs carbohydrates found in sugar and flour as nourishment. Yeast used in bread making recipes is sold under several different names such as bread machine yeast (preferred). active-dry yeast, and instant yeast . After yeasting process, the yeast produces carbon dioxide. The carbon dioxide then expands the bread and softens the inner fibre.- 1 tbsp dry yeast =3 tsp dry yeast
- 1 tbsp dry yeast =15ml yeast
- 1 tsp dry yeast =5ml yeast
- Before using, check the expiry date and storage time of yeast. Refrigerate immediately after use. The fungus will be killed at high temperature . Usually, the failure of bread rising is caused by bad yeast. TIP: To check whether your yeast is fresh and active: 11) Pour 1 cup (237ml) warm water (45-50°C) into a measuring cup . 12) Add 1 teaspoon 15 ml) white sugar into the cup and stir. Then add 1 tablespoon (15ml) yeast over the water.
(3) Place the measuring cup in a warm place for about 10 min. Do not stir the water. 4) Fresh, active yeast will begin to bubble or “grow”. lf it does not, the yeast is dead or inactive.
- Salt
Salt is necessary to improve the bread flavour and crust colour. It is also used to restrain yeast activity. Never use too much salt in a recipe. Bread is larger without salt. - Egg
Eggs can improve bread te xture and make the bread more nourished and larger in size. The egg must be whisked with other liquid ingredients. - Grease, Butter and Vegetable Oil
Grease can soften the bread and delay storage life. Butter should be melted or cut into small pieces before adding to liquid . - Baking Powder
Baking powder is used for ultra-fast rising of bread and cake. As it does not need rise time, it produces air to form bubble to soften the texture of bread utilizing chemical principle. - Baking Soda
It is similar to baking powder. It can also be used in combination with baking powder. - Water and Other Liquids (always add first)
Water is an essential ingredient for making bread . Water should be at room temperature, ideally between 20°C and 25°C. Some recipes may require milk or other liquids for enhancing bread’s flavour. Never use dairy products with the ‘Delay Timer· option.
RECIPES
Add the ingredients in the given order.
| Menu | Ingredient | Volume | Volume | Volume | Remark | |
| 1.
Basic Bread |
Bread Weight | 1000g | 750g | 500g | ||
| Sequence | Time | 3:05 | 3:00 | 2:55 | ||
| 1. | Water | 320ml | 260ml | 180ml | ||
| 2. | Salt | 2 Spoons | 1.5 Spoons | 1 Spoon | Put aside | |
| 3. | Sugar | 3 Scoops | 2. 5 Scoops | 2 Scoops | Put aside | |
| 4. | Oil | 4 Scoops | 3 Scoops | 2 Scoops | ||
| 5. | Refine Flour [Maida) | 3. 5 Cups/500g | 2.75 Cups/ 400g | 2.25 Cups/ 300g | ||
| 6. | Instant Yeast | 1.5 Spoons | 1.25 Scoops | 1.0 Spoon | Put on the dry flour: Don’t touch with any liquid. | |
| 2.
Quick Bread |
Bread Weight | 1000g | 750g | 500g | ||
| Time | 2:05 | 2:00 | 1:55 | |||
| 1. | Water | 320ml | 260ml | 180ml | Water temperature 40-50°c | |
| 2. | Salt | 2 Spoons | 1.5 Spoons | 1 Spoon | Put aside | |
| 3. | Sugar | 3 Scoops | 2. 5 Scoops | 2 Scoops | Put aside | |
| 4. | Oil | 4 Scoops | 3 Scoops | 2.5 Scoops | ||
| 5. | Refine Flour [Maida) | 3. 5 Cups/500g | 2.75 Cups/ 400g | 2.25 Cup/ 300g | ||
| 6. | Instant Yeast | 3.5 Spoons | 3 Spoons | 2.5 Spoons | Put on the dry flour: Don’t touch with any liquid. |
| Menu | Ingredient | Volume | Volume | Volume | Remark | |
| 3.
Sweet Bread |
Bread Weight | 1000g | 750g | 500g | ||
| Time | 3:50 | 3:45 | 3:40 | |||
| 1. | Water | 300ml | 240ml | 160ml | Put aside | |
| 2. | Salt | 1 Spoon | 0.5 Spoon | 0.5 Spoon | ||
| 3. | Sugar | 0.4 Cup | 0.3 Scoop | 0.2 Cup | ||
| 4. | Oil | 2 Scoops | 1.5 Scoops | 1 Scoops | ||
| 5. | Refine Flour (Maida) | 4 Scoops | 3 Scoops | 2.5 Scoops | ||
| 6. | Whole-wheat Bread | 3.5 Cups/ 500g | 2.75 Cups/ 400g | 2. 25 Cups/ 300g | ||
| 7. | Instant Yeast | 1.5 Spoons | 1.25 Spoons | 1 Spoon | Put on the dry flour: Don’t touch with any liquid. | |
| 4.
French Bread |
Bread Weight | 1000g | 750g | 500g | ||
| Time | 4:05 | 4:00 | 3:55 | |||
| 1. | Water | 320ml | 260ml | 180ml | ||
| 2. | Salt | 3 Spoons | 2. 5 Spoons | 2 Spoons | Put aside | |
| 3. | Sugar | 2 Spoons | 1.5 Spoons | 1.25 Spoons | Put aside | |
| 4. | Oil | 2 Scoops | 1.5 Scoops | 1.25 Scoops | ||
| 5. | Refine Flour (Maida) | 3.5 Cups/500g | 2. 75 Cups/400g | 2. 25 Cups/300g | ||
| 6. | Instant Yeast | 1.5 Spoons | 1.25 Spoons | 1 Spoon | Put on the dry flour: Don’t touch with any liquid. |
| Menu | Ingredient | Volume | Volume | Volume | Remark | |
| 5.
Whole-wheat Bread |
Bread Weight | 1000g | 750g | 500g | ||
| Time | 4:05 | 4:00 | 3:55 | |||
| 1. | Water | 320ml | 260ml | 180ml | ||
| 2. | Salt | 1.5 Spoons | 1 Spoon | 0.5 Spoon | Put aside | |
| 3. | Sugar | 3.5 Spoons | 3 Spoons | 2.5 Spoons | Put aside | |
| 4. | Oil | 3 Scoops | 2.5 Scoops | 2 Scoops | ||
| 5. | Refine Flour [Maida) | 1.75 Cups/250g | 1.5 Cups/210g | 1.25 Cups/160g | ||
| 6. | Whole-wheat Flour | 1.75 Cups/250g | 1.5 Cups/210g | 1 Cup/140g | Put on the dry flour: Don’t touch with any liquid. | |
| 7. | Instant Yeast | 2 Spoons | 1.5 Spoons | 1.25 Spoons | Put on the dry flour: Don’t touch with any liquid. | |
| 6.
Rice Bread |
Bread Weight | 1000g | 750g | 500g | ||
| Time | 2:05 | 2:45 | 2:40 | |||
| 1. | Water | 200ml | 160ml | 100ml | ||
| 2. | Salt | 2 Spoons | 1.5 Spoons | 1 Spoon | Put aside | |
| 3. | Sugar | 3 Scoops | 2. 5 Scoops | 2 Scoops | Put aside | |
| 4. | Oil | 4 Scoops | 3 Scoops | 2.5 Scoops | ||
| 5. | Cooked Rice | 2 Cups | 1.5 Cups | 1 Cup | Use cool downed cooked ri•ce | |
| 6. | Refine Flour [Maida) | 2 Cups/280g | 1.5 Cups/21Og | 1 Cup/140g | ||
| 7. | Instant Yeast | 2 Spoons | 1.5 Spoons | 1.25 Spoons | Put on the dry flour: Don’t touch with any liquid. |
| Menu | Ingredient | Volume | Volume | Volume | Remark | |
| 7. Gluten- free Bread | Bread Weight | 1000g | 750g | 500g | ||
| Time | 3:05 | 3:00 | 2:55 | |||
| 1. | Water | 270ml | 210ml | 150ml | ||
| 2. | Salt | 1.5 Spoons | 1 Spoon | 0.5 Spoon | Put aside | |
| 3. | Sugar | 3.5 Scoops | 3 Scoops | 2.5 Scoops | Put aside | |
| 4. | Oil | 3 Scoops | 2.5 Scoops | 2 Scoops | ||
| 5. | Flour | 2 Cups/280g | 1.5 Cups/21Og | 1 Cup/140g | ||
| 6. | Corn Powder | 2 Cups/280g | 1.5 Cups/21Og | 1 Cup/140g | Can replace with oat flour | |
| 7. | Instant Yeast | 1.5 Spoons | 1.25 Spoons | 1 Spoon | Put on the dry flour. Don’t touch with any liquid. | |
| 8. Dessert | Bread Weight | 1000g | ||||
| Time | 1:40 | |||||
| 1. | Egg | 2 Pes | ||||
| 2. | Milk | 1 Cup | ||||
| 3. | Cooked Rice | 1. 5 Cups | ||||
| 4. | Sugar | 0.5 Cup | ||||
| 5. | Raisin | 0.5 Cup | ||||
| 9. Poori Atta | Time | 0:15 | ||||
| 1. | Water | 330ml | ||||
| 2. | Salt | As per choice | ||||
| 3. | Oil | 3 Spoons | ||||
| 4. | Whole-wheat flour | 3.5 Cups* |
- Oras desired. In case less flour is used, reduce the quantity of water in same proportion.
- Ingredients can be adjusted according to your style and taste.
| Menu | Ingredient | Volume | Volume | Volume | Remark | |
| 10. Pizza Dough | Time | 1:30/1OOOg | 1:30/7509 | |||
| 1. | Water | 330ml | 260ml | |||
| 2. | Salt | 1 Spoon | 1 Spoon | Put aside | ||
| 3. | Oil | 3 Scoops | 2.5 Scoops | |||
| 4. | Refine Flour | 4 Cups/560g | 2.75 Cups/400g | |||
| 5. | Instant Yeast | 1.5 Spoons | 1.5 Spoons | Put on the dry flour. Don’t touch with any liquid. | ||
| 11. Chapatti Atta | Time | 0:07 | ||||
| 1. | Water | 330ml | ||||
| 2. | Salt | As per choice | ||||
| 3. | Oil | 1/2 Scoop | ||||
| 4. | Whole-wheat flour | 3.5 Cups* | ||||
| 12.Cake | Time | 2:20 | Dissolve sugar in egg and water, mix well by electric
egg-beater to a bulk. Put the other ingredients together into bread barrel. then start this menu. |
|||
| 1. | Water | 30ml | ||||
| 2. | Egg | 3 Nos. | ||||
| 3. | Sugar | 0.5 Cup | ||||
| 4. | Oil | 2 Scoops | ||||
| 5. | Self-rising Flour | 2 Cups/280g | ||||
| 6. | Instant Yeast | 1 Spoon | ||||
| 13. Jam | Time | 1 :20 | Stir till mushy, put water if desired. | |||
| 1. | Pulp | 3 Cups | ||||
| 2. | Starch | 0.5 Cup | ||||
| 3. | Sugar | 1 Cup |
- Oras desired. In case less flour is used, reduce the quantity of water in same proportion.
| Menu | Ingredient | Volume | Volume | Volume | Remark | |
| 14. Yogurt | Time | 8:00 | ||||
| 1. | Milk | 1000ml | ||||
| 2. | Lactic Acid Bacteria | 100ml | ||||
| 15.Bake | 1. | Adjust baking temperature by pressing crust
Button :100°C (light); 150°C (medium); 200°C (dark), default 150°C |
||||
| 16. Sticky Rice | Time | 1:20 | Soak glutinous rice for 30 mins before use with bake and stir | |||
| 1. | Water | 275ml | ||||
| 2. | Glutinous Rice | 250g | ||||
| 17. Rice Wine | Time | 36:00:00 | Soak in water 30mins before use | |||
| 1. | Glutinous Rice | 500g | ||||
| 2. | Water | Appropriate Amount | ||||
| 3. | Distiller’s Yeast | 1 Spoon (3g) | ||||
| 18. Defrost | Time | 0:30 | ||||
| 1. | ||||||
| 2. | Default 30mins; adjustable from 0:10 to 2:00, 10 mins for each pressing | |||||
| 19. Stir-fry | Time | 0:30 | ||||
| 1. | Peanuts | 300g | ||||
| 2. | Default 0:30; adjustable from 0:10 to 2:00, +/-1min for each short-pressing,+/- 10 mins for each long-pressing | |||||
CLEANING and MAINTENANCE
- Press the ‘ON/OFF’ button to turn off the appliance and unplug it
- Open the lid and remove the bread pan by turning it anticlockwise and lifting it up.
- Remove the kneading paddle. If the kneading paddle is covered in bread or dough, add some water in the pan and let it soak for a while before removing it.
- Wipe the bread pan from inside and outside using a soft cloth and wash it.
- Completly dry both, bread pan and kneading paddle, before reinstallation.
- Use moist cloth to wipe stains on the main unit and top lid.
- Use a dry cloth to clean the main unit, control panel and the exteriors of the KENT Atta Maker & Bread Maker. e Store KENT Atta Maker & Bread Maker in a dry, well ventilated place after use.
Note: After cleaning, make sure that all the parts are completely dry before storing it.
PRECAUTIONS
- Do not disassemble, repair or alter the machine on your own. It may cause appliance failure or breakdown.
- The input voltage must not exceed the rating; it might damage the appliance.
- Unplug before replacing the cleaning/moving the appliance.
- Do not use the appliance with damaged power cord or plug.
- If power cord is damaged, replace it with a genuine KENT spare part.
- Do not install the machine near any heat source, e.g., heater.
- If the machine is not in use for a long time, unplug it.
- Do not sit on, stand on or shake the appliance.
- Do not use the machine when it is in recumbent or inclined position.
IMPORTANT SAFETY INSTRUCTIONS
When using an electrical appliance, basic precaution should always be followed, including the following:
- Unplug, when not in use and before servicing.
- To reduce the risk of electric shock, do not use near or on wet surfaces.
- Use the appliance only as described in the manual.
- Do not use the appliance if cord or plug is damaged or worn out. Replace the damaged cord or plug immediately.
- Do not try to service the appliance on your own. Send it to an authorized service center only.
- Keep cord away from heated surfaces.
- Do not unplug the appliance by pulling the cord. Always unplug by pulling the plug and not the cord.
- To avoid electric shocks, do not use the appliance with wet hands.
- Keep hair, loose clothing, fingers and all parts of body away from moving parts.
- Turn all controls off before unplugging.
- This appliance is suitable for indoor use only.
- Keep away from children.
- The appliance is not designed to be used by people, who are physically or mentally disabled or mentally handicapped or lack relevant experience and knowledge, unless a person responsible for their safety uses the product for supervision or guidance.
TROUBLESHOOTING
| PROBLEM | POSSIBLE CAUSE | POSSIBLE SOLUTION |
| The appliance does not start. | 1. Power cord not correctly inserted.
2. Input power supply not as per the recommendations. 3. Motor failure. |
1. Connect the power cord.
2. Check if the input voltage is in accordance with the indicated voltage of the product. 3. Send it to KENT Authorized Service Center. |
| After connecting properly, the appliance has sound but does not start. | 1. The kneading paddle or the bread pan is not properly assembled.
2. Appliance is over-loaded. |
1. Ensure the parts have been properly assembled.
2. Check the quantities you are processing and the processing time. |
| The indicator light is on, but the unit does not work. | 1. No function key has been selected.
2. Motor failure. |
1. Press the function key.
2. Switch off the appliance and unplug it. Go to the nearest KENT Authorized Service Centre for assistance. |
| The appliance makes a lot of noise, smells, is too hot to touch, gives out smoke, etc. | 1. Motor failure. | 1. Switch off the appliance and unplug it. Go to the nearest KENT Authorized Service Centre for assistance. |
| Dough is not blending thoroughly. | 1. Bread pan or kneading paddle is not correctly installed.
2. To many ingredients used. |
1. Ensure that the pan and paddle are properly installed.
2. Ensure ingredients are measured properly and added in proper order only. |
| Bread risen too high or pushed lid up. | 1. Ingredients not measured properly (too much yeast ,flour).
2. Kneading paddle not in bread pan. 3. Forgot to add salt. |
1. Measure all ingredients accurately and make sure sugar and salt have been added.
2. Try decreasing yeast by 1/4 teaspoon (1. 2ml). 3. Check installation of kneading paddle. |
| Bread does not rise; loaf short. | 1. Inaccurate measurement of ingredients or inactive yeast.
2. Lifting lid during programs. |
1. Measure all ingredients accurately.
2. Check expiry date of yeast and flour. 3. Liquids should be at room temperature. |
| Baked bread has a crater on top of the loaf. | 1. Dough has risen too fast.
2. Too much yeast or water. 3. Incorrect program chosen for the recipe. |
1. Do not open lid during baking.
2. Select a darker crust option. |
| PROBLEM | POSSIBLE CAUSE | POSSIBLE SOLUTION | |
| Crust colour is too light. | 1. Opening the lid during baking. | 1. Do not open lid during baking.
2. Select a darker crust. |
|
| Crust colour is too dark. | 1. Too much sugar in the recipe. | 1. Decrease sugar amount slightly.
2. Select a lighter crust option. |
|
| Bread loaf is lopsided. | 1. Too much yeast or water.
2. Kneading paddle pushed dough to one side before rising and baking. |
1. Measure all ingredients accurately.
2. Decrease yeast or water slightly. 3. Some loafs may not be evenly shaped, particularly with whole-grain flour. |
|
| Loafs made are of different shapes. | 1. Varies with the type of bread. | 1. Whole-grain or multigrain is denser and shorter than a basic white bread. | |
| Bottom is hollow or there is a hole inside. | 1. Dough too wet, too much yeast, no salt.
2. Water too hot. |
1. Measure all ingredients accurately.
2. Decrease yeast or water slightly. 3. Check salt measurement. 4. Use room temperature water. |
|
| Under baked or sticky bread. | 1. Too much liquid; incorrect program chosen. | 1. Decrease liquid and measure ingredients carefully.
2. Check program chosen for recipe. |
|
| Bread mashes down when slicing. | 1. Bread is too hot. | 1. Allow to cool on wire rack for 15-30 minutes before slicing. | |
| Bread has a heavy, thick texture. | 1. Too much flour, old flour.
2. Not enough water. |
.1. Try increasing water or decreasing flour.
2. Whole-grain breads will have a heavier texture. |
|
TECHNICAL SPECIFICATION
| Model Name | KENT ATTA MAKER & BREAD MAKER |
| Model Number | 16010 |
| Mounting | Pedestal |
| Net Weight | 11 kg |
| Input Power Supply | Single Phase 220 V AC, 50Hz. [g) |
| Product Dimension (mm) | 360 (L) x 245 (W) x 300 (H) |
| Power Consumption | 550 W |
KENT RO SYSTEMS LTD.
- E-6, 7 & 8, Sector-59, Noida, U.P.-201309, India.
- Ph.: +91-120-3075000
- E-mail: [email protected]
- Website: www.kent.co.in
For customer complaints, contact customer care officer at:
- E-6, 7 & 8, Sector-59, Naida, UP-201 309, India.
- Call: 092-789-12345
- E-mail:[email protected] or Visit us at www.kent.co.in
- Imported & Marketed by: KENT RO Systems Ltd.
