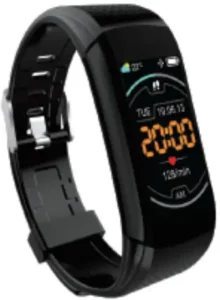
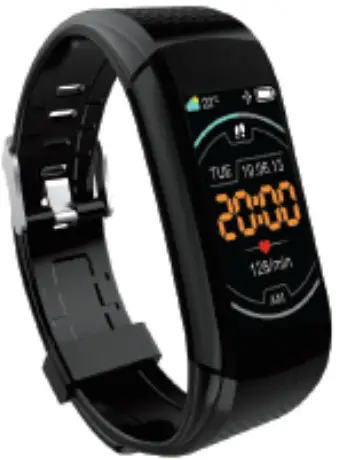
KORETRAK PRO 30585 B08MV9LHK2 Fitness Tracker Instruction Manual
KORETRAK PRO
This latest KoreTrak has an upgraded sensor that covers most skin pigmentation including tattoos to give a more accurate heart rate and SPO2 readings. It can also detect your skin temperature and calculate your baseline temperature after a few readings
IMPORTANT SAFETY INFORMATION
To prevent personal injury or damage to your KoreTrak Pro, read the following guidelines carefully to ensure proper usage:
- Avoid exposing KoreTrak Pro to chemicals, sudden impacts, and extreme heat.
- When cleaning KoreTrak Pro, do not use harsh solventssuch as alcohol, benzine, acetone or thinner.
- Do not attempt to disassemble KoreTrak Pro or remove the battery.
- If you feel any discomfort while wearing KoreTrak Pro, loosen the wristband and discontinues using.
- This is not a medical diagnostic device.
- Do not use in steamy environment such as sauna or hot spring. Not for swimming or diving.
Warning: This device is not a toy. Keep away from children.
READ ME FIRST
The Koretrak Pro is equipped with an integrated charging USB connector.
To charge your device, please remove the bottom watch strap.
The USB connector side is marked with “USB” markings on the back of the watch.
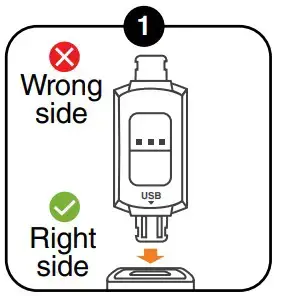
Plug into a 5V 1A USB-A port to charge (not included), if the charging does not occur, try flipping the connector 180°.
For completely drained battery, it might need about 3-5 minutes to charge before the screen and touch sensor are responsive, this is normal.
TIPS FOR USE
For best performance, keep device sensor clean and worn snuggly on wrist.
CHARGING THE BATTERY
- The Koretrak Pro is equipped with an integrated charging USB connector. To charge your device, please remove the bottom watch strap. The USB connector side is marked with “USB” markings on the back of the watch.
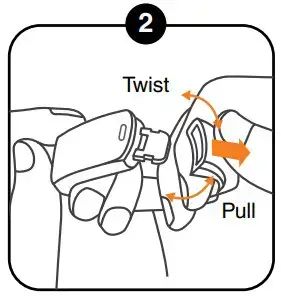
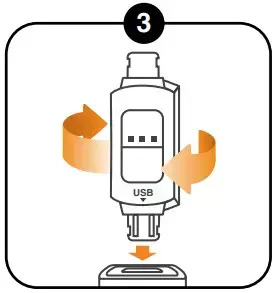
- Remove the bottom wristband to access the charging connector with a twist and pull motion (refer to diagram ). You can find the connector side under the KoreTrak Pro marked “USB” with an arrow pointing at it, the USB metal contacts should be visible (refer to diagram ).
- Plug the charging connector into your computer’s USB port or a wall socket with a USB adapter. Make sure your power source is at least 5V. It might take up to 3-5 minutes for the watch to be responsive.
- If KoreTrak Pro does not charge after inserting the connector, it may be inserted in the wrong orientation. Unplug KoreTrak Pro, flip it and reinsert the USB connector (refer to diagram ). When properly connected, KoreTrak Pro will vibrate and will start charging.
- Allow KoreTrak Pro to charge for up to 2 hours or until the battery indicator on the home screen is full.
- Remove the device and reattach the watch strap.
- Press firmly to ensure water resistance, there shouldn’t be any visible gap between the case of the watch and the watch strap.
TIPS FOR USE
Note: You can locate the USB connector by looking at the back of your KoreTrak Pro, there you will find markings of USB and an arrow.
Make sure the KoreTrak Pro USB connector contacts are properly inserted to the USB port of your computer or USB adapter (refer to diagram ). If the KoreTrak screen still does not light up immediately after being plugged in properly the battery may be completely drained. Let it charge for at least 5 minutes, the screen should light back up within this time. If KoreTrak still does not light up or charge after all these steps, please contact customer support. No charging dongle required.
TIPS FOR USE
- KoreTrak Pro requires 20 seconds to get a heart rate or blood oxygen reading.
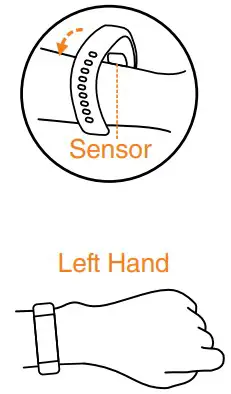
- For optimal performance, it is recommended to wear KoreTrak Pro on your left wrist.
- To keep KoreTrak Pro clean, wipe it down with a damp cloth once a week or after physical activities.
- To maintain consistent sensor reading, it is recommended to clean the sensor at the back of the watch after use. Dirt, lotion, grease or excessive water and sweat will affect sensor performance.
FASTENING THE WRISTBAND
- The device sensor require a close skin contact on your wrist to get an accurate reading.
- Hold KoreTrak Pro in place on the outside of your wrist.
- Tighten the wrist band until you feel it has a firm grip around your wrist, but not so tight that it cuts off circulation, then fasten the buckle.
- To remove the device, loosen pin buckle.
INSTALLING THE KORETRAK PRO APP
- Download the KoreTrak Pro App onto your iOS or Android smartphone by scanning the QR codes below, or by searching “DayBand” in the App Store or Google Play Store.
- Device requirements: iOS 8.0 and above; Android 4.4 and above.

CONNECTING KORETRAK PRO TO YOUR SMARTPHONE
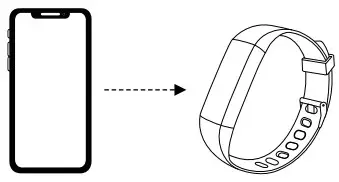
You will have to pair your KoreTrak Pro to your smartphone manually the first time you use it. After that, it will connect automatically anytime your device is within range. Your KoreTrak Pro can store off-line data for up to 7 days before syncing with your smartphone.
- Open the DAYBAND App on your smartphone.
- Hold KoreTrak Pro near your smartphone and go to Device page, click “Add a new device”.
- Choose corresponding Bluetooth name “KoreTrak Pro”.
- Connection completed.

USING KORETRAK PRO
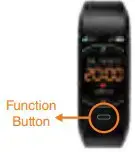
- Kore Trak Pro is equiped with a capacitive function button located at the bottom of the screen.
- Short press to scroll through all the modes.
- Long press to enter or exit mode
TO TURN ON KORETRAK PRO
- Long press function button to turned on the device.
- If the device cannot be turned on, it is possible that the battery might be low, please charge it on a 5V rated USB power supply for up to 3-5 minutes. Please refer to the charging instruction on page 4-5.
HOME SCREEN
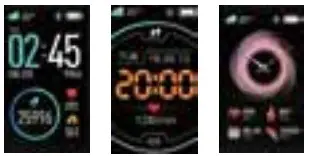
The home screen displays the time, date, weather, kinetic stats and other essential information.
To change the home screen display style, long press to cycle between the 3 different home screen designs.
MEASUREMENT MODES
- To cycle through measurement modes, short press the function button while the device is on home screen.
- Long press function button to enter function modes (ie: Sports, messages and more).
- PEDOMETER
Records the number of steps you have taken.
- ODOMETER
Records the distance you have traveled

Note: Friendly Reminder
The unit of measurement can be changed from Mile to KM in your App - CALORIMETER
Records the number of calories you have burned.

- HEART RATE MONITOR
Measures your heart rate in beats per minute.

- BLOOD OXYGEN MONITOR
Measures oxygen levels in your blood.

- SKIN TEMPERATURE
Records skin temp measurement

Note: Friendly Reminder
The unit of measurement can be changed from °F to °C in your App.
The metal temperature sensor will need direct skin contact in order to take an accurate reading. Water, sand or dirt between your wrist and watch will result in inaccurate readings.
The skin temperature measurement can take up to 30 seconds to
SLEEP TRACKING

To use sleep tracking function, the device must be paired with the phone App.
Make sure your device is sufficiently charged for the duration of the test.
Sleep tracking is pre programmed to start automatically between 8PM to 8AM the next day. (2000-0800)
Make sure you are wearing your device on your wrist during the entire duration of the sleeping period. Adjust the strap for a snug yet comfortable fit. Don’t forget to turn on Do Not Disturb function and/or lower the screen brightness.
The data will be automatically uploaded to the phone App on the next day when you are using the App.
The device can store up to 7 days of sleeping data without the phone.
FUNCTIONAL MODES
- SPORT
Measures your performance during specific exercises. Long press to enter mode; short press to scroll through activities (Running, Treadmill, Cycling, Yoga, HIIT). Long press again to start or stop an activity

- MESSAGES
Views incoming text messages from your smartphone. Long press to enter mode; short press to scroll through messages. Messaging alerts support Twitter, Messenger, Facebook, Whatsapp, Hangout, Skype, Wechat, QQ and Line.

- MORE
Access to settings and other modes. Long press to enter the menu; short press to scroll through functions.

- VERSION
Displays Bluetooth version.

- FIND
Helps you locate your smartphone. Long press to send a vibration alert to your smartphone.

- BRIGHTNESS
Adjusts the display brightness. Long press to scroll through screen brightness levels.

Note: Friendly Reminder
There are a total of 4 levels of user selectable brightness. High intensity is best used for outdoors during the day. Lower the brightness when it is not needed to reduce battery consumption. - SHUTDOWN
Long press to power down KoreTrak Pro.

- RESET
Resets KoreTrak Pro’s data and restores factory settings. Long press to reset.

- STOPWATCH
Records time. Long press to start timer; short press to stop. Long press again to reset timer.

FEATURES VIA APP
- KoreTrak Pro will vibrate when you receive a call or text message. To activate this function, you will need to set it up in the App under ‘Device’.
- When you receive a call, KoreTrak Pro will vibrate. Long press the function button to decline the call.
- Message (e.g. Twitter, Messenger, Facebook, Whatsapp, Hangout, Skype, Wechat, QQ and Line.) alert needs to connect in “App” section.
- Alarm function can only be used on the App
- Stand Up Reminder is adjustable from 30 – 180 minutes in increments of 5.
- You can link KoreTrak Pro data to Apple Health App.
- Find Device – selecting this feature will cause your KoreTrak Pro to vibrate.
- Shake to Take a Picture – this will allow you to take a photo on your smartphone by shaking your wrist.
- Light Up – KoreTrak Pro’s screen will automatically turn on when your hand is raise
- Distance Units – adjust by going to App, ‘Device’ ‘General’
- Display Timeout – adjustable by 5, 10, or 15 seconds.
- Heart Rate – you can set up auto heart rate monitoring every hour.
- Do Not Disturb – select a time frame where you can turn off KoreTrak’s vibrations, light up feature, or information push.
- 24-hour Time Setting – adjust by going to App, ‘Device’ ‘General’
- Safety Function – you will get a phone notification when you are away from your KoreTrak Pro device. (This feature will not work if your Bluetooth is off.)
LANGUAGE SETTINGS
You can change the language settings directly on the KoreTrak Pro band by selecting MORE and cycle through till you reach the languages. To change the language settings through mobile app, go to ‘Device’ ‘General’ while connected to your KoreTrak Pro.

SPECIFICATIONS
| Package Includes | KoreTrak Pro, wrist band, instruction manual |
| Screen Size | 1.08in |
| Bluetooth Version | 4.0 |
| Water Resistant Rating | IP67 |
| Battery Type | Lithium Polymer |
| Battery Capacity | 120mAh |
| Charge Time | 1.5 – 2 hours |
| Input | 5V  80mA 80mA |
Having difficulties setting up your watch?
We are here to help!
Please visit https://support.korehealth.com or scan the below QR codes for any urgent inquiries!
 The device complies with the European Directives 2014/53/EU.
 At the end of its service life, this product may not be disposed of in the normal household waste, but rather must be disposed of at a collection point for recycling electrical and electronic devices. The materials are recyclable according to their labeling. You make an important contribution to protecting our environment by reusing, recycling, or utilizing old devices in other ways. Please ask the municipal administration where the appropriate disposal facility is located. Subject to change.
FCC
FCC Statement
This device complies with part 15 of the FCC rules. Operation is subject to the
following two conditions: (1) this device may not cause harmful interference, and (2) this device must accept any interference received, including interference that may cause undesired operation.
Caution: The user is cautioned that changes or modifications not expressly
approved by the party responsible for compliance could void the user’s authority to operate the equipment.
Note: This equipment has been tested and found to comply with the limits for a Class B digital device, pursuant to part 15 of the FCC Rules. These limits are
designed to provide reasonable protection against harmful interference in a
residential installation. This equipment generates, uses and can radiate radio frequency energy and, if not installed and used in accordance with the instructions, may cause harmful interference to radio communications. However, there is no guarantee that interference will not occur in a particular installation. If this equipment does cause harmful interference to radio or television reception, which can be determined by turning the equipment off and on, the user is encouraged to try to correct the interference by one or more of the following measures:
- Reorient or relocate the receiving antenna.
- Increase the separation between the equipment and receiver.
- Connect the equipment into an outlet on a circuit different from that to which the receiver is connected.
- Consult the dealer or an experienced radio/TV technician for help.
This equipment complies with FCC‘s RF radiation exposure limits set forth for an uncontrolled environment. End user must follow the specific operating instructions for satisfying RF exposure compliance. This transmitter must not be co-located or operating in conjunction with any other antenna or transmitter.

