
KR-55 PRO
KORG RHYTHM
Quick Start Guide
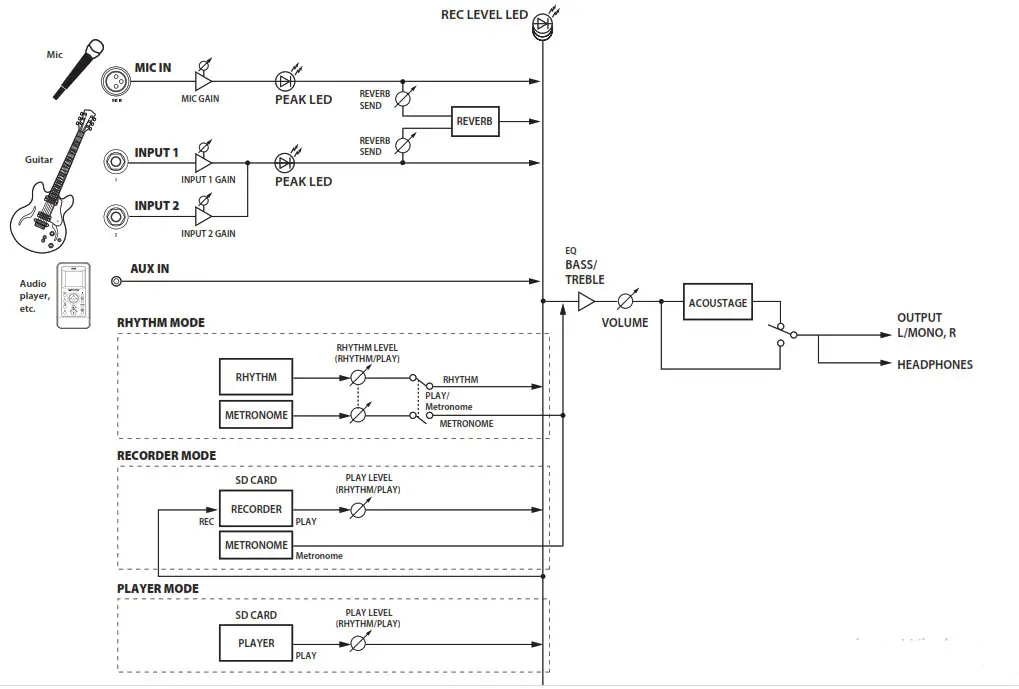
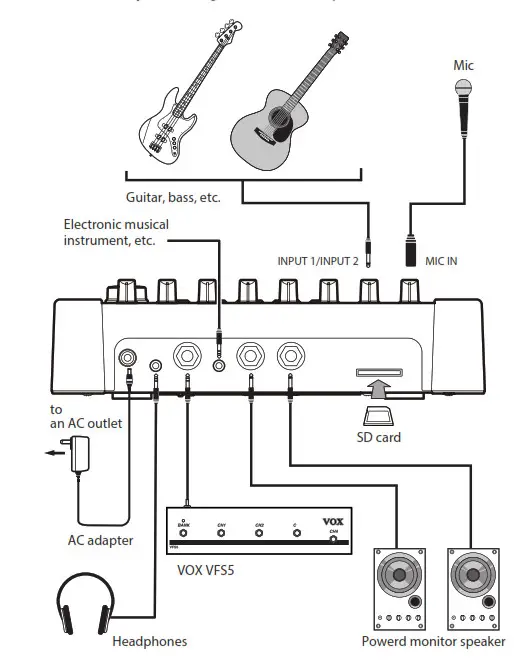
Signal Path
Thank you for purchasing the KORG RHYTHM KR-55 Pro.
To help you get the most out of your new instrument, please read this manual carefully.
About the Owner’s Manual
The KR-55 Pro Owner’s Manual is organized as follows:
- KR-55 Pro Quick Start Guide (printed material: this document)
- KR-55 Pro Owner’s Manual (PDF)
Download the PDF from the following website. http://www.korg.com
KR-55 Pro Quick Start Guide (printed material: this document)
This guide explains the settings to use for an output device such as musical instruments and powered monitor speakers, how to playback and record rhythm styles, and more.
KR-55 Pro Owner’s Manual (PDF)
This explains how to use the KR-55 Pro.
Main features
Rhythm Player function
- You can enjoy jamming along with realistic live-recorded drum and percussion accompaniment.
- Twenty-four different rhythm styles are built-in. You can directly select these rhythm styles by using the buttons on the top panel.
- Each rhythm style has two variations, and each of these variations contains three rhythm patterns: basic, fill-in 1, and fill-in 2. You can switch variations or rhythm patterns in real-time as needed during your performance.
- You can use the chain function to create the rhythm structure of an entire song so that it will play automatically.
Acoustic (surround) function - Acoustic technology provides an expansive, extra-wide sound field.
Full-fledged mixer functionality
- A mic input, two guitar inputs, and an AUX input allow multi-channel mixing.
- You can apply a reverb effect to the inputs from the MIC IN jack, INPUT 1 jack, and INPUT 2 jack.
- You can use an equalizer to adjust the tonal character.
Tuner function - You can tune while viewing a large and easily visible meter.
- You can tune while listening to the pitch of an audible guide tone.
Recording function - You can create complete songs by recording chained rhythm styles along with your own performance.
- You can record along with the playback of an audio file from an SD card.
- The completed song data can be exported (written) as a standard audio file, and played back by a commercially available audio player or loaded into your computer DAW.
Player function - Standard audio files (WAV) can be played back from an SD card.
- You can use the playlist function to play back your audio files in a specific order. A playlist you create can be used for background music or live performances.
- You can change the playback speed of audio files.
Foot switch control - By using a VOX VFS5 footswitch, you can perform operational tasks without having to take your hands off of your instrument. This includes operations such as rhythm playback or beginning recording/playback while you play your instrument.
*: You’ll need to insert an SD card into the KR-55 Pro.
Precautions
Location
Using the unit in the following locations can result in a malfunction.
- Indirect sunlight
- Locations of extreme temperature or humidity
- Excessively dusty or dirty locations
- Locations of excessive vibration
- Close to magnetic fields
Power supply
Please connect the designated AC adapter to an AC outlet of the correct voltage. Do not connect it to an AC outlet of voltage other than that for which your unit is intended.
Interference with other electrical devices
Radios and televisions placed nearby may experience reception interference. Operate this unit at a suitable distance from radios and televisions.
Handling
To avoid breakage, do not apply excessive force to the switches or controls.
Care
If the exterior becomes dirty, wipe it with a clean, dry cloth. Do not use liquid cleaners such as benzene or thinner, or cleaning compounds or flammable polishes.
Keep this manual
After reading this manual, please keep it for later reference.
Keeping foreign matter out of your equipment
Never set any container with liquid in it near this equipment.If liquid gets into the equipment, it could cause a breakdown, fire, or electrical shock. Be careful not to let metal objects get into the equipment. If something does slip into the equipment, unplug the AC adapter from the wall outlet. Then contact your nearest Korg dealer or the store where the equipment was purchased.
THE FCC REGULATION WARNING (for USA)
NOTE: This equipment has been tested and found to comply with the limits for a Class B digital device, pursuant to Part 15 of the FCC Rules. These limits are designed to provide reasonable protection against harmful interference in a residential installation. This equipment generates, uses, and can radiate radio frequency energy and, if not installed and used in accordance with the instructions, may cause harmful interference to radio communications. However, there is no guarantee that interference will not occur in a particular installation. If this equipment does cause harmful interference to radio or television reception, which can be determined by turning the equipment off and on, the user is encouraged to try to correct the interference by one or more of the following measures:
- Reorient or relocate the receiving antenna.
- Increase the separation between the equipment and receiver.
- Connect the equipment into an outlet on a circuit different from that to which the receiver is connected.
- Consult the dealer or an experienced radio/TV technician for help.
If items such as cables are included with this equipment, you must use those included items. Unauthorized changes or modifications to this system can void the user’s authority to operate this equipment.
Notice regarding disposal (EU only)
 When this “crossed-out wheeled bin” symbol is displayed on the product, owner’s manual, battery, or battery package, it signifies that when you wish to dispose of this product, manual, package or battery you must do so in an approved manner. Do not discard this product, manual, package or battery along with the ordinary household waste. Disposing of in the correct manner will prevent harm to human health and potential damage to the environment.
 Since the correct method of disposal will depend on the applicable laws and regulations in our locality, please contact your local administrative body for details. If the battery contains heavy metals in excess of the regulated amount, a chemical symbol is displayed below the “crossed-out wheeled bin” symbol on the battery or battery package.
Regarding data
Unexpected malfunctions caused by inappropriate operation can cause the contents of memory to be lost. Please save important data to other media for safekeeping. KORG INC. accepts no responsibility for any damages resulting from the loss of data.
COPYRIGHT WARNING
This professional device is intended only for use with works for which you yourself own the copyright, for which you have received permission from the copyright holder to publicly perform, record, broadcast, sell and duplicate, or in connection with activities that constitute “fair use” under copyright law. If you are not the copyright holder, have not received permission from the copyright holder, or have not engaged in fair use of the works, you may be violating the copyright law, and may be liable for damages and penalties. If you are unsure about your rights to a work, please consult a copyright attorney.
KORG TAKES NO RESPONSIBILITY FOR ANY INFRINGEMENT COMMITTED THROUGH USE OF KORG PRODUCTS.
* All product names and company names are the trademarks or registered trademarks of their respective owners.
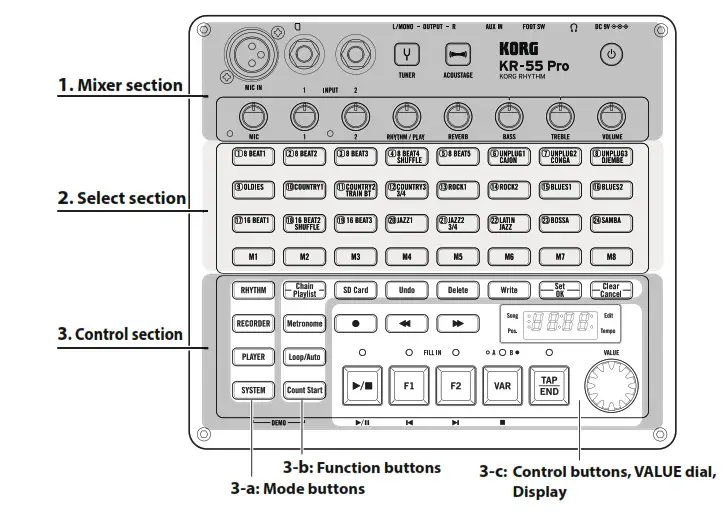
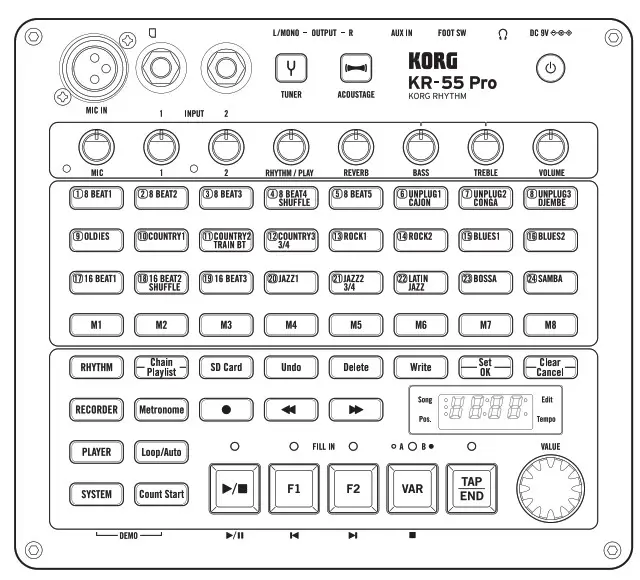
Parts and their functions
Top panel
- Mixer section
Use the mixer section to connect a mic (dynamic), guitar, bass or other instrument and control its input level and tonal character.
Press the power button to turn on the KR-55 Pro. - Select section
The functions of these buttons will change depending on the model that’s selected.
For example, in Rhythm mode, select the rhythm style and metronome sound. In Recorder mode, you can select the metronome sound that is heard when the metronome is on; and in Player mode, you can select the audio file. - Control section
3-a: Mode buttons
These buttons are used to enter each mode.
In Rhythm mode, you can sing or play an instrument while a rhythm style plays. Your playing can also be recorded on the recorder along with the rhythm style. In Recorder mode, you can overdub over the sounds you recorded in Rhythm mode or record over different input sources.
In Player mode, you can play audio files in WAV format (44.1 kHz, 16-bit, stereo) from the SD card. You can also record your own playing on the recorder, along with the audio file that is playing.
In System mode, you can select the type of batteries to use, specify the input jack(s) to which the reverb effect applies and set the auto power-off time. This mode also allows you to format or test an SD card.
3- b: Function buttons
These buttons are used to turn the chain, playlist, loop, and count start functions on and off, as well as to stop and start the metronome function. These buttons are also used to undo recorded data and to export/import audio files.
3-c: Control buttons, VALUE dial, Display
The control buttons are used to control playback and recording. Use the VALUE dial to adjust the tempo of the rhythm style and metronome, or to change the playback speed of an audio file. The display shows the tempo and other values that have been set.
Rear panel
- DC 9V jack
Connect the included AC adapter (DC 9V) here.  jack (stereo mini-jack)
Connect your headphones here.
 You must connect a stereo plug to this jack. No sound will be output if you connect a mono plug.
Turn the Acoustage (wide) function off when using headphones. The Acoustic function is optimal when using LINE OUT.- FOOT SW jack
Connect a VOX VFS5 footswitch (commercially available) here.
You can use the footswitch to play rhythm styles and perform other operations without having to put down your instrument (see “Using a footswitch” on page 25 of the Owner’s Manual). - AUX IN jack (stereo mini-jack)
Connect an electronic instrument or another audio source here.You can perform along with rhythm styles played back by the KR-55 Pro or with music from your audio player. Use the controls of the connected device to adjust the volume level. - OUTPUT L/MONO, R jack (mono phone jack)
Connect this to an external device such as a powered monitor speaker. - SD card slot
Insert an SD card here. - Battery cover
Install six AA batteries. You can use either alkaline batteries or nickel-metal hydride batteries.
Setup
Connections
Before connecting anything, turn off the power or minimize the volume to all devices. The careless operation could damage your speaker system or cause unexpected malfunctions.
- Connect a mic to the MIC IN jack (XLR jack) of the KR-55 Pro.
Condenser mics cannot be used. - Connect a guitar or bass guitar to the INPUT 1 and INPUT 2 jacks of the KR-55 Pro.
- Connect an external device such as a powered monitor speaker to the OUTPUT L/MONO and R jacks of the KR-55 Pro.
Connect your headphones to the jack.
Inserting or removing an SD card
SD cards that can be used with the KR-55 Pro
The KR-55 Pro can use the following types of SD cards: SDHC (UHS-I) 4 GB–32 GB recommendation.
- Make sure that the power is off.
- Insert the SD card into the SD card slot located on the rear panel of the KR-55 Pro until you hear the card click into place.
- To remove the SD card, push it inward until you hear it click; then release your finger.
- The SD card pops out slightly, allowing you to remove it.
Note: For details on how to properly handle SD cards, refer to the manual included with your SD card.
Formatting an SD card
Before an SD card can be used, it must be formatted on this instrument.
You should also format the card in the following cases.
- If the display shows the error message (“Err-Crd-***”) at start-up.
- If the display shows the error message when playing or recording a song.
- Press the [SYSTEM] button to enter System mode (the button lights).
- Press the [M8] button (the button blinks).
The display indicates “Init” (Initialize), and the [Set/OK] button blinks. - To format the card, hold down the [Set/OK] button for approximately one second.
During formatting, the display’s “Init” indication and the
[SD Card] button will blink.
When formatting has ended successfully, the display indicates “End”.
When you format an SD card, all data on the card is lost.
Testing whether recording can be done on an SD card
Note: See “SD card test function “tESt”” on page 23 of the Owner’s Manual.
Turning the power on/off
The KR-55 Pro can use either an AC adapter or batteries.
Using the AC adapter
Use only the included AC adapter. You risk causing a malfunction if you use any other AC adapter.
- Make sure that the power of the KR-55 Pro is off.
Check that nothing is shown in the display and that the buttons are unlit. - Connect the DC plug of the AC adapter to the DC 9V jack located on the rear panel.
- Connect the plug of the AC adapter to an AC outlet.
Be sure to use an AC outlet of the correct voltage for the adapter.
Using batteries
Batteries are not included. You must purchase them separately.
- Remove the battery cover from the rear panel.
- Install six AA batteries, either alkaline or nickel-metal hydride, taking care that each battery is oriented in the correct polarity as shown in the illustration.

- In System mode, specify the type of batteries that you’re using.
(Default setting aL: Alkaline batteries)
If you switch to using a different type of battery, be sure to specify the correct battery type in System mode.
See “[M1] Battery type “batt”” on page 23 of the Owner’s Manual
Replacing the batteries
Replace the batteries when the power button blinks.
As the batteries run low, you might hear noise or interruptions in the sound.
Unusable batteries should be removed immediately. If unusable batteries are left installed in the unit, they may leak, causing malfunctions. You should also remove the batteries if you don’t plan to use the unit for an extended time.
Be sure to replace all six batteries together as a set. Do not mix fresh batteries with used batteries in the same set.
Turning the power on
Note: If a device is connected to the AUX IN jack, turn its power on before you continue.
Note: If you’re using an SD card, insert it into the SD card slot before you turn on the power (see page 6 “Inserting or removing an SD card”).
- On the top panel, set the VOLUME knob to the minimum level (far left).
- On the top panel, hold down the power button for at least one second to make the button light.
When the KR-55 Pro finishes starting up, it is ready to produce sound. - Turn on the power of the external equipment that is connected to the KR-55 Pro’s OUTPUT L/MONO and R jacks, such as powered monitor speakers.
- Adjust the volume on the external output device and on the KR-55 Pro.
Turning the power off
Never turn off the power or disconnect the AC adapter during recording, while data is being converted, or while data is being written to the system. Doing so may make the KR-55 Pro malfunction, or damage the data on the SD card. If the data on the SD card has been damaged, format the card.
- If recording or playback is occurring, press the[
 ] button to stop.
 - Hold down the power button for one second or longer until the button blinks.
After a time, the power button and display indication will go dark, and the KR-55 Pro will shut down.
Use caution when turning off the power!
To turn off the power of the KR-55 Pro, you must press the power button located on the panel. (When you do this, the KR-55 Pro saves its data.)
Never disconnect the AC adapter or remove the batteries while the power is on.
Auto Power-Off
The KR-55 Pro has an auto power-off function. The auto the power-off function automatically turns off the power when there has been no user input for a certain length of time (which you can specify).
(See “[M3] Auto power-off function “APOF” on page 23 of the Owner’s Manual.)
Listening to the demo performances
The KR-55 Pro contains demo song data. Let’s start by listening to the sound of the KR-55 Pro.

- Simultaneously press the [SYSTEM] button and [Count
Start] button to enter Demo mode.
The [SYSTEM] button and [Count Start] button blink, and the demo song plays.
The top panel buttons light in synchronization with the demo song. - Use the VOLUME knob to adjust the volume of the demo song.
- You can press the [
 ] or [
  ] buttons to play the previous or next demo song.
 - To exit Demo mode, press any one of the mode buttons
[RHYTHM], [RECORDER], [PLAYER], or [SYSTEM].
Connecting and playing instruments
The KR-55 Pro provides a mic input, two inputs for guitar or bass, and an AUX input, allowing multi-channel mixing. A variety of input sources are supported, including guitar, bass guitar, and a microphone.
Playing guitar
Here’s how to connect a guitar.

- Set the (INPUT) 1 knob and the VOLUME knob to the minimum position, and connect your guitar to the INPUT 1 jack.
- Use the (INPUT) 1 knob to adjust the input level. To avoid signal clipping (a signal that’s too loud) this knob should be adjusted so that the peak LED doesn’t light up when the signal is being loudly input.
- Use the VOLUME knob to adjust the volume that is being outputted from the OUTPUT L/MONO and R jacks.
- Use the TREBLE knob and BASS knob to adjust the tone.
- As necessary, use the REVERB knob to adjust the effect.
You can apply a reverb effect to the signals from the MICIN jack, INPUT 1 jack, and INPUT 2 jack.
Using a mic
Let’s try connecting a mic to the MIC IN jack. Only dynamic mics can be used with the KR-55 Pro.
Condenser mics are not supported on the KR-55 Pro.
- Set the MIC knob and VOLUME knob to the minimum position, and connect your mic to the MIC IN jack.
- While vocalizing into the mic, use the MIC knob to adjust the mic’s input level. To avoid signal clipping signal that’s too loud) this knob should be adjusted so that the peak LED doesn’t light up when the signal is being input at a high volume level.
- Use the VOLUME knob to adjust the volume that isbeing outputted from the OUTPUT L/MONO and R jacks.
- Use the TREBLE knob and BASS knob to adjust the tone.
- As necessary, use the REVERB knob to adjust the effect as desired.
Playing and recording rhythm styles
Let’s try out rhythm styles of various genres.
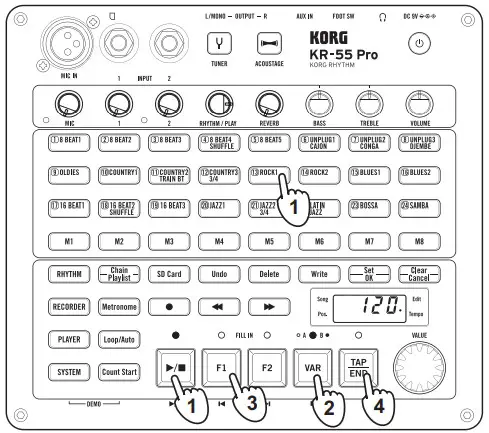
Selecting and playing a rhythm style

- Press the [RHYTHM] button to enter Rhythm mode (the button lights up).
- Set the VOLUME knob to a fairly low level, and set the rhythm/PLAY knob to about the 3 ’clock position.
- Use the [(1) 8 BEAT1]–[(24) SAMBA] buttons to select a rhythm style.
The button of the selected rhythm style will light up. - Press the [
 ] button to play the rhythm style.
During playback, the LED above the [ ] button is lit up. The [M1]–[M8] buttons blink to indicate the currently playing measure of the rhythm style. - Use the VOLUME knob to adjust the volume.
- Use the VALUE dial to set the tempo. You can set the tempo in a range of q =48–240. The display indicates the tempo value. Tip: When rhythm playback is stopped, you can also set the tempo by pressing the [TAP/END] button several times.
- If you press the button of a different rhythm style, playback switches to the newly selected rhythm style at the top of the next measure.
Note: Press the button slightly ahead of time so that the rhythm style will be ready to switch. - Press the [] button to stop playback.
Tip: You can use the chain function to create the rhythm framework for an entire song and play it consecutively (see”Chain function” on page 18 of the Owner’s Manual).
Switching variations, and inserting a filling or ending
Each rhythm style provides two variations. Each variation has three rhythm patterns: basic, fill-in 1, and fill-in 2.
- Select a rhythm style and play it.
See page 8 “Selecting and Playing a rhythm style” - Press the [VAR] button to switch variations of the rhythm style.
You’ll switch to variation B when the next measure begins.
The LED above the [VAR] button lights up to indicate that variation B is selected.
Press the button once again to return to variation A (the LED goes dark). - During playback, press the [F1] or [F2] button.
A fill-in plays when the measure changes (the LED lights), and then the basic rhythm pattern returns.
Tip: From the stopped condition, you can press the [F1] or [F2] button to start playback with a fill. - During playback, press the [TAP/END] button.
At the next measure, an ending is played and then the rhythm style stops.
Recording your own performance together with the rhythm style
In Rhythm mode, you can record your own performance along with the rhythm style.
Create a rhythm style chain ahead of time for the song that you want to perform (see “Creating a chain” on page 18 of the Owner’s Manual). Our example here explains how to record using a chain that you’ve already registered.
Getting ready to record
The recorded data is saved on an SD card inserted in the SD card slot. In order to record, insert the SD card into the SD card slot before you turn on the power (see page 6 “Inserting or removing an SD card”).
- Connect your mic or instrument.
See page 7 “Connecting and playing instruments”
Note: The Acoustage function cannot be used while recording. - Select a chain.
Press the [Chain/Playlist] button to turn the chain function on (the button lights). Use the [F1] or [F2] button to select the chain that you want to playback.
In this example, press the [F1] button to select the C01 chain. Specify the tempo as desired. - Put the KR-55 Pro in the record-standby state, and select the recording-destination song number.
Press the [ ] button to enter the record-standby state (the button blinks).
The display indicates the song number (d01, d02…). The number of an unrecorded song blinks, and the number of an already-recorded song is lit.
Use the [F1] or [F2] button to select the song number that you want to record. Tip: If there is an unrecorded song (new song), the lowest-numbered new song is selected automatically. If you select a previously-recorded song number (whose song number is lit) and then start recording, the previously recorded data is lost and overwritten by the newly recorded data. - Adjust the recording level of the rhythm style and the mic or instrument.
Set the volume of the rhythm style by turning the RHYTHM/PLAY knob to the 3 o’clock position. Use the MIC knob and the (INPUT) 1 and 2 knobs to adjust the volume level of your mic or instrument accordingly. Note: In the record-standby state or during recording (when the [ ] button is blinking or lit), the three LEDs at the left of the display operate as the recording level meter.
Adjust the knobs listed above so that the top LED flickers occasionally. To check the recording level of the rhythm style, press the button and make adjustments while you record.
When you’ve finished making adjustments, press thebutton to stop the rhythm style.
Note: The VOLUME knob does not affect the recording level. If acoustic feedback occurs, use this knob to lower the overall volume.
Start recording
- Take the steps described in “Getting ready to record” on page 9.
- Press the [Count Start] button to turn on the count start function (the button blinks).
Tip: The count start function inserts a two-measure count after you press the [ ] button before recording starts. - Press the [ ] button to enter the record-standby state.
The LEDs above the [ ] button and button blink. - Use the [F1] or [F2] button to select the song number that you want to record.
Note: Select the song number that you selected in step 3 of “Getting ready to record” on page 9. - Press the button. A two-measure count is sounded, and then the recording starts.
When recording starts, the LEDs above the [ ] button and button will light up (the [Count Start] button goes dark). - Perform along with the rhythm style.
Tip: If you like, you can initially record just the rhythm style for which you specified a chain, and overdub your performance afterward. (See “Overdubbing onto a recorded song” on page 14 of the Owner’s Manual ). - When you’ve finished performing, press the button to stop recording.
You can listen to the recorded song in Recorder mode. (See “Playing back the recorded performance” on page 13 of the Owner’s Manual ) Tip: If the chain contained a stop setting, it stops automatically.
Specifications
Rhythm function
Rhythm Styles: 24 rhythm styles, two variations for each rhythm style, each variation has three patterns (basic, fill-in 1, fill-in 2).
Tempo: 48–240 bpm
Chain function: 30 banks (up to 999 measures can be registered in each)
Recorder function
Recording format: PCM audio WAV format (file name extension .wav), 44.1 kHz, 16-bit
Recording time: Depends on the SD card used; approximately 100 minutes per 1 GB
Maximum continuous recording time: 3 hours
Number of songs: Maximum 50
Number of multitrack recordings: Depends on the remaining
free capacity of the SD card
Undo/Redo: Once
Player function
Playback formats: PCM audio WAV format (file name extension .wav) 44.1 kHz, 16-bit, Stereo
Maximum data size (time): Depends on the memory card used; approximately 100 minutes per 1 GB (for WAV data)
Maximum number of data files (number of folders): Up to 99 songs (per folder); a total of eight folders M1– M8 inside the PLAYER folder can be used.
Playlist function: 10 banks (up to 24 songs can be registered in each)
Mixer effect section
Effects: Reverb effect
Equalizer: BASS, TREBLE
ACOUSTAGE (wide stereo effect)
Tuner function
Scale: 12-note equal temperament
Chromatic
Calibration: 435–445 Hz
Tuning guide tone: Three types (guitar, bass, piano)
Display
7-segment four-digit LED
SD card
Usable cards: SDHC (UHS-I) 4 GB–32 GB recommendation
Input jacks
MIC IN jack: XLR-3-32 type (balanced), input impedance 4.7 kΩ, nominal level -43 dBV
INPUT 1 jack, INPUT 2 jack (guitar, bass): 1/4″ mono phone jack (unbalanced), input impedance 1 MΩ, nominal level -26 dBV
AUX INPUT jack: 1/8” stereo mini-phone jack (unbalanced), input impedance 10 kΩ, nominal level -17 dBV
FOOT SW jack: 1/4” stereo phone jack, usable foot switch: VOX VFS5 foot switch
Output jacks
OUTPUT L/MONO jack, R jack: 1/4” mono phone jack (unbalanced)
![]() jack: 1/8” stereo mini-phone jack, maximum level: 0 dBV, 30 mW, 32 Ω
jack: 1/8” stereo mini-phone jack, maximum level: 0 dBV, 30 mW, 32 Ω
Power supply:
DC 9V, six AA batteries (alkaline or nickel-metal hydride are supported)
Battery life:
approximately 7 hours (when using alkaline batteries)
approximately 7 hours (when using nickel-metal hydride batteries)
* Varies depending on the batteries used and the conditions of use.
Current consumption
330 mA
Dimensions (W×D×H)
244 x 220 x 68 mm / 9.61”× 8.66” × 2.68”
Weight
1.4 kg / 3.09 lbs (Excluding batteries)
Included items
AC adapter (DC 9V,), Quick Start Guide
Options (sold separately)
Footswitch: VOX VFS5
* Specifications and appearance are subject to change without notice for improvement.
IMPORTANT NOTICE TO CONSUMERS
This product has been manufactured according to strict specifications and voltage requirements that are applicable in the country in which it is intended that this product should be used. If you have purchased this product via the internet, through mail order, and/or via a telephone sale, you must verify that this product is intended to be used in the country in which you reside.
WARNING: Use of this product in any country other than that for which it is intended could be dangerous and could invalidate the manufacturer’s or distributor’s warranty. Please also retain your receipt as proof of purchase otherwise your product may be disqualified from the manufacturer’s or distributor’s warranty.
KORG INC.
4015-2 Yanokuchi, Inagi-City, Tokyo 206-0812 JAPAN 2017 KORG INC.
©2017 KORG INC.
Published 12/2017 Printed in Vietnam