levoit Core 300 True HEPA Air Purifier User Manual
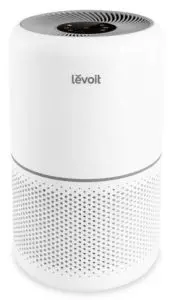
Package Contents
- 1 x Air Purifier
- 1 x True HEPA 3-Stage Original Filter (Pre-Installed)
- 1 x User Manual
- 1 x Quick Start Guide
Specifications
| Power Supply | AC 220-240V, 50Hz |
| Rated Power | 33W |
| Effective Range | 40 m2 / 431 ft2 |
| CADR (CFM) | 187 rns/h |
| Operating Conditions | Temperature: -10°C-40°C / 14°F-104°F |
| Humidity: < 85% RH | |
| Noise Level | 24-48dB |
| Standby Power | < 0.8W |
| Dimensions | 22 x 22 x 36 cm / 8.7 x 8.7 x 14.2 in |
| Weight | 3.4 kg / 7.5 lb |
SAFETY INFORMATION
To reduce the risk of fire, electric shock, or other injury, follow all instructions and safety guidelines.
General Safety
- Only use your air purifier as described in this manual.
- Do not use without removing the plastic wrap from the filter. The purifier will not filter air, and may overheat, causing a fire hazard.
- Do not use your air purifier outdoors.
- Keep your air purifier away from water, and wet or damp areas. Never place in water or liquid.
- Do not use in excessively humid areas.
- Keep your air purifier away from heat sources.
- Do not use where combustible gases, vapours, metallic dust, aerosol (spray) products, or fumes from industrial oil are present.
- Keep 1.5 m / 5 ft away from where oxygen is being administered.
- Supervise children when they are near the air purifier.
- Do not place anything into any opening on the air purifier.
- Do not sit or place heavy objects on the air purifier.
- Keep the inside of the air purifier dry. To prevent moisture buildup, avoid placing in rooms with major temperature changes or underneath air conditioners.
- Always unplug your air purifier before servicing (such as changing the filter).
- Do not use your air purifier if it is damaged or not working correctly, or if the cord or plug is damaged. Do not try to repair it yourself. Contact Customer Support (see 18).
- WARNING: Do not use this air purifier with solid-state speed controls (such as a dimmer switch).
- Not for commercial use. Household use only.
Power & Cord
- Keep air purifier near the outlet it is plugged into.
- Never place the cord near any heat source.
- Do not cover the cord with a rug, carpet, or other covering. Do not place the cord under furniture or appliances.
- Keep the cord out of areas where people walk often. Place the cord where it will not be tripped over.
READ AND SAVE THESE INSTRUCTIONS
GETTING TO KNOW YOUR AIR PURIFIER
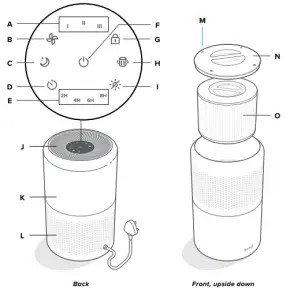
- A. Fan Speed Indicators
- B. Fan Speed Button
- C. Sleep Mode Indicator/Button
- D. Timer Button
- E. Timer Indicators
- F. On/Off Button
- G. Display Lock Button
- H. Check Filter Indicator
- I. Display Off Button
- J. Air Outlet
- K. Housing
- L. Air Inlet
- M. Anti-Skid Pads
- N. Filter Cover
- O. True HEPA 3-Stage Original Filter
CONTROLS
 On/Off Button
- Turns the air purifier on/off.
 Fan Speed Button
- Cycles through fan speeds: I (low), II (medium), and III (high).
 Sleep Mode Button
- Turns Sleep Mode on/off (see page 11).
 Timer Button
- Cycles through timer options (see page 11).
 Display Lock Button
- Prevents current settings from being changed (see page 11).
 Check Filter Indicator
- Lights up when the filter should be checked (see page 14).
 Display Off Button
- Turns the display off.
- Tap any button (except ) to turn the display back on.
GETTING STARTED
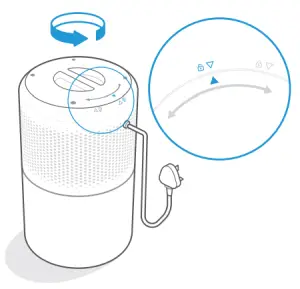
- Flip the air purifier over. Twist the filter cover anticlockwise and remove it. [Figure 1.1]
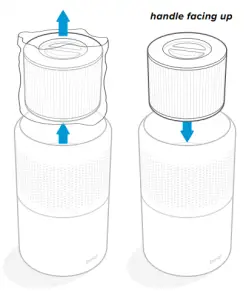
- Remove the filter from its plastic packaging and place the filter back into the purifier with the handle facing up. [Figure 1.2]
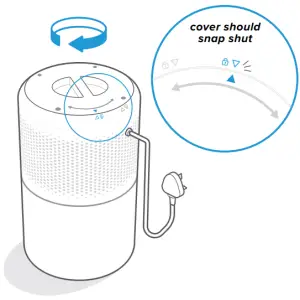
- Replace the filter cover and twist clockwise to lock. [Figure 1.3]
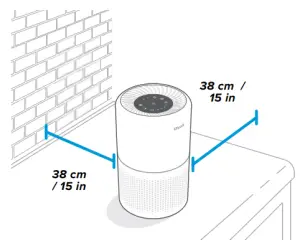
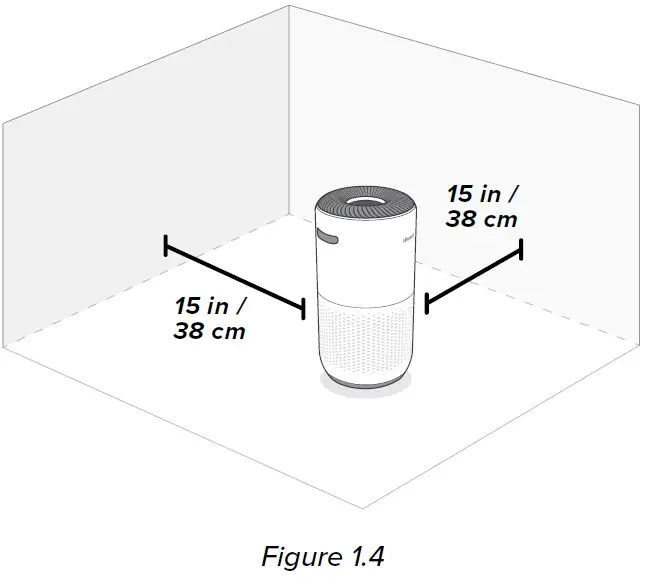
- Place the purifier on a flat, stable surface with the display facing up. Allow at least 38 cm / 15 in of clearance on all sides of the purifier. Keep away from anything that would block airflow, such as curtains. [Figure 1.4]
USING YOUR AIR PURIFIER
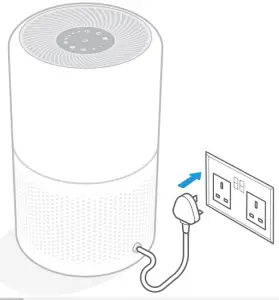
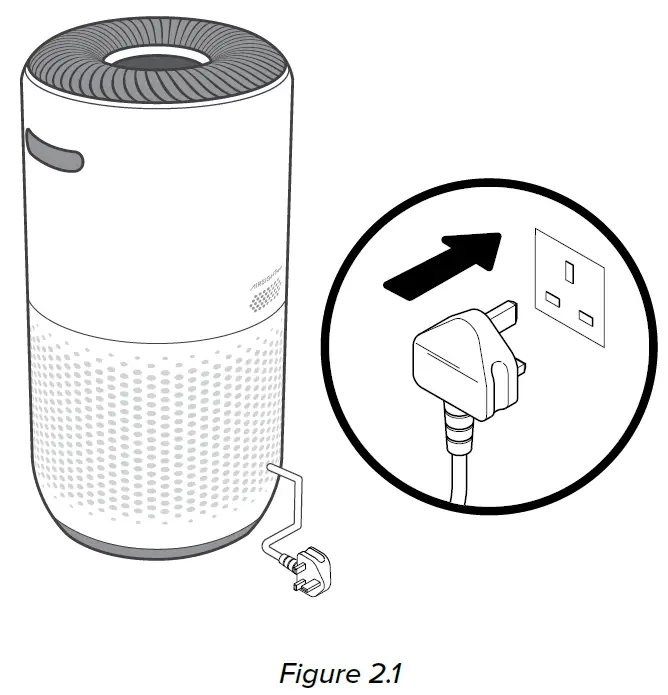
- Plug in and tap
 to turn on the air purifier. The fan will start on level I. [Figure 2.1]
 - Optionally, tap
 to change fan speed between I, II, and III.
Note:- The indicators are not buttons and cannot be used to change the fan speed.
- The fan speed indicators will light up when active.
- Fan speed III is the loudest, but cleans air the quickest.
- For best results, or to address a specific air quality issue such as smoke, run the air purifier at high speed (level III) for 15–20 minutes before using a lower speed.
- To effectively clean air, keep windows and doors closed while the air purifier is on.
- . Tap
 to turn off the air purifier.
Memory Function
When the air purifier is plugged in, it will remember its previous fan speed setting.
Note: The air purifier will not remember timers or Sleep Mode
Sleep Mode
Sleep Mode operates quietly by using the lowest possible fan speed.
Tap  to turn Sleep Mode on/off.
Note:
- All indicators will be at half brightness while Sleep Mode is on.
- Tapping
 will exit Sleep Mode.
Timer
You can set a timer for 2, 4, 6, or 8 hours.
- Tap
 repeatedly to select a time. The timer will start automatically
Note:- The indicators are not buttons and cannot be used to select a time.
- The timer indicators will light up blue when active.
- Once the timer has finished, the air purifier will turn off.
- To cancel a timer, tap
 until all timer indicators are off.
Note: -
- You can change the fan speed at any time while the timer is on.
- The timer will restart if the time is changed.
Display Lock
Locking the display prevents settings from being accidentally changed. Buttons will not respond to being tapped.
- Tap and hold
 for 3 seconds to lock/ unlock the display.
Note: You can turn the display on and off even if the display is locked.
ABOUT THE FILTER
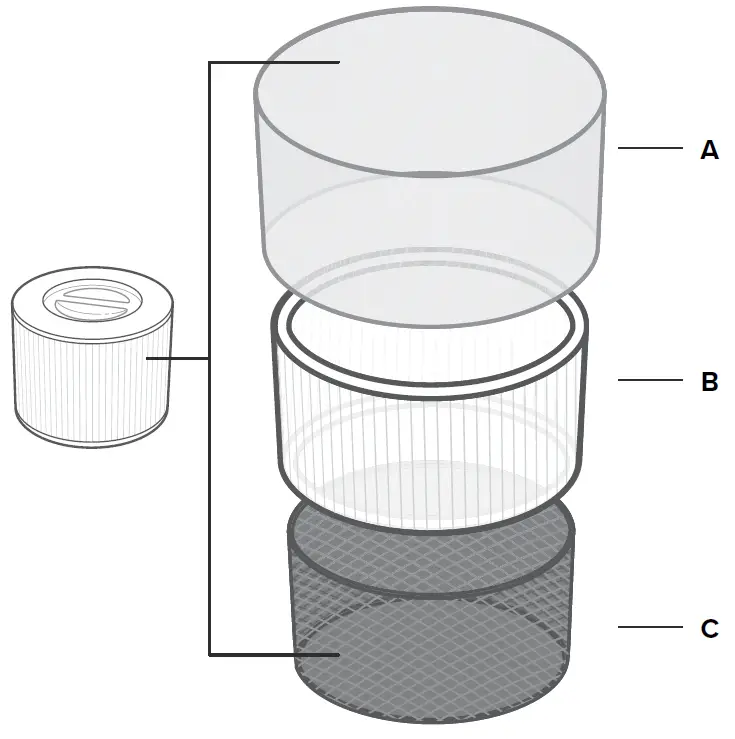
The air purifier uses a 3-stage filtration system to purify air.
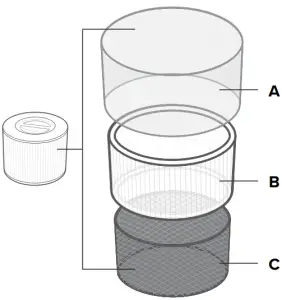
- Pre-Filter
- Captures large particles such as dust, lint, fibres, hair, and pet fur.
- Maximises the filter’s life by protecting it.
- B. True HEPA Original Filter
- Removes at least 99.97% of airborne particles 0.3 micrometres (µm) in diameter.
- Filters small particles such as mould spores, tiny dust particles, parts of smoke, and allergens such as pollen, dander, and mites.
- C. High-Efficiency Activated Carbon Filter
- Physically adsorbs smoke, odours, and fumes.
- Filters compounds such as formaldehyde, benzene, ammonia, hydrogen sulphide, and volatile organic compounds (VOCs).
Clean Air Delivery Rate
Clean Air Delivery Rate (CADR) measures the efficiency of an air purifier by indicating the volume of clean air that an air purifier produces per minute. This is based on removal of dust, pollen, and smoke, which are the 3 most common indoor air pollutants. The higher the CADR, the more particles the air purifier will remove and the larger the area it can clean. The rating is measured at the air purifier’s highest speed.
Air Change per Hour
The air change rate is how many times all of the air in a room can be purified (or “changed”) by the air purifier in 1 hour. Air changes per hour are calculated on the recommended room size assuming 2.4 m / 8 ft ceilings. For smaller rooms, the air change per hour will increase. The Core 300 has an air change per hour of 5, which means it can change air 5 times at the max speed. This purifier is suggested for use in a single, closed room up to 40 m² / 431 ft².
Note: To effectively clean air, keep windows and doors closed while the air purifier is on.
Humidity
Moisture may damage the filter. This air purifier should be used in an area with a humidity level below 85% RH. If you use the air purifier in excessively humid areas, the surface of the filter will become mouldy
Note: Water or moisture will allow mould to grow. Air purifiers cannot solve an existing mould problem, only remove mould spores and reduce odours.
Essential Oils
Do not add essential oils to the air purifier or filter. The filter will become damaged by the oil and will eventually release an unpleasant smell. Do not use oil diffusers near the air purifier.
LEVOIT REPLACEMENT FILTERS
Choose the filter best suited to the environment of your home.
Note: Your air purifier comes with an Original Filter included.
 Core 300-RF
Levoit True HEPA 3-Stage Original Filter Amazon ASIN: B07S8NM4Q9
Traps fine particles such as dust mites, pollen, pet dander, mould, and bacteria while neutralising common household smells such as pet odours or cooking smells.
Best used for: allergies, dust, and minor odours Core 300-RF-PA
Levoit True HEPA 3-Stage Pet Allergy Filter Amazon ASIN: B07SDPHJ19
Get all the benefits of the Original Filter, but with the high-efficiency activated carbon filter which is very effective for strong smells, and is customised for pet odours and cooking smells.
Best used for: pet allergies, bad-smelling rooms Core 300-RF-TX
Levoit True HEPA 3-Stage Toxin Absorber Filter
Amazon ASIN: B07S6MSC1T
Get all the benefits of the Original Filter, but with the high-efficiency activated carbon filter which is very effective for strong smells, and is customized for air pollution, cigarette smoke, vehicle exhaust, toxic gases and fumes, volatile organic compounds (VOCs), and smoke from wildfires.
Best used for: high air pollution, smoke Core 300-RF-MB
Levoit True HEPA 4-Stage Mold and Bacteria Filter
Amazon ASIN: B07SCZ46N2
Get the benefits of the Original Filter, but with an additional antibacterial treatment which is very effective for trapping and neutralizing bacteria and mould spores.
Best used for: mould, bacteria, and musty environments
CARE & MAINTENANCE
Cleaning the Air Purifier
- Unplug before cleaning.
- Wipe the outside of the air purifier with a soft, dry cloth. If necessary, wipe the housing with a damp cloth, then immediately dry.
- Vacuum the inside of the air purifier.
- Do not clean with abrasive chemicals or flammable cleaning agents.
Check Filter Indicator
 will light up as a reminder to check the filter. Depending on how much you use the air purifier, the indicator should turn on within 6–8 months. You may not need to replace your filter yet, but you should check it when
  turns on.
Cleaning the Filter
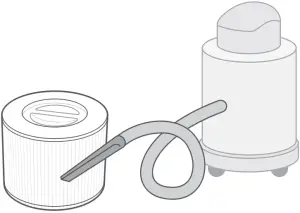
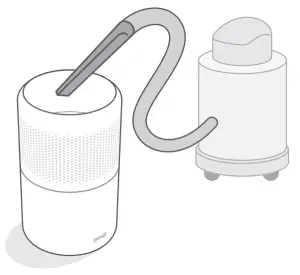
The outer pre-filter should be cleaned every 2–4 weeks to increase the efficiency and extend the life of your filter. Clean the pre-filter using a soft brush or vacuum hose to remove hair, dust, and large particles. [Figure 3.1] Do not clean the filter with water or other liquids.
| Filter | When to Clean | How to Clean | When to Replace |
| Pre-Filter | Every 2–4 weeks | Use a soft brush or vacuum hose [Figure 3.1] | 6–8 months |
| True HEPA & Activated Carbon Filte | Do not clean | ||
When Should I Replace the Filter?
The filter should be replaced every 6–8 months. You may need to replace your filter earlier or later depending on how often you use your air purifier. Using your air purifier in an environment with relatively high pollution may mean you will need to replace the filter more often, even if  is off.
You may need to replace your filter if you notice:
- Increased noise when the air purifier is on
- Decreased airflow
- Unusual odours
- A visibly clogged filter
Note:
- To maintain the performance of your air purifier, only use official Levoit filters. To buy replacement filters, go to Amazon and search B07S8NM4Q9.
- Remember to reset
 after changing the filter.
Replacing the Filter
- Unplug the air purifier. Flip the air purifier over and remove the filter cover (see Getting Started, 9).
- Remove the old filter.
- Clean out any remaining dust or hair inside the purifier using a vacuum hose. Do not use water or liquids to clean the purifier. [Figure 3.2]
- Unwrap the new filter and place it into the housing (see Getting Started, 9).
- Replace the cover. Plug in the air purifier.
- Reset the Check Filter Indicator (see 14).
Storage
If not using the air purifier for an extended period of time, wrap both the purifier and the filter in plastic packaging and store in a dry place to avoid moisture damage.
TROUBLESHOOTING
| Problem | Possible Solution |
| Air purifier will not turn on or respond to button controls. | Plug in the air purifier |
| Check to see if the power cord is damaged. If it is, stop using the air purifier and contact Customer Support (see 18). | |
| Plug the air purifier into a different outlet. | |
| The air purifier is malfunctioning. Contact Customer Support (see 18). | |
| Airflow is significantly reduced. | Make sure the filter is removed from its packaging and properly in place (see page 9). |
Tap  to increase the fan speed. to increase the fan speed. |
|
| Leave 38 cm / 15 in of clearance on all sides of the air purifier. | |
| air purifier. The pre-filter may be clogged by large particles, such as hair or lint, blocking airflow. Clean the pre-filter (see 14). | |
| Replace the filter (see 15). | |
| Air purifier makes an unusual noise while the fan is on. | Make sure the filter is properly in place with plastic packaging removed (see page 6). |
| Make sure the air purifier is operating on a hard, flat, even surface. | |
| Replace the filter (see 15). | |
| The air purifier may be damaged, or a foreign object may be inside. Stop using the air purifier and contact Customer Support (see 18). Do not try to repair the air purifier. | |
| Strange smell coming from the purifier. | Clean the filter or replace if necessary. |
| Contact Customer Support (see 18). | |
| Make sure not to use your purifier in an area with high humidity or while diffusing essential oils. | |
| Poor air purification quality | Tap  to increase the fan speed. to increase the fan speed. |
| Make sure no objects are blocking the sides or top of the air purifier (the inlet or outlet). | |
| Make sure the filter is removed from its packaging and properly in place (see page 9). | |
| Close doors and windows while using the air purifier. | |
| Make sure the room is smaller than 40 m² / 431 ft². The air purifier may not be as effective in larger rooms. | |
| Replace the filter (see 15). | |
 is still on after replacing the filter. is still on after replacing the filter. |
Reset the Check Filter Indicator (see 14). |
 has not turned on within 8 months. has not turned on within 8 months. |
 is a reminder for you to check the filter and will light up based on how much the air purifier has been used (see 14). If you don’t use your air purifier often, is a reminder for you to check the filter and will light up based on how much the air purifier has been used (see 14). If you don’t use your air purifier often,  will take longer to turn on. will take longer to turn on. |
 turned on before 6 months. turned on before 6 months. |
 is a reminder for you to check the filter and will light up based on how much the air purifier has been used (see 14). If you run your air purifier frequently, is a reminder for you to check the filter and will light up based on how much the air purifier has been used (see 14). If you run your air purifier frequently,  will turn on sooner. will turn on sooner. |
If your problem is not listed, please contact Customer Support (see 18).
WARRANTY INFORMATION
Terms & Policy
Arovast Corporation warrants all products to be of the highest quality in material, craftsmanship, and service for 2 years, effective from the date of purchase to the end of the warranty period. Warranty lengths may vary between product categories.
If you have any questions or concerns about your new product, please contact our helpful Customer Support Team.
CUSTOMER SUPPORT
Arovast Corporation
1202 N. Miller St., Suite A
Anaheim, CA 92806
USA
Email: s[email protected]
Please have your order invoice and order ID ready before contacting Customer Support.
]]>
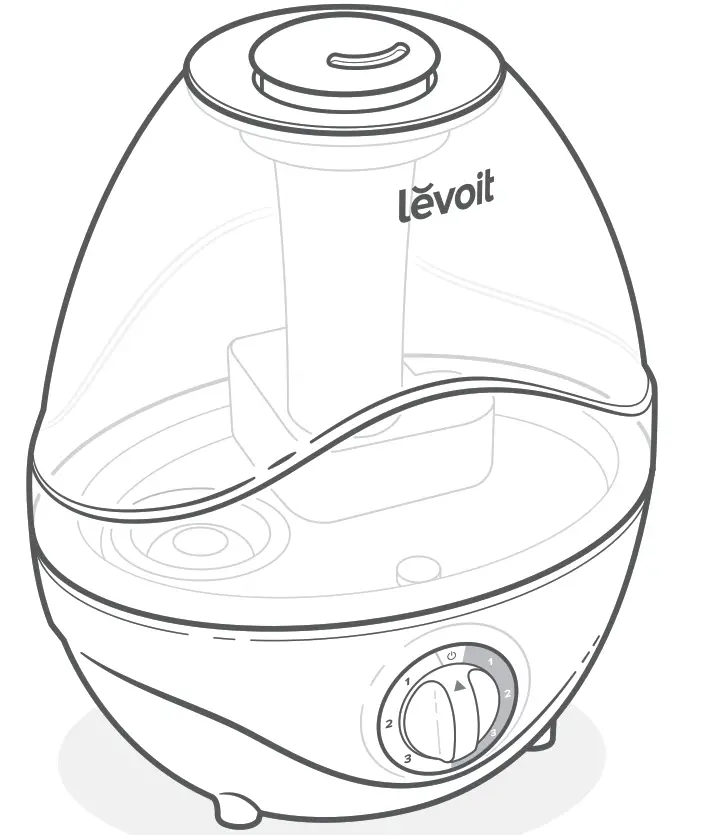
USER MANUAL
Ultrasonic Cool Mist Humidifier
Model: Classic 100
Questions or Concerns?
Please contact us at [email protected]
Thank you for purchasing the
ULTRASONIC COOL MIST HUMIDIFIER BY LEVOIT.
If you have any questions or concerns, please
reach out to us at [email protected].
We hope you enjoy your new humidifier!
Find Us Online
Search for @LevoitUK on social media for tips, special deals, giveaways, inspiration, and more.
Package Contents
1 x Ultrasonic Cool Mist Humidifier
1 x Power Adapter
1 x Cleaning Brush
1 x User Manual
1 x Quick Start Guide
Specifications
| Rated Power | DC 24V, 24W |
| Water Tank Capacity | 2.4 L / 0.63 gal |
| Max Run Time | Up to 24 hours on low mist setting Note: The humidifier may run for a longer or shorter time depending on environmental temperature and humidity. |
| Noise Level | ≤ 30dB |
| Effective Range | 10–27 m² / 107–290 ft² |
| Dimensions | 21.7 x 17 x 26 cm /8.5 x 6.7 x 10.2 in |
| Weight | 1.1 kg / 2.5 lb |
| Adapter
Rated Power |
Input: AC 100–240V, 50/60Hz Output: DC 24V, 1A |
SAFETY INFORMATION
To reduce the risk of fire, electric shock, or another injury, follow all instructions and safety guidelines.
General Safety
- Only use the humidifier as described in this manual.
- Place the humidifier and power adapter cord so that it will not be knocked over. Do not place near large pieces of furniture or in areas with high foot traffic.
- When not in use, turn the humidifier off and disconnect from power by removing the power adapter from the outlet.
- Do not use the humidifier in wet environments.
- Keep the humidifier out of reach from children.
- To avoid risk of electric shock, always unplug the humidifier from the power outlet before cleaning it or detaching the water tank from the base.
- Always make sure the humidifier is placed on a hard, flat, level surface before operation.
- Do not place the humidifier near sources of heat, such as stovetops, ovens, or radiators.
- Do not place the humidifier directly on floors, carpets, or rugs. Only place on water-resistant surfaces.
- Do not place foreign objects into the humidifier base or water tank.
- Do not use power adapters that are not recommended by Levoit for the humidifier.
- Do not cover the nozzle while the humidifier is on. Doing so may damage the humidifier.
- Do not allow water or other liquids into the air outlet.
- Remove the water tank from the base before moving the humidifier.
- Do not immerse the humidifier base or power adapter in water.
- Always allow the humidifier to completely cool before cleaning.
- Do not use detergents to clean the humidifier. Only use distilled white vinegar.
- If the humidifier is damaged or is not functioning properly, stop using it and contact Customer Support immediately (see page 15).
- Not for commercial use. Household use only.
Power Adapter
• Do not handle the power adapter with wet hands. Keep the power adapter away from liquids.
Caution: Risk of Leaks and Electric Shock
Do not add essential oils, water treatment liquids, or third-party water filters into the humidifier (including the water tank or base chamber). This will damage the humidifier and cause leaks.
READ AND SAVE THESE INSTRUCTIONS
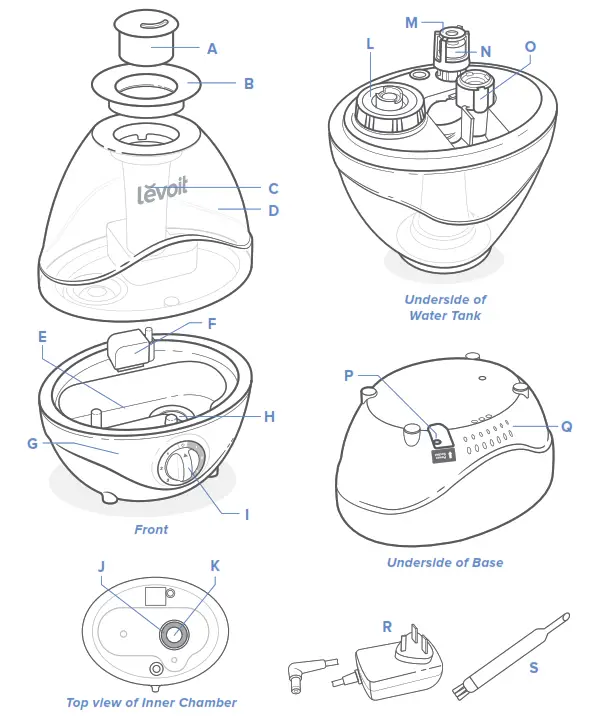
GETTING TO KNOW YOUR HUMIDIFIER
A. Nozzle
B. Nozzle Cap
C. Mist Tube
D. Water Tank
E. Base Chamber
F. Air Outlet
G. Base
H. Night Light
I. Mist Level Dial
J. Insulation Ring
K. Transducer
L. Water Tank Cap
M. Float Housing
N. Float
O. Noise Silencer
P. Power Socket
Q. Air Inlet
R. Power Adapter
S. Cleaning Brush
GETTING STARTED
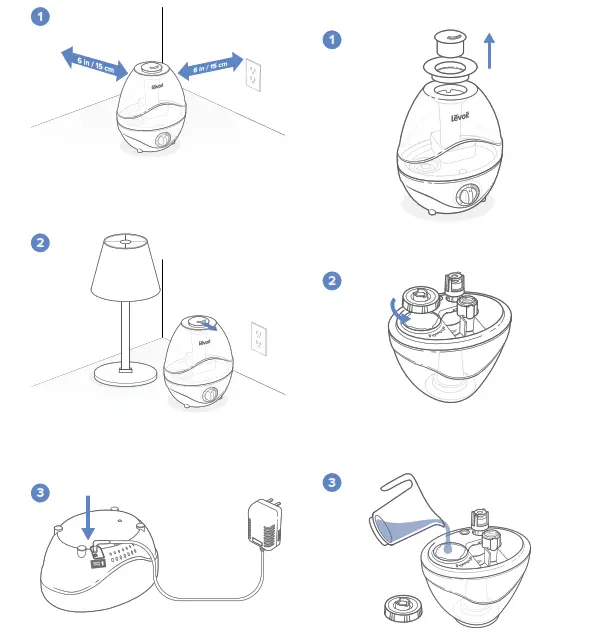
1. Remove all packaging. Choose a hard, flat location for the humidifier at least
15 cm / 6 in away from any walls. The surface must be water-resistant.
2. Make sure the mist nozzle is directed away from walls, furniture, bedding, and appliances.
3. Connect the power adapter to the base.
Filling & Refilling
1. Remove the nozzle and nozzle cap from the water tank.
2. Flip over the water tank and remove the water tank cap by twisting it anticlockwise.
3. Fill the tank with cool water. Do not fill with warm or hot water.
Note: We recommend using purified or distilled water in the humidifier.
CAUTION
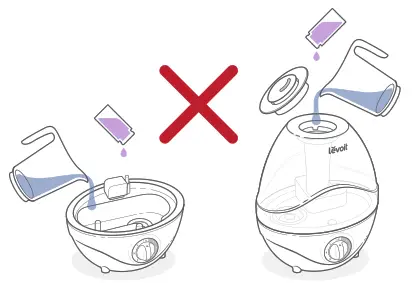
- Do not add water directly into the base chamber.
- Do not add water through the mist tube.
- Do not add essential oils into the humidifier.
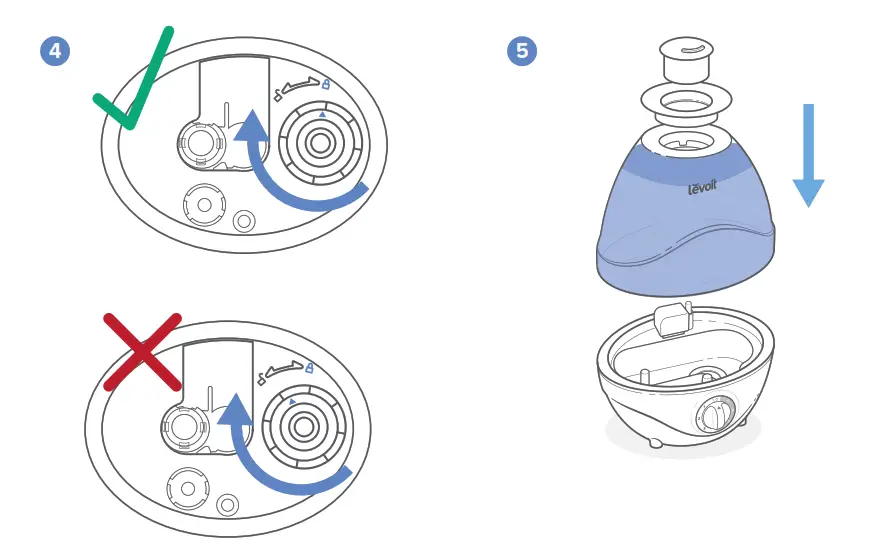
4. Replace the water tank cap by firmly twisting it back in place, aligning the arrow with the lock.
5. Place the tank properly on the base. Replace the nozzle and nozzle cap onto the water tank.
USING YOUR HUMIDIFIER
Note: If there is no water in the tank, the humidifier will not turn on and will light up red. Fill the water tank (see Filling & Refilling, page 6).
1. Plug in the adapter.
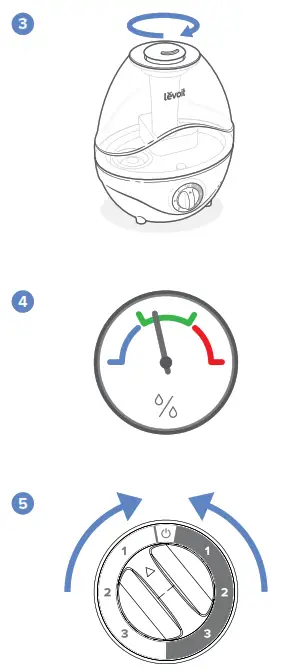
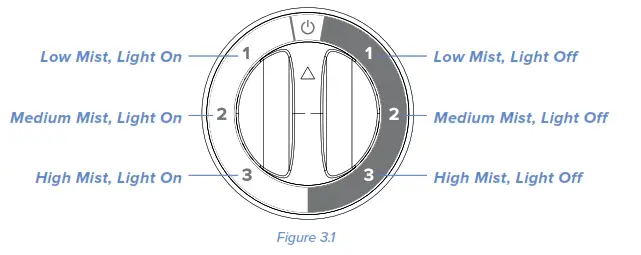
2. Turn the dial to the desired setting. [Figure 3.1]
3. Rotate the nozzle to adjust the direction of the mist.
4. When your room has reached a comfortable humidity level, turn your humidifier to a lower setting or turn it off. A comfortable humidity level is above 40% and below 60%.
5. Turn the dial to  to turn the humidifier off.
IMPORTANT TIPS
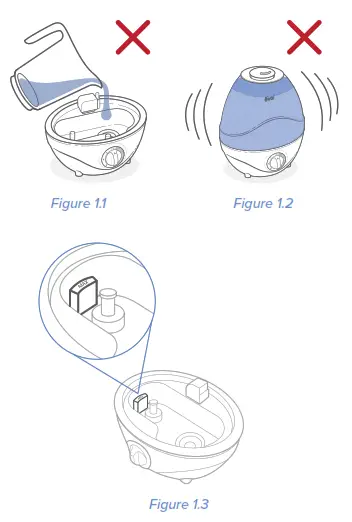
• Never pour water directly into the base chamber. [Figure 1.1] Only add water to the water tank. The humidifier will automatically release the correct amount of water into the base chamber.
• Avoid moving or shaking the humidifier. [Figure 1.2] This may cause the water tank to release too much water into the base chamber.
• Before moving the humidifier, turn it off, unplug it, and remove the water tank.
• If your humidifier doesn’t produce mist correctly, check the max water line [Figure 1.3] to see if there is too much water in the base chamber. Pour out any extra water if water is over the max line.
Note: The max water line is only for this purpose. Do not pour water into the base.
CARE & MAINTENANCE
Note:
• All maintenance should be done on a water-resistant surface, such as a kitchen counter.
• Change the water daily to avoid bacteria growth.
• Use a tissue or cloth to clean the nozzle regularly.
• If not using the humidifier for 1 week or longer, do not leave water inside. Clean and dry the humidifier instead.
Cleaning
You should clean your humidifier every week, and when you’re ready to store it.
Note:
• Never immerse the base in water or liquid. Do not place any part of the humidifier in a dishwasher.
• Do not use detergents to clean the humidifier.
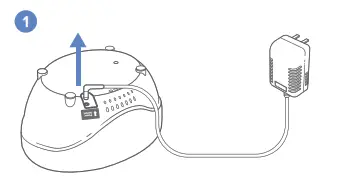
1. Unplug the humidifier and remove the power adapter from the base.
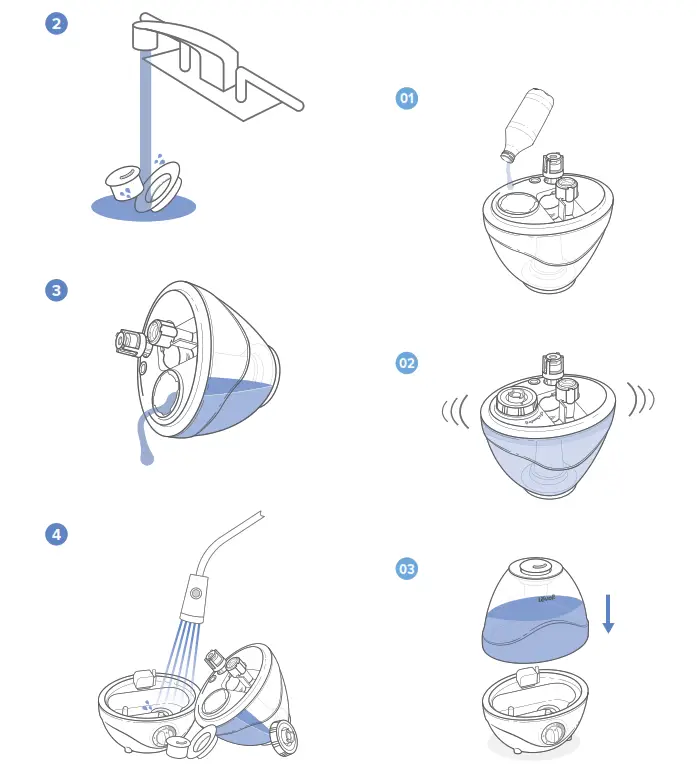
2. Remove and rinse the nozzle and nozzle cap.
3. Remove the water tank from the base. Pour out all water from the tank and base.
4. Rinse the tank and the base chamber with room temperature water.
5. To descale the humidifier:
01. Fill the water tank with 237 mL / 2 US cups of distilled white vinegar.
02. Replace the tank cap and swish the vinegar around in the tank.
03. Place the tank properly on the base. Vinegar will drain into the base chamber and loosen scale (mineral buildup) in the tank and in the base (including the transducer and float).
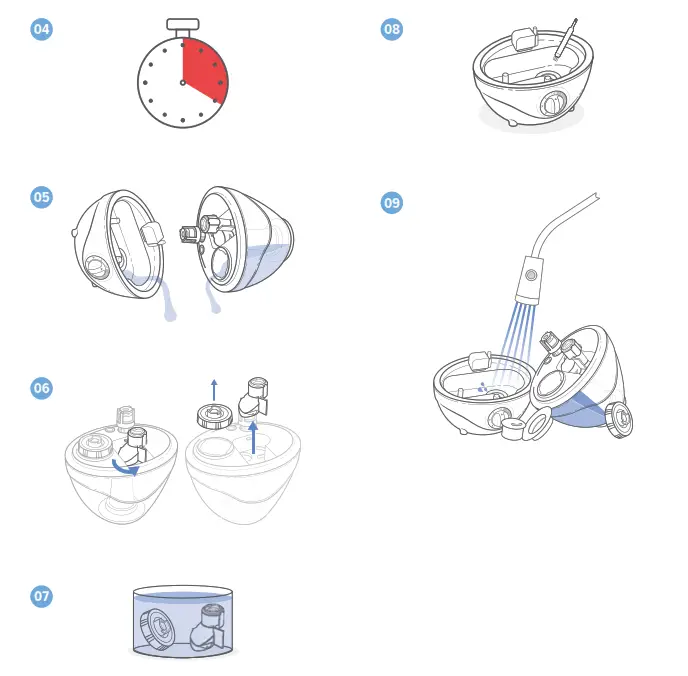
04. Soak for 15–20 minutes.
05. Remove the tank and pour out any vinegar.
06. Flip the tank over and remove the tank cap and noise silencer.
07. Place the tank cap and noise silencer in a small container (or the base chamber). Fill with enough vinegar to cover them. Soak for 15–20 minutes.
08. Use a soft cloth and the included cleaning brush to remove scale.
09. Rinse all parts until any vinegar smell is completely gone.
6. Dry all parts with a cloth. Make sure all parts are completely dry.
Reassembling
1. Flip the water tank over and replace the noise silencer on the tank.
2. Refill the tank, if necessary. Replace the water tank cap by firmly twisting it back in place, aligning the arrow with the lock.
3. Place the tank properly on the base. Replace the nozzle and nozzle cap onto the water tank.
Storing
Follow the cleaning instructions and allow all parts to dry completely before storing. Store in a cool, dry location.
TROUBLESHOOTING
| Problem | Possible Solution |
| Humidifier doesn’t turn on. | Make sure the power adapter is correctly plugged into a working outlet. |
| Make sure the power adapter is correctly plugged into the humidifier base. | |
| Little or no mist comes out. | Turn the mist level dial to a higher setting. |
| Fill the water tank. | |
| There may be too much water in the base chamber. Empty the base chamber. Refill the water tank (not the base chamber) and place the water tank properly onto the base. | |
| Make sure the air inlet on the bottom of the base is not blocked. The humidifier should not be set on carpet or other surfaces that may block the air inlet. | |
| Make sure the nozzle is not blocked or clogged. | |
| Make sure the humidifier is on a level surface. | |
| The water temperature may be too low. Turn the mist level dial to the highest setting and let the humidifier run for a while, then adjust to the desired setting. | |
| If the water tank or base was washed with detergent, rinse thoroughly with clean water to remove any detergent. | |
| Humidifier uses water too quickly. | The humidifier uses up water based on the environmental temperature and humidity. If your environment is cold and/or dry, the humidifier will run out of water faster. |
| Humidifier produces an unusual smell. | Clean the water tank and base chamber (see Care & Maintenance, page 9). |
| Water leaks from the humidifier. | Tighten the water tank cap. |
| Check the water tank for leaks. If there are leaks, contact Customer Support (see page 15). | |
| Condensation forms around humidifiers or windows. | Humidity may be too high. Turn down the mist level, turn off the humidifier, or open the door to the room. |
| Problem | Possible Solution |
| Mist is leaking from the base. | Empty the base chamber. Refill the water tank (not the base chamber) and place the water tank properly onto the base. |
| White dust appears around the humidifier. | Use purified or distilled water to fill the humidifier. Avoid using water with high mineral content. |
| Clean the humidifier (see Care & Maintenance, page 9). | |
 is red. is red. |
Fill the water tank. |
| Place the water tank properly on the base. |
If your problem is not listed, please contact Customer Support (see page 15).
WARRANTY INFORMATION
Terms & Policy
Arovast Corporation warrants all products to be of the highest quality in material, craftsmanship, and service for 2 years, effective from the date of purchase to the end of the warranty period. Warranty lengths may vary between product categories.
If you have any questions or concerns about your new product, please contact our helpful Customer Support Team.
CUSTOMER SUPPORT
Arovast Corporation
1202 N. Miller St., Suite A Anaheim, CA 92806 USA
Email: [email protected]
* Please include your order ID when contacting Customer Support.

Connect with us @LevoitUK

![]()
levoit Ultrasonic Top-Fill Cool Mist 2-In-1
Humidifier Diffuser User Manual
Questions or Concerns?
Please contact us MonFri, 9:00 am5:00 pm PST/PDT
at [email protected] or at (888) 726-8520.
Package Contents
1 x 2-in-1 Humidifier & Diffuser
1 x User Manual
1 x Quick Start Guide
Specifications
Power Supply — AC 100120V, 60Hz
Rated Power — 24W
Water Tank Capacity — 0.48 gal / 1.8 L
Run Time — 820 hours
Note: The humidifier will be able to run for a longer or shorter time depending on the environmental temperature and humidity.
Noise Level — ≤28dB
Effective Range — 107260 ft² / 1024 m²
Dimensions — 7 x 7 x 10.6 in / 7.6 x 17.6 x 27.1 cm
SAFETY INFORMATION
To reduce the risk of fire, electric shock, or another injury, follow all instructions and safety guidelines.
General Safety
- Only use the humidifier as described in this manual.
- Place the humidifier and cord so that they will not be knocked over. Do not place near large pieces of furniture or in higher c areas.
- When not in use, turn the humidifier off and disconnect from power by removing the plug from the outlet.
- Do not use the humidifier in wet environments.
- Keep the humidifier out of reach from children.
- To avoid the risk of electric shock, always unplug the humidifier from the power outlet before cleaning it or detaching the water tank from the base.
- Always make sure the humidifier is placed on a flat, level surface before operation.
- Do not place the humidifier near sources of heat, such as stovetops, ovens, or radiators.
- Do not place the humidifier directly on floors, carpets, or rugs. The only place on water-resistant surfaces.
- Do not place foreign objects into the humidifier’s base or water tank.
- Do not use attachments that are not recommended by Levoit for the humidifier.
- Do not cover the mist outlet while the humidifier is on. Doing so may damage the humidifier.
- Do not allow water or other liquids inside the air vent.
- Remove the water tank from the base before moving the humidifier.
- Do not immerse the humidifier base, power cord, or plug in water.
- Always allow the humidifier to completely cool before cleaning.
- Do not use detergents to clean the humidifier. Only use distilled white vinegar.
- If the humidifier is damaged or is not functioning properly, stop using it and contact Customer Support immediately (see 14).
- Not for commercial use. Household use only.
Plug and Cord
- Do not handle the power cord or plug with wet hands. Keep the plug and power cord away from liquids.
- Ensure that the plug fits properly into a polarized socket.
- The humidifier has a polarized plug (one prong is wider than the other), which fits into a polarized outlet only one way. This is a safety feature to reduce the risk of electric shock. If the plug does not fit, reverse the plug. If it still does not fit, do not use the plugin that outlet. Do not bypass this safety feature.
READ AND SAVE THESE INSTRUCTIONS
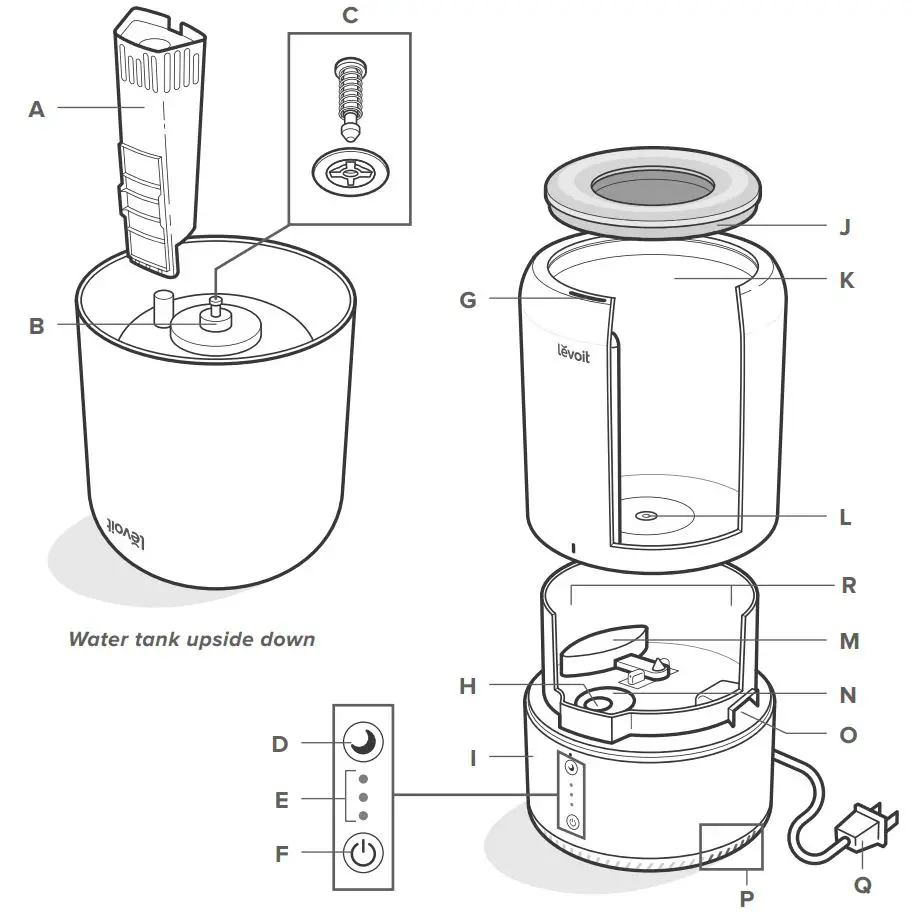
GETTING TO KNOW YOUR 2 IN 1 HUMIDIFIER & DIFFUSER
- A. Mist Tube
- B. Water Outlet
- C. Water Outlet Valve Assembly
- D. Sleep Mode Button
- E. Mist Level Indicators
- F. Control Button
- G. Mist Outlet
- H. Transducer
- I. Base
- J. Top Cover
- K. Water Tank
- L. Sealing Ring
- M. Float
- N. Insulation Ring
- O. Air Outlet
- P. Air Inlet
- Q. Power Cord
- R. Base Chamber
GETTING STARTED
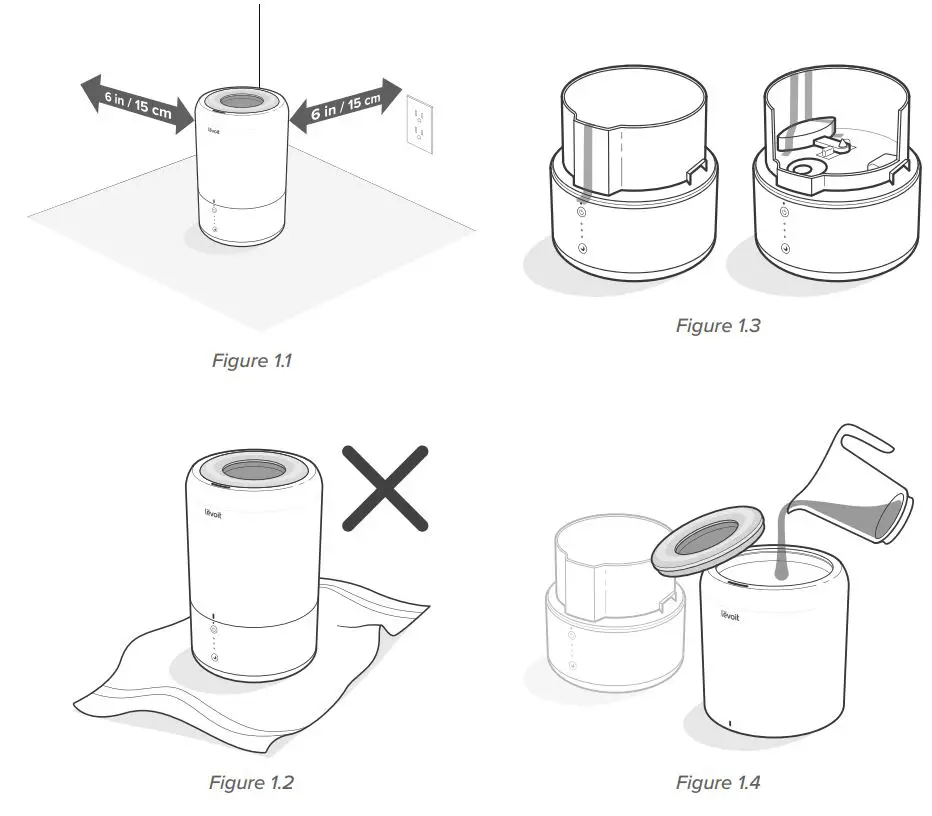
- Remove all packaging. Choose a hard, flat location for the humidifier at least 6 in / 15 cm away from any walls, furniture, bedding, and appliances. The surface must be water-resistant. [Figure 1.1]Note: Do not place the humidifier on towels, carpets, rugs, floors, or any surfaces with fibers. This will block the air inlet at the bottom of the humidifier and cause overheating. [Figure 1.2]
- Take the water tank off of the base and remove all tape. [Figure 1.3]
Filling & Refilling
1. Remove the top cover from the water tank. Fill the tank with room temperature water. Do not fill with warm or hot water. [Figure 1.4]
Note:
- We recommend using purified water.
- Avoid using tap water, because the mineral content is too high and will create white dust around the humidifier.
CAUTION
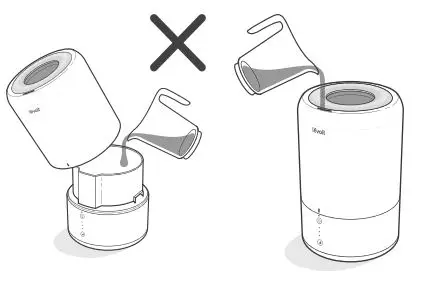
- Do not add water directly into the base chamber.
- Do not add water through the mist tube.
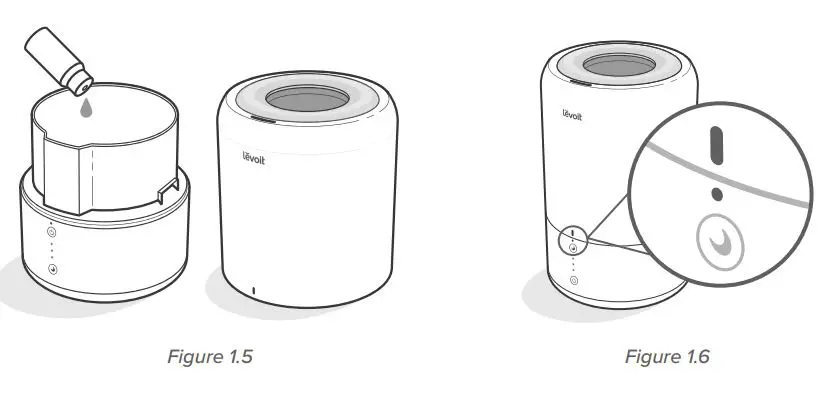
2. Optionally, add 1015 drops of essential oil into the base chamber. [Figure 1.5]
Note: For best results, we recommend using pure essential oil.
3. Place the top cover back onto the water tank. Make sure the tank is properly placed on the base by aligning the indicator marks. [Figure 1.6]
4. Plug in the humidifier.
USING YOUR 2 IN 1 HUMIDIFIER & Diffuser
Note:
- If there is no water in the tank, the humidifier will not turn on and
 will blink. Fill the water tank (see Getting Started, 5).
 - Keep the humidifier stable while using, or water may spill.
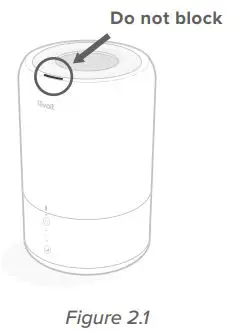
- Do not block the mist outlet. This will damage the humidifier. [Figure 2.1]
Mist Level
- Press
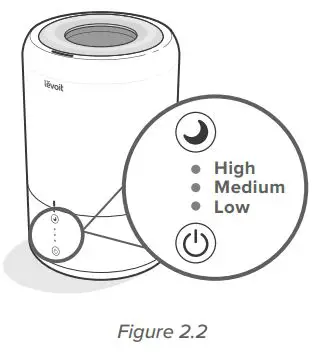
 once. The humidifier will start on the low mist level. [Figure 2.2]
 - Press
 repeatedly to cycle through mist levels (low, medium, high) and to turn the humidifier off.
Intelligent Sleep Mode
Intelligent Sleep Mode turns off all display lights and uses a humidity sensor to automatically adjust the mist level to maintain a 60% relative humidity (RH) while you sleep.
- Press
 to turn on the humidifier.
Note: The humidifier must be on to start Sleep Mode. - Press
 to start Sleep Mode. After 5 seconds, all display lights will turn off.
 - Press
 a second time (or press ) to cancel Sleep Mode. The humidifier will go back to the previously set mist level.
Note:
- Excessive humidity can cause health issues and mold growth. If the relative humidity in your room is over 60%, use the low mist setting or turn o the humidifier.
Important Tips
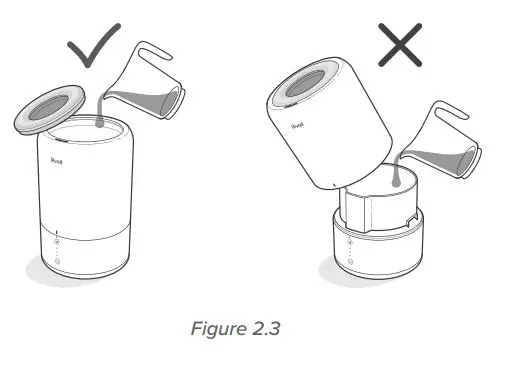
- Never pour water directly into the base chamber. Only add water to the water tank. [Figure 2.3] The humidifier will automatically release the correct amount of water into the base chamber.
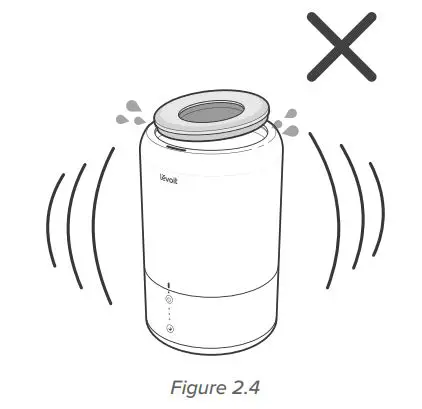
- Avoid moving or shaking the humidifier. [Figure 2.4] This may cause the water tank to release too much water into the base chamber.
- Before moving the humidifier, turn it off, unplug it, and remove the water tank.
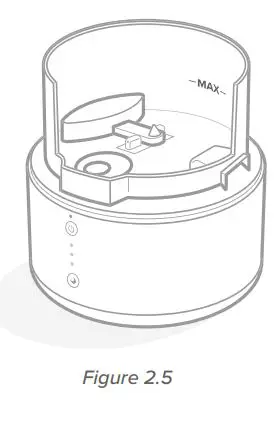
- If your humidifier doesn’t produce mist correctly, check the max water line to see if there is too much water in the base chamber. [Figure 2.5] Pour out any extra water if water is over the max line.
Note: The max water line is only for this purpose. Do not pour water into the base.
CARE & MAINTENANCE
Note:
- All maintenance should be done on a water-resistant surface, such as a kitchen counter.
- Change the water daily to avoid bacteria growth.
- Use a tissue or cloth to clean the mist outlet regularly.
- If not using the humidifier for 1 week or longer, do not leave water inside. Dry and store instead.
Cleaning
Clean your humidifier every week, and when you’re ready to store it.
Note:
- Never immerse the base in water or liquid. Do not place the base in a dishwasher.
- Do not use detergents to clean the humidifier.
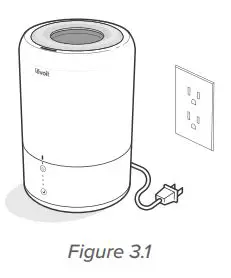
- Unplug the humidifier. [Figure 3.1]
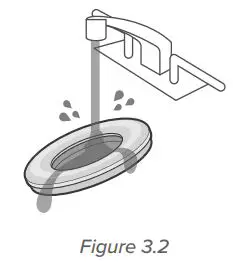
- Remove and wash the top cover. [Figure 3.2]
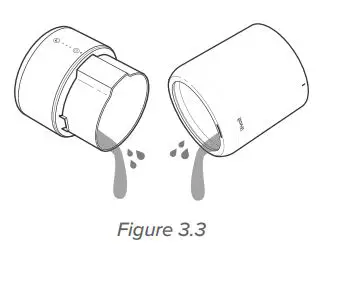
- Remove the water tank from the base. Pour out all water from the tank and base. [Figure 3.3]
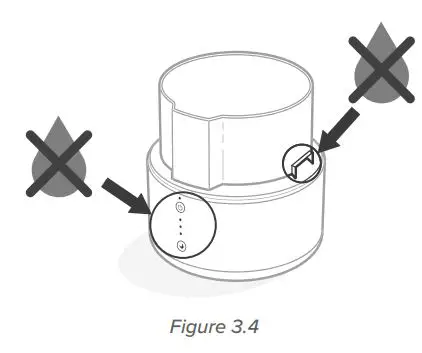
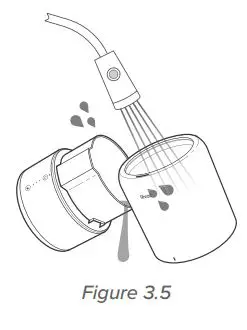
Note: Do not let water inside the air outlet or near the control panel. [Figure 3.4] - Rinse the tank and base chamber with room temperature water. [Figure 3.5]
- To remove any scale buildup inside the water tank or base chamber, soak with distilled white vinegar and wipe with a cloth and cotton swab.
- If you used essential oils in the humidifier, fill the water tank and the base chamber with distilled white vinegar and allow to soak.
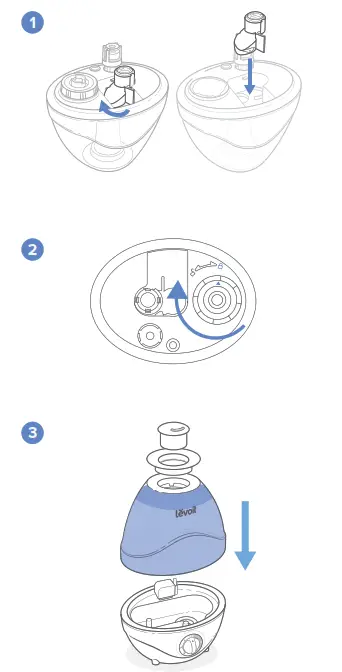
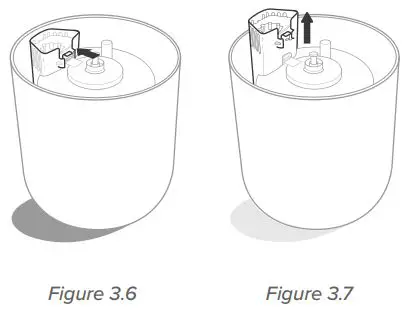
- To remove the mist tube for cleaning, flip the tank over. Push in the tab on the mist tube and pull out the mist tube. [Figure 3.6 – Figure 3.7] To replace, see Installing the Mist Tube.
- Rinse all parts and pour out the remaining water.
- Dry all parts with a cloth. Make sure all parts are completely dry.
Installing the Mist Tube
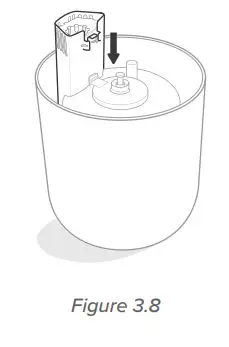
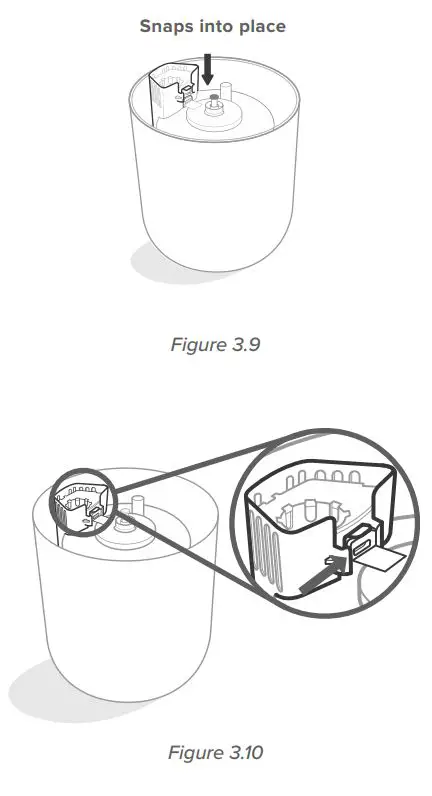
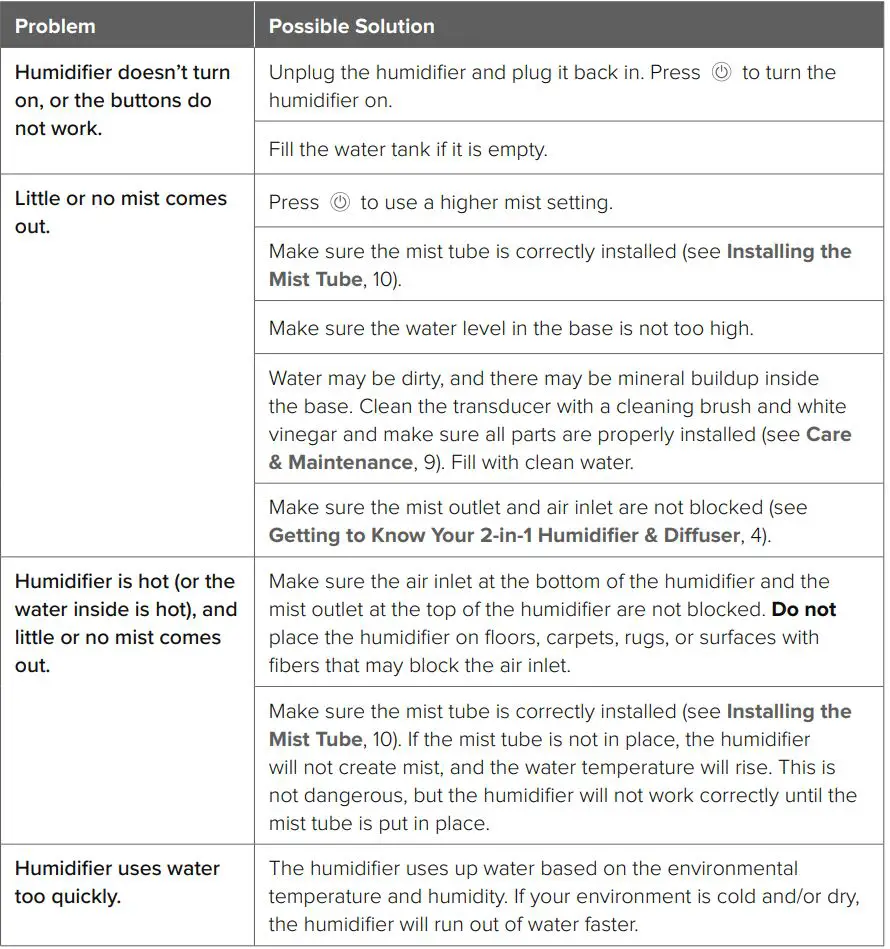
Make sure the mist tube is in place. If it is not, the humidifier will not create mist.
- Put the mist tube into place inside the water tank, then aligns the top of the mist tube with the mist outlet. [Figure 3.8]
- Press the mist tube down until the tab snaps into place. [Figure 3.9 Figure 3.10] Snaps into place
Storing
Follow the cleaning instructions (see 9) and allow all parts to dry completely before storing. Store in a cool, dry location.
TROUBLESHOOTING
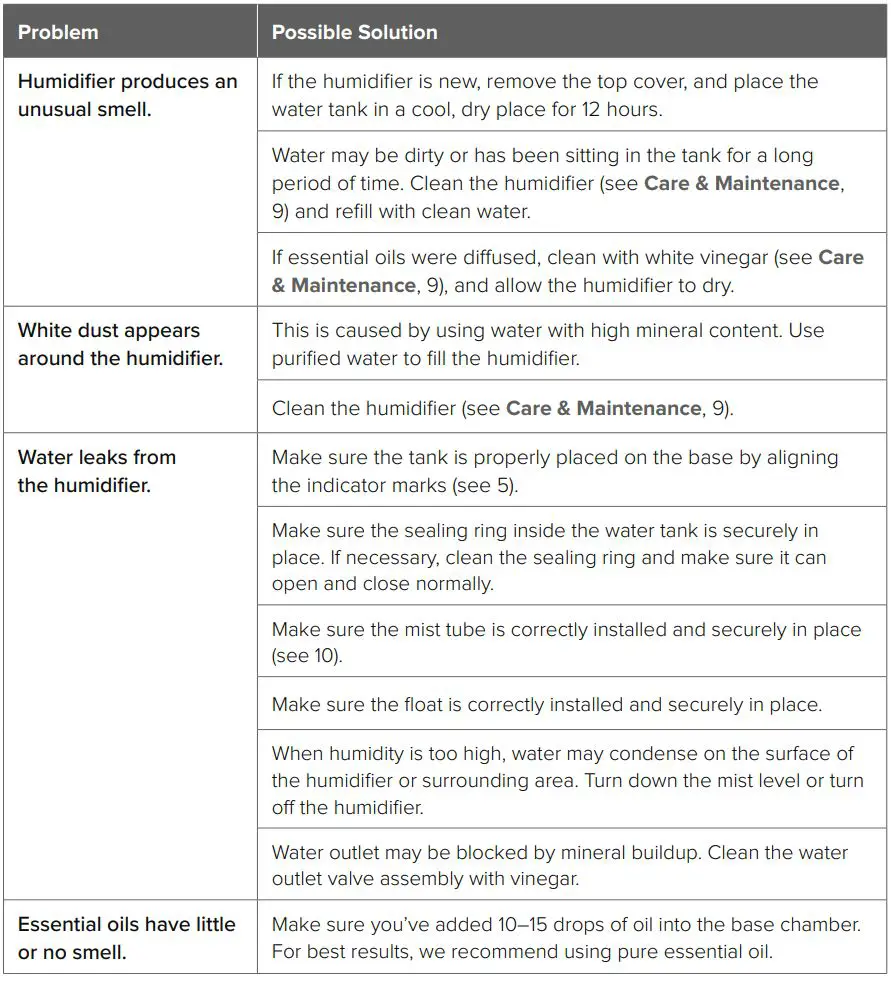
WARRANTY INFORMATION

Terms & Policy
Arovast Corporation (“Arovast”) warrants this product to the original purchaser to be free from defects in material and workmanship, under normal use and conditions, for a period of one year from the date of original purchase.
Arovast agrees, at our option during the warranty period, to repair any defect in material or workmanship or furnish an equal product in exchange without charge, subject to verification of the defect or malfunction and proof of the date of purchase.
There is no other express warranty. This warranty does not apply:
- If the product has been modified from its original condition;
- If the product has not been used in accordance with directions and instructions in the user manual;
- To damages or defects caused by accident, abuse, misuse, or improper or inadequate maintenance;
- To damages or defects caused by service or repair of the product performed by an unauthorized service provider or by anyone other than Arovast;
- To damages or defects occurring during commercial use, rental use, or any use for which the product is not intended;
- To damages or defects exceeding the cost of the product.
Arovast will not be liable for indirect, incidental, or consequential damages in connection with the use of the product covered by this warranty.
This warranty extends only to the original consumer purchaser of the product and is not transferable to any subsequent owner of the product regardless of whether the product is transferred during the specified term of the warranty.
This warranty does not extend to products purchased from unauthorized sellers. Arovast’s warranty extends only to products purchased from authorized sellers that are subject to Arovast’s quality controls and have agreed to follow its quality controls.
All implied warranties are limited to the period of this limited warranty.
This warranty gives you specific legal rights and you may also have other rights which vary from state to state. Some states do not allow the exclusion or limitation of incidental or consequential damages, so the above limitation or exclusion may not apply to you.
If you discover that your product is defective within the specified warranty period, please contact Customer Support via [email protected]. DO NOT dispose of your product before contacting us. Once our Customer Support Team has approved your request, please return the product with a copy of the invoice and order ID.
Extend Your Warranty by 1 Year
Register your product within 14 days of purchase at www.levoit.com/warranty to extend your 1-year warranty by an additional year.
This warranty is made by:
Arovast Corporation
1202 N. Miller St. Suite A
Anaheim, CA 93806
CUSTOMER SUPPORT
If you have any questions or concerns about your new product, please contact our helpful Customer Support Team.
Customer Support
Arovast Corporation
1202 N. Miller St., Suite A
Anaheim, CA 92806
Email: [email protected]
Toll-Free: (888) 726-8520
Support Hours
MonFri, 9:00 am5:00 pm PST/PDT
*Please have your order invoice and order ID ready before contacting Customer Support.

levoit True HEPA Replacement Filter Instructions

SAFETY INFORMATION
Follow all safety guidelines. Read all instructions before using.
- Do not allow children to play with the plastic packaging. Immediately discard the plastic after unwrapping the filter.
- A damaged filter may not properly filter air. Contact Customer Support immediately if you have received a damaged air filter
Note:
- The air filter should be replaced every 68 months.
- Do not clean the filter with water or other liquids.
REPLACING THE AIR FILTER
- Unplug the air purifier and remove the filter cover.

- Remove and properly dispose of the old air filter.

- Unwrap the filter and place into the air purifier with pull tabs facing out.

- Replace the filter cover.

- Plug in the air purifier and turn it on.

- Press and hold
 for 3 seconds to reset it.

Note: If ![]() is off, press and hold for 3 seconds to turn it on, then press and hold again for 3 seconds to reset it.
is off, press and hold for 3 seconds to turn it on, then press and hold again for 3 seconds to reset it.
PURCHASING ADDITIONAL AIR FILTERS
To maintain the performance of your air purifier, only use official Levoit
filters. To buy replacement filters, visit Levoit’s online store. Go to levoit.com
for more information.
Customer Support
Arovast Corporation 1202 N. Miller St., Suite A
Anaheim, CA 92806 Email: [email protected] Toll-Free: (888) 726-8520
Support Hours
MonFri, 9:00 am5:00 pm PST/PDT
*Please have your order invoice and order ID ready before contacting Customer Support.
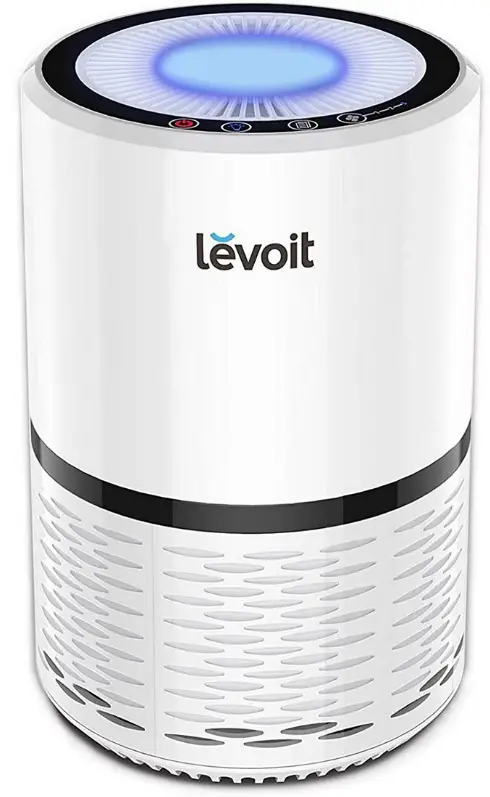
levoit LV-H132XR True HEPA Air Purifier
Package Contents
- 1x Air Purifier
- 2x True HEPA Combination Filter/Pre-Filter Sets (1 Pre-Installed)
- 3xUser Manual
Specifications
| Power Supply | AC 220–240V, 50/60Hz |
| Rated Power | 25W |
| Effective Range | ≤ 12 m² / 129 ft² |
| Operating Conditions | Temperature: -10°–40°C
/ 14°–104°F |
| Humidity: ≤ 85% RH | |
| Noise Level | ≤ 50dB |
| Standby Power | < 0.8W |
| Dimensions | 20 x 20 x 32 cm /
7.9 x 7.9 x 12.6 in |
| Weight | 2.5 kg / 5.5 lb |
SAFETY INFORMATION
To reduce the risk of fire, electric shock, or other injury, follow all instructions and safety guidelines.
General Safety
- Only use your air purifier as described in this manual.
- Do not use your air purifier outdoors.
- Keep your air purifier away from water, and wet or damp areas. Never place in water or liquid.
- Keep your air purifier away from heat sources.
- Do not use where combustible gases, vapours, metallic dust, aerosol (spray) products, or fumes from industrial oil are present.
- Keep 1.5 m / 5 ft away from where oxygen is being administered.
- Supervise children when they are near the air purifier.
- Do not place anything into any opening on the air purifier.
- Do not sit on or place heavy objects on the air purifier.
- Keep the inside of the air purifier dry. To prevent moisture buildup, avoid placing in rooms with major temperature changes or underneath air conditioners.
- Always unplug your air purifier before servicing (such as changing filters).
- Do not use your air purifier if it is damaged or not working correctly, or if the cord or plug is damaged. Do not try to repair it yourself. Contact Customer Support (see page 15).
- WARNING: Do not use this air purifier with solid-state speed controls (such as a dimmer switch).
- Not for commercial use. Household use only.
Plug & Cord
- Keep air purifier near the outlet it is plugged into.
- Never place the cord near any heat source.
- Do not cover the cord with a rug, carpet, or other covering. Do not place the cord under furniture or appliances.
- Keep the cord out of areas where people walk often. Place the cord where it will not be tripped over.
GETTING TO KNOW YOUR AIR PURIFIER
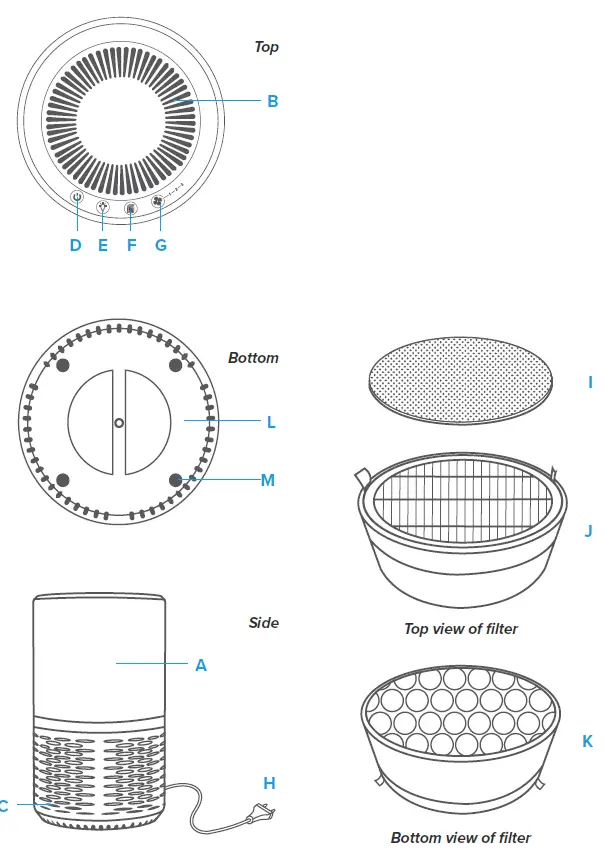
- A. Housing
- B. Air Outlet
- C. Air Inlet
- D. On/Off Button
- E. Night Light Button
- F. Check Filter Indicator Button
- G. Fan Speed Button
- H. Power Cord
- I. Pre-Filter
- J. True HEPA Combination Filter
- K. Activated Carbon Filter
- L. Filter Cover
- M. Anti-Skid Pads
CONTROLS
 On/Off Button
Turns the air purifier on/off. Night Light Button
- Cycles through night light settings: high, low, and off.
- Press and hold to turn off all lights on the air purifier, including button lights. Pressing any button
 Check Filter Indicator
Lights up when the filters need to be checked (see Check Filter Indicator, page 10). Fan Speed Button
Cycles through fan speeds:1 (low), 2 (medium), and 3 (high).
GETTING STARTED
- Flip over the air purifier. Locate the
“OPEN” and “LOCK” labels printed on the bottom of the air purifier, near the power cord inlet. - Twist the filter cover anticlockwise to the “OPEN” position, lining up the arrow on the filter cover with the arrow labeled
“OPEN”. [Figure 1.1] Lift the cover off the air purifier. - Remove the filters from their plastic packaging.
- Place the True HEPA Combination Filter into the air purifier with the pull tabs facing out. Then, place the Pre-Filter into the air purifier. [Figure 1.2]
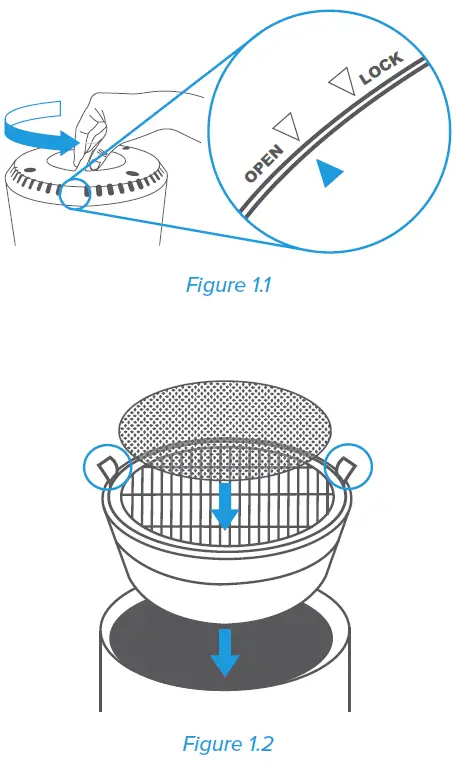
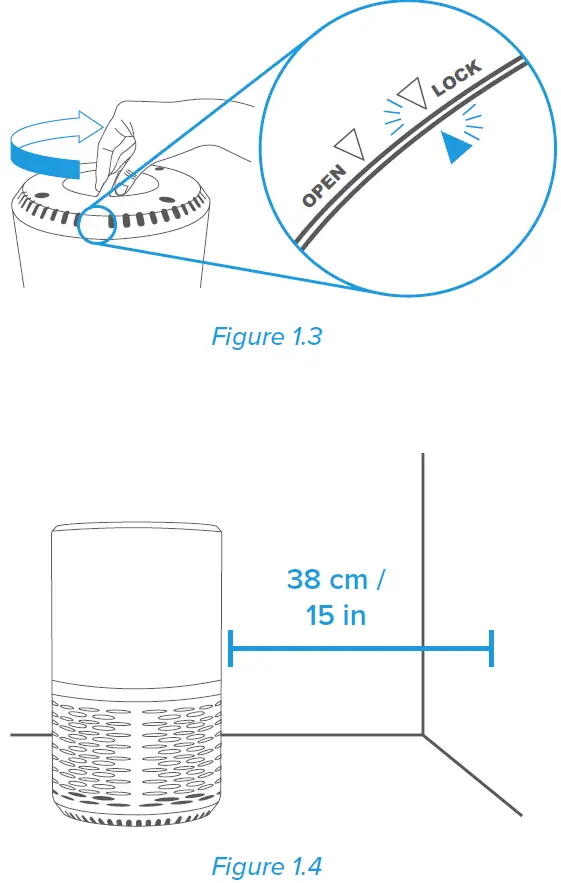
- Replace the filter cover on the air purifier. Line up the arrow on the filter cover with the arrow labeled “OPEN”. Then, twist the cover clockwise until the arrow on the cover lines up with the arrow labeled “LOCK”. The cover should lock in place. [Figure 1.3]
- Place the air purifier on a flat, stable surface with the display facing up. Leave at least 38 cm / 15 in of clearance on all sides of the air purifier. [Figure 1.4]
USING YOUR AIR PURIFIER
- Tap
 to turn on the air purifier. The air purifier fan will start automatically.
 - Optionally, tap
 to change fan speed.
 - Tap
 to turn off the air purifier.
Note:
- For best results, or to address a specific air quality issue such as smoke, run the air purifier at high speed (level 3) for 15–20 minutes before using a lower speed.
- To effectively clean air, keep windows and doors closed while the air purifier is on.
Memory Function
When the air purifier is plugged in, it will remember its programmed settings for the fan speed and night light when turned off. The air purifier will resume these settings when turned back on.
ABOUT THE FILTERS
This air purifier uses a 3-stage filtration system to purify air.
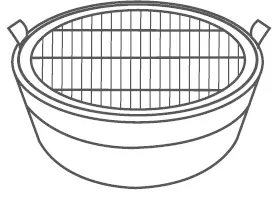
Pre-Filter
- Captures large particles such as dust, lint, fibres, hair, and pet fur.
- Maximises the life of the True HEPA Filter by protecting it.
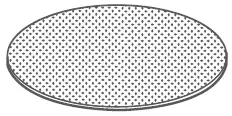
True HEPA Filter
- Removes at least 99.97%
- if airborne particles 0.3 micrometres (µm) in diameter.
- Filters small particles such as smoke, tiny dust particles, mould spores, tiny dust particles, parts of smoke, and allergens such as pollen, dander, and mites.
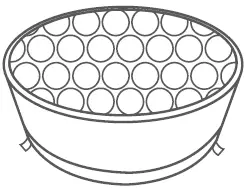
High-Efficiency Activated Carbon Filter
- Physically adsorbs smoke, unwanted odours, and fumes.
- Filters compounds such as formaldehyde, benzene, ammonia, hydrogen sulphide, and volatile organic compounds (VOCs).
CARE & MAINTENANCE
Cleaning the Air Purifier
- Unplug before cleaning.
- Wipe the outside of the air purifier with a soft, dry cloth. If necessary, wipe the housing with a damp cloth, then immediately dry.
- Do not clean with abrasive chemicals or flammable cleaning agents.
Storage
If not using the air purifier for an extended period of time, wrap both the air purifier and the filters in plastic packaging and store in a dry place to avoid moisture damage.
The Check Filter Indicator ( ) will light
up as a reminder to check the filters. Depending on how much you use the air purifier, the indicator should turn on within 6–8 months. You may not need to change your filters yet, but you need to check them when the indicator light turns on.
Resetting the Check Filter Indicator
Reset the Check Filter Indicator when:
- lights up.
- Replace the filters (see page 12).
- While the air purifier is plugged in and turned on, press and hold for 3 seconds until the air purifier beeps.
- The light will turn off once it is successfully reset.
- The filters were changed before lit up.
- Replace the filters (see page 12).
- While the air purifier is plugged in and turned on, press and hold for 3 seconds until the air purifier beeps. This will turn the indicator light on.
- Press and hold again for 3 seconds until the air purifier beeps.
- The light will turn off once it is successfully reset.
Cleaning the Filters
- Pre-Filter
The Pre-Filter should be cleaned once a month to increase efficiency and extend the life of your filters. Clean the Pre-Filter using a brush to remove hair, dust, and large particles. Optionally, rinse the Pre-Filter in clean water - True HEPA Combination Filter
Do not clean the True HEPA Combination Filter. Fine dust or bacteria may be released back into the air if cleaning is attempted, and the filter will be permanently damaged. Only clean the Pre-Filter.
Note:
Always make sure the Pre-Filter is completely dry before using, because dampness or moisture will damage the True HEPA Filter.
When Should I Replace the Filters?
The filters should be replaced every 6–8 months. You may need to replace your filters sooner or later depending on how often you use your air purifier. Using your air purifier in an environment with relatively high pollution may mean you will need to change the filters more often (even if the Check Filter Indicator is off).You may need to replace your filters if you notice:
- Increased noise when the air purifier is on
- Decreased airflow
- Unusual odours
- Visibly clogged filters
Note:
To maintain the performance of your air purifier, only use official Levoit filters. To buy replacement filters, visit Levoit’s online store. Go to levoit.com for more information.
Replacing the Filters
- Unplug the air purifier. Flip the air purifier over and remove the filter cover (see page 7).
- Remove the old filters.
- Clean any remaining dust or hair inside the air purifier using a vacuum hose. Do not use water or liquids to clean the air purifier.
- Unwrap the new filters and place them into the housing (see page 7).
- Replace the cover and plug in the air purifier.
- Reset the Check Filter Indicator (see page 10).
TROUBLESHOOTING
| Problem | Possible Solution | |
| Air purifier will not turn on or respond to button controls. | Plug in the air purifier. | |
| Check to see if the power cord is damaged. If it is, stop using the air purifier and contact Customer Support (see page 15). | ||
| Plug the air purifier into a different outlet. | ||
| Air purifier may be malfunctioning. Contact Customer Support (see page 15). | ||
| Airflow is significantly reduced. | Make sure the filters are removed from their packaging and properly in place (see page 7). | |
| Tap | to increase the fan speed. | |
| Leave at least 38 cm / 15 in of clearance on all sides of the air purifier. | ||
| Replace the filters (see page 12). | ||
| Air purifier makes an unusual noise while the fan is on. | Make sure the filter is properly in place with plastic packaging removed (see page 7). | |
| Make sure the air purifier is operating on a hard, flat, even surface. | ||
| Replace the filters (see page 12). | ||
| Air purifier may be damaged, or a foreign object may be inside. Stop using the air purifier and contact Customer Support (see page 15). Do not try to repair the air purifier. | ||
| Poor air purification quality. | Tap | to increase the fan speed. |
| Make sure no objects are blocking the sides or top of the air purifier (the inlet or outlet). | ||
| Close doors and windows while using the air purifier. | ||
| Make sure the filters are removed from their packaging and properly in place (see page 7). | ||
| Make sure the room is smaller than ≤ 12 m² / 129 ft². The air purifier may not be as effective in larger rooms. | ||
| Replace the filters (see page 12). | ||
| Problem | Possible Solution |
| The Check Filter Indicator is still on after replacing the air filter. |
Reset the Check Filter Indicator (see page 10). |
| The Check Filter Indicator has not turned on within 8 months. | The Check Filter Indicator is a reminder for you to check the filters and will light up based on how long the air purifier has been used (see page 11). If you don’t use your air purifier often, the indicator will take longer to turn on. |
| The Check Filter Indicator turned on before 6 months. | The Check Filter Indicator is a reminder for you to check the filters and will light up based on how long the air purifier has been used (see page 11). If you run your air purifier frequently, the indicator will turn on sooner. |
| Air does not flow evenly out of the air purifier. | This is due to the design of the air purifier. This is normal and will not affect the air purifier’s efficiency. |
WARRANTY INFORMATION
Terms & Policy
Arovast Corporation warrants all products to be of the highest quality in material, craftsmanship, and service for 2 years, effective from the date of purchase to the end of the warranty period. Warranty lengths may vary between product categories. If you have any questions or concerns about your new product, please contact our helpful Customer Support Team.
CUSTOMER SUPPORT
- Arovast Corporation
- 1202 N. Miller St., Suite A
- Anaheim, CA 92806
- USA
- Email: [email protected]
*Please have your order invoice and order ID ready before contacting Customer Support.
Levoit Smart True HEPA Air Purifier

Questions or Concerns?
Please contact us at [email protected]
Package Contents
- 1 × Smart Air Purifier
- 1 × True HEPA 3-Stage Original Filter (Pre-Installed)
- 1 × User Manual
- 1 × Quick Start Guide
Specifications
| Power Supply | AC 220–240V, 50/60Hz |
| Rated Power | 24W |
| Ideal Room Size | 83 m²
Note: • Effective for larger rooms, but purifica- tion will take longer. • Ideal Room Size is based on 2 air chang- es per hour (ACH). |
| CADR (CFM) | 400 m³/h / 235 CFM |
| Operating Conditions | Temperature:
-10°–40°C / 14°–104°F |
| Humidity: < 85% RH | |
| Noise Level | 24–48dB |
| Dimensions | 27.4 × 27.4 × 52 cm /
10.8 × 10.8 × 20.5 in |
| Weight | 5 kg / 11 lb |
| Wi-Fi® Frequency Range | 2412–2472MHz E.I.R.P.: <20dBm |
| Bluetooth® Frequency Range | 2402–2480MHz E.I.R.P.: <20dBm |
Note: To access additional smart functions, download the free VeSync app.
SAFETY INFORMATION
To reduce the risk of fire, electric shock, or other injury, follow all instructions and safety guidelines.
General Safety
- Only use your air purifier as described in this manual.
- Do not use without removing the plastic wrap from the filter. The air purifier will not filter air, and may overheat, causing a fire hazard.
- Do not use the air purifier outdoors.
- Keep the air purifier away from water, and wet or damp areas. Never place in water or liquid.
- Do not use in excessively humid areas.
- Keep the air purifier away from heat sources.
- Do not use where combustible gases, vapours, metallic dust, aerosol (spray) products, or fumes from industrial oil are present.
- Keep 1.5 m / 5 ft away from where oxygen is being administered.
- Supervise children when they are near the air purifier.
- Do not place anything into any opening in the air purifier.
- Do not sit on or place heavy objects on the air purifier.
- Keep the inside of the air purifier dry. To prevent moisture buildup, avoid placing in rooms with major temperature changes or underneath air conditioners.
- Always unplug the air purifier before servicing (such as changing the filter).
- Do not use the air purifier if it is damaged or not working correctly, or if the cord or plug is damaged. Do not try to repair it yourself. Contact Customer Support (see page 19).
- WARNING: To reduce the risk of fire or electric shock, do not use this air purifier with any solid-state speed controls (such as a dimmer switch).
- Not for commercial use. Household use only.
Power & Cord
- Keep the air purifier near the outlet it is plugged into.
- Never place the cord near any heat source.
- Do not cover the cord with a rug, carpet, or other covering. Do not place the cord under furniture or appliances.
- Keep the cord out of areas where people walk often. Place the cord where it will not be tripped over.
Electromagnetic Fields (EMF)
Your Levoit air purifier complies with all standards regarding electromagnetic fields (EMF). If handled properly and according to the instructions in this user manual, the appliance is safe to use based on scientific evidence available today.
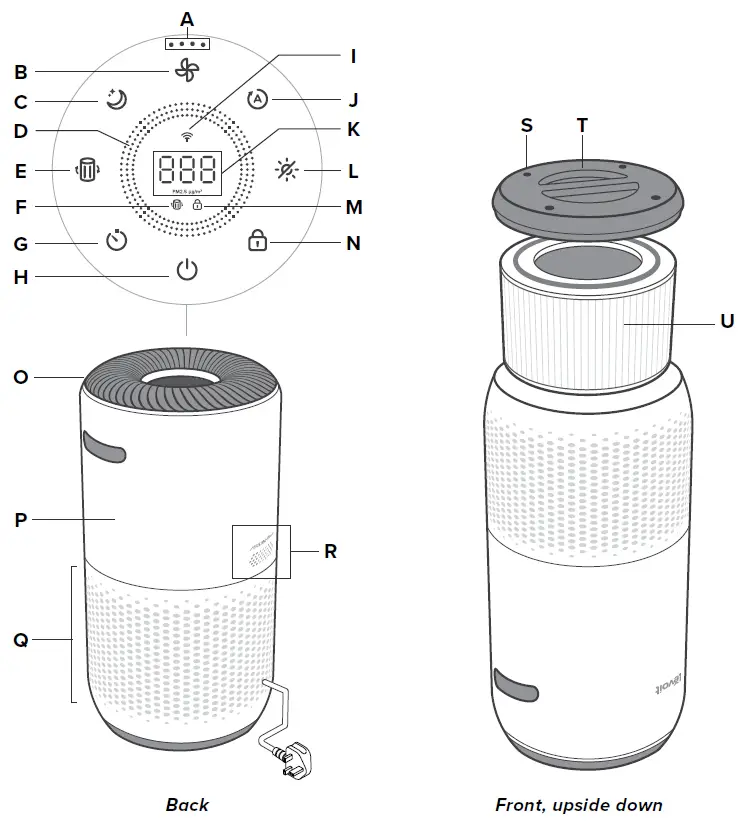
GETTING TO KNOW YOUR SMART AIR PURIFIER
A. Fan Speed Indicators
B. Fan Speed Button
C. Sleep Mode Button
D. Air Quality Indicator Rings
E. Check Filter Indicator Reset Button
F. Check Filter Indicator
G. Timer Button
H. On/Off Button
I. Wi-Fi Indicator
J. Auto Mode Button
K. PM2.5/Timer Display
L. Display Off Button
M. Display Lock Indicator
N. Display Lock Button
O. Air Outlets
P. Housing
Q. Air Inlets
R. AirSight™ Plus Laser Dust Sensor
S. Anti-Skid Pads
T. Filter Cover
U. True HEPA 3-Stage Original Filter
CONTROLS & DISPLAY
On/Off Button
- Turns the air purifier on/off.
- Press and hold to configure the air purifier. See the VeSync in-app instructions for more information.
Air Quality Indicator Rings
These indicators use an automatic sensor to display the air quality: Blue (Very Good), Green (Good), Orange (Moderate), and Red (Bad).
Wi-Fi Indicator
Turns on, off, or blinks to indicate pairing status. See the VeSync in-app instructions for more information.
Fan Speed Button
- Cycles through fan speeds: low (1 indicator will light up), medium (2 indicators), high (3 indicators), and turbo (4 indicators).
- Tapping the Fan Speed Button while the air purifier is in Auto Mode or Sleep Mode (if the display is on) will exit that mode.
Sleep Mode Button
Turns Sleep Mode on/off .
Timer Button
- Cycles through timer options.
- Press and hold for 2 seconds to begin cycling through the timer options in 1- hour increments.
Auto Mode Button
Turns Auto Mode on/off .
Display Off Button
- Turns the display off.
- Tap any button (except ) to turn the display back on.
Display Lock Button
- Prevents current settings from being changed. Press and hold for 3 seconds to turn Display Lock on/off.
- The Display Lock Indicator ( ) will blink when any other button is tapped to indicate that Display Lock is on.
Check Filter Indicator Reset Button
- Press and hold for 3 seconds to reset the Check Filter Indicator.
- The Check Filter Indicator lights up when the filter should be checked.
GETTING STARTED
- Flip the air purifier over or turn it on its side. Twist the filter cover anticlockwise and remove it. [Figure 1.1]
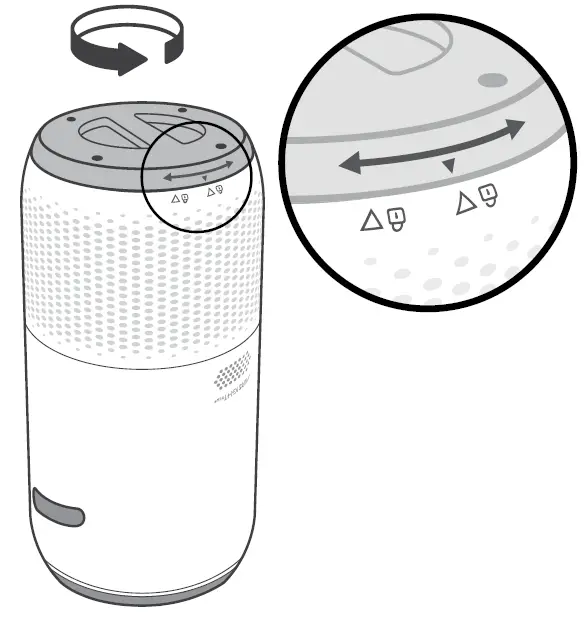
- Remove the filter from its plastic packaging and place the filter back into the air purifier. [Figure 1.2]
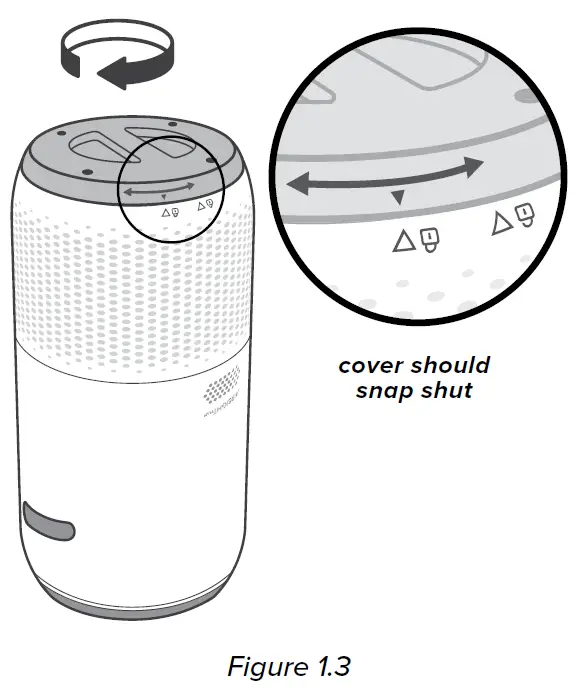
- Replace the filter cover and twist clockwise to lock. [Figure 1.3]

- Place the purifier on a flat, stable surface with the display facing up. Allow at least 38 cm / 15 inches of clearance on all sides. Keep away from anything that would block airflow, such as curtains. [Figure 1.4]
VeSync App Setup
- To download the VeSync app, scan the QR code or search “VeSync” in the Apple App Store® or Google Play Store.
- Open the VeSync app. Log In or Sign Up.
- Follow the in-app instructions to set up your smart air purifier.
Connect with Amazon Alexa or Google Assistant™
You can use the VeSync app to connect your smart air purifier to Amazon Alexa or Google Assistant. Please follow the in-app instructions to set up your voice assistant.
Note: You must create your own VeSync account to access voice assistants.
USING YOUR SMART AIR PURIFIER
Note: Using the VeSync app allows you to control your air purifier remotely and access additional functions and features.
- Plug in and tap to turn on the air purifier. The fan will start on low speed. [Figure 2.1]
- Optionally, tap to change fan speed between low, medium, high, and turbo.
Note:- The fan speed indicators will light up when active. 1 indicator will light up for low, 2 for medium, 3 for high, and 4 for turbo.
- Turbo speed is the loudest, but cleans air the quickest.
- For best results, or to address a specific air quality issue such as smoke, run the air purifier at turbo speed for 15–20 minutes before using a lower speed.
- To effectively clean air, keep windows and doors closed while the air purifier is on.
- Tap to turn off the air purifier.
Sleep Mode
Sleep Mode operates quietly by using a fan speed lower than low speed.
- Tap to turn Sleep Mode on/off.
- Sleep Mode will turn off the display after 3 seconds if no other buttons are tapped.
Note:
- When the display is turned off, tap any button (except ) to turn the display back on. If you don’t tap another button, the display will turn off again after 3 seconds.
- The Check Filter Indicator will still turn on and stay on if it’s time to check your filter.
Auto Mode
Auto Mode uses AirSight Plus, a smart laser dust sensor inside the air purifier, to adjust the fan speed automatically based on air quality. For example, if the air quality is bad, the fan will automatically be set to high speed.
| Air Quality Indicator Chart | ||
| Indicator Colour | Air Quality | Auto Mode Fan Speed |
| Blue | Very Good | Sleep Mode |
| Green | Good | Low |
| Orange | Moderate | Medium |
| Red | Bad | High |
Note:
- The air purifier will take 5 seconds to detect the air quality each time it is turned on. During this time, the air quality indicator rings will be blue. After 5 seconds, the air quality indicator rings will change colour based on the detected air quality.
- Auto Mode does not use the Turbo fan speed.
- The VeSync app also supports additional auto modes: Quiet Auto Mode and Efficient Auto Mode.
PM2.5 Display
The PM2.5 value on the display shows the amount of airborne particles (µg) that are detected per 1 cubic metre (m³) of air volume.
PM2.5 refers to particulate matter (PM) that is less than or equal to 2.5 microns (µm) in diameter. These particles, also known as “fine particles”, are so small that they can only be detected with an electron microscope, and they stay in the air longer than heavier particles such as dust and mould.
Your air purifier’s AirSight Plus laser dust sensor detects the amount of PM2.5 particles that are in a given space (µg/m³). Generally, the lower the number, the better your air quality. A number above 115 indicates that there is an unhealthy amount of fine particles in the air.
Timer
You can set a timer for 1–12 hours.
- Tap . The display will switch from showing the PM2.5 reading to the time you’ve selected.
- Tap repeatedly to select a time in 1-hour increments. If you don’t touch any buttons for 5 seconds, the display will switch to showing the PM2.5 reading and the timer will start automatically.
Note: Press and hold for 2 seconds to cycle through timer options automatically in 1-hour increments. - The timer will count down from your selected time.
Note:- While a timer is active, tapping will show the remaining time, rounded up to the nearest hour. Tap again within 5 seconds to add more time in 1-hour increments.
- You can see the exact remaining time in the VeSync app.
- When the timer is finished, the air purifier will turn off.
- To cancel a timer, tap repeatedly until the display reads “–H”.
Note:
- You can change the fan speed at any time while the timer is on.
- The timer will restart if the time is changed.
- The air purifier will remember the last timer setting while turned off, but the timer will be cancelled and need to be restarted.
- You can set a timer for 1–24 hours in the VeSync app.
Display Off
This turns off the display lights on the air purifier, including button lights and indicator lights (except the Check Filter Indicator).
- Tap to turn off the display.
- Tap any button (except or ) to temporarily turn the display back on. If you don’t tap another button, the display will turn back off after 3 seconds.
- Tap to turn the display back on. The display will stay on.
Note: The Check Filter Indicator will still turn on and stay on if it’s time to check your filter .
Display Lock
When the air purifier is on, you can lock the display to prevent settings from being accidentally changed. Buttons will not respond to being tapped.
- Press and hold for 3 seconds to lock the display. The indicator will light up in the centre of the display.
Note: If the display is turned off, the indicator will flash 3 times to show that the display has been locked, then turn off. - The indicator will blink when any other button is tapped to indicate that Display Lock is on.
- Tap and hold again for 3 seconds to unlock the display. The indicator will turn off.
Note:
- If the display is turned off, the indicator will flash 3 times to show that the display has been unlocked.
- Display Lock can still be used when the air purifier is in Standby Mode.
ABOUT THE FILTER
The air purifier uses a 3-stage filtration system to purify air.
A. Pre-Filter
Captures large particles such as dust, lint, fibres, hair, and pet fur.
Maximises the filter’s life by protecting it.
B. H13 True HEPA Filter
Captures at least 99.97% of airborne particles 0.3 microns (μm) in size
Traps small particles such as mould spores, fine dust, smoke particles, bacteria and viruses*, and allergens such as pollen, dust mites, and pet dander.
C. Custom High-Efficiency Activated Carbon Filter
Physically adsorbs smoke, odours, and fumes.
Customised using the ARC formula to be especially effective for cooking smells and pet odours in a multi-pet household.
Filters compounds such as formaldehyde, benzene, ammonia, hydrogen sulphide, and volatile organic compounds (VOCs).
The H13 True HEPA Filter can remove most viruses and bacteria from the air, but cannot fully remove them from your environment. Air purifiers cannot prevent an infected person from spreading an infection, and cannot remove bacteria and viruses from surfaces. Please use this air purifier together with other precautions.
Clean Air Delivery Rate
This air purifier has a Clean Air Delivery Rate of 400 m³/h or 235 cubic feet per minute (CFM).
Clean Air Delivery Rate (CADR) measures the efficiency of an air purifier by indicating the volume of clean air that an air purifier produces per minute. This is based on removal of dust, pollen, and smoke, which are the 3 most common indoor air pollutants. The higher the CADR, the more particles the air purifier will remove and the larger the area it can clean. The rating is measured at the air purifier’s highest speed.
Air Change Per Hour
The air change rate is how many times all of the air in a room can be purified (or “changed”) by the air purifier in 1 hour. Air changes per hour (ACH) are calculated with the recommended room size assuming 2.4 m / 8 ft ceilings. For smaller rooms, the air change per hour will increase. This air purifier has an air change per hour of 2, which means it can change air 2 times per hour at the max speed in a single, closed room up to 83 m². The air purifier is effective for larger rooms, but air purification will take longer, with fewer air changes per hour.
Note: To effectively clean air, keep windows and doors closed while the air purifier is on.
Humidity
Moisture may damage the filter. This air purifier should be used in an area with a humidity level below 85% RH. If you use the air purifier in excessively humid areas, the surface of the filter may become mouldy.
Note: Water or moisture will allow mould to grow. To solve a mould problem, get rid of the source of the moisture and clean up the mould. Air purifiers cannot solve an existing mould problem, and can only remove airborne mould spores and reduce odours.
Essential Oils
Do not add essential oils to the air purifier or filter. The filter will become damaged by the oil and will eventually release an unpleasant smell. Do not use diffusers near the air purifier.
CARE & MAINTENANCE
Cleaning the Smart Air Purifier
- Unplug before cleaning.
- Wipe the outside of the air purifier with a soft, dry cloth. If necessary, wipe the housing with a damp cloth, then immediately dry.
- Vacuum the inside of the air purifier.
- Do not clean with abrasive chemicals or flammable cleaning agents.
Check Filter Indicator
will light up as a reminder to check the filter. Depending on how often you use the air purifier, the indicator should turn on at about 12 months. You may not need to change your filter yet, but you should check it when turns on.
When your air purifier is set up with the VeSync app, you can also check the app to see your remaining filter life. You will also receive a notification from VeSync when it’s time to check your filter.
The VeSync app uses a scientific algorithm to determine your filter life based on air quality, amount of use, and other factors. The filter life percentage is based on 12 hours of daily use.
Cleaning the Filter
The outer pre-filter should be cleaned every 2–4 weeks to increase efficiency and extend the life of your filter. Clean the pre-filter using a soft brush or vacuum hose to remove hair, dust, and large particles. [Figure 3.1] Do not clean the filter with water or other liquids.
| Filter | When to Clean | How to Clean | When to Replace |
| Pre-Filter | Every 2–4 weeks | Use a soft brush or vacuum hose [Figure 3.1] | 12 months |
| True HEPA
& Activated Carbon Filter |
Do not clean | ||
When Should I Replace the Filter?
The filter should be replaced every 12 months. You may need to replace your filter earlier or later depending on how often you use your air purifier. Using your air purifier in an environment with relatively high pollution may mean you will need to replace the filter more often, even if is off.
You may need to replace your filter if you notice:
- Increased noise when the air purifier is on
- Decreased airflow
- Unusual odours
- A visibly clogged filter
Note:
- To maintain the performance of your air purifier, only use official Levoit filters. To buy replacement filters, go to Amazon and search B08SQQK6K7.
- Remember to reset after changing the filter.
Cleaning the AirSight Plus Laser Dust Sensor
The AirSight Plus Laser Dust Sensor can be blocked by dust, which affects the sensor’s accuracy. Clean the sensor every 3 months. Using your air purifier in an environment with more dust may mean you will need to clean the sensor more often.
- Unplug the air purifier.
- Place the end of a vacuum cleaner over the sensor openings. [Figure 3.3]
- Turn the vacuum on for at least 10 seconds to clean out dust.
Replacing the Filter
- Unplug the air purifier. Flip the air purifier over or turn it on its side. Remove the filter cover (see Getting Started, page 6).
- Remove the old filter.
- Clean out any remaining dust or hair inside the air purifier using a vacuum hose. Do not use water or liquids to clean the air purifier. [Figure 3.2]
- Unwrap the new filter and place it into the housing (see Getting Started, page 6).
- Replace the cover. Plug in the air purifier.
- Reset the Check Filter Indicator.
Storage
If not using the air purifier for an extended period of time, wrap both the air purifier and the filter in plastic packaging and store in a dry place to avoid moisture damage.

TROUBLESHOOTING
| Problem Possible Solution | |
| Air purifier will not turn on or respond to button controls. | Plug in the air purifier. |
| Check to see if the power cord is damaged. If it is, stop using the air purifier and contact Customer Support (see page 19). | |
| Plug the air purifier into a different outlet. | |
| The air purifier may be malfunctioning. Contact Customer Support (see page 19). | |
| Airflow is significantly reduced. | Make sure the filter is removed from its packaging and properly in place (see page 6). |
| Tap to increase the fan speed. | |
| Leave 38 cm / 15 inches of clearance on all sides of the air purifier. | |
| The pre-filter may be clogged by large particles, such as hair or lint, blocking airflow. Clean the pre-filter (see page 13). | |
| Replace the filter (see page 14). | |
| Air purifier makes an unusual noise while the fan is on. | Make sure the filter is properly in place with plastic packaging removed (see page 6). |
| Make sure the air purifier is operating on a hard, flat, level surface. | |
| Replace the filter (see page 14). | |
| The air purifier may be damaged, or a foreign object may be inside. Stop using the air purifier and contact Customer Support (see page 19). Do not try to repair the air purifier. | |
| Strange smell coming from the air purifier. | Clean the filter, or replace if necessary. |
| Contact Customer Support (see page 19). | |
| Make sure not to use your air purifier in an area with high humidity or while diffusing essential oils. | |
| Problem Possible Solution | |
| Poor air purification quality. | Tap to increase the fan speed. |
| Make sure no objects are blocking the sides or top of the air purifier (the inlet or outlet). | |
| Make sure the filter is removed from its packaging and properly in place (see page 6). | |
| Close doors and windows while using the air purifier. | |
| If the room is larger than 83 m², air purification will take longer. The air purifier may not be as effective in significantly larger rooms. | |
| Replace the filter (see page 14). | |
| is still on after replacing the filter. | Reset the Check Filter Indicator (see page 13). |
| has not turned on within 12 months. | is a reminder for you to check the filter and will light up based on how much the air purifier has been used (see page 13). If you don’t use your air purifier often, will take longer to turn on. |
| turned on before 12 months. | is a reminder for you to check the filter and will light up based on how much the air purifier has been used (see page 13). If you run your air purifier frequently, will turn on sooner. |
| Air Quality Indicator always stays red. | The AirSight Plus Laser Dust Sensor may need to be cleaned (see page 14). |
| If you’re using an ultrasonic humidifier near the air purifier, the mist may affect the accuracy of the AirSight Plus Laser Dust Sensor. The sensor will detect the large mist particles, and the Air Quality Indicator may turn red. Avoid using an ultrasonic humidifier near the air purifier, or avoid using Auto Mode. | |
| Air Quality Indicator always stays blue, even when the air quality is poor. | The AirSight Plus Laser Dust Sensor detects airborne particles, but it cannot detect gas. Make sure there isn’t gas polluting the air. |
| Display shows Error Code “E1”. | The motor has malfunctioned. Please contact Customer Support (see page 19). |
VESYNC APP TROUBLESHOOTING
My air purifier isn’t connecting to the VeSync app.
- Make sure your phone has Bluetooth turned on and is not currently connected to another Bluetooth device.
- During the setup process, you must be on a secure 2.4GHz Wi-Fi network. Confirm that the network is working correctly.
- Make sure the Wi-Fi password you entered is correct.
- There should be no spaces at the beginning or end of the password.
- Test the password by connecting a different electronic device to the router.
- If you’re manually typing in the SSID and password, double check that both are entered correctly.
- Try moving your air purifier closer to the router. Your phone should be as close as possible to your air purifier.
- Your router may need to be at a higher location, away from obstructions.
- Make sure your air purifier and router are away from appliances (such as microwave ovens, refrigerators, electronic devices, etc.) to avoid signal interference.
- If you’re using a VPN, make sure it’s turned off while setting up your air purifier.
- Disable portal authentication for your Wi-Fi network. If portal authentication is enabled, the air purifier will not be able to access your Wi-Fi network, and setup will fail.
Note: Portal authentication means that you need to sign in to your Wi-Fi network through a web page before you can use the Internet.
My air purifier is offline.
- Make sure the air purifier is plugged in and has power, then refresh the VeSync menu by swiping down on the screen.
- Make sure your router is connected to the internet and your phone’s network connection is working.
- Delete the offline air purifier from the VeSync app. Swipe left (iOS®) or press and hold (Android™), then tap Delete. Reconfigure the air purifier with the VeSync app.
Note: Power outages, internet outages, or changing Wi-Fi routers may cause the air purifier to go offline.
ABOUT ENERGY-RELATED PRODUCTS
The product, in accordance with the Eco-design Requirements for Energy Related Products Directive 2009/125/EC, is in compliance with the following norm(s) or document(s): Regulation (EC) NO. 1275/2008, as amended by Regulation (EU) No. 801/2013.
| Required Power State Information | Networked Standby |
| Power consumption in specified power mode, at 230V/50Hz input | ≤ 2.0 W |
| Time after which equipment is automatically switched into mode | Immediately |
| Network port deactivation/activation procedures | Disconnecting the Wi-Fi connection will deactivate the Wi-Fi network. Connecting the device to Wi-Fi will activate the Wi-Fi network. |
| Networked Standby Mode: When the Wi-Fi network is activated, press and hold the On/Off button, and the device will immediately enter the networking standby state. | |
WARRANTY INFORMATION
| Product Name | Smart True HEPA Air Purifier |
| Model | Core 400S Series |
| For your own reference, we strongly recommend that you record your order ID and date of purchase. | |
| Date of Purchase | |
| Order ID | |
Terms & Policy
Arovast Corporation warrants all products to be of the highest quality in material, craftsmanship, and service for 2 years, effective from the date of purchase to the end of the warranty period. Warranty lengths may vary between product categories.
If you have any questions or concerns about your new product, please contact our helpful Customer Support Team.
CUSTOMER SUPPORT
If you have any questions or concerns about your new product, please contact our helpful Customer Support Team.
Arovast Corporation
1202 N. Miller St., Suite A
Anaheim, CA 92806
USA
Email: [email protected]
Please have your order invoice and order ID ready before contacting Customer Support.
ATTRIBUTIONS
Amazon, Alexa, and all related logos are trademarks of Amazon.com, Inc. or its affiliates. Google, Android, and Google Play are trademarks of Google LLC.
App Store® is a trademark of Apple Inc.
Wi-Fi® is a registered trademark of Wi-Fi Alliance®.
iOS is a registered trademark of Cisco Systems, Inc. and/or its affiliates in the United States and certain other countries.
The Bluetooth® word mark and logos are registered trademarks owned by Bluetooth SIG, Inc. and any use of such marks by Arovast Corporation is under license.


