IMPORTANT INSTRUCTIONS
- Before operating the machine read the Instruction manual carefully.
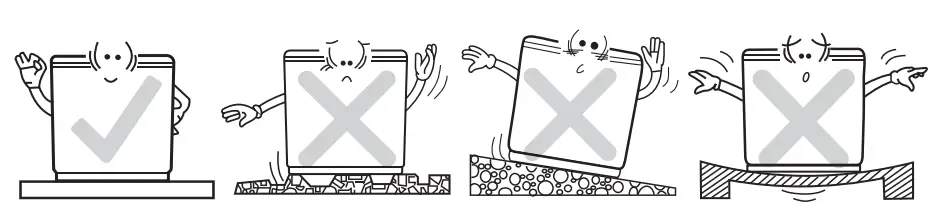
- Always keep the machine on the floor level.
- Place the machine on a flat & firm floor.
- When not in use, take the power cord out from the power socket outlet.
- During washing spinning & drain, check that the drain hose is lowered.
- Don’t touch cloth while running of the cycle.
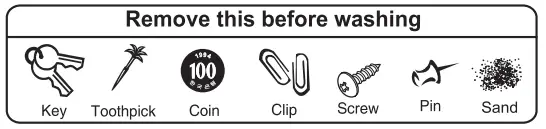
- Before putting clothes in the Wash Tub. check the pockets thoroughly for Coins, Keys, and other objects.
- Transfer the clothes from Wash Tub to Spin Dryer Basket one by one.
- In case you notice excessive vibration or abnormal noise during spinning, immediately open the Spin Dryer Cover and rearrange the laundry evenly.
- Rat away is a way to reduce damage caused by specific categories of Rats and may not be effective on all rodents. Actual results may vary depending on actual product use conditions.
- The machine has mobility function by manual intervention, Care to be taken to avoid any body parts coming under wheels.
- In case of any doubt contact the nearest service center or Dealer.
Take care of the following signs to avoid any harm to the machine and operator’s
warning
- this is a warning sign specifying users’ applications that might be dangerous.
- This is a sign specifying ‘Strictly Forbidden’ applications.
- Failure to comply with the instructions under this sign may result in major physical injuries or death
CAUTION: Failure to comply with the instructions under this sign may result in minor physical injuries or damages to the product.
This Washing Machine is intended to be used in household and similar applications only.
Disclaimer: The user should follow the instructions as per the owner’s manual to avoid any malfunctioning of the product, accident, or damage. The manufacturer is not liable for any accident or consequential or resulting liability, damage, or loss to property or life arising directly or indirectly from the product. The manufacturer’s liability is limited only to the extent of repair or replacement of the product as per the terms and conditions mentioned elsewhere in the document.
SAFETY MEASURE
WARNING
- In Operation
Do not insert the hand inside the spin dryer basket while the machine is in operation. Do not let children machine or climb into the tub. climb the on Injury may occur.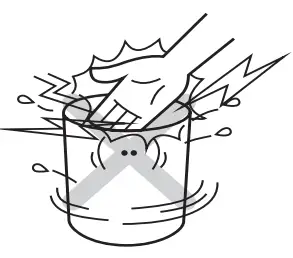
- Switch Area
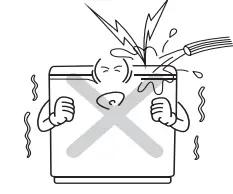
- Avoid watering on the control panel and power socket outlet. It may cause electric shock or fire.
- Installation
Install the washing machine’s horizontal support. Otherwise, it may cause vibration and noise.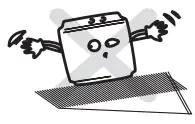
- Installation Area
Avoid area exposed to high humidity, snow, rain or direct sunlight. It may cause electric shock or deformation in the product.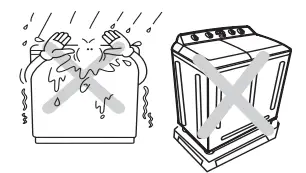 Machine to be used without Packing Base
 - Electric Outlet
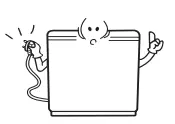
Do not use an adapter or extension ord to Supply power to the washing machine. It may cause a fire.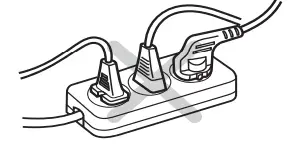
- Heat
Do not use an electric heater, candlelight, cigarette, bug smoker, etc. near the machine It may ignite or deform plastic part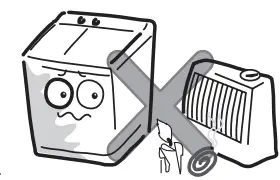
- Power Cord
if the power supply cord is damaged, it must only be replaced by a repair shop appointed by the manufacturer because special purpose tools are required.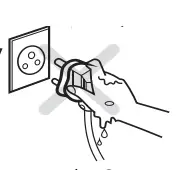
- Do not touch the power supply cord with your wet hand.
- Plug out the power supply cord, when cleaning or not using the washing machine for a long time.
Caution
- Hot Water
Avoid using hot water over 50°C. It may deform plastic parts or cause malfunction.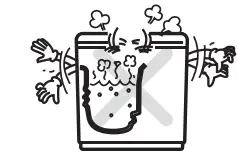
- Drain Hose
The level of the drain should be slightly lower than the lowest part of the washing machine in order to ensure proper and complete drainage and to avoid falling overflowing water on electrical parts.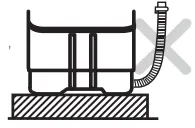
- Volatile Material
Do not use volatile material such as Benzene, or Gasoline bug killer. Do not leave strong alkaline substances such as bleach inside the tub. It may damage the plastic surfaces and rubber parts.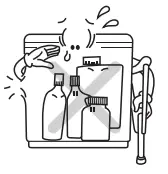
- Water Level
The washing machine is provided with different water level selection options for the washing/Rinsing process such as, “L” (Low) , “M” (Medium), “H” (High). “H” represents the Maximum water level available. Fill the adequate water quantity as per the laundry load so that Clothes can absorb the required amount of water & water will not be short.
INSTALLATION
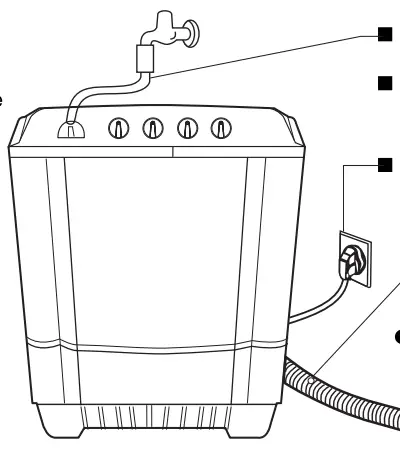
Connecting the power plug
Insert the power plug into the power socket-outlet with proper earthing.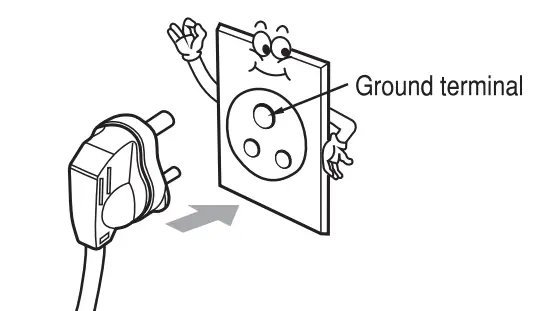
Installation area
- Select flat and firm floor
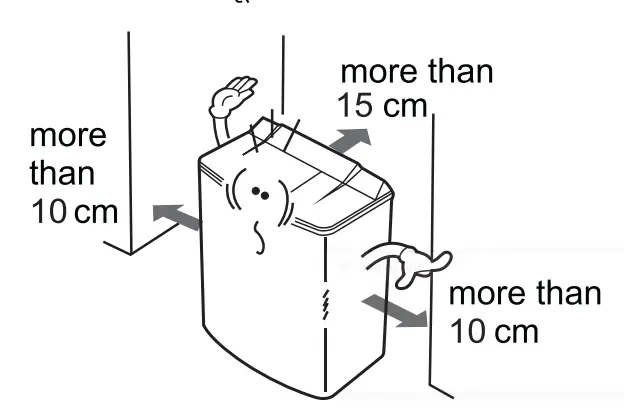
- Maintain more than a 15 cm gap between the side of drain hose and the wall.
- The base openings must not be obstructed by carpeting when the washing machine is installed.ona.carnetedfloar
Drain Hose Installation
Drain Hose
- Fix the snap ring to the drain hose.
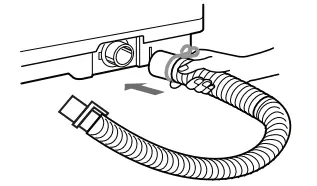
- Align the drain hose with the drain outlet.
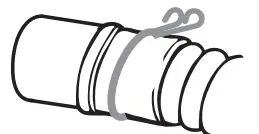
- Push the hose towards the body of the washing machine & release the snap ring.

Notes
Be sure to re-route the drain hose so that it is not kinked or has sharp bends which will prevent proper drainage. Use only new hose set provided with the machine.
Warning
Packaging materials (such as plastic bags and thermocol) should be kept away from children.The packaging material can cause suffocation.
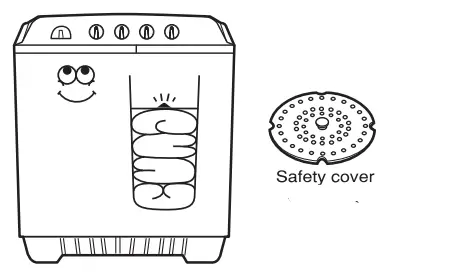
PARTS IDENTIFICATION
Accessories
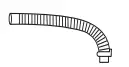
- Inlet Hose

- Safety Cover
- Drain Hose
- Sean Rinoa

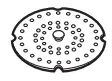
- Rotation Filter-C
Accessories may be different according to the model.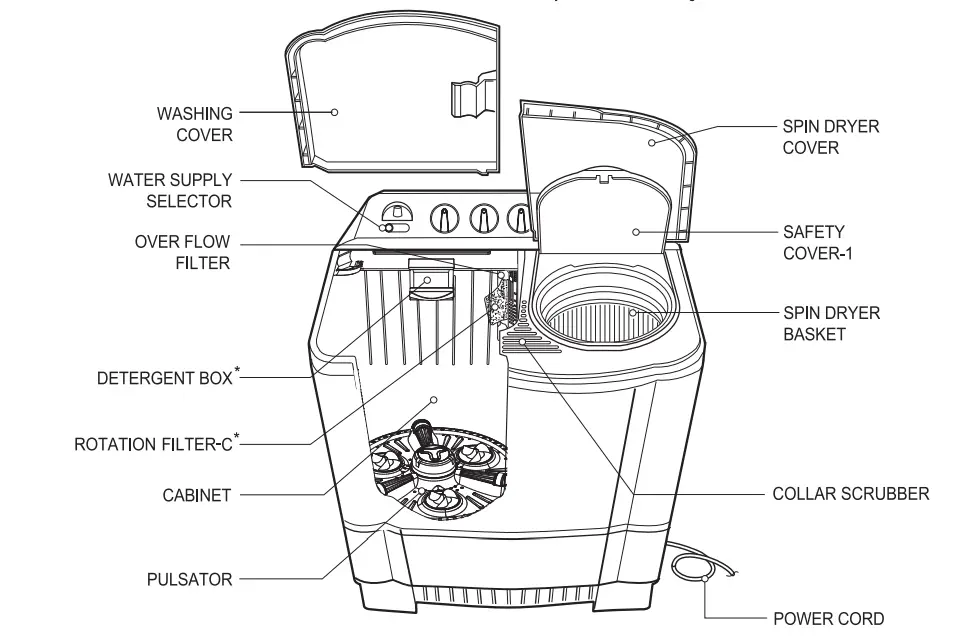
- (Please do not match this figure with the model as it may be different from your model . These are schematic diagrams only.)
- (Due to continuous improvements at LG, specifications of washing machines are subject to change without prior notice)
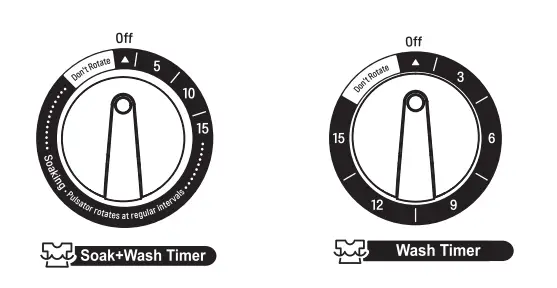
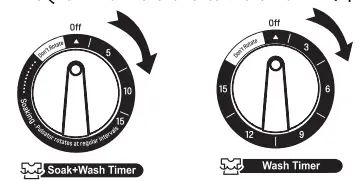
Wash Timer
The wash timer can be used for SOAK, WASH, and RINSE operations. Following combinations can be selected.
- Soak+ Wash: Select the desired soak time by setting the timer between 15-35/40 min Then total wash time will be selected as soak time+ 15 min of wash time.
- Wash/Rinse: Any Wash/Rinse time 1-15 min can be selected by setting the timer between 1-15 min
Washing will take place for the set period, then the machine stops automatically - In the Soak option, the machine operates for 1-2 min & remains off for 5 min This cycle continues for the selected soak time.
Soak Function
Soaking is provided for better cleaning of clothes as detergent water goes to inner por of clothes resulting dirt removal in a better way.
PARTS IDENTIFICATION
Control Panel
(Please do not match this igure with model as it may be diferent from your model. These are schematic diagrams only,)For Features and Specifications of your purchased model, please refer 1able “A” on page 15.
Description
- Water Supply Inlet Connect here with the inlet hose from the water tap to feed water to the tub.
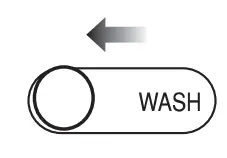
- Water Selector Select “WASH” to supply water for washing and rinsing and “SPIN” for spin shower rinse.
- Wash Timer Select the desired time for soaking, washing or rinsing. For Wash Timer please refer to Table “A” on page 15 for your purchased model.
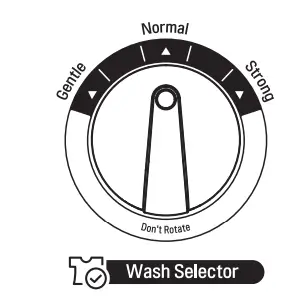
- Wash Selector Set the Selector to “GENTLE”, “NORMAL”, and ‘STRONG according to kinds and quantity of the laundry.
- Drain Selector Select “WASH RINSE” for washing and rinsing, and “DRAIN” to drain the water from the tub.
- Spin Timer Select the desired time for spinning. Don’t rotate the knob more than the prescribed limit,
PREPARATION BEFORE WASHING
Preparation
- Connect the water supply hose to the water supply inlet.
- Set the water selector lever to “WASH” for washing/ rinsing & to “SPIN” for interim spin rinse.
- Note: The water Selector lever should not be placed near the center (as shown in Fig. A flows to the wash and spin tub simultaneously). otherwise water
- For your convenience hang up the wash cOver on the left side of the washing machine tub when not in use.
- Use new inlet hose available with machine
- Connect the power cord to the electrical outlet.
- Drain Hose
- Always keep the level of drain hose slightly lower than the lowest part of the washing machine
Before washing
- Check the washing instructions labels on the clothing to be washed.
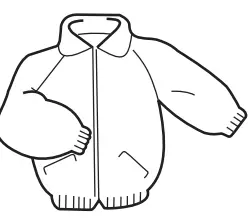
- Don’t forget to remove any objects from the pockets of the clothing. Object left in the pockets will damage the clothing or washing machine (especially cause clogging of the drain hose).
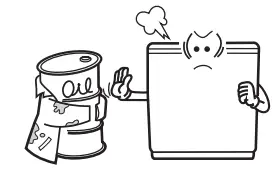
- Start washing after separating an oiled or dyed laundry.
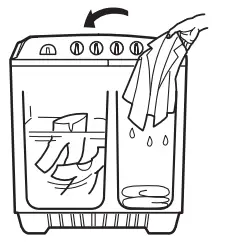
HOW TO WASH
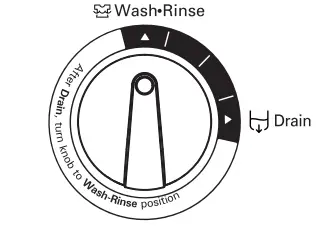
- Set the drain selector to the “Wash Rinse” position.
- Set the water selector to “WASH”.
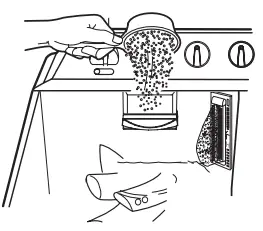
- Open the water tap and fill water in the wash tub about halfway to the desired water level.
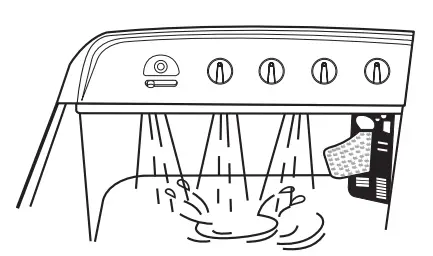
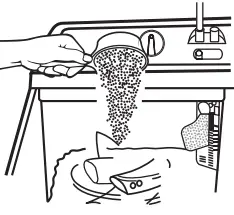
- Put the appropriate amount of detergent and the laundry into the wash tub and add water to the required Water level
 For the model without detergent box
 Put the appropriate amount of detergent into the detergent box and the laundry into the wash tub and add water to the required water level
For model with detergent box- For water level refer to Tables for Reference on page 16./ v TR
- Select the wash selector to “Gentle”, “Normal”, and “Strong” according to kinds and quantity of the laundry.
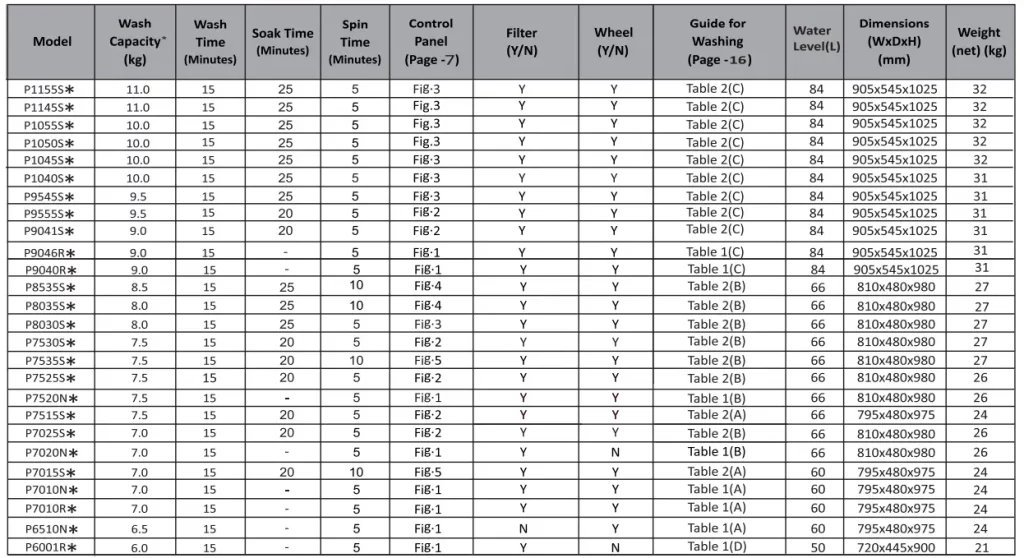
- For Features and Specifications of your purchased model. Please refer Table “A” on name 15,
- set the desired wash time
- Refer to TABLES for REFERENCE on page 16 for information on how to select the appropriate washing time.
- For Features and Specifications of your purchased model, please refer Table “A” on page 15.
- When washing is finished, select the drain selector to “Drain” position and drain the water out.

HOW TO RINSE
Continuous water supply rinse
The course is to rinse while feeding water continuously
- Set the drain selector to the “Wash Rinse” position.
- Put the laundry into the wash tub and open the water tap.
- Set the rinse time with the wash timer and feed water continuously.
 For Features and Specifications of your purchased model. please refer Table “A” on page 15.
Interim spin rinse
Interim spin rinse prior to regular rinsing will remove sudsy water from the laundry and improve rinsingg efficiency.
- After washing
- Put the laundry into the spin dryer basket.
- Place the safety cover horizontally on the laundry.
- Set the water selector to “SPIN” &0pen the tap.

- Supply water for about 1 minute Adjusts the water flow to prevent overflow from the wash tub.
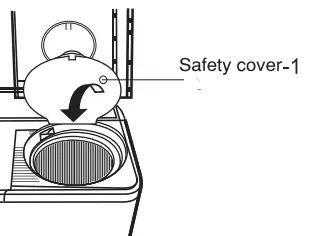
- Turn off the water supply, close the safety cover-1, and spin the dryer cOver
- Set the desired spin time with the spin timer
- After spinning Put the laundry into the wash tub and rinse
Caution
Do not operate the Spin with the water supply ON.
Spin Motor may stop operation or may be damaged.
HOW TO SPIN
- Put the laundry evenly into the spin dryer basket.
- Put the laundry down lightly.
- Place the safety cover horizontally on the top of the laundry inside the basket.
- Close the safety over-1 and than spin dryer cover.
- Set the spin timer according to the following table.
| Type of clothing/ q,qi <I> l!<nR | Spin Time |
| Thin fabrics (synthetic fabrics, mixed fabrics) Sweaters | 1min |
| Silk (synthetic fa brics) | 1 ~3 min |
| Cotton underwear | 3~5 min |
| Sheets, towels | 5 ~ lO min |
- Do not drain the water out of the wash tub while the spin dryer basket is in operation. Otherwise, the spin motor could be damaged.
- If the spin dryer basket is off-balance and vibrates excessively, stop the spinning, rearrange the clothes evenly, and then resume spinning.
- If the spinning tail stops when the spin dryer cover is opened, the brake is out of order. Immediately stop using the machine and request a repair service
IMPORTANT INSTRUCTION
For woolen clothes, spin for 1 min only for clothes protection.
**10 min Spin Timer available with selected models only. For Spin Timer please refer to table “A” on page 15 for your purchased model.
Caution
Do not continue Spin over 3 consecutive cycles. After 3 consecutive spin cycles, stop spinning for more than 1 hour.
Spin Motor may stop operation or may be damaged.
AFTER FINISHING WASH
- Remove the laundry from the spin dryer basket and close the spin dryer cover
- If there is water in the wash tub, set the drain selector to “DRAIN” in order to drain it out.
- disconnect the power cord from the electrical outlet.
- Clean the washing machine. (Refer to CARE AND MAINTENANCE on pages 12-13).
CARE AND MAINTENANCE
Be sure to disconnect the power cord from the electric outlet before starting care and maintenance.
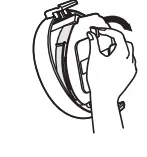
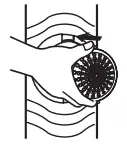
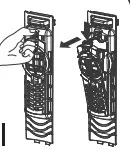
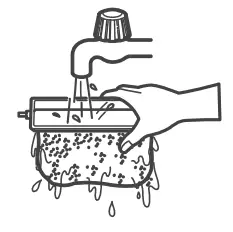
Lint Filter
- Pull out lint filter in the shown direction.
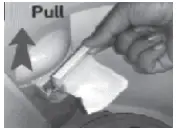
- Turn the net over and rinse in water
- Fit the filter to its original position. Press the filter until you hear a click sound.
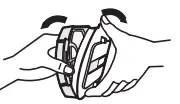
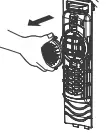
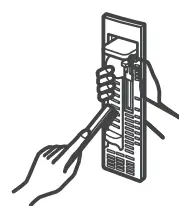
Magic Filter
- Pull out the Magic Filter from 1 tub in the direction as shown in the figure.

- Open the back cover of the filter in the direction shown in the figure.
- Pull out the inner filter in the direction shown in the figure.
- Remove lint.
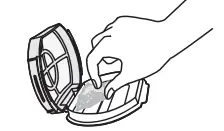
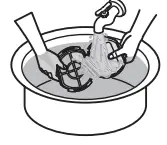
- Rinse the filter with water.
- Place the filter in the original location. Push the filter until a click sound is heard.
Smart Filter
- Press the upper and lower part of the filter and Dull forward.
- Remove lint and then wash out.
- Press the upper part of the overflow filter down and pull forward.
- Open the lid & remove lint and then wash out.

- Close the lid and then insert the 5 lower pat of the overflow filter into the wash tub and then press the top part into the original p0sition.
- Place the filter to the original position.
Overflow filter and Rotation filter-C
- Lift up the area (A of the overflow filter.
- Take out the rotation filter-C by pulling in direction shown.
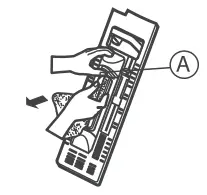
- Pull the overflow filter forward from the wash tub in the direction of the arrow.
- Turn the net over and rinse in water.
- Use a brush or your hand to remove all of the lints which has adhered to the overflow filter.
- Insert the overflow filter back into the wash tub.
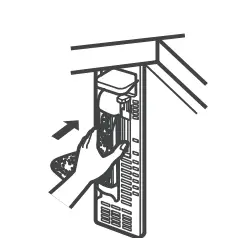
- Insert the rotation filter-C back into the overflow filter.

- If only rotation filter-C need washing, proceed the process 1>3>6 on the upper figure.
For Features and Specifications of your purchased model, please refer Table “A” on page 15.
Washing machine
- If the washing machine itself becomes dirty.
- The washing machine can be cleaned with cloth soaked in mild liquid detergent.
Never use abrasive cleaner or chemical Such as benzene or thinner to clean washing machine, because these materials will damage the plastic parts
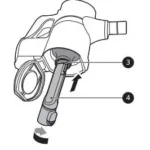
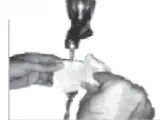
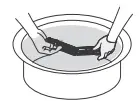
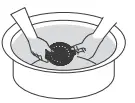
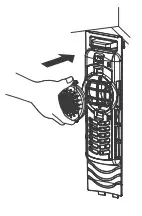
Pulsator
I lfa button or some other object gets caught in the pulsator
- Take out the pulsator cap with type screw driver. (Fig. a)
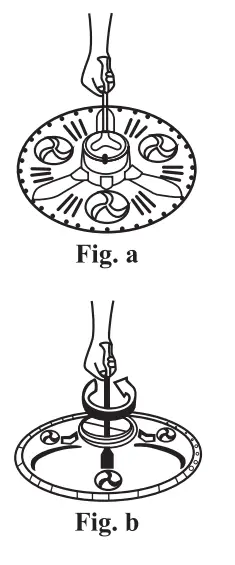
- Use a screwdriver to unscrew the screw in the center of the pulsator and lift the pulsator straiaht up in order to remove the button or other object. ((Fia.b)
- Place the pulsator at its original position and tighten the screw.
- Place the pulsator cap at its original position.
Detergent Box
- Pull the detergent box as shown in picture 1
- Press at the side of the detergent box and rotate downwards following the arrow direction in picture 2
- Clean detergent box with water.
For Selected models only
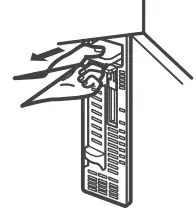
Spin dryer basket
- If clothing becomes trapped between the spin dryer basket and the spin tub.
- Firmly hold the tub by the other hand.
- Pull the safety cover-2 upward.
- Remove the clothing.
- Close the safety cover-2, pressing down on it so that it fits securely into the spin tub.

TROUBLESHOOTING GUIDE
Before Requesting Service
Disposal of your old appliance (as per e-waste Rules)
- The product is required to be handed over only to the authorized recycler for disposal.
- Keep the product in isolated area, after it becomes non-functional/un-repairable so as to prevent its accidental breakage.
- . The product should not be opened by the user himself/herself, but only by authorized service personnel
- The product is not meant for re-sale to any unauthorized agencies/scrap dealer/Sabarimala.
- The product is not meant for mixing into the household waste stream.
- Do not keep any replaced spare part(s) from the product in the exposed area.
- Any disposal through unauthorized agencies/persons will attract action under Environment (Protection) Act 1986.
- “This product complies with the requirement of Hazardous Substances as specified under Rule 13 (1) & (2) of the E-Waste (Management& Handling) Rules, 2011.
- To locate the nearest collection centre or call for pick-up (limited area only) for disposal of this appliance, please contact Toll-Free No. 1800-315-9999 1800-180-9999 for details. All collection centres and pick-up facilities are done by third parties with LG Electronics India Pvt. Ltd. merely as a facilitator. For more detailed information please visit: http://www.lg.com/in 9711709999 (LG WhatsApp No.)
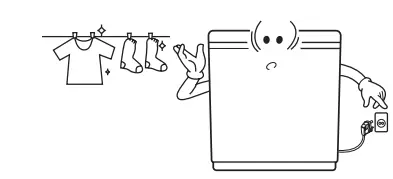
ENERGY SAVING GUIDE*/ if’cRI *
- Refer below instructions for wash/ Rinse/ Spin function.
- In models having Water Level Selection , the lever should be at “H” Level.
- Water Filling to be done in wash tub till water start flowing from drain hose.
- Rinse to be done in washing tub only.
- Input the detergent directly inside the wash tub input clothes.
Function and Time Selection
- For model capacity : 8.5 kg or more
- For model capacity : 8.0 kg or Less
Mode selection
Washing/ Rinsing: Normal Mode for Model P1155S. / P1145S. and gentle mode for remaining models.
under test conditions, when tested in accordance with standard IEC 60456: 2010 & BEE Schedule-12 (Revision: 03) Actual Performance of the machine will depend on how the appliance is being used.
WARRANTY
The Washing Machine (hereinafter referred as product) comes with 2 year warranty on all parts (except Plastic parts, Consumables, Loose Plastic Parts, Filters, Knobs, Top covers, Inlet/outlet hose) and thereafter a 3 years additional warranty only on the wash motor from the dale of purchases on producing the tax paid invoice of the product provided always that the warranty card bears the rubber stamp, dale and signature of our authorized dealer.
3 YEAR ADDITIONAL WARRANTY ON THE WASH MOTOR
The 3 Year warranty on the Wash Motor will continue even after the expiry of 2 year period from the date of purchase.This warranty covers Wash Motor only except for the models P651 ON* & P6001 R*. During the additional warranty period, it does not cover parts such as Controller Assembly, Timers, Spin motor, Tub assembly, etc. The standard visiting charges will be applicable within municipal limit of town where LG Electronics India Pvt. Ltd. (LGEIL) has its Authorized Service Centre, Service Outside municipal limit will attract to and fro travelling, other incidental expense in addition to standard visiting charges, as per the prevailing from time to time. During the additional warranty period only the parts replaced or repaired shall be free of costs, but service charges shall always be payable by the customer.
COMMON TERMS and CONDITIONS APPLICABLE FOR WARRANTIES AS MENTIONED ABOVE
- The warranty is confined to the first purchaser of the Washing Machine only & is non-transferable.
- Repairs & replacements will be carried out through the Authorized Service Centres of LG Electronics India Pvt Ltd. (hereinafter referred as LG or LGEIL). Customer may place their service call through the LG customer care or through the dealer from whom the product has been purchased. In case the customer shifts the place of residence during warranty period, it is advised to contact our helpline.
- Repair under warranty shall be carried out by an authorized service personnel only. The details of centralized helplines are attached.
- For units installed beyond municipal limits of the jurisdiction of company’s Authorized Service Centre, ii is responsibility of the purchaser to contact the nearest authorized service centre and bring the unit to the authorized service at its own cost and risk. All expense incurred in collecting the units or parts thereof from the company’s authorized service centre, as well as expenses incurred with deputing of service personnel/technician toward conveyance and other incidentals etc. will be borne by the customer. Local charges for transportation and handling charges may vary from location to location. Customers are advised to verify before. In case the customer desires to bring the unit on its own to the Authorized Service Centre, the same shall be at its own risks & consequences.
- The concerned authorized service centre will advise the customer whether to effect the repairs at site or at the authorized service centre.
- Call registered with the centralized helpline/Authorized service centre, wherein only cleaning of the unit/parts in the unit due to dust accumulation on portions of the units are not to be considered as defects.
- In case of repairs or replacement of any part/s of the unit, this warranty will thereafter continue and remain in force only for the unexpired period of the warranty. LGEIL may use parts that are new or refurbished and equivalent to new in performance and reliability. Replacement of parts would be purely at the discretion of LGEIL alone. In case the replacement of the entire unit is being made, (subject to the sole discretion of LGEIL), the same model shall be replaced and in the event such model has been discontinued, it shall be replaced with the model price equivalent at the time of purchase.
- In case of any damage to the product/customer abuse/repairs by un-authorized personnel’s/ misuse detected/ by the Authorized Service Centre personnel, the warranty conditions are not applicable and repairs will be done subject to availability of parts and on a chargeable basis only.
- This warranty shall not cover any consequential or resulting liability, damage or loss to property or life arising directly or indirectly out of any defect being noticed in the equipment during warranty period of the Washing Machine. The company’s obligation under this warranty shall be limited to repair or providing replacement of defective parts only under the warranty period.
- The company or its Authorized Service Centre reserves the right to retain any part/s or component replaced its discretion, in the event of defect being noticed in the equipment during warranty period.
- While the company will make every effort to carry out repairs at the earliest, it however is made expressly clear that the company is under no obligation to do so in a specified period of time.
- Warranty does not cover accessories external to the equipment supplied by the dealer
- In the event of any unforeseen circumstance, and spares not being available, the company’s prevailing depreciation rules may apply on the purchaser to accept as a commercial solution in lieu of repairs.
- If any coloured internal or external components are replaced, there will be commitment to ensure that the shades match with the original or other components. The replaced shades, patterns, tints may vary from the customes unit due to continuous usage of the unit. Any matching components changed at customer’s request will be chargeable basis except the component which actually needed.
- Free Installation or Demo of the product, can be availed only once & within 3 months from the date of purchase.
- Any extended warranty offered by LGEIL has to be supported by relevant proof.
- Warranty shall expire after the warranty period as mentioned above even if the Washing Machine may not be in use for any time during the warranty period for any reason.
- Only courts in state of Delhi and places where LGEIL has its branch office shall have the jurisdiction for settling any claims, disputes arising under the warranty.
- Warranty is not applicable in any of the following cases where:
- The warranty card is not completed properly at the time of purchase.
- The completed warranty card is not presented to authorized service personnel at the time of service of the product.
- The product is not operated according to instructions given in the Operating Instruction Booklet/Owner’s Manual.
- The product is used for commercial purposes.
- The product is used at any places such as public bathroom, lodging houses, training center, dormitory etc.
- The product has failed under certain conditions like water logging , flood, fire , misuse etc.
- Defects/malfunction are caused by improper or reckless use, which shall be determined by the company personnel.
- Any repair work is carried out by persons other than authorized service personnel.
- Defect/malfunction are caused which are beyond control like lightening, abnormal voltage, Acts of God.virus etc.
- Any issue is caused by usage of 3rd party product like voltage stabilizer, power outlet socket, MCB, extension board etc.
- Defects/malfunction caused while in transit to service centre or purchaser’s residence.
- Defects caused by rodents bite or by pests and vermin ants/Insects/animals/birds etc.
- The serial number is deleted, defected or altered.
- Damage is caused to the product or any part/s due to transportation or shifting
- Any accessory external to the equipment are supplied by dealer or LG.
CUSTOMER’S DETAILS
MODEL No.: SERIAL No.: