Little Tikes Shop’n Learn Smart Checkout Instructions Manual

Parent Guide Instructions
The Shop ‘n Learn™ Smart Checkout will launch and run on all Android devices 4.3 or higher
and all Apple devices running iOS 7 and above. iPad 2 is not supported with this product. Devices must support Bluetooth LE for the app to sync with the Smart Checkout.
For a complete list of compatible devices, please visit: littletikes.com/shopnlearn
1. Get Started!
Download the Smart Checkout app to your tablet or mobile device by scanning the QR code, or by visiting littletikes.com/smartcheckout

IMPORTANT: Make sure your device is fully charged and has a working Internet connection. Be sure your Smart Checkout has a fresh set of batteries.
2. Sync Smart Checkout with the app:
Turn on your device.
- Be sure that the device’s Bluetooth feature is turned on.
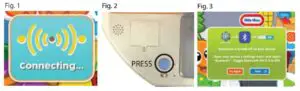
- Launch the Shop ‘n Learn™ Smart Checkout app. The “connecting” screen appears while connecting to the check stand (Fig. 1).
- Press the “Connect” button located on top of the Smart Checkout. A green LED will flash
while it is searching for your device (Fig. 2). - When connecting screen disappears and the green LED remains solid, you’re connected!
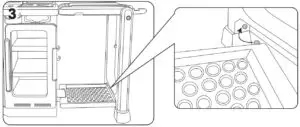
NOTE: If you’re having trouble connecting, select “Help” for troubleshooting tips (Fig. 3).
3. Update the firmware:
IMPORTANT: Do not turn o the workbench or close the app during the update process.
- Once connected, click the settings button to search for a firmware update.
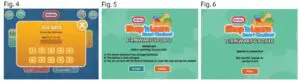
- Enter the correct answer to the math problem to open the settings page (Fig. 4). Select “Firmware Update.”
- If the app does not find an update, it will tell you the firmware is up to date.
- If the app finds an available update, it will prompt you to “update” or do so at a later time (Fig. 5).
- Tap “Update” to download to your device.
- A progress bar will appear to indicate the update status. This may take a few minutes. Once the update is complete, the Smart Checkout will automatically turn itself o and back on.
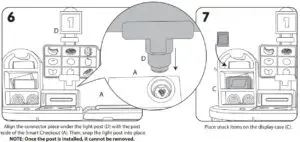
- The app will display an “Update Successful” message. Press “Okay” to continue (Fig. 6).
App Play
Remember to sync the Smart Checkout with the app before every use, and keep your device near the check stand as you play!
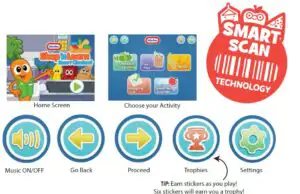
Music
Play fun songs related to included items as you play with the Smart Checkout.
Free Play
As kids engage in traditional role-play, the app recognizes and responds to the items they are using with random animations, encouraging phrases and interesting facts.
Checkout Counting
Use the included coins and bills as you follow the on-screen counting instructions. You’ll earn stickers when you accomplish the counting tasks.
Shopping List
Can you nd the food items that match each clue? Listen carefully and scan the item that matches
the description to earn stickers!
Speed Scanner
Quick! Select the 10 food items that appear on the screen and scan them before time runs out to earn a sticker.
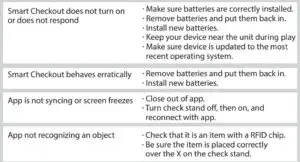
GENERAL TROUBLESHOOTING
iOS TROUBLESHOOTING
Device must support Bluetooth 4.0 (LE) technology in order to connect to the unit.
How to Connect
- On your iOS device, go to Settings > Bluetooth and make sure Bluetooth is turned on. If you can’t turn on Bluetooth or you see a spinning gear, restart your device.
Once the device has restarted: - Turn on the Smart Checkout.
- Launch the app on your device.
- Press and hold the “Connect” button for about three seconds.
- The green LED next to the button should begin blinking.
- Allow up to 30 seconds for connection to be established.
Tips for Connecting
- Ensure device’s Bluetooth is enabled and broadcasting. *See your device’s user manual for instructions.
- Try turning both device and Smart Checkout o and on completely.
- Ensure your device has the most current supported operating system.
- Remember to press and hold the green “Connect” button on the Smart Checkout until the LED begins ashing.
- Make sure your device and Smart Checkout are close to each other.
- Enable location services on your device.
ANDROID TROUBLESHOOTING
Device must support Bluetooth 4.0 (LE) technology in order to connect to the unit.
How to Connect
- Tap the “apps” icon on your Android device’s home screen.
- Tap on the Settings icon.
- Scroll down to Application Manager from the Application section.
- Display “All” tab by swiping left or right.
- Tap on Bluetooth.
- Tap FORCE STOP button.
- Tap CLEAR DATA.
Tips for Connecting
- Ensure device’s Bluetooth is enabled and broadcasting.*See your device’s user manual for instructions.
- Try turning both device and Smart Checkout o and on completely.
- Ensure your device has the most current supported operating system.
- Remember to press and hold the green “Connect” button on the Smart Checkout until the LED begins ashing.
- Make sure your device and Smart Checkout are close to each other.
- Enable location services on your device.
OTHER FUN WAYS TO PLAY
Items in this playset feature interactive play with other Shop ‘n Learn™ products (not included)!
Learn more at www.littletikes.com/shopnlearn
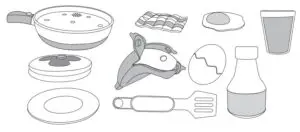
Smart Breakfast
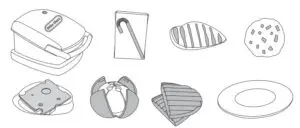
Smart Lunch
Smart Dinner
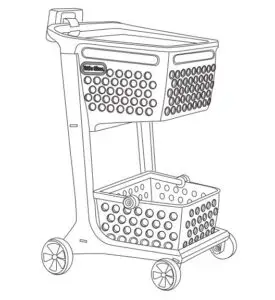
Smart Cart
Shop ‘n Learn

The Shop ‘n Learn™ Smart Checkout will launch and run on all Android devices 4.3 or higher and all Apple devices running iOS 7 and above. iPad 2 is not supported with this product. Devices must support Bluetooth LE for the app to sync with the Smart Checkout. For a complete list of compatible devices, please visit: littletikes.com/shopnlearn

Download the Smart Checkout app using the QR code here, or by visiting
littletikes.com/shopnlearn
WARNING
- ADULT ASSEMBLY REQUIRED
- Keep these instructions for future reference.
- Keep long hair and loose apparel away from the conveyor belt.
- This product is intended for indoor family use only.
- This product is indented for use by children ages 2 years and up.
- Do not allow children to sit, stand, play or climb on the Smart Checkout. Failure to do so may cause the product to become unstable.
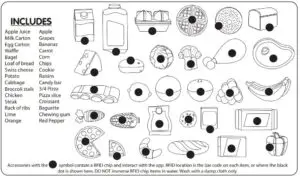
- IMPORTANT: DO NOT immerse RFID chip items in water. Wash with a damp cloth only.
- Electronic devices to be installed and removed by an adult only.
Smart Checkout
- SKU: 646713C
- ADULT ASSEMBLY AND BATTERY INSTALLATION REQUIRED
- AGE 2+ YEARS
- ADULT SUPERVISION RECOMMENDED
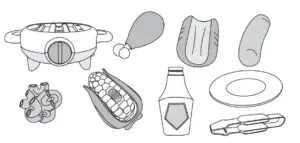
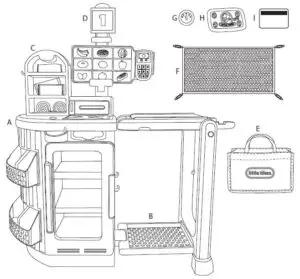
CONTENTS
ADULT ASSEMBLY REQUIRED
A. 1 Smart Checkout
B. 1 Tray
C. 1 Display Case
D. 1 Light Post
E. 1 Reusable Shopping Bag
F. 1 Net
G. 5 Coins
H. 5 Bills
I. 1 Credit Card
IMPORTANT INFORMATION
- Please save sales receipt for proof of purchase.
- Clean the unit with a slightly damp cloth (cold water) and mild soap if necessary.
- Real food items are not recommended for use with this unit or accessories.
- Always turn the Smart Checkout OFF after use to conserve battery power.
- The refrigerator does not keep items cold. Do not use as a real refrigerator.
- NOTE: If the unit stops working or doesn’t work as it should, remove the batteries for a few minutes and then re-insert them. If there is still a problem, install new batteries.
LIMITED WARRANTY
The Little Tikes Company makes fun, high quality toys. We warrant to the original purchaser that this product is free of defects in materials or workmanship for one year * from the date of purchase (dated sales receipt is required for proof of purchase). At the sole election of The Little Tikes Company, the only remedies available under this warranty will be the replacement of the defective part or replacement of the product. This warranty is valid only if the product has been assembled and maintained per the instructions.
This warranty does not cover abuse, accident, cosmetic issues such as fading or scratches from normal wear, or any other cause not arising from defects in material and workmanship. *The warranty period is three (3) months for daycare or commercial purchasers. U.S.A and Canada:
For warranty service or replacement part information, please visit our website at www.littletikes.com, call 1-800-321-0183 or write to: Consumer Service, The Little Tikes Company, 2180 Barlow Road, Hudson OH 44236, U.S.A. Some replacement parts may be available for purchase after warranty expires—contact us for details. Outside U.S.A and Canada: Contact place of purchase for warranty service.
This warranty gives you specific legal rights, and you may also have other rights, which vary from country/state to country/state. Some countries/states do not allow the exclusion or limitation of incidental or consequential damages, so the above limitation or exclusion may not apply to you.
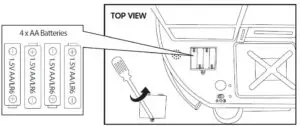
BATTERY SAFETY INFORMATION
- Use only size “AA” (LR6) alkaline batteries (4 required).
- Charging of rechargeable batteries should only be done under adult supervision.
- Remove rechargeable batteries from the product before recharging.
- Do not mix old and new batteries.
- Do not mix alkaline, standard (carbon-zinc), or rechargeable batteries.
- Be sure to insert the batteries correctly and follow the toy and battery manufacturer’s instruction.
- Always remove exhausted or dead batteries from the product.
- Dispose of dead batteries properly: do not burn or bury them.
- Do not attempt to recharge non-rechargeable batteries.
Avoid short-circuiting battery terminals. - Remove batteries before placing the unit into storage for a prolonged period of time.
FCC COMPLIANCE
NOTE: This equipment has been tested and found to comply with the limits for a Class B digital device, pursuant to Part 15 of the FCC Rules. These limits are designed to provide reasonable protection against harmful interference in a residential installation.
This equipment generates, uses and can radiate radio frequency energy and, if not installed and used in accordance with the instructions, may cause harmful interference to radio communications.
However, there is no guarantee that interference will not occur in a particular installation. If this
equipment does cause harmful interference to radio or television reception, which can be determined by turning the equipment off and on, the user is encouraged to try to correct the interference by one or more of the following measures:
- Reorient or relocate the receiving antenna.
- Increase the separation between the equipment and receiver.
- Connect the equipment into an outlet on a circuit different from that to which the receiver is connected.
- Consult the dealer or an experienced radio/TV technician for help.
This device complies with Part 15 of the FCC Rules. Operation is subject to the following two conditions:
- This device may not cause harmful interference, and
- This device must accept any interference received, including interference that may cause undesired operation. Caution: Modifications not authorized by the manufacturer may void users authority to operate this device.
CAN ICES-3 (B)/NMB-3(B).

The wheelie bin symbol indicates that the product must not be disposed of with other household waste. Please use designated collection points or recycling facilities when disposing of the item. Do not treat old batteries as household waste. Take them to a designated recycling facility.
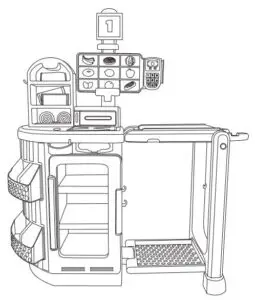
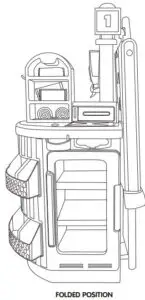
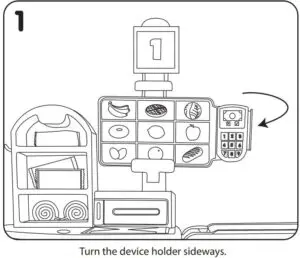
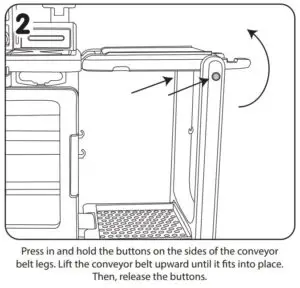
FOLDING AND UNFOLDING
BATTERY INSTALLATION
An adult must install fresh alkaline batteries (not included) in the Smart Checkout prior to playing. Here’s how:
- Using a Phillips screwdriver (not included) remove the screw and battery compartment cover from the top of the Smart Checkout.
- Install four (4) 1.5V AA (LR6) alkaline batteries (not included) making sure the (+) and (-) ends face the proper direction as indicated inside the battery compartment.
- Replace the compartment cover and tighten the screw.
ASSEMBLY
ADULT ASSEMBLY REQUIRED
Please follow instructions carefully. Once assembled, some parts may not be removed.
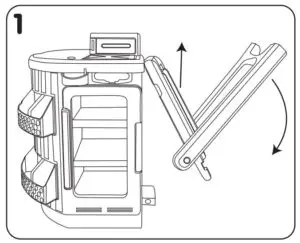
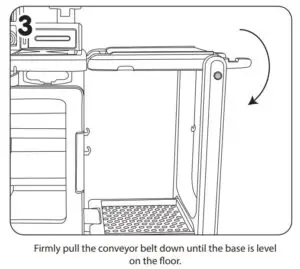
- Fold down the support leg on the Smart Checkout (A) and pull the conveyor belt up until it clicks into place.
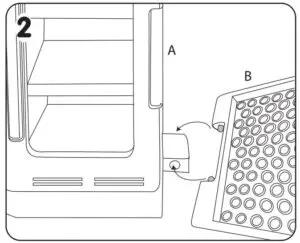
- Press the spring-loaded buttons on both sides of the tray (B) inward and slide them into the openings on the Smart Checkout (A) to attach.
- Attach the other end of the tray (B) to the support leg by pressing in the srpring loaded buttons and sliding it into place.
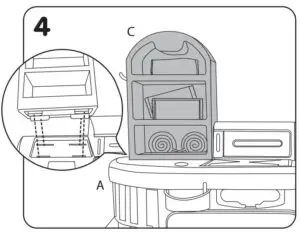
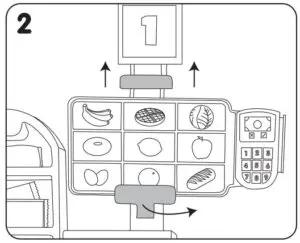
- Snap the display case (C) onto the top of the Smart Checkout (A).
NOTE: Once the display is installed, it cannot be removed.

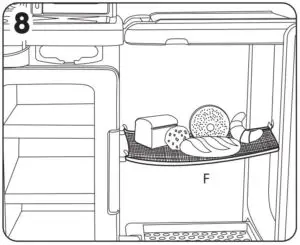
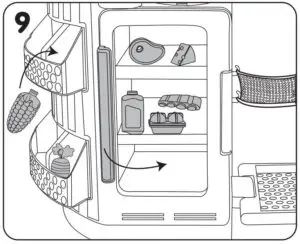
- Place bakery items in the hanging net (F).
FEATURES AND USAGE
- If necessary, adjust the device holder clips according to the size of your device (not included) and secure it in place. Launch the Shop ‘n Learn™ Smart Checkout App and pair your device to the unit. See the included Parent Instruction Guide for more information on downloading, pairing and app play instructions.
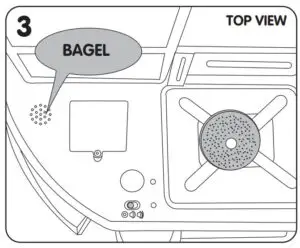
- Scan an item over the center of the X on the Smart Checkout. It will say the item name, and the conveyor belt will start to move.
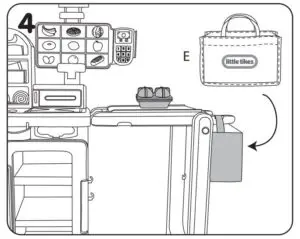
- Place the included bag (E) at the end of the conveyor belt. Then, place your food item on the belt and let it roll into the bag!

- Time to pay! Place coins (G) in the coin slot, bills (I) in the bill slot, or swipe your card (I)! The light post (D) will light up when you insert money and the checkout counts up to 10.

- If coins or bills get stuck in the Smart Checkout, an adult can remove the cover from the back of the unit with a screwdriver (not included) to remove the items.