![]()
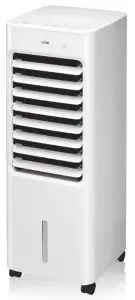
Air Cooler
Instruction Manual
L48ACW20

Thank you for purchasing your new product.
We recommend that you spend some time reading this instruction manual in order that you fully understand all the operational features it offers. You will also find some hints and tips to help you resolve any issues. Read all the safety instructions carefully before use and keep this instruction manual for future reference.
Unpacking
Remove all items from the packaging. Retain the packaging. If you dispose of it please do so according to local regulations. The following items are included: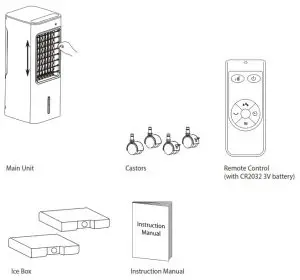

Product Overview
Main Unit
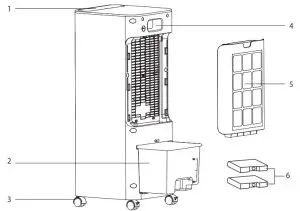
| 1. Control Panel 2. Water Tank 3. Castor |
4. Recessed Handle 5. Grille 6. Ice Box |
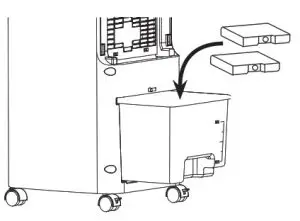
 Make sure that the iceboxes are cold enough before putting them into the water tank. You may put the icebox into the freezer for cooling.
Control Panel
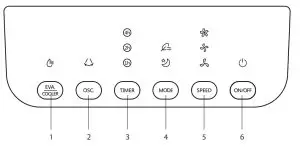
1. EVA. / COOLER Button
- Press repeatedly to select between Evaporator / Cooler mode.
- The indicator lights up in Evaporator mode.
- The indicator flashes while there is a shortage in the water tank. Refill the water tank at the rear of the unit.
2. OSC. ButtonPress repeatedly to switch oscillation on/off.
3. TIMER Button Press repeatedly to switch TIMER Off and On (from 1h to 7h).
4. MODE Button
- Press repeatedly to switch between
 Natural Wind (switching wind speed between
  high /
 medium /
 low level), Sleep (Wind speed in medium level for 15 minutes, and then in low level), and Normal mode.
 - Both indicators will turn off in Normal mode.
5. SPEED Button Press repeatedly to switch the wind speed between high/medium/low levels.
6. ON/OFF Button Press repeatedly to switch the unit on/off.
Remote Control
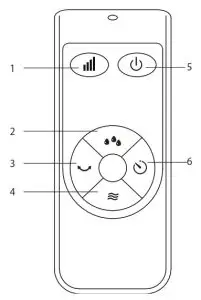
 SPEED Button
Press repeatedly to switch the wind speed betweenhigh/medium/low levels. Evaporator/Cooler Button
Press repeatedly to select between Evaporator/Cooler mode.-
 SWING Button
Press repeatedly to switch oscillation on/off. - Wind Type Button
Press repeatedly to switch between Natural Wind or Steady and Slow Wind mode. -
 ON/OFF Button
Press to switch the unit on/off.  Timer On/Off Button
Press to switch on/off the TIMER.
Moving the Unit
Moving the Unit The unit is on castors. When moving the unit, keep it upright and stable. Do NOT tilt or turn sideways. Grip the recessed handles and push the unit to another location.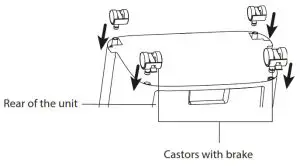
While installing the castor wheels, make sure that the castors with brake are installed at the rear of the unit.
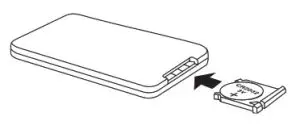
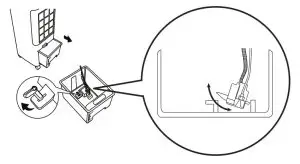
Battery Replacement for the Remote Control
The remote control requires a CR2032, 3V battery.
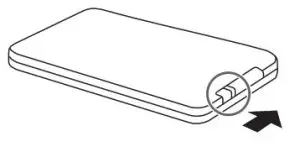
- Slide and hold the battery release tab in the direction of the arrow.
- Pull out the battery holder and remove the old battery.
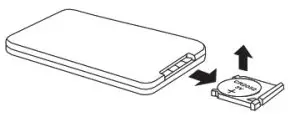
- Replace with a new battery.
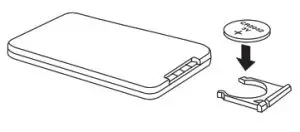
- Insert the battery holder back into the remote control.
- Improper or incorrect use of batteries may cause corrosion or battery leakage, which could cause fire, personal injury, or damage to property.
- Only use the battery type indicated in this manual.
- When the battery is exhausted, the remote control will not function.
- Do not dispose of the used battery as domestic waste. Dispose of it in accordance with local regulations.
- Install the battery correctly in the battery compartment.
- Small button cell batteries such as the one used in the remote control are easily swallowed by young children and this is dangerous. Keep loose button cells away from young children and make sure that the battery is secure in the remote control. Seek medical advice if you believe a battery cell has been swallowed
Handling the Remote Control
- Take care of your fingernails when
- you slide and pull the battery release tab.
- Do not drop the remote control.
- Do not allow anything to impact the remote control.
- Do not spill water or liquid on the remote control.
- Do not place the remote control on a wet object.
- Remove the battery from the remote control when not in use for a long period of time, like corrosion or battery leakage may occur and result in physical injury, and/or property damage, and/or fire.
- Do not ingest the battery. Chemical Burn Hazard.
This product contains a coin/button cell battery. If the coin/button cell battery is swallowed, it can cause severe internal burns in just 2 hours and can lead to death. - Keep new and used batteries away from children.
- f the battery compartment does not close securely, stop using the product and keep it away from children.
- If you think batteries might have been swallowed or placed inside any part of the body, seek immediate medical attention.
Filling the Water Tank
- Turn the water tank switch anticlockwise at the rear of the unit.
- Slide the water tank out from the main unit.
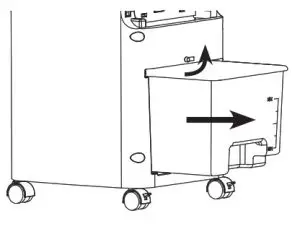
- Pour water and add the icebox(es) into the water tank not more than the MAX level.
- Slide the water tank back into the main unit. Turn the water tank switch downwards to lock the water tank securely.
Draining water out from the water tank (if necessary
The water-filled in the water tank is for air cooling operation. Once when there is a shortage in the water tank, the Evaporator indicator will flash.
- Slide the water tank out from the main unit.
- Unlock the water pump connected with the unit, and then take the water tank out from the unit
- Drain the water out from the water tank. After securely locking the water pump, slide the water tank back into the unit.
General Operation
Switching the Unit ON/OFF
- Press ON/OFF button on the unit or remote control to switch the unit on/off.
- To completely switch off the unit, unplug from the main supply.
Setting Evaporating / Cooling Mode
Press EVA. / COOLER button on the unit or Evaporator/Cooler button on the remote control to select between Evaporator or ir Cooler mode.
The unit can humidify the indoor areas in Evaporator mode. Make sure that there is water in the water tank, and keep it above MIN and below MAX level.
Adjusting the Louvre
- Press OSC. button on the unit or SWING button on the remote control repeatedly to switch on/off the auto-swing (left & tight) the function of the unit.
- You may also manually adjust the louver up and down.
Setting the Auto On/Off Time
Press TIMER button on the unit or button on the remote control repeatedly to set the power-on time (when the unit is in Standby mode) and power-off time (when the unit is in ON mode) between OFF and from 1h to 7h.
Selecting Fan Mode
Press MODE button on the unit or the Wind Type button on the remote control to select between Natural Wind, Steady and Slow and Normal mode.
Both indicators will be off in Normal fan mode.
Selecting Speed
Press the SPEED button on the unit or  button on the remote control to select the wind speed between high/medium/low levels.
Cleaning the Exterior
- Use a soft cloth to wipe down the exterior.
- Do NOT use any abrasive cleaning agents or detergents.
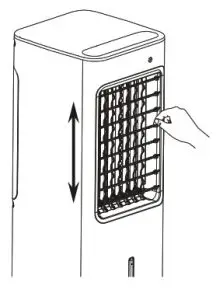
- Do NOT immerse any part of the unit in water or any other liquid. Cleaning the Grille and Filter
- Remove the grille from the rear of the unit.
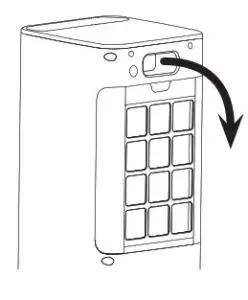
- Remove the honeycomb filter, and then the filter from the grille.
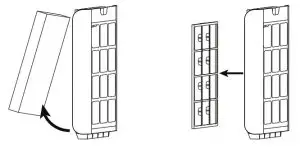
- Clean the filter in warm water with a neutral detergent.
- Make sure both filters are thoroughly dry before installing back onto the grille.
- Replace the grille back into the filter holder.
S
If the unit will not be used for a long period, make sure it is stored properly.
- Ensure the unit is completely drained of water and dry.
- Ensure the air filter is cleaned.
- Ensure the unit is unplugged.
- Ensure the batteries are removed from the remote control.
Hints and Tips
| Problem | Solution |
| Unit does not start or there is no power when pressing 0 on the unit or remote control. | •Check that the unit is firmly plugged in and the mains socket is switched on. |
| Room is not cool enough. | •Check that all windows and doors are closed. •Remove or switch off all heat sources if possible. •Clean the air filter and re-fit securely before continuing operation. •Set a higher level of Wind Speed. |
| Noisy or excessive vibration. | •Make sure that the water tank has enough water. •Move the unit to a stable, flat and level surface. |
| Gurgling is heard. | This is normal; it should not be considered a fault. |
| The no Evaporator indicator flashes and the unit beeps | There is a shortage in the water tank. Make sure that it has enough water. |
If the problem(s) persists, contact a qualified service agent for assistance.
Specifications
| Brand | Logik |
| Model | L48ACW20 |
| Rated Voltage | 220 – 240V~ |
| Rated Frequency | 50 Hz |
| Rated Power | 50 W |
| Maximum Fan Flow Rate (F) | 4.9 m3/min |
| Fan Power Input (P) | 49.9 W |
| Service Value (SV) | 0.10 (m3/min)/W |
| Standby Power Consumption (Psb) | 0.20 W |
| Off Mode Power Consumption (Poff) | N/A |
| Fan Sound Power Level (Lwa) | 59.18 dB(A) |
| Maximum Air Velocity (C) | 1.24 meters/sec |
| Seasonal Electricity Consumption (Q) | 18.11 kWh/a |
| Measurement Standard for Service Value Water Tank Capacity | EN ISO 5801:2017 |
| Water Tank Capacity | 4.5 L |
| Dimension (H) × (W) × (D) | Approx. 700 mm × 265 mm × 290 mm |
Features and specifications are subject to change without prior notice.
IB-L48ACW20-210131V2