Lucky FF916 WIFI Fish Finder Operations Manual
1. Product Overview
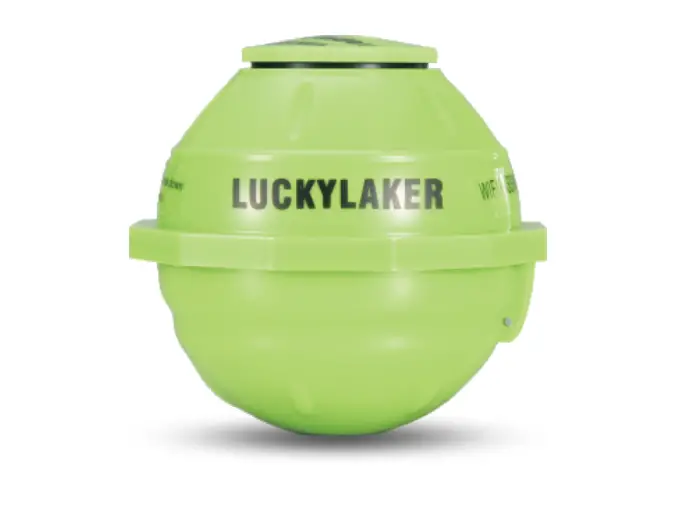
Thank you for choosing Lucky WIFI Fish Finder. This WIFI Fish Finder is especially designed for amateur and professional fishermen alike, to find out the location of fish, depth and bottom contour of water.
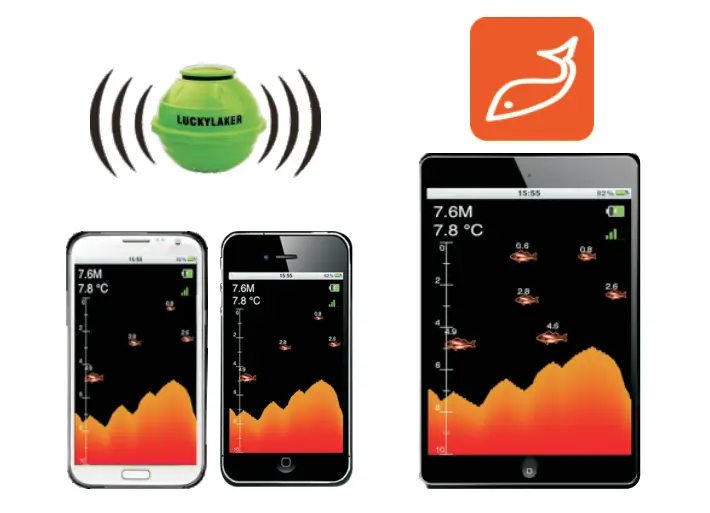
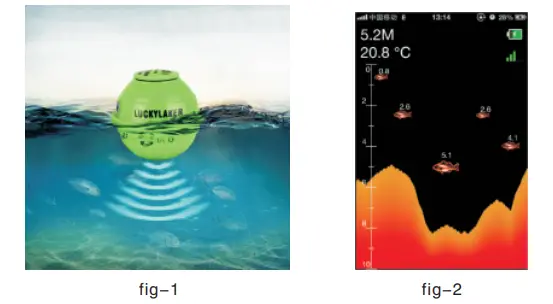
This WIFI fish finder can be used in ocean, river or lake and is fantastic for detecting schools of fish in any fresh water or salt water. This WIFI Fish Finder is based on Sonar technology, The WIFI transducer sends a sound wave signal, the returned “ echoes ” are transmitted with WIFI technology to the IPHONE, IPAD or other intelligent device, then all the underwater information is displayed on the screen, including the water depth, water temperature, bottom
contour, fish location and depth.
2. Download the APP
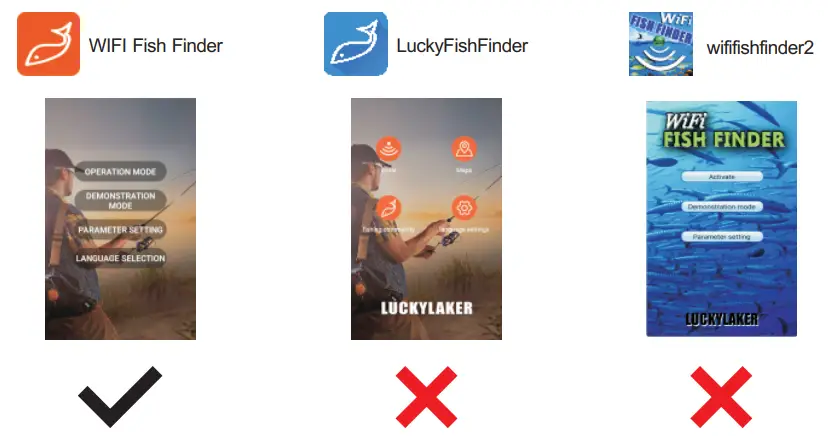
The app is available in Google Play and App Store. You may search “WiFi Fish Finder” to download.
Kindly Remind it is not “LuckyFishFinder” or “wififishfinder2”
3. Using The WIFI Transducer
The WIFI transducer is powered by built-in lithium battery; therefore, it is necessary to fully charge the battery through the charger. Firstly, unscrew the transducer, as shown in Figure 3: the charge port is in the middle; the red light is lit when charging, it presents the battery is charging, as shown in Figure 4; when the red light is off, it represents the battery is fully charged. Before using, press the power switch to power on the transducer, the blue light is lit, as shown in Figure 5, it presents the transducer is on working, then sure screw the cap to prevent the water into. You can simply attach the WIFI transducer to the end of your fishing line and cast it into the water as you would a normal float or lure, then you can open you APP and you are ready to fish.
NOTE: When casting the WIFI transducer into water, shock from abrupt contact with rocks will damage your WIFI transducer, we recommend using your WIFI transducer in water deeper than 1 foot only.
Warning: Please screw down cover to prevent water.
4. Intelligent Device Setting
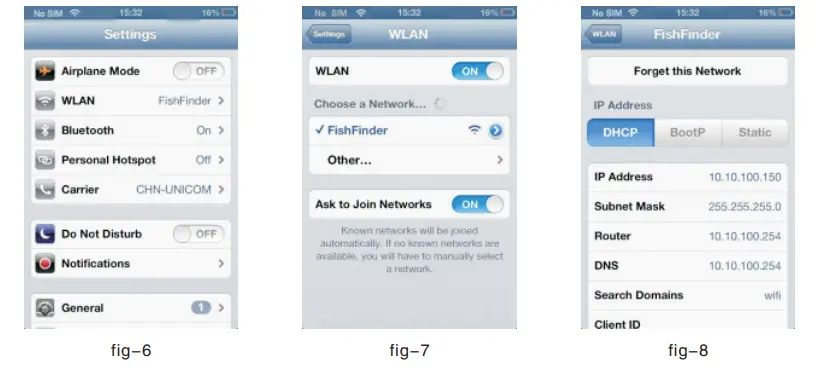
After the WIFI transducer is guaranteed to be powered on and last 10 seconds, the device can be connected to the WIFI transducer, as shown in Figure 6; click on the setting, Wi-Fi will enter into the Wi-Fi network (WIFI Pass Word: 12345678); then select Fish Finder in the network, as shown in Figure 7; about 20 seconds later, it can be seen that the signal icon ![]() will appear on the top left corner of the device, it represents that WIFI transducer has been connected. At the moment, APP can be used. Click on the right arrow
will appear on the top left corner of the device, it represents that WIFI transducer has been connected. At the moment, APP can be used. Click on the right arrow  of Fish Finder in Figure 7, the detailed IP address information can be viewed, as shown in Figure 8.

5. App Display View
The format of underwater information showed by this APP is very simple and understandable. The display information of the whole screen is shown in Figure 9. The first button represents operation mode; the second button represents simulation and demonstration; the third button represents the parameter setting and the fourth button represents the language setting. The function of each button will be introduced in details in the following chapters.
6. Simulation Mode
Demo mode is to stimulate the operation mode; in addition to the depth, temperature and fish information generated by the software, other functions are consistent with the practical effect in use, and can be provided for users to learn this software accordingly. In demo mode, it is feasible to close WIFI, and it is unnecessary to connect the software with the transducer. See Figure 10.

7. Operation Mode
Click on 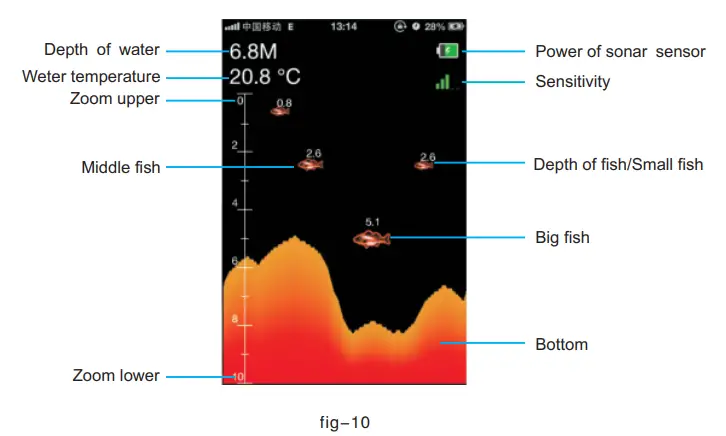 in the main interfaces shown in Figure 9, and enter the operation mode. If the transducer can’t be connected by WIFI, then no response
  will be prompted. The display content of operation mode is consistent with that of the simulation demonstration; in other words, the water depth, water temperature and fish information can be constantly obtained from WIFI transducer, and constantly updated from right to left; when the underwater situation changes a lot, the underwater profile diagram will be formed as shown in Figure 11. Next, each display unit in Figure 12 will be made detailed introduction.

a) Water depth: Depth detection ranges from 0.6 – 45m (2-135Ft), the precision is 0.1 m (0.3 ft). Depth is expressed as one decimal point.
b) Water temperature:The detected temperature refers to the water surface temperature; the temperature sensor on the probe keeps in touch with the water surface. The temperature range is from minus 9.9 ℃ to 60.0 ℃, the precision is 0.1 ℃; the corresponding Fahrenheit degree should range from 14.2° to 140°.
c) Calibrated scale: Based on this scale, the user can intuitively check the water depth and the depth of fish group, and combine with the depth range to partially enlarge for use, so as to achieve many ways for viewing, and maximally watch the interesting information of fish group within the depth range.
d) Zoom upper limit: This value represents the currently displayed upper limit value, and the value is jointly determined by the depth range and ZOOM. When the local zoom is set as OFF, the upper limit value of zoom is 0; when zoom value is set as other values, the upper limit value of zoom is equal to the difference between the lower limit value and zoom value; when the lower limit value of zoom is less than zoom value, the upper limit value of zoom is 0.
e) Zoom lower limit: The value indicates the currently displayed lower limit value, and the value is determined by the depth range. When the depth range of the parameters is set as AUTO, then the value is not more than the current minimum value in the list of the water depth range (the value is not more than the minimum value of current water depth range among 1m-45 m); when the depth range is set as the other values, then the lower limit value of zoom is the setting value; in other words, when the lower limit value of zoom is 5 m, the content above 5m is only displayed.
f) Fish icon: When the fish is detected by the sonar, and the fish icon is on; then the big fish, medium-sized fish or small fish can be displayed respectively according to the size of fish.
g) The depth of fish: The value indicates the depth where the fish is located.
h) Underwater bottom contour: Underwater bottom contour represents the change of the underwater depth within the detection time. The underwater bottom contour is update from right to left, and the refresh rate of the parameters can be set as 1~5; and the users can select the appropriate refresh rate according to their requirements.
i) Capacity of WIFI transducer power: The icon represents the capacity of WIFI transducer power, and shown as 0-4. WIFI transducer can be used for about five hours if it is fully charged.
j) Sensitivity: The icon represents the sensitivity value of the transducer; the user can modify the sensitivity value in the parameter settings, and can be reflected in the icon after modification.
8. Parameter Setting
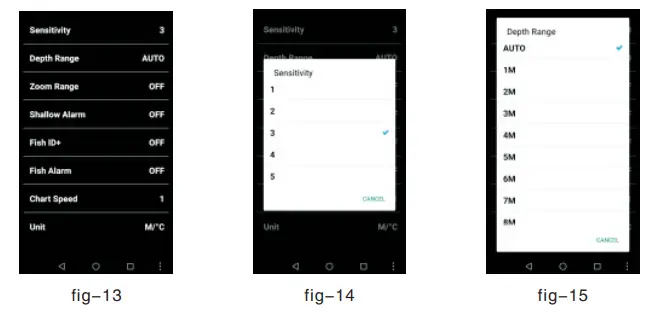
Click On 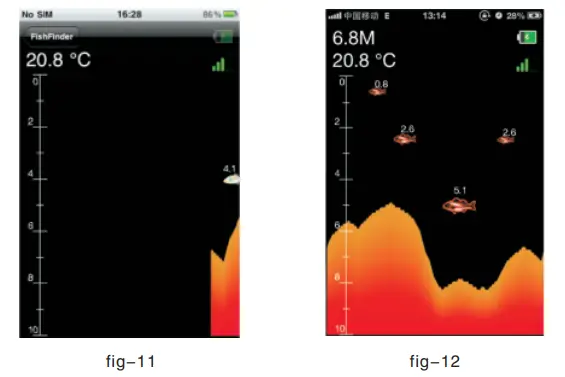 in the main interface shown in Figure 9,and enter the parameter setting function, as shown in Figure13;the functions are shown from top to bottom in turn:

- Sensitivity: Sensitivity is set as 1-5; this option is used to adjust the sensitivity of the sonar, as shown in Figure 14.
- Depth range:The depth range setting is used to set the displayed maximum depth; i.e. the lower limit value of the scale, as shown in Figure 15. If the depth range is set to be automatic, then the lower limit value is selected automatically according to the depth value; in other words, the lower limit value is greater than the minimum value of the depth among 1m-45m). If the depth unit is set as Ft, then the values in the table are 3Ft -135 Ft.
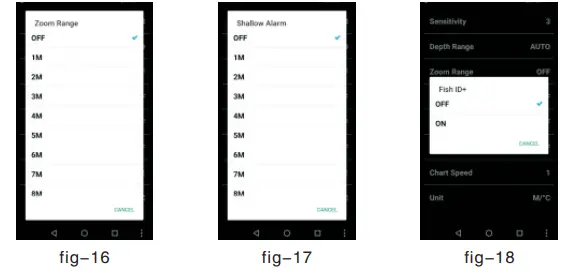
- ZOOM range:ZOOM setting is used to set the local zoom value; in other words, determine the upper limit value of the calibrated scale. The upper limit value = the lower limit value of the depth – ZOOM value; if the lower limit value of the depth is less than the ZOOM value, then the upper limit value is 0. If ZOOM option is off, then the upper limit value is 0; if ZOOM value is any value among 1~45,according to the formula: the upper limit value = the lower limit value of the depth – ZOOM value, then the currently displayed area is the ZOOM value.For instance, the depth range is set as 15M, ZOOM value is set as 10M,then the lower limit value of the calibrated scale is 15M, the upper limit value is 5M,which is the difference between 15 and 10. In other words, the current layout depth ranges from the underwater 5M to 15M, and the content beyond this area will not be displayed. See Figure 16.
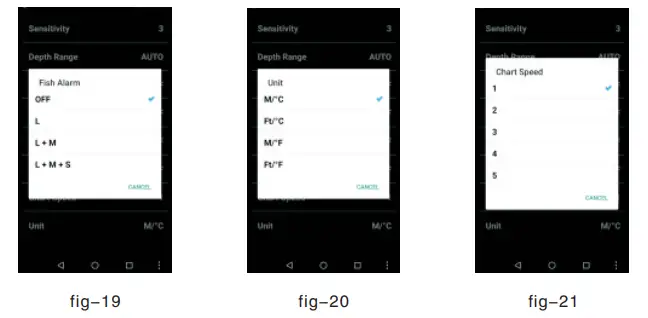
- Shallow alarm: 4) Shallow water alarm setting is used to set the value of shallow water alarm, as shown in Figure 17; when the detecting depth is less than the setting value, the software will alarm, and display ” depth is shallow, ”
 so as to remind the users of avoiding the ship stranding.
 - Fish icon: Fish icon setting is used to set whether the fish icon is displayed or not; if it is on, then the fish icon and the depth of fish
 is displayed; if it is off, the only the seagull shape is displayed,
  and the depth of fish will not be displayed. See Figure 18.
 - Fish alarm: Fish alarm setting is used to set whether the fish alarm function is on or not. If the function is on, then the software will alarm and prompt the appearance of fish. This option can be set to be:
A) off: there is no alarm when the fish appears.
B) Big fish: the software will alarm when the big fish is detected, and will not alarm for medium-sized and small fish.
C) Big fish + medium – sized fish: the software will alarm when the big fish and medium-sized fish are detected, and will not alarm for the small fish.
D) Big fish + medium- sized fish+small fish: the software will alarm once the fish are detected. As shown in Figure 19.

- Unit:Unit setting is used to set the depth unit with the metric system (M) or British system (Ft), and the temperature unit is Celsius or Fahrenheit. As shown in Figure 20.
- Chart speed: The chart speed setting is used to set the refresh rate from right to left, and can be set as 1to 5 in accordance with the level. As shown in Figure 21.
9. Language Selection
 In Figure 9, click on the
 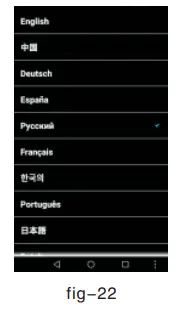 button in the main interface, then the language setting can be done, as shown in figure 22;Can be selected Russian, German, Dutch, Spanish, French, Japanese, Korean, Hungarian, Portuguese, polish, English, Chinese, and the setting is done successfully; click on Fish Finder button on the top left corner, and then return the main menu for other operations.
10. Product Specification
- Sonar frequency:125KHz
- Sonar coverage:90 degrees
- Depth capacity:0.6M-45M (2Feet-135Feet)
- Power:3.7V rechargeable lithium battery
- Running time:5 hours fully charging
- WIFI range:70M
- WIFI frequency:2.4GHz
- Charging indicator:red light
- Working indicator:blue light

MADE IN CHINA
MANUFACTURER: JINHUA LUCKY ET MANUFACTURER CO., LTD.