Manufactured by Luxe Bidet
PRODUCT INSTALLATION
BEFORE INSTALLATION
Locate your Bidet ID and write it down below.
Bidet ID: __________________________________________
The Bidet ID is required for registering your bidet for a 2-year extended warranty.
The Bidet ID can be located on the sticker attached to the arm of the bidet AND on the bottom of the bidet’s control panel.

Check that you have access to the fill valve under the toilet tank.
The provided cold water t-adapter should be installed at the fill valve under the toilet tank (as pictured below), NOT at the cold water supply valve coming from the wall.
If you do not access the fill valve under the toilet tank, contact Luxe Bidet Customer Support at 858-360-7780 and we may be able to provide alternative
installation options.

Check that your toilet tank water supply line is flexible.
Check the toilet tank water supply line that connects the toilet tank fill valve to the water supply valve on the wall. If it is a rigid pipe, you will need to replace this pipe with a flexible water supply hose before installing the bidet.
The length of the hose you purchase may vary, but the top connection size should be 7/8” Ballcock (to connect to the provided t-adapter) and the bottom connection size should be 3/8” or 1/2” (to connect to your water supply valve).
INSTALLATION
Step 1 -Turn Off the Toilet Tank Water Supply
Turn off the toilet tank water supply at the wall to stop the flow of water (most valves will need to be turned clockwise). Flush the toilet and hold down the handle to completely empty the toilet tank.

Step 2 – Remove the Toilet Seat
To remove the toilet seat, lift the hinge tabs and use a flathead screwdriver to unscrew the toilet seat bolts white holding the nuts on the underside of the bolts in place. Remove the toilet seat and toilet seat bolts and nuts and set them aside.

Step 3 – Mount Your Luxe Bidet on the Toilet
Place the bidet attachment on the toilet. The adjustment plates will need to line up with the holes on the toilet bowl. You may need to rotate the adjustment plates accordingly to line up properly with the holes.

Step 4 – Reattach Your Toilet Seat
Reattach the toilet seat on top of the bidet attachment and secure it using the original toilet seat hardware. Make sure to tighten the bolts to ensure that the bidet attachment and toilet seat do not move.

Step 5 – Disconnect the Water Supply Hose
Make sure you have turned off the toilet tank water supply and flushed the toilet to empty the toilet tank if you have not done so already. Place a towel or bucket underneath the toilet tank connection to catch any residual water, then disconnect the water supply hose from the toilet tank.

Step 6 – Check the T-adapter
Make sure that there is a black rubber washer inserted at the top of the t-adapter. If it is not already there, insert the black rubber washer so it is securely in place, as shown in the picture.

Step 7 – Install the T-adapter to the Toilet Tank
Connect the top of the t-adapter to the toilet tank and the bottom of the t-adapter to the water supply hose.

Step 8 – Connect the Bidet Hose to the T-adapter and inlet
Connect the 1/2″ end of the cold water metal-braided bidet hose to the t-adapter. Connect the 1/4″ end of the hose to the bidet inlet.

Step 9 – Turn on the Toilet Tank Water Supply
Turn on the toilet tank water supply.

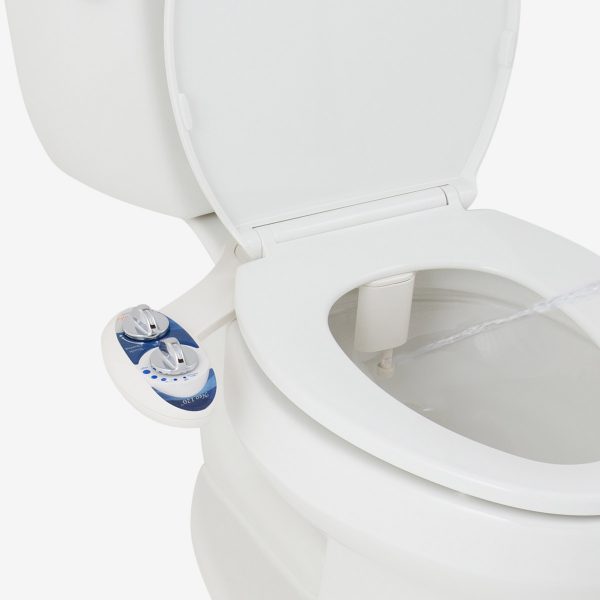
Congratulations! You are ready to use the Luxe Bidet for the first time. Gently turn the water pressure control knob to reach your desired spray pressure.
ASSEMBLED UNIT
