MAGNASONIC FS81 Super 8/8mm Film Scanner User Manual
Thank you for your purchase of this Magnasonic product. Please read this user manual carefully before using product to ensure proper use. Keep this manual in a safe place for
future reference.
What’s Included

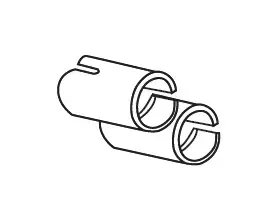
Super 8/8mm Film Scanner 7” Reel Reel Adapter (x2)

Power Adapter User Manual Lifetime Customer Support


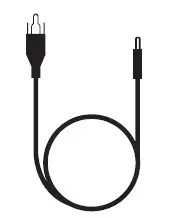
USB Cable TV Out Cable (RCA) 1 Year Warranty
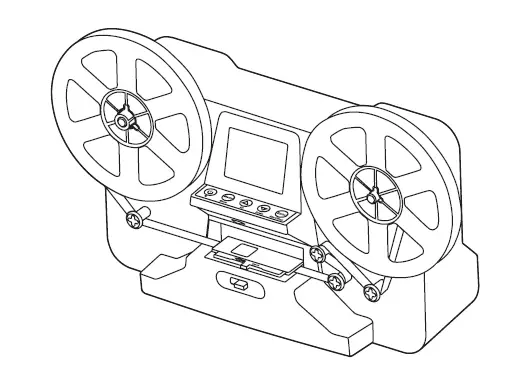
Product Information

- Left Reel Shaft
- LCD Display
- Film Insert Door
- Film Type Switch
- Right Reel Shaft
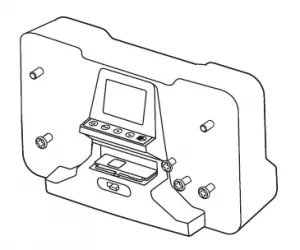
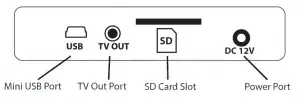
Back

Buttons
Powering on Your Super 8/8mm Scanner
- Insert an SD card (not included) into the SD card slot at the back of the lm scanner. An SD card (CLASS 4 or above) is required in order to scan and save video.
IMPORTANT: Inserting an SD Card after powering on the scanner will cause the scanner to shut o
IMPORTANT: Inserting an SD Card after powering on the scanner will cause the scanner to
shut off

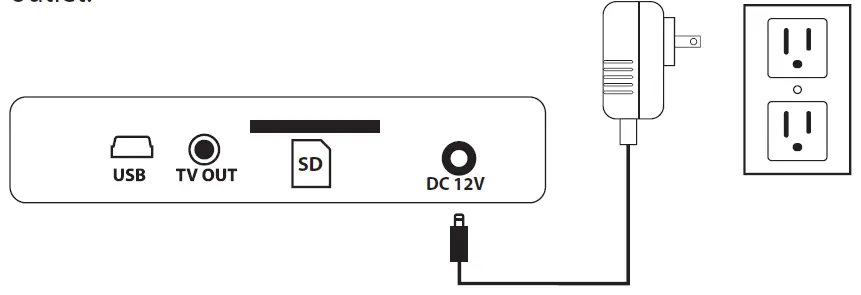
- Connect the power adapter into the DC 12V port at the back of the outlet.

Preparing Your Film
This scanner can support 8mm or Super 8 film on 3′: 5″ or 7″ reels.
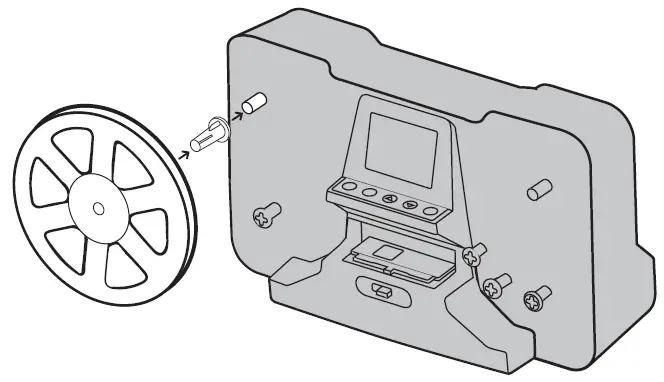
- Install your film reel onto the left reel shaft. Ensure the perforated holes on your film are on the inside, closest to the scanner.
Note: If using with Super 8 film you will need to install the red reel adapter.

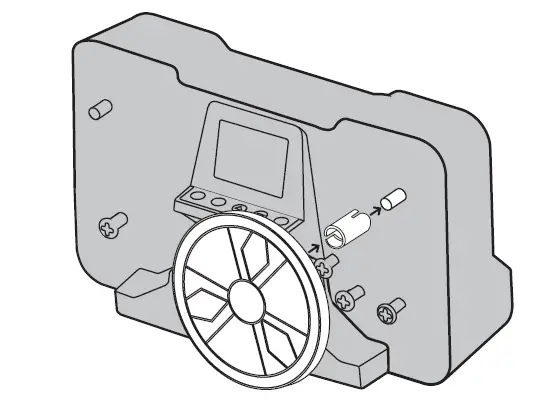
- Install the included ?”film reel onto the right reel shaft of the scanner. If using a different reel use the grey reel adapter as needed.

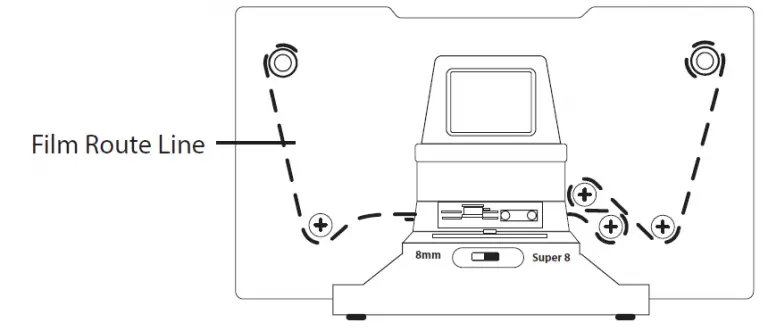
- Feed your film along the dotted film route line on the film scanner to properly load the film onto the scanner.
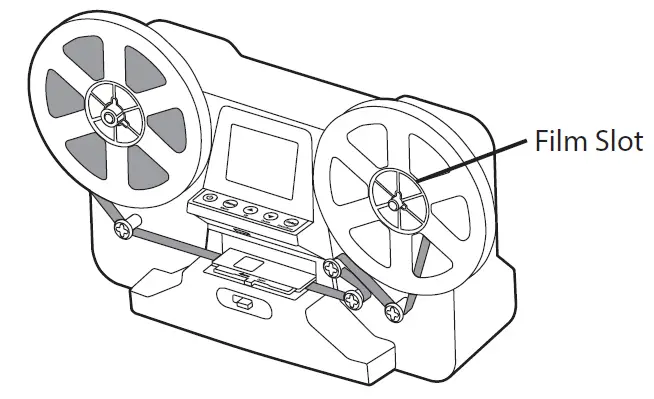
- Place the film around the empty film reel on the right, placing the end of the film into the slot on the reel. Gently rotate the reel 2-3 times to secure
the film in place. Hold the film in place for the first rotation.
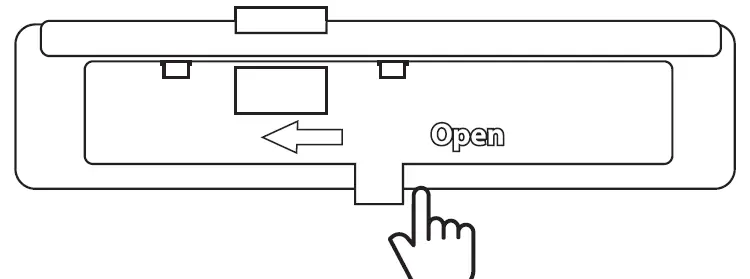
- Slide the Open tab to the left to release the film tray door latch.
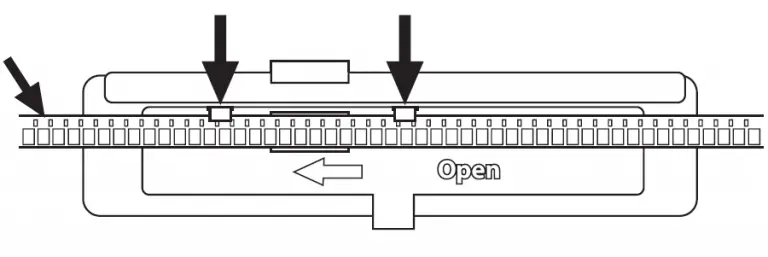
- Insert the film ensuring that the film’s perforated holes are at the back and placed under the two white tabs located on the film tray.
- Once the film is secured under the tabs close the film tray door to lock the film in place during scanning.
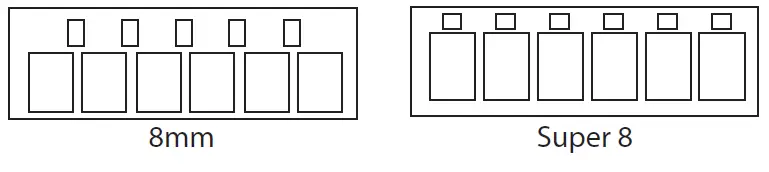
Selecting Film Type
Change the film type to either 8mm or Super 8 by pushing the film type lever on the film scanner left or right.
Note: Switching film types will prompt the reel motor to adjust. This is normal.
Adjusting Your Scan Settings
Exposure (Brightness)
IMPORTANT: Exposure can only be adjusted before recording video.
- You can adjust the exposure by going to Exposure on the main menu.
- Use the and buttons to change the brightness value between 2.0 (brighter) and – 2.0 (darker). Note: The default setting is 0.0.
- Once you have chosen the value, press the OK button.
Sharpness
IMPORTANT: Sharpness can only be adjusted before recording your video.
- You can adjust the sharpness by going to Sharpness on the main menu.
- Use the and buttons to change the sharpness to either Low, Medium, or High.
Note: The default setting is medium. - Once you have chosen your sharpness, press the OK button.
Frame Adjustment
IMPORTANT: The frame can only be adjusted before recording your video. You can adjust the frame position by going to Frame ADJ on the main menu.
Use the and buttons to adjust the selected setting. Use the OK button to cycle through the different adjustments. Press the button to return to the Scanning Mode
screen.
X – Horizontal
Y – Vertical
W – Zoom
Resetting to Default
If you would like to change all settings (Exposure, Sharpness, and Frame Adjustments) back to default, go to Default Setting in the main menu and press the OK button
Scanning Your Film
Ensure you are in Scanning Mode. If you are in the main menu, press the MENU
button to exit. You should see the scanning mode screen below. Note: This film scanner will only capture video and not audio.
IMPORTANT: Make sure that you are done changing your Exposure, Sharpness, and Frame Adjustment settings before moving onto the next step.
- Press the OK button to proceed to selecting the size of your reel. Use the to move between reel size options. See Appendix A for a film reel size selection diagra
| Film Reel Size | Film Duration | Recording Time |
| 3” | 3 min | 27 min |
| 5” | 7 min | 60 min |
| 7” | 20 min | 180 min |
2. Press the OK button to confirm your selection. Scanning will then begin automatically. While scanning, a red dot will appear at the upper left corner indicating that the recording is in progress. Your video will automatically be saved to the inserted SD card.
3 .You can stop scanning at any time by pressing the OK button.
Note: Stopping the recording means the video file recording will end. The next time you start the
recording again, it will be a new video file.
Viewing Your Scanned Videos
- Press the and button to enter the main menu.
- Press the button to select Playback and press the OK button to enter playback mode.
- Press the OK button to play or pause the selected video.
- Press the and buttons to move between videos.
- Press the MENU button again to stop playback on any video and enter the Playback sub-menu. Here you can Return to the playback menu, Delete a video, or Protect a video.
Protecting Your Video File
- Protecting your video file prevents it from being deleted. If you try to delete a protected file a “Protected!”warning will flash on the screen. You can lock either the
current video file or all video files by choosing either Lock Current or Lock All. - To delete a protected file, go into the playback sub-menu, select Protect, and choose Unlock Current or Unlock All. You should now be able to delete the video.
Watching Video on Your TV
You can use a TV or a monitor to view your saved videos on a larger screen.
- Power on the film scanner and your TV.
- Plug one end of the included TV out cable into the TV OUT port on the back of the
- Plug the other end of the TV out cable to the yellow RCA input on your TV. If your TV does not have a yellow/RCA input you may need to use the Component Input instead.
Note: If the image on the TV is in black and white a TV setting may need to be changed. Check your TV settings to enable Video Input or Composite Input. If your TV does not have this setting or does not have an RCA input, contact the TV manufacturer for instructions on using the yellow RCA cable.
Rewinding Your Film
Once scanning is complete you will need to rewind your film reel.
- Remove the included 7″reel with your film on it. Install the reel on the left reel shaft.
- Install the empty original film reel on the right reel shaft, using the grey reel adapter if necessary
- Feed the film using the below diagram and install on the empty film reel. Remember to rotate the reel 2-3 times to secure it in place.
- Press the MENU button to open the main menu.
- Use the button to select Fast Forward and press the OK button to select it.
- Use the button to select Yes and press the OK button to begin fast forwarding.
- Once fast forwarding is complete press the OK button to stop.
Downloading Video to Your PC
Note: The scanner will not scan directly to your PC.
- Plug the included USB cable into the USB port at the back of the film scanner.
- Plug the other end of the USB cable into the USB port on your PC.
- Ensure there is an SD card in the SD card slot on the scanner.
- Press the button on the scanner to turn it on.
- Press the MENU button on the scanner to enter the main menu.
- Use the button to move to USB in the menu.
- Press OK to start the scanner-to-PC connection. The SD card is read like it is an external hard drive and will show up as a USB drive.
- Open the FilmScanner folder and then the Movie folder. You should now be able to see your saved video files (MP4) that are on your SD card. Simply copy them onto your computer.
IMPORTANT: Always safely eject the USB drive before disconnecting the USB cable.
Formatting SD Card
IMPORTA1’1T: Formatting your SD card will cause all information to be erased, including protected files.
- Press the MENU button to go to the main menu use the button to go to Format.
- Press the OK button to select Format. “All data will be deleted” warning will appear. Press the button to select “OK” and press the “OK” button to format.
- Your SD card is now formatted.
Changing the Language
- Press the MENU button.
- Use the button to move through the menu and highlight Language.
- Press the OK button to select Language.
- Choose your language by pressing and then pressing OK .
Cleaning and Care
- Please make sure the scanner is clean before using.
- Do not use liquid cleaners.
- Do not use organic solvents such as alcohol, gasoline, or thinner, to clean the equipment.
- Clean inside of the product only with a dry cloth.
Scanning Error
- Ensure the lm size switch on the front of the scanner is set to the correct size.
- Open the Film Tray Door and check the lm. Ensure it is properly threaded and installed under the white tabs.
If you receive the error message, “Cluster size wrong. Please format” when scanning follow the below steps. SD Card Error - Ensure the SD Card is CLASS 4 or higher and is 32 GB or less.
- Follow the instructions in the Formatting SD Card section to format the SD Card.
- Inspect the sprocket holes on the lm for signs of wear. Worn sprocket holes may prevent the scanner from grabbing the holes and advancing the lm.
- Press the MENU button to clear the error message and attempt scanning again.
FAQ / Troubleshooting
Film not feeding? See an error message? Check out our Support Center for a full troubleshooting guide.
| Issue | Solution |
| How should I prepare the
possible scan? |
be done with the included cleaning cloth. |
| I’ve noticed a consistent
scanned. Is something wrong with my scanner? |
There is likely a small amount of dust inside your unit. Use the included cleaning cloth to ensure there is no foreign debris. |
| Do I need a computer to begin scanning? | Everything is plug-and-play right out of the box. You can save images to an SD card (up to 32GB) and then export to a computer at a time that is more convenient. |
| The scanner screen is black but it has power. | Ensure the TV Out cable is not connected to the back of the film scanner. |
| The TV Out image is in black and white on my TV. | A TV setting may need to be changed. Check your TV settings to enable Video Input or Composite Input. If your TV does not have this setting or does not have an RCA input, contact the TV manufacturer for instructions on using the yellow RCA cable. |
Appendix A
Film Reel Size Selection
Specifications
|
Image Sensor |
3.53 Mega pixels (2304 x 1536) 1/3” CMOS sensor |
| Display | 2.31” color TFT LCD |
| White Balance | Automatic |
| Exposure Control | Automatic/Manual (-2.0 EV ~ +2.0 EV) |
| Supported Film Type | |
|
Languages |
English, French, German, Italian, Spanish,
Chinese |
| Scanning Method | Video Recording (no sound) |
| Resolution | 1440 x 1080 |
| PC System Compatibility | Windows XP, Vista, Windows 7/8/10 |
| Mac System Compatibility | Mac 10.7.3 |
| Image File Format | MP4 |
| Light Source | LED Backlight |
| Scanning Speed | 2 frames per second |
| Internal Memory | None |
|
External Memory Card |
Supports SD cards up to 32GB (Class 4 and above) |
| Power Supply | DC 12V/1500mA |
| Dimensions | 12.6 (L) x 4.49 (W) x 7.36 (H) inches |
| Weight | 3.88 lbs |
| FCC |
Important Safety Instructions
- Do not attempt to dissemble or modify any part of the scanner.
- If any of the following conditions are present, stop using immediately, unplug the power
cord, and refer to a qualified service professional for servicing:
A. If there is any smoke or unusual smell while using.
B. If the product has been exposed to rain, water, or other liquids.
C. If the product does not operate normally by following the operating instructions.
D. If the product exhibits a distinct change in performance.
E. If the product has been dropped or damaged in any way.
Best Practices for Safe Use
- Only use films of standard size.
- Only use attachments/accessories specified by the manufacturer.
- Unwind and straighten the USB cord before use.
- Check that the power voltage stated on the rating label corresponds to your local electricity supply.
- Unplug the power adapter from the wall when the product is unused for a long period of time and during thunderstorms.
- Do not use this product near water.
- Do not immerse this product, the power cord, or any accessories in water or any other liquid.
- Do not block any ventilation openings.
- Do not place this product near any heat sources such as radiators, heat registers, stoves,
- Do not attempt to service or disassemble this product yourself as opening or removing covers may expose you to dangerous voltages or other hazards.
FCC Information
This equipment has been tested and found to comply with the limits for a Class B digital device, pursuant to part 15 of the FCC Rules. These limits are designed to provide reasonable
protection against harmful interference in a residential installation. This equipment generates, uses and can radiate radio frequency energy and, if not installed and used in accordance with the instructions, may cause harmful interference to radio communications. However, there is no guarantee that interference will not occur in a particular installation. If this equipment does cause harmful interference to radio or television reception, which can be determined by turning the equipment off and on, the user is encouraged to try to correct the interference by one or more of the following measures:
- Reorient or relocate the receiving antenna.
- Increase the separation between the equipment and receiver.
- Connect the equipment into an outlet on a circuit different from that to which the receiver is connected.
- Consult the dealer or an experienced radio/TV technician for help.
NOTE: This unit may contain a microcomputer for signal processing and control function. In very rare situations,
severe interference, noise from an external source, or static electricity may cause it to lockup. In the unlikely event that
this should happen, turn off the unit, wait at five seconds, and then turn it bock on again.
Magnasonic® Warranty
Thank you for choosing Magnasonic. We guarantee your investment in our products is a solid one! Extensive thought, research, planning, and design goes into every product we make.
High quality components combined with precision manufacturing allows us to maintain the highest possible production standards. All items are guaranteed against defects in materials and craftsmanship.
Magnasonic products come with a complete one year parts and labour warranty. Proof of purchase from an authorized Magnasonic dealer is required when seeking warranty assistance.
Magnasonic has outstanding quality control, if something should go wrong with any of our products, we will repair it free of charge! If the product cannot be repaired, we will replace the product. If the product has been discontinued, we will replace the product with either the newest version of said product or current equivalent. Replacement parts furnished in connection with this warranty shall be warranted to a period equal to the unexpired portion of the original product warranty.
This warranty shall not apply to: A. Any defects caused or repairs required as a result of abusive operation, negligence, accident, improper installation or inappropriate use as outlined in the owner’s manual.
B. Any Magnasonic product tampered with, modied, adjusted or repaired by any party other than Magnasonic.
C. Any cosmetic damage to the surface or exterior that has been defaced or caused by normal wear and tear.
D. Any damage caused by external or environmental conditions, including but not limited to transmission line/power line voltage or liquid spillage.
E. Any product received without appropriate model, serial number, and CSA/cUL/cULus/ cETL/cETLus markings.
F. Any products used for rental or commercial purposes.
G. Any installation, setup and/or programming charges.
H. Defect or damage as a result of connecting a product to an outlet with the incorrect voltage. Voltage converters must be used where applicable.
If in any situation your purchase displays a manufacturer’s defect during the warranty period and does not function correctly, Magnasonic will repair your product and cover all parts, labour, and return costs upon delivery of the Magnasonic product together with proof of purchase.
Products returned to Magnasonic for warranty service must be shipped prepaid (paid by customer). Products must be shipped in the original shipping container or its equivalent; in any case the risk of loss or damage in transit is to be borne by you. We believe everyday experiences should be extraordinary. We pledge to work with you in resolving any issue that occurs with your product. If you are in need of assistance do not
hesitate to visit our support page at: www.magnasonic.com/support/