
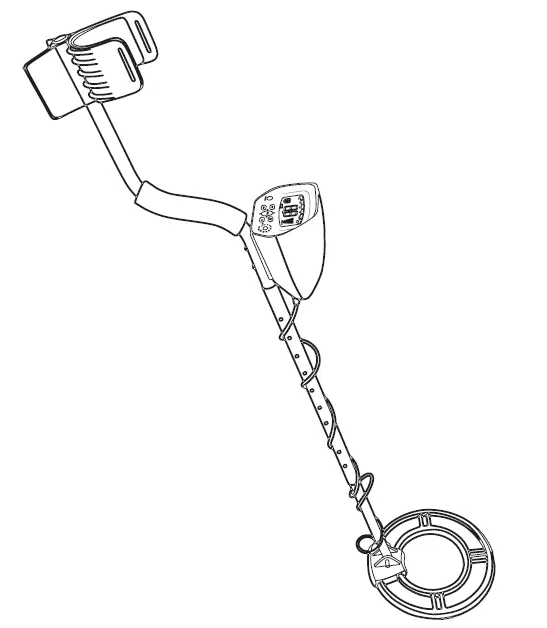
MARNUR Metal Detector
User Manual
Included
- 1 x Metal detector
- 1 x Protective cover for search coil
- 2 x Battery
- 1 x Multipurpose shovel (with a storage bag)
- 1 x Handheld rake
- 1 x Carrying bag
- 1 x User manual
Product Installation
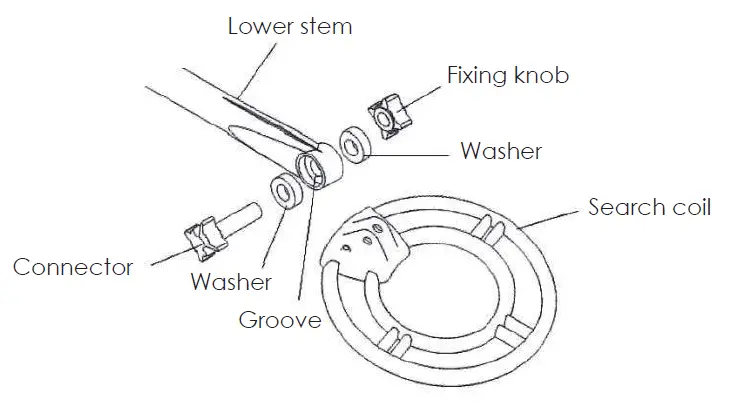
1. Unscrew the fixing knob on the search coil and remove the knob connector. Place the washers in the grooves of the lower stem. Then install the search coil on the lower stem with the holes on the search coil and the stem being aligned. Push the connector through the holes and tighten the knob.
*Note: The washers can be removed if the search coil is connected too tightly to the lower stem.

2. Press the buttons on the lower stem, and connect it with the middle stem and the upper stem.
3. Install the control box with batteries, place the control box on the upper stem, tighten the screw, and adjust the stem length.
4. Wind the cable neatly around the stem, with the connector on the cable being inserted into the connector socket on the control box.
Product Diagram
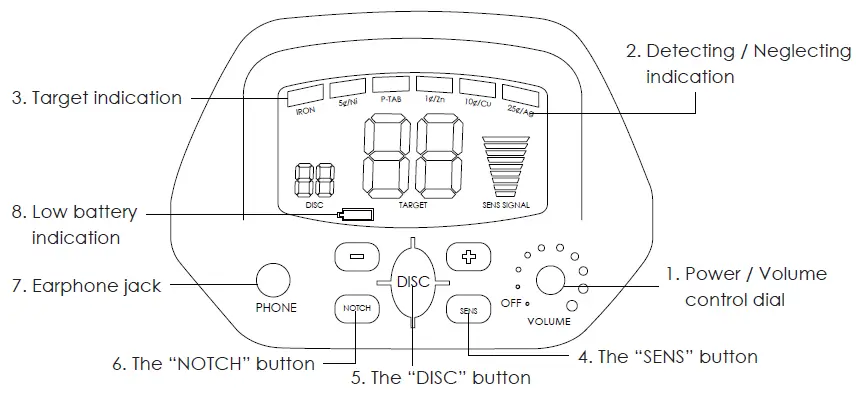
1. Power / Volume Control Dial
Rotate the dial clockwise to turn on the product or increase the volume; Rotate the dial counterclockwise to decrease the volume or turn off the product. When the product is turned on, the background light will be activated automatically.
2. Detecting / Neglecting Indication
The product can detect 6 kinds of metal and below are the numerical value ranges (the values are for general reference only, for there is no absolute values for certain kinds of metal) :
- -IRON: 0-5
- -5¢/NI: 6-17
- -P-TAB: 18-26
- -1¢/Zn: 27-38
- -10¢/Cu: 39-62
- -25¢/Ag: 63-99
3. Target Indication
After the target metal has been detected, the corresponding area will flicker.
4. The “SENS” Button
Press the “SENS” and “+” or “-” button to adjust the sensitivity level. After the buried target metal has been detected, you can adjust the sensitivity to a higher level, but do not set the highest level, otherwise a false signal might occur due to the disturbance from broadcast antennas or other electronic circuits.
5. The “DISC” Button
If you do not want to detect certain target material listed on the screen, press the “DISC” button, and set the corresponding detecting value (range:0-80) via the “+” button and the “-” button.
Note: If the value is “00”, all kinds of metal detectable by the detector could be detected.
6. The “NOTCH” Button
Press NOTCH and “+” or “-” button, and choose the targets that you want to exclude. If you want the excluded targets to be detected again, press the “NOTCH” button again.
7. Earphone Jack
Insert with the earphone, and the audible signals for discovering would be sent to the earphone instead. Please adjust the volume to the lowest level before listening to the audible signals to avoid damage to ears.
8. Low Battery Indication
When low battery indicator lights, replace the batteries.
Product Operation Guide
For better understanding of the responses for detecting different kinds of metal from the detector, it’s recommended to test before first use.
Indoor
- To test the detector, please place the detector on a wooden or a plastic table, and let the bottom of the search coil face the ceiling. Take off anything containing metal like a watch or a ring you are wearing.
- Slowly scan a sample you want the detector to find (such as a coin) 2-3 inches or more above the surface of the search coil. If any metal is detected, there would come audible signals, and the corresponding area would flicker.
Outdoor
- To test the detector, please find a place outside where there is no metal, and place a sample (like a coin) on the ground.
- Keep the search coil parallel with the ground and scan slowly. Please do not swing the detector like a pendulum while scanning.
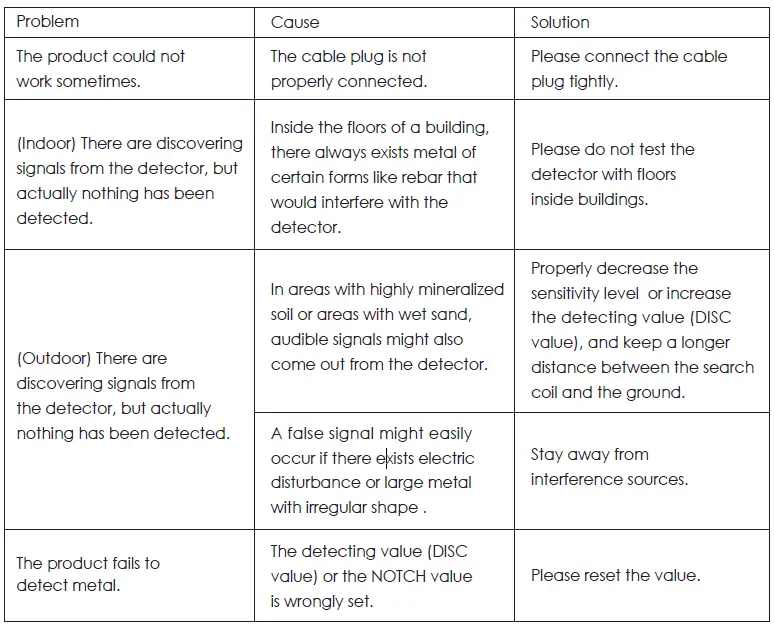
Questions and Answers
Product Maintenance
- Please wipe the surface of the product with mildly damp cloth or sponge for cleaning. Please avoid
cleaning with any detergent or abrasive. - Please store the product properly. If the product is not to be used for long, please remove the batteries