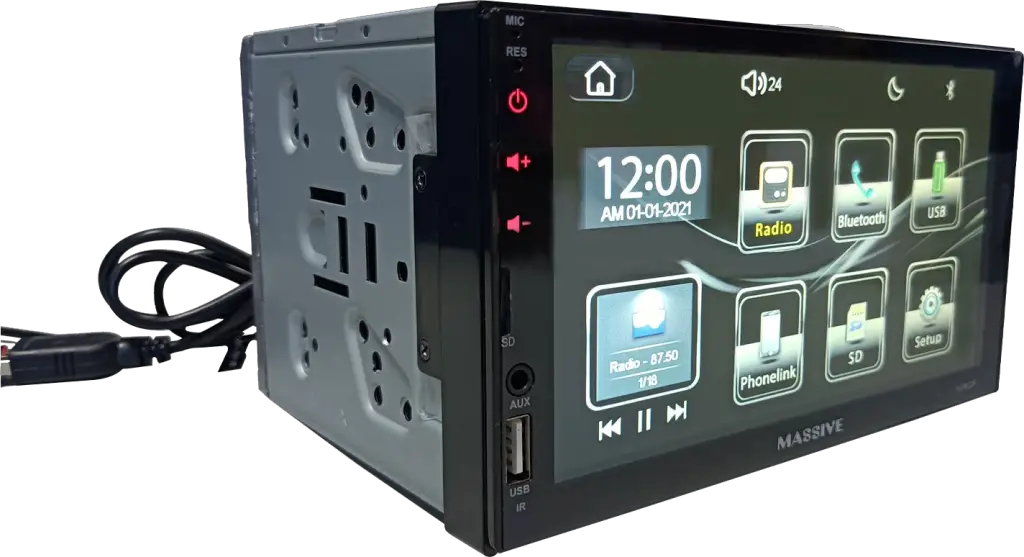
MASSIVE H7MCP Car MP5 Player

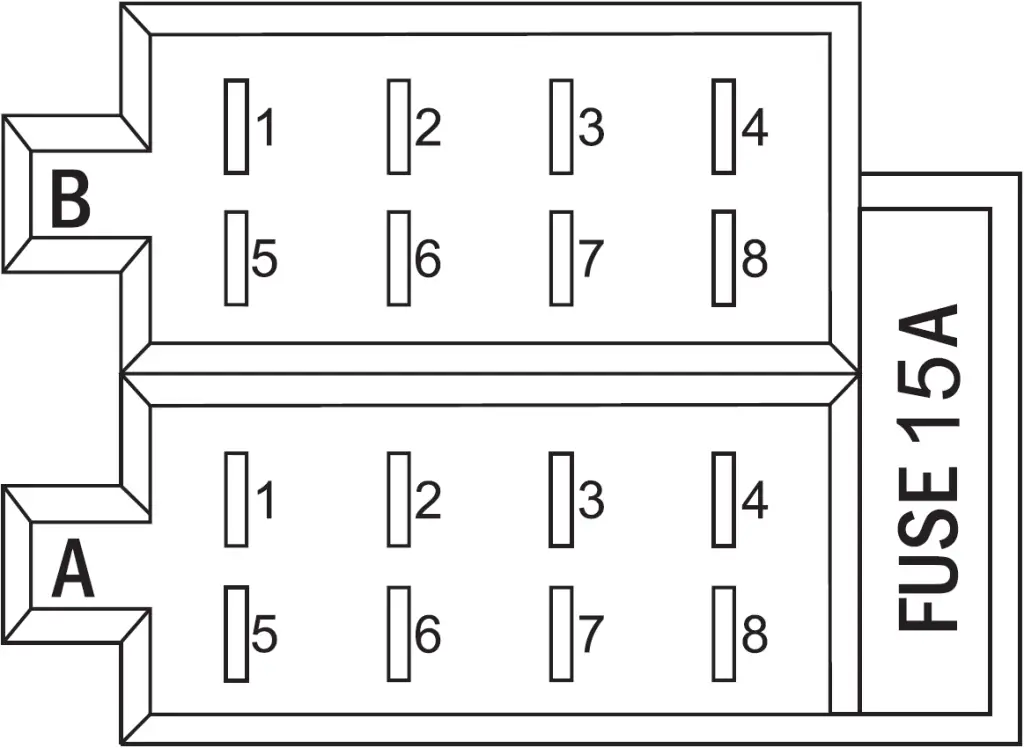
Wiring Diagram
- SUB-OUT
- REAR-R-OUT
- REAR-L-OUT
- VIDEO-OUT
- AUX-AUDIO-R-IN
- AUX-AUDIO-L-IN
- FRONT-CAM-IN
- REAR-CAM-IN
- AUX-VIDEO-IN
- RADIO-Antenna
- GPS (OPTIONAL)
- TV(OPTIONAL)
- USB port
ISO Speaker Connection

Connector A
- Braking
- Key
- Auto ANT
- ACC + 12V
- Rear Camera
- Battery +
- ILL
- GND
Connector B
- Rear Right Speaker (+)
- Front Right Speaker (+)
- Front Left Speaker (+)
- Rear Left Speaker (+)
- Rear Right Speaker (-)
- Front Right Speaker (-)
- Front Left Speaker (-)
- Rear Left Speaker (-)
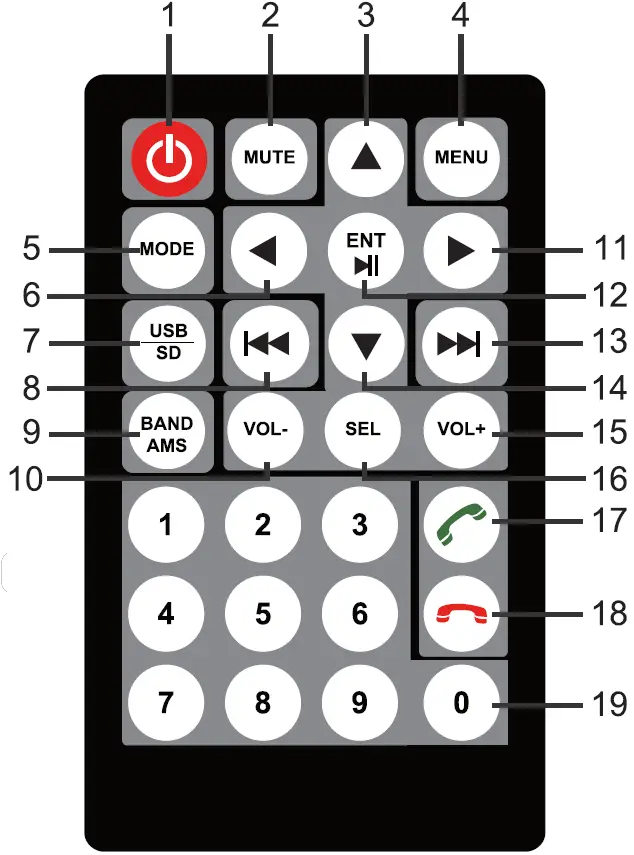
Remote Control Description
- Power Switch
- Mute
- Up
- Menu
- Mode Switch
- Right
- USB / SD
- Last Song
- Band / Automatic
- Volume +
- Left
- Confirm / Play / Pause
- Next Song
- Under the
- Volume –
- Choice
- Answer the Phone
- Hang Up
- Digital Key
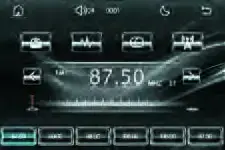
Radio Operation
When the unit connect with power, press POWER key button of the unit or the POWER key button of the remote control, the unit will turn on and enter into the radio interface. The radio interface is as shown below:
Radio Operation
- Press this icon to enter into the main interface
- Volume icon: press to enter volume adjustment, touch and slide to adjust volume
- Time display
- Press this icon to switch the backlight mode (day, night, off screen) 4 mode
- Return back icon (press to return back to main interface)
- Short press this icon to browse radio stations, long press to search and save stations automatically
- BAND switch (switch FM1/FM2/FM3/AM1/AM2)
- ST stereo switch (switch ST stereo and MONO mode)
- Switch between LOC and DX (LOC: strong signal LOC: weak signal)
- Short press to scan to the low end manually, long press to scan to the low end automatically
- Short press to scan to high end manually, long press to scan to high end automatically
- Radio progress bar: Press and slide to adjust radio stations at will
- Press to select a station, long press to store your favorite station
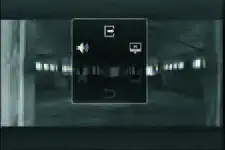
Main Interface
Press “Home” icon at any interface, it will return back to main interface, main interface as below:
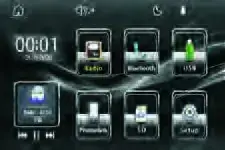
Main interface operation as follow:
- Time and date display, press to switch to two different display style.
- Small window displays, enter the main interface in different modes, the small window will display the current mode. When press, it can quickly enter into current mode. It can choose “previous song, next song, play or pause the song, or select the previous or next station”, when playing MP3 or BT music or in radio mode.
- Radio
- Bluetooth
- USB (If unit without USB, when press this icon, it will display: No Device)
- Phonelink (Press to enter with choice: Android USB, Android Wi-Fi and iPhone USB, iPhone WIFI mirrorlink and CARPLAY connecting)
- SD (If unit without SD card, when press this icon, it will display: No Device)
- Setting (Enter into to set language, time, steering wheel control etc.)
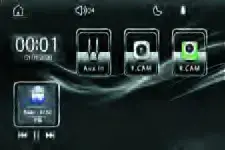
- External audio and video input (when the audio and video input line is not connected, it will be blue screen)
- Front view (when the camera is not connected, it will be blue screen)
- Rear view (when the camera is not connected, it will be blue screen)
SD or USB Playback
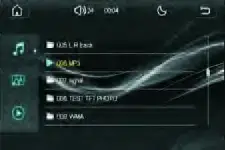
Choose icon in the main interface or press MOD key button to enter into SD or USB playback function, support music, image, video.
- Music playback interface as follow:
 The operation of the music interface is as follows:
- Switch to previous song
- When playing music, press once to pause the music, press again to resume playback
- Switch to next song
- Enter the speaker area and sound effect settings, after setting, press icon to return back to music playback
- Repeat playback (can choose: repeat one song, repeat all, repeat folder and close repeat)
- Shuffle Playback
- Number selection, click to enter the small keyboard to directly enter the number to select the corresponding song
- Folder selection, such as when there is a folder in SD or USB, click to enter the small keyboard to directly input the number to select the corresponding folder
- Play progress bar, press and slide to adjust the play progress at will
- Picture playback, the playback interface is as shown below:

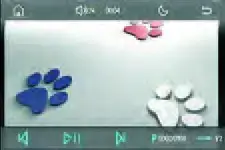 The picture playback interface operation is as follows:
- Switch to previous image
- When playing an image, press once to pause playback, press again to resume playback
- Switch to next image
- Select the picture by number, click to enter the small keyboard to directly input the number to select the corresponding picture
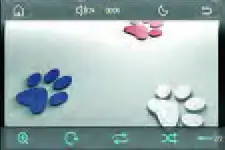
- Switch to 2/2 function interface
Enlarge or zoom the image (magnification factor x2,x3,x4,x5 zoom factor: x1/2,x1/3,x1/4) - Rotate image
- Repeat playback (can choose: repeat one, repeat all, repeat folder and close repeat)
- Shuffle Playback
- Switch to 1/2 function interface
- Video playback, the playback interface is as shown below:
 Video playback interface operations are as follows:
- Switch to previous one
- When playing the video, press once to pause playback, press again to resume playback
- Switch to next one
- Repeat playback (can choose: repeat one, repeat all, repeat folder and close repeat)
- Shuffle Playback
- Enlarge or zoom(magnification factor x2,x3,x4,x5 zoom factor: x1/2,x1/3,x1/4)
- Switch to the next function page
- Enter sound settings
- Video color adjustment, enter to adjust brightness, contrast, etc.
- Select music by number, click to enter the small keyboard to directly input the number to select the corresponding video
- Folder selection, such as when there is a folder in SD or USB, click to enter the small keyboard to directly input the number to select the corresponding folder
- Switch to the last function page
- When playing music, pictures or videos, click the upper right corner icon The first time enter the list of music, pictures or videos. Click the second time to enter the folder selection, as shown below:
 The folder interface operation is as follows:
- View music folder
- View image folder
- View video folder
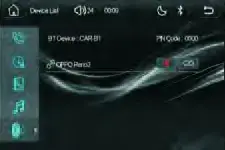
Bluetooth
Choose Bluetooth icon in the main interface to enter Bluetooth Connection method: Turn on the Bluetooth of the mobile phone, search for the BT name “CAR-BT” and click the BT name to pair, the host pairing is successful as shown below:
 Warm reminder: If the Bluetooth of the mobile phone and the host cannot be successfully paired, please try the following solutions:
- Turn off the Bluetooth of the mobile phone and turn on the Bluetooth again to pair, if it still fails to pair, please restart the mobile
- Press the RESET of the unit to clear the host memory
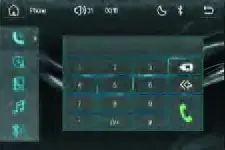
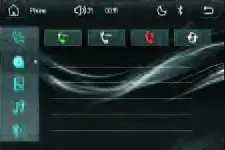
- Press icon to enter BT calling interface, as shown below:
 BT call dial interface operation is as follows:
- Delete a single entered number
- Delete all entered numbers
- Dial key
- Entered dial display box
- Number dial key
- Press icon to enter BT calling record as follows:
 BT call log interface is as follows:
- Received call history
- Dialed call records
- Rejected call history
- Click to download call log
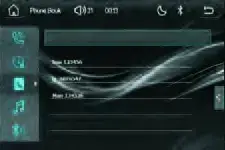
- Press icon to enter into BT phonebook interface as shown below:
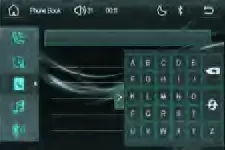 The operation of the Bluetooth phone book(image one) is as follows:
- Download Bluetooth phone book
- Delete the letters that have been entered
- Already entered letter display box
- Letter input key, enter letters to search for names
- Click to collapse the alphabet search keypad, means it has been put away, Click again to open, if the phone book has been downloaded, when the keypad is closed, it displays as image two
- Warm reminder: You can search by name only after downloading the phone book
- Press music, Enter the Bluetooth music playback interface, as shown below:
 BT music interface operations are as follows:
- Switch to previous song
- When playing music, press once to pause the music, press again to resume playback
- Switch to next song
- BT music ID3 display
- Press Bluetooth to view connected Bluetooth devices
Mirrorlink
Select the main interface, press icon enters the mobile internet interface, as shown below:
 Tips:
Tips:
- When all connection interfaces are not connected to the mobile phone, press the lower right corner icon to exit phonelink
- The rear USB is used as a portable Wi-Fi signal receiver socket, all USB connections only support the front USB
- Choose icon to enter Auto link Android USB connect (support dual control) as shown below:
- Connecting method as follow:
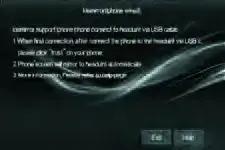
Auto link support Android phone link via USB data line- When connecting for the first time, follow the instructions on your phone to download and install the APP.
- Connect the phone and unit via USB data line
- The phone screen will be automatically mirrored to the unit
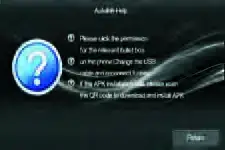
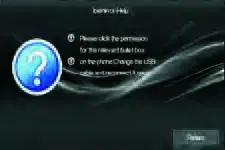
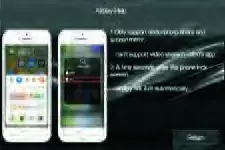
- For more information, please refer to the help page, press icon to enter help page, as follow:
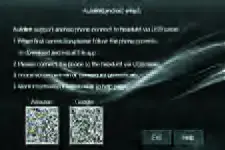
- Auto link-help
- Please click the prompt box related to permissions
- Change the USB on the phone and reconnect the USB cable
- If the APK installation fails, please scan the QR code to download and install the APK
Warm reminder:- Some phones may not support
- No sound while mirrorlink if without connecting to BT
- If the unit mirroring cannot display the full screen, please try to adjust the resolution of your phone
- If the mobile phone cannot be connected all the time, please try to restart the mobile phone or press “RESET” key of the unit to reset and reconnect
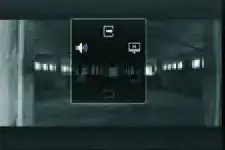
- Auto link Android USB connection is successful, the unit will display the phone mirror, as shown below:
- Auto link Android USB successful connection interface is as follows:
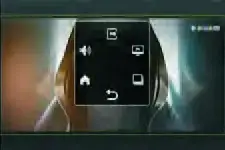
- Exit mirrorlink
- Sound adjustment
- Turn off screen display
- Enter the main interface of the phone
- Return to the upper level of the phone
- Force horizontal screen, some phones do not support
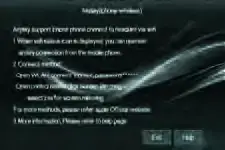
- Connecting method as follow:
Choose icon to enter Miracast Android Wi-Fi connect (Only supports one-way control: mobile phone controls the unit), the display interface is as follows:
- Connecting method as follow:
Miracast support Android phone connect to the unit via Wi-Fi- When the phone displays the Wi-Fi status icon, you can operate the Miracast connection from the phone
- The connection methods between different brands of mobile phones are different, such as:
HUAWEI: Establish more connections-easy projection-wireless projection
Samsung: Set up smart view for screen mirroring (Smart View)
Xiaomi: Set up more connections-wireless display
For more connection methods, please contact the phone manufacturer - For more information, please refer to the help page, press icon to enter to help page as follow:

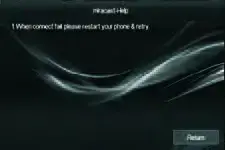
- Miracast -help
- When the connection fails, please restart your phone and try again
Reminder: some mobile phones do not need to connect to Bluetooth to transmit sound. If there is no sound when connected, please disconnect the Bluetooth connection - Miracast Android Wifi connection is successful, the unit will display the phone mirror, as shown below:
 Miracast Android Wifi successful connection interface is as follows:
- Exit mirrorlink
- Sound adjustment
- Turn off screen display
- Enter the main interface of the phone (Miracast Android Wi-Fi not support this operation)
- Return to the upper level of the phone (Miracast Android Wi-Fi not support this operation)
- Force horizontal screen (Miracast Android Wi-Fi not support this operation)
- When the connection fails, please restart your phone and try again
- Choose icon to enter into Iosmirror iPhone USB connection (support two-way control), the display interface is as shown below:

- Connecting method as follow:
Iosmirror support iPhone connect with the unit via USB- When connecting for the first time, connect the phone to the unit via a USB data line, please click “Trust” on the phone
- The phone screen will be automatically mirrored to the unit
- For more information, please refer to the help page, press icon to enter into help page as follow:
- Iosmirror -Help
- Please click the prompt box related to permissions
- Change the USB on the phone and reconnect the USB cable
- Connecting method as follow:
Reminder:
- The sound transmission is not affected when Bluetooth is not connected
- When connected to Bluetooth, it supports two-way control (the phone can control the unit, also the unit can control the phone)
- Iosmirror iPhone USB connection is successful, the unit will display the mirror image of the phone, as shown below:
Iosmirror iPhone USB successful connection interface is as follows:
- Exit mirrorlink
- Sound adjustment
- Turn off screen display
- Iosmirror iPhone USB not support this operation
- Iosmirror iPhone USB not support this operation
- Iosmirror iPhone USB
Choose icon to enter into Airplay iPhone Wi-Fi connection (only support one-way control: mobile phone control the unit), the display interface is as follows:
- Connecting method as follow:
Airplay support iPhone connect to the unit via Wi-Fi- When the Wi-Fi status icon is displayed, you can perform operations to connect to Airplay via your mobile phone
- Connecting method:
- Open the phone WLAN, connect Wi-Fi name, such as: DIRECT-Car-phonelink, password: 88888888
- Open the control center, click “Screen mirroring”, select “Car-airplay” for screen mirroring
For more methods, please visit Apple’s official website - For more information, please refer to the help page, press icon to enter help page as follow:
- Airplay -Help
- Only supports audio/photo sharing and screen mirroring, and cannot support video sharing in video applications
- Airplay will automatically exit after the phone locks the screen for a few seconds
Reminder:- The sound transmission is not affected when Bluetooth is not connected
- If the mobile phone has been unable to connect, please try to restart the mobile phone or press “RESET” button of the unit to reset and reconnect
- Airplay iPhone Wi-Fi connection is successful, the unit will display the phone mirror, as shown below:
 Airplay iPhone Wi-Fi successful connection interface is as follows:
- Exit mirrorlink
- Sound adjustment
- Turn off screen display
- Airplay iPhone Wi-Fi not support this operation
- Airplay iPhone Wi-Fi not support this operation
- Airplay iPhone Wi-Fi not support this operation
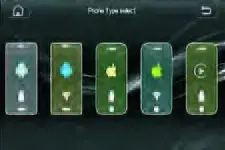
Setting
Press icon in the main interface to enter into setting
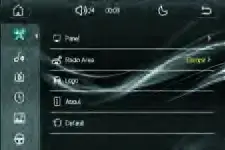
- Choose settings interface to enter system setting as follow:
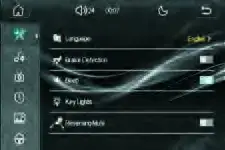
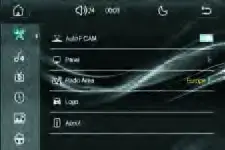 The system settings list are as follows:
- Language setting: different languages can be selected according to personal needs
- Brake detection switch
- Key tone switch
- Key button light color settings (including: red, green, yellow, blue, rose red, cyan, white and automatic conversion)
- Reversing silent switch
- Automatic front view switch
- Screen settings (including: brightness setting and touch correction)
- Radio area settings: different radio areas can be set according to different regions
- Car logo setting: different car logos can be set according to different models
- About the unit (software version information)
- Reset
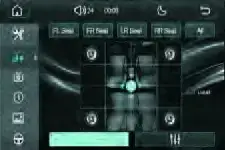
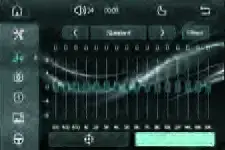
- Choose settings interface icon to enter the speaker area setting and sound effect setting, as shown below:
Press icon enter the speaker area settings, press icon to enter EQ settings (including 16-segment EQ)
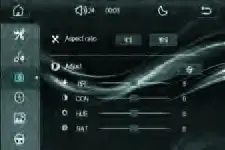
- Choose settings interface icon to enter video setting as follow:
 The video settings list are as follows:
- Video ratio setting, choose 4:3 or 16:9
- Brightness setting
- Contrast setting
- Chroma setting
- Saturation setting
- Restore default settings
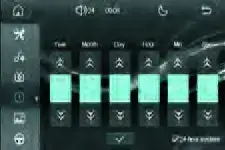
- Choose settings interface icon to enter date and time setting as follow:
 The date and time setting list are as follows:
- Adjust up
- Adjust down
- Save the adjusted date and time settings
- 12-hour and 24-hour time system settings, tick “√” for 24-hour system
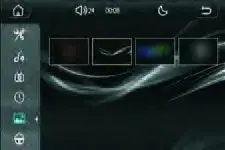
- Choose settings interface icon to enter background image setting, 4 different styles of backgrounds to choose from, as shown below:
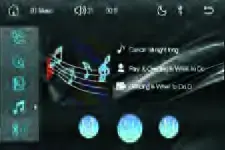
- Choose settings interface to enter steering wheel control setting as follow:
 The steering wheel control setting list is as follows:
Setting method: long press the steering wheel button, choose corresponding key button to select the prefer key button. When the color is gray, it means that the button learning is successful.- Save learned button
- Clear all learned keys
- The square in the lower right corner of the interface is the button voltage display area
- Learning Tips Bar
- Steering wheel control key button