MASTERBUILT MES 130B Digital Electric Smoker

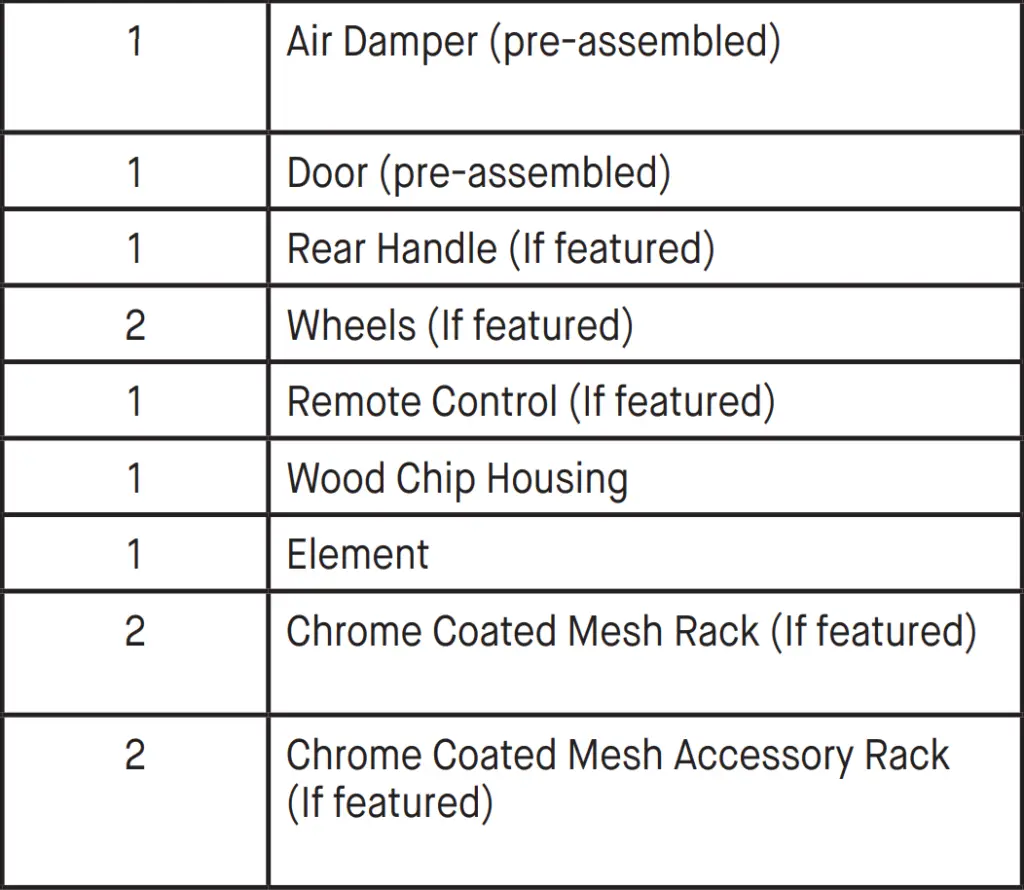
Parts List
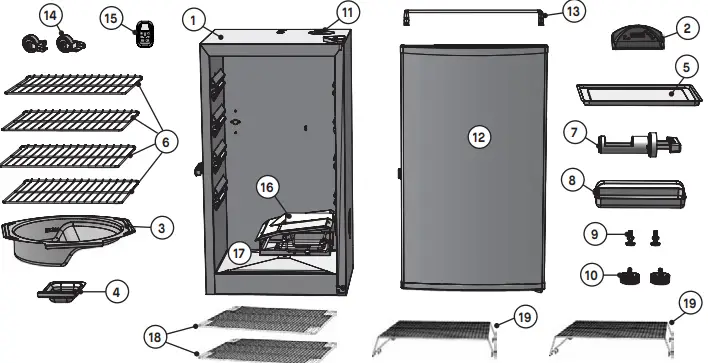

Hardware List
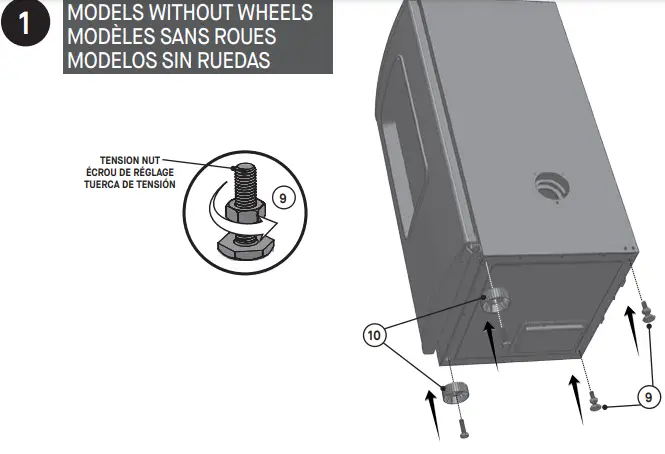
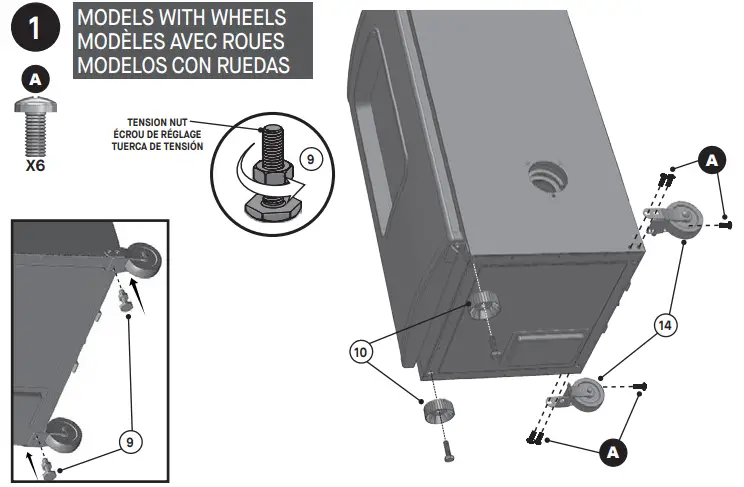
BEFORE ASSEMBLY READ ALL INSTRUCTIONS CAREFULLY.
- Assemble on a clean flat surface.
- Tools needed: Adjustable wrench, Phillips head screwdriver
- Approximate assembly time: 25 minutes
- The actual product may differ from the picture shown.
- It is possible that some assembly steps have been completed in the factory
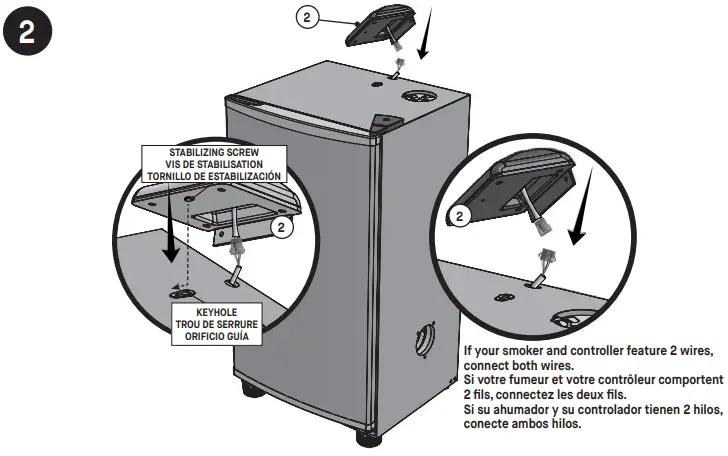
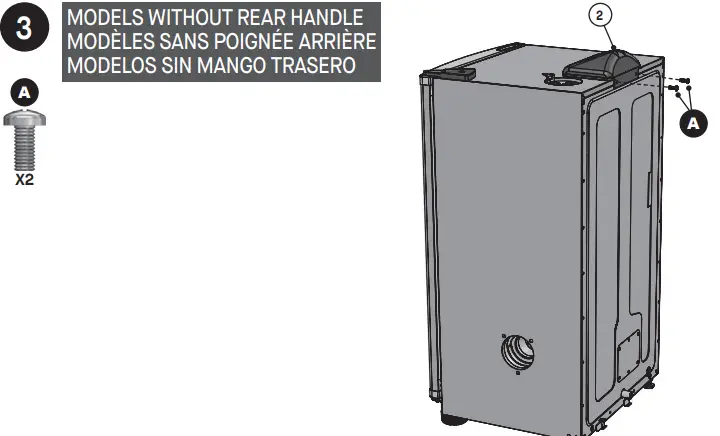
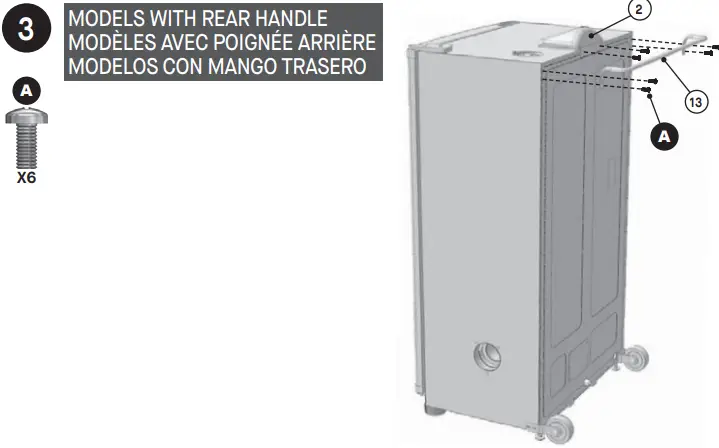
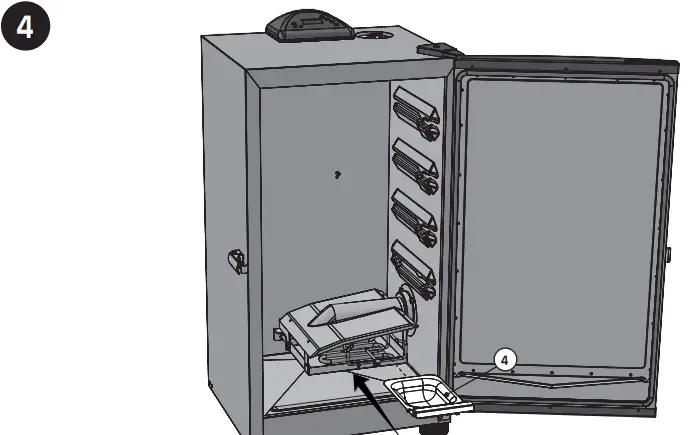
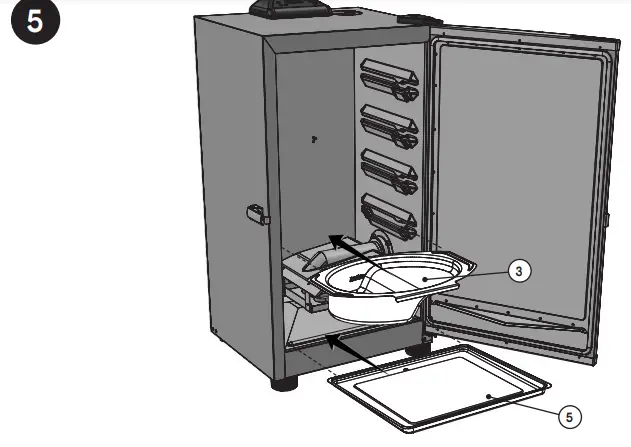
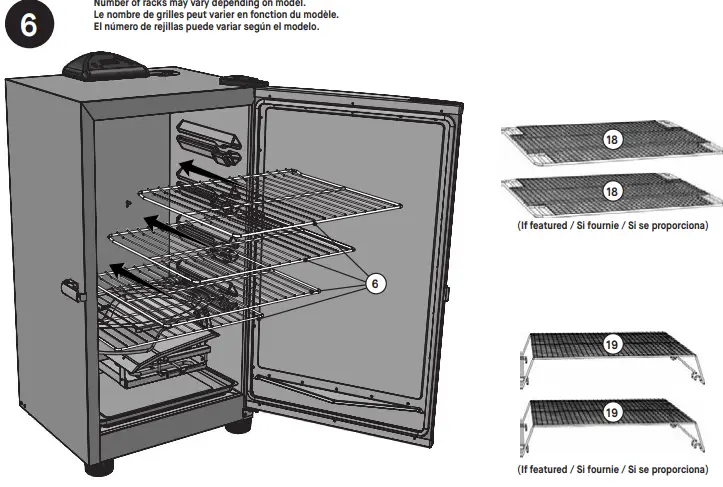
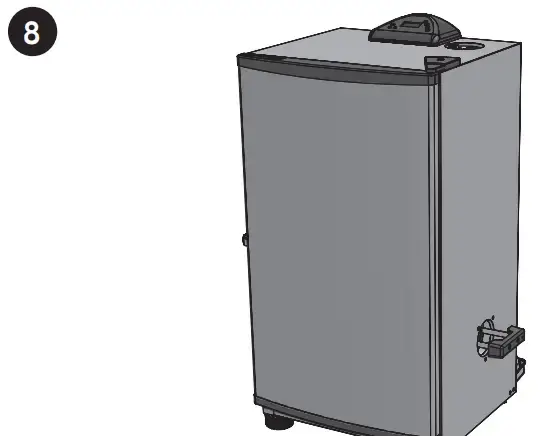
Assembly
Operating Instructions
CONTROL PANEL
To set temperature:
- Press ON/OFF button.
- Press SET TEMP button once-LED display will blink.
- Use up or down arrows to set temperature. Maximum temperature setting is 275°F (135°C).
- Press SET TEMP button again to lock in temperature.
Note: Heating will not begin until timer is set.
To set timer: - Press SET TIME button once-LED display for hours will blink.
- Use up or down arrows to set hours.
- Press SET TIME button again to lock in hours. The minutes LED will start blinking.
- Use up or down arrows to set minutes.
- Press SET TIME to lock in minutes and start cook cycle. Heat will turn off when time has expired. NOTE: When outside temperature is cooler than 65°F (18°C) and/or altitude is above 3,500 feet (1067m), additional cooking time may be required. To ensure that meat is completely cooked use a meat thermometer to test internal temperature or use meat probe, if featured.
To use meat probe (If featured): - Insert meat probe into center of meat to get most accurate reading.
- Press and hold MEAT PROBE button-LED display will show internal temperature of meat.
- Once MEAT PROBE button is released-LED display will return to set temperature or set time. To use light (If featured):
- Press LIGHT button to turn light on.
- Press LIGHT button to turn light off. To RESET control panel: If control panel displays an error message, turn smoker off and unplug smoker from outlet. Wait ten seconds, plug smoker back into outlet then turn smoker on.
To replace batteries:
- Slide belt clip to the left to remove. Press tab down on battery cover and pull out.
- Install 2 AAA alkaline batteries. Check positive (+) and negative (-) symbols on the case and battery to ensure proper installation. Replace the battery cover.
- Remove batteries before storing remote control.
To test frequency range: - Turn smoker on. Use remote to turn light on and off as you move away from smoker.
- Remote control is out of frequency range when light will no longer turn on and off. Remote control has frequency range of up to 100ft (30m). Test frequency range before and during use. IMPORTANT:
- Do not leave remote control exposed to sunlight for prolonged periods of time.
Troubleshooting
- If the remote is not working properly or not interfacing correctly with the controller, it may be due to weak batteries, incorrect battery installation or the remote is not correctly linked to controller. Possible solutions:
- Replace batteries and install them according to the image in the battery housing.
- Link controller and remote:
- Turn controller and remote ON.
- Press and hold SET TEMP on the controller for 3 seconds.
- On the remote, press MEAT PROBE, LIGHT, MEAT PROBE, LIGHT (all buttons must be pressed within 5 seconds of each other). A short beep will occur after each button is pressed.
REMOTE CONTROL
This device complies with Part 15 of the FCC Rules. Operation is subject to the following two conditions:
- This device may not cause harmful interference, and
- This device must accept any interference received, including interference that may cause undesired operation.
FCC Statment
Warning: Changes or modifications to this smoker not expressly approved by the party responsible for compliance could void the user’s authority to operate the equipment.
FCC Statement
This equipment has been tested and found to comply with the limits for a Class B digital device, pursuant to Part 15 of the FCC Rules. These limits are designed to provide reasonable protection against harmful interference in a residential installation. This equipment generates uses and can radiate radio frequency energy and, if not installed and used in accordance with the instructions, may cause harmful interference to radio communications. However, there is no guarantee that interference will not occur in a particular installation. If this equipment does cause harmful interference to radio or television reception, which can be determined by turning the equipment off and on, the user is encouraged to try to correct the interference by one or more of the following measures:
- Reorient or relocate the receiving antenna.
- Increase the separation between the equipment and receiver.
- Connect the equipment into an outlet on a circuit different from that to which the receiver is connected.
- Consult the dealer or an experienced radio/TV technician for help
PRE-SEASONING
PRE-SEASON SMOKER PRIOR TO FIRST USE. Some smoke may appear during this time, this is normal.
- Make sure water bowl is in place WITHOUT WATER.
- Set temperature to 275°F (135°C) and run smoker for 3 hours.
- . Add 1/2 cup of wood chips to the wood chip loader during the last 45 minutes to complete pre-seasoning.
- Shut down and allow to cool.
LOADING FOOD INTO SMOKER
- Pre-heat smoker for 30 to 45 minutes at desired cooking temperature before loading food.
- DO NOT cover racks with aluminum foil as this will not allow heat to circulate properly.
- Do not overload smoker with food. Extra large amounts of food may trap heat, extend cooking time and cause uneven cooking. Leave space between food on racks and smoker sides to ensure proper heat circulation. If utilizing cooking pans, place pans on center of rack to ensure even cooking.
- Do not open smoker door unless necessary. Opening smoker door causes heat to escape, may extend cooking time, and may cause wood chips to flare up. Closing the door will re-stabilize the temperature and stop flare up.
- There will be a lot of smoke produced when using wood chips. Smoke will escape through seams and turn the inside of smoker black. This is normal. To minimize smoke loss around door, the door latch can be adjusted to further tighten the door seal against the body.
- To adjust door latch, loosen hex nut on door latch. Turn hook clockwise to tighten as shown. Secure hex nut firmly against door latch (see diagram).
- Check grease tray often during cooking. Empty grease tray before it gets full. Grease tray may need to be emptied periodically during cooking.
WOOD CHIP LOADER
- Wood chip loader and wood chip tray MUST be in place when using smoker. This minimizes the chance of wood flare ups.
- Wood chips must be used in order to produce smoke and create the smoke flavor.
- Before starting the smoker, place ½ cup of wood chips in chip loader. Never use more than ½ cup of wood chips at a time. Never use wood chunks or wood pellets.
- Insert wood chip loader into a smoker. Wood chips should be level with top rim of wood chip loader.
- Turn handle clockwise in direction of arrow mark on smoker to unload wood chips. Wood chips will drop into wood chip tray. Turn handle counterclockwise to upright position and leave wood chip loader in place.
- If wood chips do not smoke on low setting, increase the temperature to 275°. After 8 to 10 minutes, or when wood chips begin to smolder, reduce temperature to desired low setting.
- You may use dry or pre-soaked wood chips in your smoker. Dry chips will burn faster and produce more intense smoke. Chips pre-soaked in water (for approximately 30 minutes) will burn slower and produce a less intense smoke.
- Check wood chip tray periodically to see if wood has burned down. Add more chips as needed.
- Do not leave old ashes in the wood chip tray. Once ashes are cold, empty tray. Tray should be cleaned out prior to, and after each use to prevent ash buildup.
WATER BOWL
- Wait until the smoker reaches the desired temperature.
- Fill water bowl to fill line with water or liquids like apple or pineapple juice.
- You may also add slices of fruit, onions or fresh dried herbs into the water to blend different subtle flavors into your smoked food. Tip: For chicken or other foods high in moisture, little or no liquid is needed.
CLEANING AND STORAGE
ALWAYS MAKE SURE THE SMOKER IS COOL TO THE TOUCH BEFORE CLEANING AND STORING.
- Be sure to clean the smoker after each use. This will extend the life of your smoker and prevent mold and mildew.
- For rack supports, racks, water bowl and drip pan use a mild dish detergent. Rinse and dry thoroughly.
- For wood chip tray and wood chip loader, clean frequently to remove ash build up, residue and dust.
- Dispose of cold ashes by placing them in aluminum foil, soaking with water and discarding in a noncombustible container.
- For the interior, glass indoor (if featured), and exterior of smoker, simply wipe down with a damp cloth. Do not use a cleaning agent. Make sure to dry thoroughly.
- After cleaning, store smoker in a covered and dry area.
- Check your smoker periodically to avoid possible rust and corrosion due to moisture buildup.
- Watch a video with step-by-step instructions on how to clean your smoker at www.youtube.com/ Masterbuilt Electric Smokehouse: Cleaning and Storage.