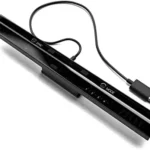
MAYFLASH Magic-NS Wireless Controller Adapter

MAGIC-NS Rev 1.2
Wireless Controller Adapter for Nintendo Switch, PS3, PC, NEOGEO mini, PS Classic Wirelessly connect your PS4, PS3, Wii U Pro, Wiimote, Nintendo Switch Pro, Nintendo Joy-Con and Xbox One SIX Bluetooth controllers to your Nintendo Switch, PS3, PC, NEOGEO mini and PS Classic system. The wired PS4, PS3, Nintendo Switch Pro, Xbox One, Xbox One SIX, Xbox 360 controllers and fightsticks, and standard wired USB controllers like Logitech rumble gamepad F510 and F310 can be connected to your Nintendo Switch, PS3, PC, NEOGEO mini and PS Classic system. If you find any issues or have any difficulty operating the device,please reach out to us at [email protected] and we will be more than happy to help you out. Includes MAGIC-NS Adapter.use Type C Cable. Buttons Sticker.Manual.
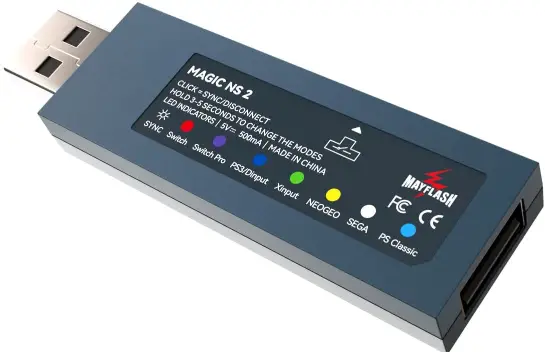
Buttons and LED Indicators
USB A-Male
Connect the adapter to the Nintendo Switch, PS3, PC, NEOGEO mini , PS Classic system.
USB A-Female
Connect the wired PS4, PS3, Nintendo Switch Pro, Xbox One, Xbox One S, Xbox 360 controllers and fight sticks, and standard wired USB controllers to the adapter.
LED Indicators
- LED Indicator in Blue: PS3 or PC Dinput System mode
- LED Indicator in Red: Nintendo Switch System mode
- LED Indicator in Green: PC Xinput System mode
- LED Indicator in Purple: Switch Pro mode
- LED Indicator in Yellow: NEOGEO mini mode
- LED Indicator in Cyan: PS Classic mode
- LED Indicator blinks slowly: The Bluetooth is not connected yet
- LED Indicator blinks quickly: The Bluetooth is syncing
- LED Indicator lights up: The Bluetooth has been paired
To make sure the system can identify the adapter easily, please turn on the “Pro Controller Wired Communication” of the Nintendo Switch system once you switch the adapter to the Switch Pro mode
Button on the side of the adapter
Used for the modes switching and Bluetooth pairing.
- Press the button shortly to SYNC the controllers and the adapter. The indicator blinks quickly.
- To switch the modes, press and hold the button on the side of the adapter for 3-5 seconds.
- The LED indicator blinks slowly in blue for the PS3 or PC Din put system mode, the Nintendo Switch mode is red, the PC Xinput mode is green, the Switch Pro mode is purple,NEOGEO mini mode is yellow,PS Classic mode is cyan.
Bluetooth Controllers Set Up
- Turn on your Nintendo Switch, PS3, NEOGEO mini, or PS Classic system.
- Connect the Nintendo Switch, PS3, NEOGEO mini or PS Classic to a TV. Just turn on your PC if you use the adapter on your PC system.
- Connect the adapter into any spare USB port on your Nintendo Switch, PS3, NEOGEO mini, PS Classic or PC system.
- To switch the modes, press and hold the button on the side of the adapter for 3-5 seconds. The LED indicator blinks slowly.
- Turn on the Bluetooth controllers.
- To sync the Bluetooth controller and the adapter, press the Button on the side of the adapter, and then press the SYNC button on your Bluetooth controller. The LED indicator blinks quickly. I/the Bluetooth syncing failed, please connect the Bluetooth controller to the adopter using a USB cable (not included in the packaging, you can purchase it separately). As soon as the controller is identified by the system, you can disconnect the USB cable and start to SYNC it again.
- The Bluetooth has been paired if the LED indicator lights up.
- Your controller is now ready to use.
Wired Controllers Set UP
- Turn on your Nintendo Switch, PS3, NEOGEO mini, or PS Classic system.
- Connect the Nintendo Switch, PS3, NEOGEO mini or PS Classic to a TV. Just turn on your PC if you use the adapter on your PC system.
- Connect the adapter into any spare USB port on your Nintendo Switch, PS3, NEOGEO mini, PS Classic or PC system.
- Connect the wired controllers to the adapter.
The wireless controller that comes with your console will become a wired controller by simply connecting a standard USB cable (with exception of Xbox 360 which requires an official wired Xbox 360 controller). For best results, it is recommended that you use genuine Xbox or PlayStation controllers and quality certified USB cables. - Your controller is now ready to use.
Update the Software
If you are having problems with the adapter, you can follow the below instructions to update the software.
- Download the software from http://www.mayflash.com/Support/Download/ and install it on your Windows system.
- Double click on the updater and leave the updater window open on your screen.
- Connect the USB from your adapter into any spare USB port on your PC.
- Please make sure your adapter is in the Nintendo Switch or PS3/Dinput mode (The LED indicator is in Red or Blue). If not, please switch the adapter to the Nintendo Switch or PS3/Dinput mode by pressing and holding the button located at the side of the adapter for 3-5 seconds.
- As soon as the adapter has been recognized (LED indicator turns off), select “Update”.
- Does not disconnect the device until you are informed that the update is completed successfully.
Additional Functions
- Only one Bluetooth controller is supported for one adapter.
- A wired USB controller and a wireless Bluetooth controller can be connected at the same time, but both of them have the same functions and can only play one game character.
- To switch A-B,B-A, X-Y,Y-X, press and hold the button “START” and “ft:’ for 3 sec-and.To switch A-A, B-B, X-X, Y-Y, press and hold the button “START” and “B” for 3 seconds. (This function is optional. It depends on the different controllers.)
- When you connect your P54 controller to the Switch system through the adapter, the Touch Pad button on the P54 controller works as the Capture button of Switch system. Please see more details about the other controllers on the below “Controllers Buttons Table.”
- If you connect up to 4 Bluetooth controllers to the adapter, you can disconnect the first controller by pressing the button located on the side of the adapter, and disconnect the second one by pressing the button, and then the third and fourth controller using the same way.
- Adjust the vibration intensity Quick Start
- Pressing and holding the two buttons Rl /RB and R3 for 3-5 seconds until the controller keeps rumbling.
(Note: You need to keep holding these two buttons until you finish the whole process) - To adjust the vibration intensity, press the Directional Pad “Up” or “Down”.
- To quit the vibration adjusting, release any button of Rl /RB or R3 once you have got your
- preferred vibration intensity.
- There are 7 levels of the vibration intensity. The default one is 100%. (NEOGEO mini and PS Classic mode don’t support the vibration)
Switch Pro mode vibration levels: 0%, 25%, 37.5%, 50%, 62.5%, 75%, 100% P53, PC Xinput vibration levels: 50%, 62.5%, 75% ,B7.5%, 100%, 125%, 150%. - Logitech wireless gamepad F710 is supported. Please make sure you connect the emitter to the adapter before using.
- To make sure the system can identify the adapter easily, please turn on the “Pro Controller Wired Communication”of the Nintendo Switch system once you switch the adapter to the Switch Pro mode (the LED indicator is purple).
- Pressing and holding the two buttons Rl /RB and R3 for 3-5 seconds until the controller keeps rumbling.
Tips:! System Settings-controllers and Sensors I-I Pro Controller Wired Communication