USE IT CLOSE TO YOUR LIFE
Precautions Before using the system
Important security information
Please read and fully understand the following information before use, and keep this manual next to the product for reference.
* Warning
- Do not install or repair the product by yourself.
- Personnel who are not trained in repairing electronic equipment and auto parts may cause danger when installing or repairing this product.
- For the personal security of you and others, it is forbidden to watch videos and perform related operations while driving according to relevant national laws and regulations. Please do not watch the screen and do related operations while driving the car.
- Please take note of all the precautions in this manual and strictly follow the operating instructions.
- Do not tap liquids, as this product may be short-circuited or damaged.
* Security statement
- The reversing camera function in this system should only be used as an auxiliary reference while driving, so please pay attention to the actual situation.
* Note
- Do not expose this product to moisture.
- The date of the different screens displayed by the main unit must be manually adjusted to display accurately when the product is first turned on and used or when the vehicle has been disconnected and reconnected for use.
- Ensuring safe driving
- Always obey safe driving regulations and current traffic rules.
- Do not continue to use this product if its use, including the use of the backup camera function, interferes with your security and concentration while driving.
- If you need to watch the screen to do so, park the vehicle in a safe place and make sure the parking brake is applied.
- When using this product, do not set the volume too high, or you will not be able to hear the traffic and emergency signals outside the vehicle.
- When the vehicle is running, some functions (such as video playback, ) cannot be realized for the sake of driving security.
- Other security information
- The system automatically detects the speed at which the vehicle is traveling, and when the speed is above a certain value, the system will prevent you from using the video playback feature while driving. If you want to watch a video, pull over at Security and use the parking brake.
- Use the system when starting the engine to prevent battery
Ensuring safe driving
- Always obey safe driving regulations and current traffic rules.
- Do not continue to use this product if its use, including the use of the backup camera function, interferes with your security and concentration while driving.
- If you need to watch the screen to do so, park the vehicle in a safe place and make sure the parking brake is applied.
- When using this product, do not set the volume too high, or you will not be able to hear the traffic and emergency signals outside the vehicle.
- When the vehicle is running, some functions (such as video playback, ) cannot be realized for the sake of driving security.
Other security information
- The system automatically detects the speed at which the vehicle is traveling, and when the speed is above a certain value, the system will prevent you from using the video playback feature while driving. If you want to watch a video, pull over at Security and use the parking brake.
- Use the system when starting the engine to prevent battery
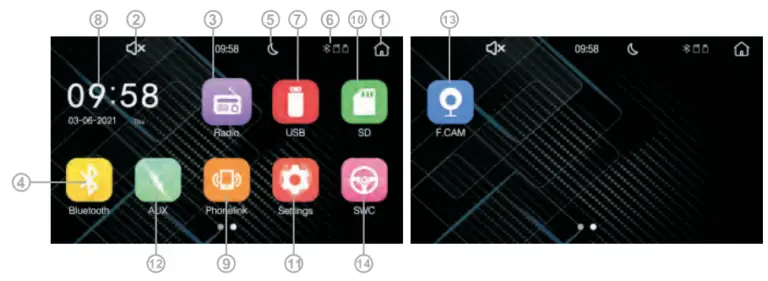
Introduction and operation of the main page features

- Home key
Tap this key to return to the main interface; - Volume key
Tap the volume key to display the current volume information; You can adjust the volume I switch mute display the current volume status. - Radio mode icon
Tap the radio mode icon to enter the radio operation interface. - Bluetooth mode icon
Tap the Bluetooth mode icon to enter the Bluetooth operation interface. - Backlight mode icon
Tap the backlight mode icon to switch between day and night or turn off the backlight mode. - Displays the device connection status
Displays the connection status of Bluetooth or USB. When Bluetooth or USB is connected, the corresponding icon will be highlighted on the screen, otherwise, it will not be displayed. - USB mode icon
Tap the USB mode icon to enter the USB operation interface. - Time display
Displays the current system time; Tap it to switch the clock format to digital format display. - Phone link mode icon
Tap the mode icon of the Phone link to enter the operation interface of the Phone link; - SD card mode icon
Tap the SD card mode icon to enter the SD card operation interface; - Setting mode icon
Tap the setting mode icon to enter the setting mode for operation; - AUX mode icon|
Tap the AUX mode icon to enter the AUX operation interface; - FCAM mode icon
Tap the FCAM mode icon to enter the FCAM operation interface; - SWC mode icon
Sterring wheel contra!
Introduction to radio features and operation
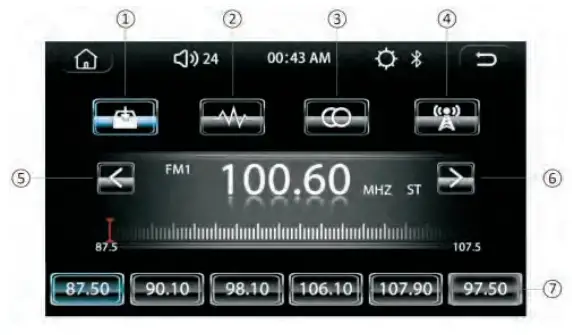 Tap this key to browse the stored station information; long-tap this key for one second to search the station from the lowest to the highest frequency, and save the searched information to the search list, and the list will be refreshed and replaced;
 Tap this key to cycle through FM >AM > FM modes;
 Tap this key to switch to stereo/mono;
 Tap this key to toggle remote/near distance;
 Tap this key. The frequencies can be moved backward, long-touch for one second to search backward, and automatically stop when a valid station is found.
 Tap this key. The frequencies can be moved forward, long-touch for one second to search forward, and automatically stop when a valid station is found.
- Radio Storage Area. 18 stations can be stored on FM and 12 on AM; (AM function is optional)
Brief introduction and operation of Bluetooth function
Introduction of Bluetooth Function:
The system is compatible with Bluetooth V4.2+BR+EDR+BLE and supports A2DP1AVCTP 1AVDTP 1AVRCP 1 HFP 1SPP1ATT1GAP 1 GATT 1 RFCOMM 1SDP1L2CAP;
| 1 |
|
Tap this key to enter the Bluetooth extraction interface; |
| 2 | Tap this key to enter the Bluetooth call recording interface; | |
| 3 | Tap this key to enter the Bluetooth phone book interface; | |
| 4 | Tap this key to enter the Bluetooth music interface; | |
| 5 | Tap this key to enter the Bluetooth connection interface; | |
| 6 | Tap this key to delete the connected phone’s information; | |
| 7 | Tap this key to disconnect the connected phone reconnect the phone to Bluetooth; |
Function introduction and operation of USB flash
- Introduction and operation of the music playback function.
Introduction to the music playback feature.
Supports playing MP31WMA1AAC1WAVE1FLAC1APE1OGG1M4A(QT)1RA;

1.1 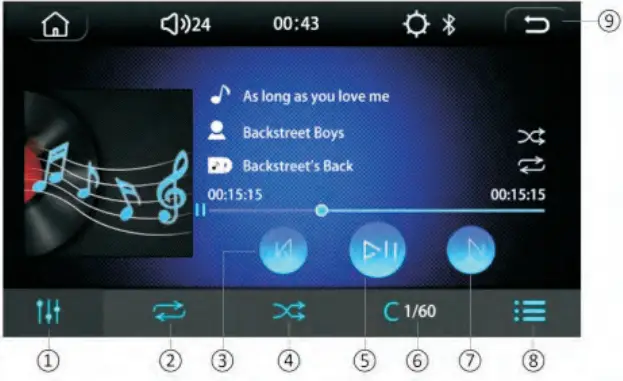

Tap this key to enter the audio setting interface; 1.2 Tap this key to toggle the single song loop/ folder loop/ all loop 1.3 Tap this key to switch to the previous song to play 1.4 Tap this key to turn on the random play function 1.5 Tap this key to toggle on the pause/play function; 1.6 Tap this key to turn on the 1 Off numeric keyboard function 1.7 Tap this key to switch to the next song; 1.8 Tap this key to turn on the dl off the song list function; 1.9 Tap this key to enter the elicit file list screen; - Introduction and operation of the video playback function
Video playback Function overview:
Support playing DIVX1AVIIMKVQTMPGASFFLVIRMVBTS;

2.1 

Tap this key to switch to the previous song; 2.2 Tap this key to toggle the pause/play function; 2.3 Tap this key to switch to the previous song; 2.4 Tap this key to toggle between single loop/ folder loop/ all loop function; 2.5 Tap this key to turn on the random play; 2.6 Tap this key to zoom in on the video; 2.7 Tap this key to switch to the next SOD; 2.8 Tap this key to enter the audio setting interface; 2.9 Tap this key to enter the interface of display settings; 2.10 Tap this key to turn on/off the numeric keypad function; 2.11 Tap this key to turn on/off the song list function;| 2.12 Tap this key to switch to the previous page of SOD; - Introduction and operation of picture playback function.
Picture playback function description: support playing JPG1I3MP1PNG;

3.1 

Tap this key to switch to the previous picture; 3.2 ITap this key to toggle the pause/play function; 3.3 Tap this key to switch to the next picture to be played; 3.4 Tap this key to turn on/off the numeric keyboard function; 3.5 Tap this key to switch to the next SOD; 3.6 Tap this key to zoom in on a picture; 3.7 Tap this key to rotate the picture; 3.8 Tap this key to toggle between single song loop/ folder loop/all loop functions; 3.9 Tap this key to turn on the random play function; 3.10 Tap it to switch to the previous page of the SOD;
Function introduction and operation of Phone link
Note: In order to use the cell phone connection function, you need to select the connection method on the vehicle side first.
Introduction to Phone link’s functions: When using an Android phone for wired phone interconnection, the phone needs to turn on “USB Debugging” in “Developer Options”; when using an Android phone for wireless phone interconnection, you need to turn on the phone’s “Wireless Casting” function to search for the device, and then click on the name of the device when you find it to connect wirelessly; When using iPhone for wireless phone interconnection, the phone should first connect to the WIFI of the car side, that is, open the WIFI function of the phone side to connect to the WIFI of the car side, and then click on the screen image of the phone side to search for the device, search for the target device and click on the name to achieve wireless connection;

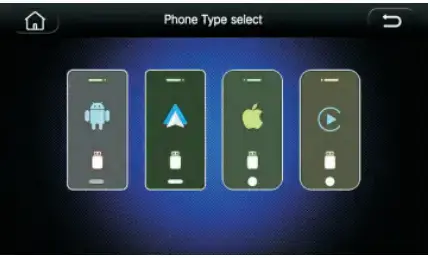 Tap this key to enter the interface of the Android device wired phone interconnection function;
 Tap this key to enter the interface of wired mobile interconnection for Apple devices;
 Tap this key to enter the wired CAR PLAY interface;
 Tap this key to enter the Android auto interface;
Common problems when using the cell phone interconnect function:
- When using the wired phone interconnect back control function, you need to connect Bluetooth to use;
- Some Android phones need to be touched in Mobile>Application Management > Auto link > Open “Force full-screen display”;

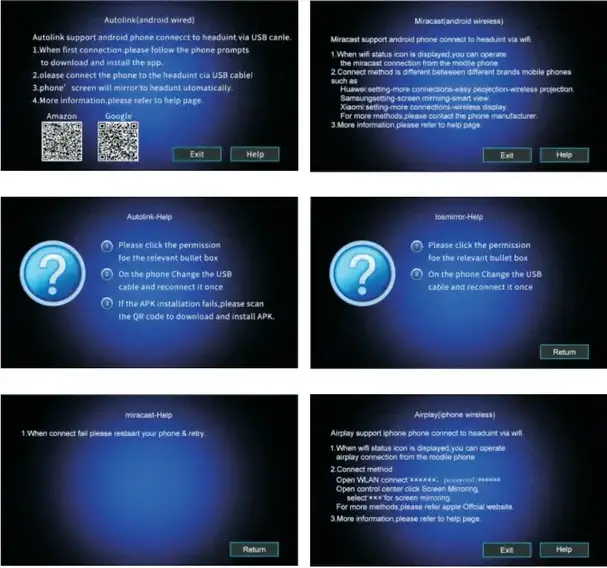
Brief introduction and operation of learning function of

VII. Introduction and operation of setting menu function
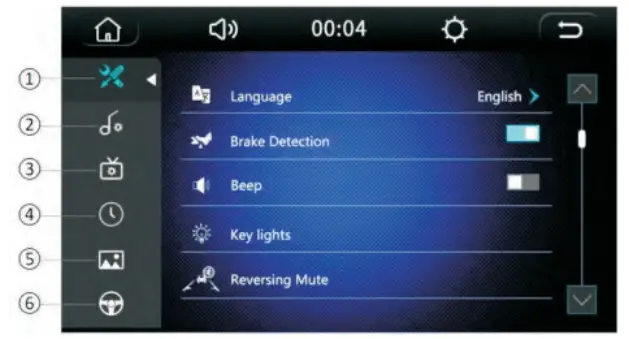 Tap this key to enter the function setting interface, which can be slid up and down by touching it;
 Tap this key to enter the audio setting interface;
 Tap this key to enter the display settings interface;
 Tap this key to enter the time setting interface;
 Tap this key to enter the wallpaper setting interface;
 Tap this key to enter the direction control setting interface;
Brief introduction and operation of learning function of direction control

- Press and hold the steering wheel key, then click on the key icon on the steering wheel interface, the icon will change color;
- After pressing all keys, tap
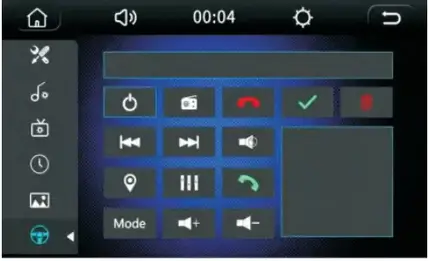 , and learning is complete.
Brief introduction and operation of remote control function

| Number | Icon | Features | Features | Icon | Number |
| 01 | Switch key: short press to switch machine. | The mute key, short press Mute again short dress to resume. | 02 | ||
| 03 | Mode key: Short press To perform mode conversion. | Menu key, short press to return to the main menu, again press to return to the current state. | 04 | ||
| 05 | Band key: Short press to switch band. | Video button, short press to enter the video playback. (SD / USB inside there must be a valid video file) | 06 | ||
| 07 |  |
Direction key: short press to jump up. (Note: not in any interface are valid) | Music key, short press to enter the audio playback. (SD / USB inside the audio file is valid) | 08 | |
| 09 |  |
Direction Left key short press to jump left. (Note: not in any interface are valid) | Picture key, short press to enter the picture playback. (SD/USB inside the picture file to be effective) | 10 | |
| 11 | Confirm/Play/Pause: Press this button to confirm the selection, play/pause when playing audio/video |
Right Direction: Short press to jump right. (Note: not in any instance are valid) interface |  |
12 | |
| 13 | Stop/Back key. Press and hold for 3 seconds to stop the playback. | An M S key, short press the automatic scanning station coexist, and then radio preview. (Radioactive) | 14 | ||
| 15 |  |
Down key: Short press to jump down. (Note: not in any interface are valid) | Etc. Loudness Key Press this button to increase the bass effect. | 16 | |
| 17 | Repeat key Short press single cycle – folder cycle – all ring. (Effective when playing audio and video) | Zoom in: To play a video or picture Press this button to zoom in and playback. | 18 | ||
| 19 | Delete key. When the input is wrong, short press to delete the current input number. (Valid for BT) | Tone +: Short press this button to increase the volume, long press this button will continue to increase the volume. | 20 | ||
| 21 | Far/Close/Shuffle button: When in the radio state for the far/near the choice.
The remote stop is strong, the short-range stop is weak when playing audio and video for random play. (Valid for BT) |
Sweep + /Next key: When in the radio state to the high-end scanning station. The next song plays when the audio/video is played. | 22 | ||
| 23 | Sweep – /Previous key. When in the radio state far the low-end scanning station. When playing audio and video for the first play. | Audio Key: Press this
button when playing audio and video, enter the audio settings, there are bass/high/front /rear/loudness/loudness / EQ related settings. |
24 | ||
| 25 | Answer key: when not in the BT short press this button will enter into the BT mode, the caller to answer the call. | Channel key. Press this key when playing a video to switch to the left channel/right channel/stereo channel. | 26 | ||
| 27 | Hang up key: When an incoming call, press to end the call. | Tone – Short press this button to decrease the volume. Press this button to decrease the volume. | 28 | ||
| 29 | 1 | Digital 1 key. When playing the audio-video, optional song, BT can dial. | Digital 4 key. When playing audio-video, an optional song, Br can dial. | 4 | 30 |
| 31 | 2 | Digital 2 key: When playing the audio-video, optional song, BT can dial. | Digital 3 key. When playing audio-video. optional song OT can dial. | 3 | 32 |
| 33 | 5 | Digital 5 key: When playing the audio-video, optional song, OT can dial. | Digital 8 key When playing audio-video, optional song BT can dial. | 8 | 34 |
| 35 | 6 | Digital 6 key. When playing the audio-video, optional song, BT can dial. | Digital 7 key: When playing audio ‘ark°, optional song, 1ST can dial. | 7 | 36 |
| 37 | 9 | Digital 9 key: When playing audio-video, optional sang. ST can dial. | Select the track key when playing audio frequency. Press this key and then select the appropriate track number and then press the OK key. (Play audio and video are valid) | 38 | |
| 39 | 0 | Digital 0 key. When playing the audio-video, optional song, BT can dial. | Digital 10 e kef When playing audio-video, optical song, (play audio and video is valid) | 40 |
 |
1. Connect the Pink Wire. (Parking Sensor Control Wires), Zoned C-1 2. Connect the Positive Pole of the Reversing Light 3. Connect the negative pole of the reversing light ( Red&Black Wire ) 4. Connect the Positive Pole of the Reversing Light (Red Wire ) |
Introduction to interface definition (WARNING DIAGRAM)
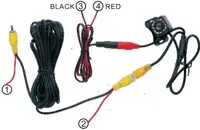
| Al: Video Input(Yellow) | A4: Right Audio InpugRed) | A7: Left Audio Input(White) | |
| A2: Rearview Input(Yellow) | AS: F Camera Input (Yellow) | AS: Subwoofer Output(Green) | |
| A3: Video Output(Yellow) | A6: Right Audio Output(Red) | A9: Left Audio Output(White) |
ISO SOCKET
| B | C |
| 1. RR Speaker(Violet) + | 1. Rearview Control Wire (Pink) |
| 2. FR Speaker(Grey) + | 2. Steering Wheel Key Control Line (Orange/Black) |
| 3. FL Speaker(White) + | 3. Power Antenna (Blue) |
| 4. RL Speaker(Orcen) + | 4. To ignition Key (Red) |
| 5. RR Speaker(Violet/Black) – | 5. Steering Wheel Key Control Line(Brown) |
| 6. FR Speaker(Grey/Black) – | 6. To Battery 12V(+gYellow) |
| 7. FL Speaker(White/Black) – | 7. High Beam Line(Grange) |
| 8. RL Speaker(Green/Black) – | 8. Ground Wire(Black) |
 |
1.NC 2.NC 3. steering wheel control 4. steering wheel control2 5. Auto antenna 6.NC 7. Speaker front right+ 8. Speaker front right- 9. Speaker front left+ 10. Speaker front left- |
11. Brake wire 12. rear view 13. headlight control 14.ACC 15.12V(3+) 16. Ground wire 17. Speaker back right+ 18. Speaker back right- 19. Speaker back left+ 20. Speaker back left- |
This device complies with part 15 of the FCC Rules. Operation is subject to the following two conditions: (1) this device may not cause harmful interference, and (2) this device must accept any interference received, including interference that may cause undesired operation. Any changes or modifications not expressly approved by the party responsible for compliance could void us er’s authority to operate the equipment.
NOTE: This equipment has been tested and found to comply with the limits for a Class B digital device, pursuant to Part 15 of the FCC Rules. These limits are designed to provide reasonable protection against harmful interference in a residential installation. This equipment generates, uses, and can radiate radio frequency energy and, if not installed and used in accordance with the instructions, may cause harmful interference to radio communications. However, there is no guarantee that interference will not occur in a particular installation. If this equipment does cause harmful interference to radio or television reception, which can be determined by turning the equipment off and on, the user is encouraged to try to correct the interference by one or more of the following measures:
- Reorient or relocate the receiving antenna.
- Increase the separation between the equipment and receiver.
- Connect the equipment into an outlet on a circuit different from that to which the receiver is connected.
- Consult the dealer or an experienced radio/TV technician for the lp.
The device has been evaluated to meet general RF exposure requirements. The device can be used in portable exposure conditions without restriction.