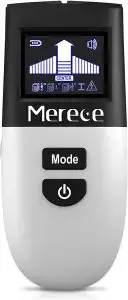
Merece Wall Seanner MK101 User Manual

Thanks for Choose Merece wall scanner. This scanner has 5 scanning modes and is designed to locate the stud/metal/AC wires behind the walls. This detector can locate the edges of wood and metal studs and joists behind walls, floors. and ceilings. And it can detect metal (steel, copper pipe etc.) and the cables hidden in walls, ceilings and floors etc.
Product Display
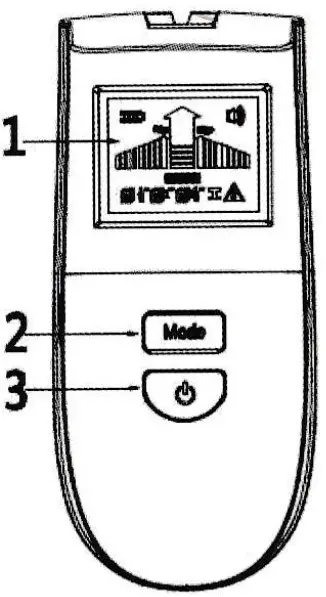
- Screen
- Mode switch button I Shortly press “button 2 ” to choose the different modes)
- ON/OFF Switch
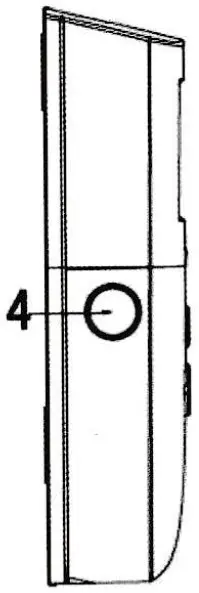
- Calibration button I Keep pressing the “button 4 ” until the signal bar disappear, whtch means the Calibration is complete
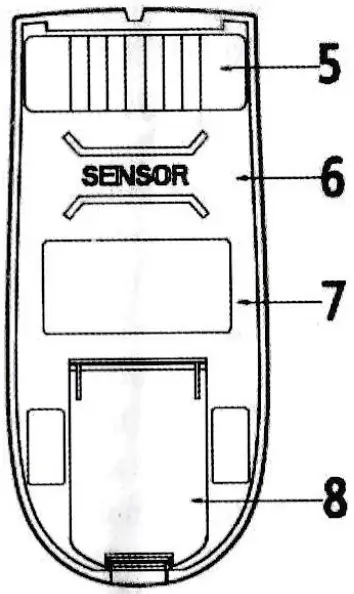
- Metal detection area
- Main detection area
- Product label
- Battery compartment
Screen Display
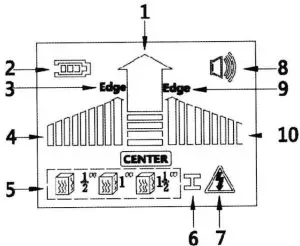
- Center Indication Bar
The center indication and “CENTER” will be displayed at the same time foreign objects mode only, not be displayed in other - Battery Indication
- Left Border Icon (Only objects mode will display the “EDGE” indication)
- Signal area on the left
- Foreign objects Mode referred to wood block, there are 3 depth modes are 5 inches, I inch, 1.5 inches)
- Metal Mode
- AC Mode
- Buzzer Icon (Pressing and holding the mode button and ON/OFF button meanwhile to turn sound on and off)
- Right Border Icon (Only foreign objects mode will display the “EDGE” indication)
- Signal area on the right
Specifications
Maximum detection depth
Ferrous metal: 1.5
inches Non-ferrous metal (copper) : ! inch AC:1.5 inches
Foreignobjects (usually refen‘ed to as wood stalls): 0.5 inch/ 1 inch / 1.5 inch
Automatic shutdown time: about 5 minutes
Operating humidity range
Metal mode: 0-85% RH Foreign body mode:0-60% RU AC: 0-30% RH
Operating temperature range: -10 degrees +50 degrees Storage temperature range :-20 degrees +70 degrees conterminously use)
The detection result will be affected by the material of the detected object and the size of the object, as well as the material and condition of the detection surface; For AC wire mode, if the cable is not char bed, the detection depth will be reduced.
Scanning modes
This detector is equipped with 5 scanning modes(as follows):
Stud: b2 in. Scan Mode: Locates the center and edges of wood and metal studs up to L2 in. (12 mm) deep.
Stud1 in Scan Mode: Locates the center and edges of wood and metal studs up to 1 in. (2 mm) deep
Stud: 1’/z in. Scan Mode: Locates the center and edges of wood and metal studs up to 1’/z in. (38 mm) deep
Metal Scan Mode: Detects metal up to 2.36 in. (60 mm) deep
AC Scan Mode: Detects live unshielded AC wires up to 2 in. (51mm) deep
Note:
- According to the thickness of the detection wall, press the ‘Mode switch button’ to enter the detection of roreign objects mode at the appropriate
- The stud scanning mode will detect objects in gypsum drywall, plywood sheathing, bare wood flooring, and coated wood walls. But is does not detect objects in concrete, mortar, blocks, bricks, carpets, foil materials, metal surfaces, tiles, glass or any other dense
- Due to moisture, material content, wall texture and paint, the depth and precision of the induction will
Operation
Step one-Installing/Replacing the battery
Only use 9-volt dry battery
Please insert a new 9-volt battery into the battery compartment as shown in Figure 1 eighth, correctly matching the positive (+) and negative (-) terminals according to the icon in the battery bay.
When not using the detector, the battery must be removed from the compartment. After long-term shelving, the battery will corrode or automatically discharge.
Step two- Power it on and choose the mode
Shortly press the switch button to turn on the detector. After starting up, the detector automatically calibrate and enters the “ I/2 inch” scanning mode. And please press the “mode” button to switch the scanning modes. Note: Before the detector is activated, please make sure there is no moisture/water in the area where you intend to detect . Dry the detector with a cloth if necessary.
Step three-Calibrate the tool and scan tbe wall
IMPROTANT: Completely calibration is important for the accurate reading of the tool.
When you put the tool on the interface, it will automatically calibrate itself. If the tool shortly beeps, the signal bar gradually disappears and the icon of battery disappears, it means the calibration is completed. If the calibration is not completed, please press the button on the side of the tool to calibrate it.
After the calibration finish, please And then move it flat against the wall to scan.Please place the detector on the surface and move it evenly and slowly in the same direction, left or right, not lifting or applying additional pressure.
Note:
This tool has two methods to calibrate:automatically calibration and manually calibration.