![]()
milwaukee M18 Radio/Charger User Manual
To reduce the risk of injury, user must read and understand operator’s manual.
IMPORTANT SAFETY INSTRUCTIONS
RADIO SAFETY
 WARNING
- Read these instructions.
- Keep these instructions.
- Heed all warnings.
- Follow all instructions.
- Do not use this apparatus near water.
- Clean only with dry cloth.
- Do not block any ventilation openings. Install in accordance with the manufacturer’s instructions.
- Do not install near any heat sources such as radiators, heat registers, stoves, or other apparatus (including amplifiers that produce heat.)
- Do not defeat the safety purpose of the polarised or grounding-type plug. A polarised plug has two blades with one wider than the other. A grounding type plug has two blades and a third grounding prong. The wide blade or the third prong are provided for your safety. If the provided plug does not fit into your outlet, consult an electrician for replacement of the obsolete outlet.
- Protect the power cord from being walked on or pinched particularly at plugs,convenience receptacles,and the point where they exit from the apparatus.
- Only use attachments/accessories specified by the manufacturer.
- Use only with the cart, stand, tripod, bracket, or table specified by the manufacturer, or sold with the apparatus. When a cart is used, use caution when moving the cart/ apparatus combination to avoid injury from tip-over.
- Unplug this apparatus during lightning storms or when unused for long periods of time.
- Refer all servicing to qualified service personnel. Servicing is required when the apparatus has been damaged in any way,such as power-supply cord or plug is damaged, liquid has been spilled or objects have fallen into the apparatus, the apparatus has been exposed to rain or moisture, does not operate normally, or has been dropped.
- WARNING To reduce the risk of fire or electric shock, do not expose this apparatus to rain or moisture.
- Only plug power supply into readily accessible outlet to allow the appliance to be unplugged quickly.
- Only operate this apparatus in a well ventilated area.
- A battery operated radio with integral batteries or a separate battery pack must be recharged only with the specified charger for the battery. A charger that may be suitable for one type of battery may create a risk of re when used with another battery.
- Use battery operated radio only with specifically designated battery packs. Use of any other batteries may create a risk of re.
- When battery pack is not in use, keep it away from other metal objects like: paper clips, coins, keys, nails, screws, or other small metal objects that can make a connection from one terminal to another. Shorting the battery terminals together may cause sparks, burns, or a re.
- Avoid body contact with grounded surfaces such as pipes, radiators, ranges and refrigerators. There is an increased risk of electric shock if your body is grounded.
- Do not use any adaptor plugs.
- When operating a radio outside, use an outdoor extension cord marked “W-A” or “W”. These cords are rated for outdoor use and reduce the risk of electric shock.
- Never disassemble the radio or try to do any rewiring on the radio’s electrical system.
- Do not expose this apparatus to dripping and splashing, or place objects filled with liquids on this unit.
- Maintain labels and nameplates. These carry important information. If unreadable or missing, contact a MILWAUKEE service facility for a free replacement your local authorised MILWAUKEE® dealer or service centre.
- This radio charger is designed to be powered by a standard 220-240 volt AC line or AC generator. The radio can also be powered using a MILWAUKEE® M18™ Li-Ion battery pack. Radio charger must be plugged into an appropriate receptacle. Do not attempt to use with any other voltage or power supply.
- The apparatus shall not be exposed to dripping or splashing and that no objects filled with liquids, such as vases, shall be placed on the apparatus. CHARGER SAFETY
- SAVE THESE INSTRUCTIONS – THIS OPERATOR’S MANUAL CONTAINS IMPORTANT SAFETY AND OPERATING INSTRUCTIONS FOR MILWAUKEE® LI-ION M18™ RADIO CHARGER.
- BEFORE USING, READ THIS OPERATOR’S MANUAL, YOUR BATTERY PACK OPERATOR’S MANUAL, AND ALL LABELS ON THE BATTERY PACK AND RADIO CHARGER.
- CAUTION – TO REDUCE THE RISK OF INJURY, CHARGE MILWAUKEE® LITHIUMION PACKS ONLY IN THEIR MILWAUKEE® LITHIUM-ION CHARGER. Other types of chargers may cause personal injury or damage. Battery pack and charger are not compatible with V™-technology or NiCd systems. Do not wire a battery pack to a power supply plug or car cigarette lighter. Battery packs will be permanently disabled or damaged.
- AVOID DANGEROUS ENVIRONMENTS. Do not charge battery pack in rain, snow, damp or wet locations.Do not use battery pack or charger in the presence of explosive atmospheres (gaseous fumes, dust or flammable materials) because sparks may be generated when inserting or removing battery pack, possibly causing fire.
- CHARGE IN A WELL VENTILATED AREA. Do not block charger vents. Keep them clear to allow proper ventilation. Do not allow smoking or open flames near a charging battery pack. Vented gases may explode.
- MAINTAIN CHARGER CORD. When unplugging charger, pull plug rather than cord to reduce the risk of damage to the electrical plug and cord. Never carry charger by its cord. Keep cord from heat, oil and sharp edges. Make sure cord will not be stepped on, tripped over or subjected to damage or stress. Do not use charger with damaged cord or plug. Have a damaged charger replaced immediately.
- DO NOT USE AN EXTENSION CORD UNLESS IT IS ABSOLUTELY NECESSARY. Using the wrong, damaged or improperly wired extension cord could result in the risk of re and electrical shock. If an extension cord must be used, plug the charger into a properly wired 16 gauge or larger extension cord with pins that are the same number, size and shape as the pins on the charger. Make sure that the extension cord is in good electrical condition.
- USE ONLY RECOMMENDED ATTACHMENTS. Use of an attachment not recommended or sold by the battery charger or battery pack manufacturer may result in a risk of fire, electric shock or personal injury.
- UNPLUG CHARGER when not in use. Remove battery packs from unplugged chargers.
- TO REDUCE THE RISK OF ELECTRIC SHOCK, always unplug charger before cleaning or maintenance. Use a Residual Current Device (RCD) to reduce shock hazards.
- STORE YOUR BATTERY PACK AND CHARGER in a cool, dry place. Do not store battery pack where temperatures may exceed 120°F (50°C) such as in direct sunlight, a vehicle or metal building during the summer.
- This appliance is not intended for use by persons (including children) with reduced physical, sensory or mental capabilities, or lack of experience and knowledge, unless they have been given supervision or instruction concerning use of the appliance by a person responsible for their safety. Children should be supervised to ensure that they do not play with the appliance.
- If the supply cord is damaged, it must be replaced by the manufacturer, its service agent or similarly qualified persons in order to avoid a hazard.
- Danger of explosion if battery is incorrectly replaced. Replace only with the same or equivalent type.
- Batteries (battery pack or batteries installed) shall not be exposed to excessive heat such as sunshine, fire or the like.
- The MAINS plug or an appliance coupler is used as the disconnect device, the disconnect device shall remain readily operable.
- Connect the equipment into an outlet on a circuit different from that to which the receiver is connected.
- Consult the dealer or an experienced radio/TV technician for help.
SPECIFICATIONS

Charges MILWAUKEE® M18™ Li-Ion battery M18B, M18B2, M18BX, M18B4, M18B5, M18B6 and M18B9
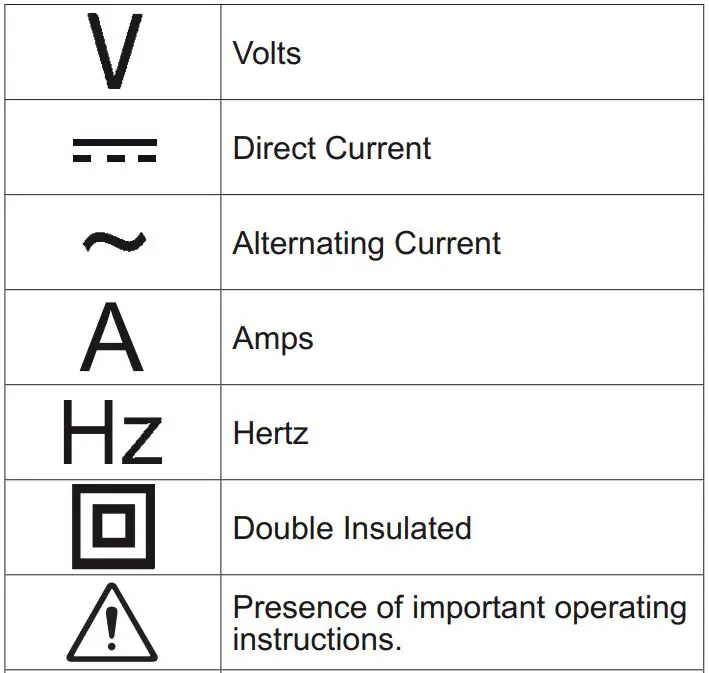
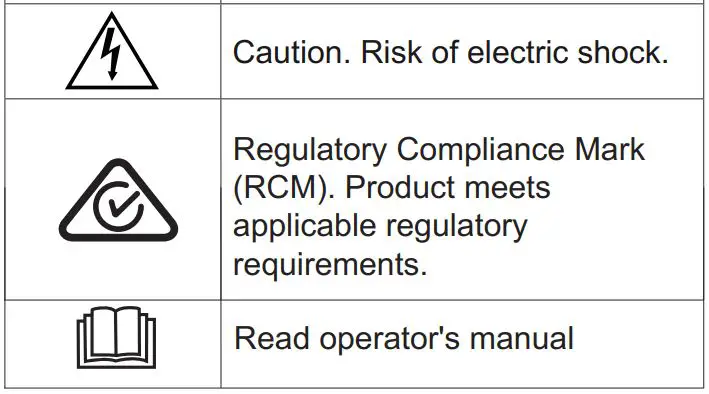
SYMBOLOGY

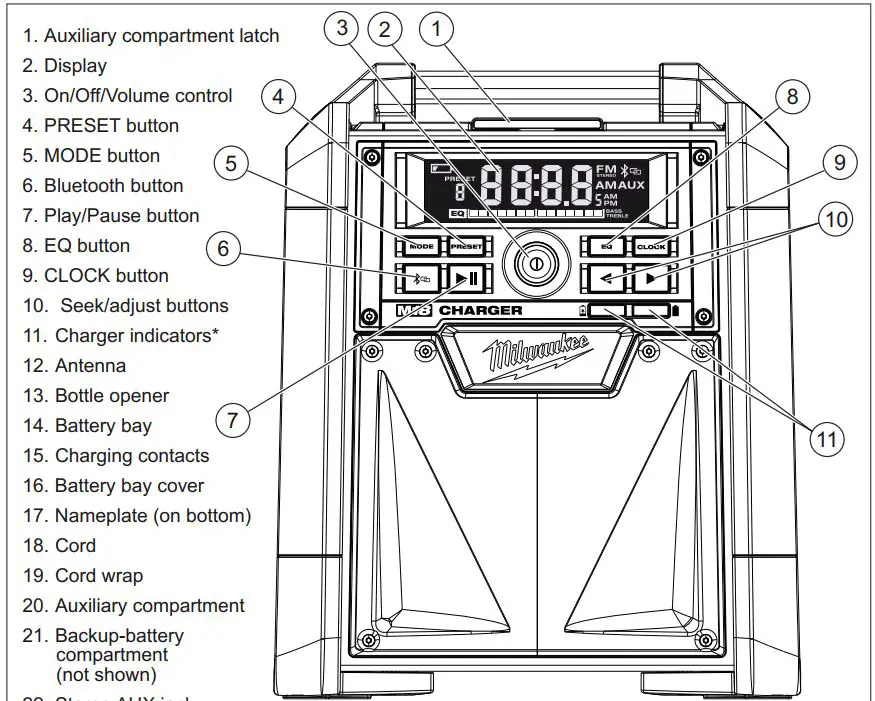
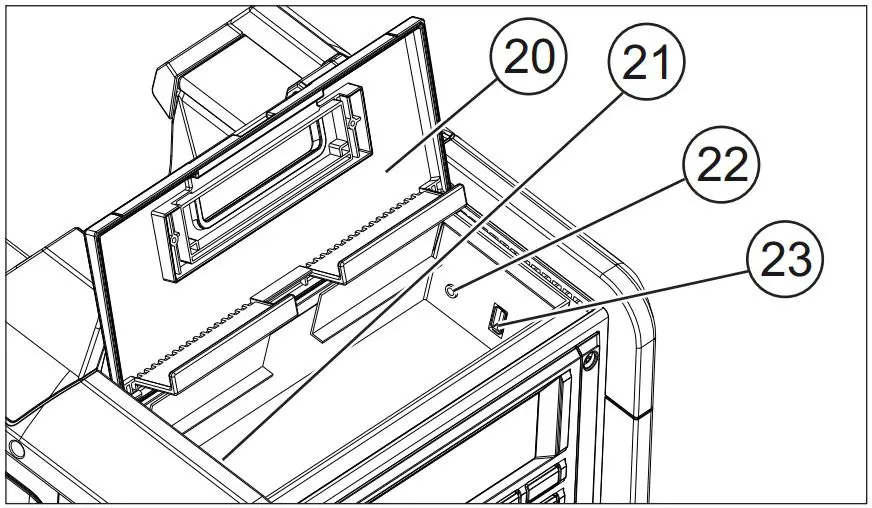
FUNCTIONAL DESCRIPTION
22. Stereo AUX jack
23. USB power outlet
* Charger Indicators
When a battery pack is inserted into the charger, the LEDs will indicate the following:


EXTENSION CORDS
Double insulated tools can use either a two or three wire extension cord. As the distance from the supply outlet increases, you must use a heavier gauge extension cord. Using extension cords with inadequately sized wire causes a serious drop in voltage, resulting in loss of power and possible tool damage. Refer
Guidelines for Using Extension Cords
- If you are using an extension cord outdoors, be sure to indicate that it is acceptable for outdoor use.
- Be sure your extension cord is properly wired and in good electrical condition. Always replace a damaged extension cord or have it repaired by a qualified person before using it.
- Protect your extension cords from sharp objects, excessive heat and damp or wet areas.
- Unplug all cords during lightning storms or when unused for long periods of time.
RADIO ASSEMBLY
 WARNING Recharge only with the charger specified for the battery. For specific charging instructions, read the operator’s manual supplied with your charger and battery.
Power
The MILWAUKEE M18TM Radio Charger can be powered by MILWAUKEE M18TM Li-Ion battery packs or a standard wall outlet. When plugged into a wall outlet, the battery bay will charge MILWAUKEE M18TM Li-Ion battery packs (see Charger Operation).
Inserting/Removing Battery Pack
- Open the battery bay cover.
- To insert the battery pack, slide it into the battery bay.
- To remove the battery pack, pull the battery pack off of the bay.
- Always close the battery bay cover when the bay is not in use.
Low Battery Indicator
When the radio is powered by a battery pack and its charge falls below 10%, the low battery indicator is displayed.
Battery Pack Protection
To protect the life of the battery pack, the radio will shut off when the battery’s charge becomes too low. If this happens, plug radio charger into a 120V outlet and charge the battery pack according to Charger Operation.
Installing an Auxiliary Device
Open the auxiliary compartment to connect an MP3 player, CD player, or other audio device using the stereo auxiliary jack. Small devices can be stored in the compartment during use.
USB Power Outlet
This outlet can be used to charge a cell phone, power an MP3 player or any other device that uses less than 2.1A of DC electrical current.
NOTE: Any device that uses more than 2.1 A of DC electrical current will trip a self-resetting overload and disable the output. Changing Back-up Batteries
Changing Back-up Batteries
WARNING Batteries may leak chemicals or may explode if used incorrectly. The following care should be taken to prevent such an incident:
- Make sure the positive (+) and negative (-) battery terminals are positioned correctly.
- Do not mix new and old batteries together, or mix different types of batteries.
- Do not try to recharge non-rechargeable batteries.
If chemicals from the batteries come in contact with your skin, wash them off immediately with water. If chemicals leak onto the radio, clean the radio completely.
To hold station presets and clock time when the battery pack is removed and the radio is unplugged, 2 AAA batteries are required.
- Remove battery pack and unplug radio.
- Remove the screw and battery cover.
- Insert two (2) AAA batteries according to matching positive (+) and negative (-) marks.
- Replace the battery cover and screw.
RADIO OPERATION
WARNING Always remove battery pack before changing or removing accessories. Only use accessories specifically recommended for this radio. Others may be hazardous.
WARNING To reduce the risk of fire or electric shock, do not expose this radio to rain or moisture.
 Turning On/Off and Controlling Volume
Plug the cord into an appropriate AC outlet or install a battery pack.
Press the On/Off/Volume control button  to turn the radio on and off. The radio station (frequency) is displayed. To display the time, press the CLOCK button. Volume is restored to the last setting.
NOTE: When the Radio Charger is running on battery power, the display will dim after 5 minutes to reduce power use.
Rotate the On/Off/Volume control button to increase or decrease the volume.
Setting the Clock
- Press and hold the CLOCK button until the hour begins to flash.
- Use the ◄ and ► buttons to change the hour.
- Press the CLOCK button again. The minutes will begin to flash. Use the ◄ and ► buttons to change the minutes.
- Press the CLOCK button again to save.
EQ Adjustment
To manually adjust the Bass/Treble sound, press the EQ button. Set the bass sound by rotating the On/Off/Volume control button . Press the EQ button again to set the treble sound by rotating the On/Off/Volume control button .
Selecting Band
Push the MODE button to select Bluetooth, FM, AM, or AUX.
Tuning and Seeking
Press the ◄ and ► buttons to move up and down the band. Press, hold, and release the ◄ and ► buttons to SEEK through the band. When a station is found, the SEEK will stop.
PRESET Stations
To set the PRESET stations:
- Tune to desired station.
- Press and hold the PRESET button until the PRESET indicator on the display begins to ash.
- Use the ◄ and ► buttons to select the PRESET location for the station. Five locations (1-5) are available.
- Press the PRESET button to save the location. To tune to a PRESET station: Press and release the PRESET button to step through the PRESET stations.
Using the Stereo AUX Jack
- Open the Auxiliary Compartment
- Plug the auxiliary device into the Stereo AUX jack.
- Use the MODE button to select AUX.
- Start the auxiliary device.
 Using Bluetooth
To enter the Bluetooth mode, press the  button, or press the MODE button to cycle through to Bluetooth.
Pairing
- If no Bluetooth device is connected, Bluetooth pairing will begin automatically and the icon will flash on the display.
- The radio will continue to search for a signal for 3 minutes.
- To manually pair a device, press and hold bluetooth button until the
- begins to flash.
- While the is flashing, select “Milwaukee” on the Bluetooth capable device.
- Enter PIN “0000”.
- Once the device has successfully paired with the radio, the will be shown on the radio’s display.
Connecting
To enter the Bluetooth mode, press the button, or press the MODE button to cycle through to Bluetooth.
When the radio locates a paired Bluetooth device, the will be shown on the radio’s display.
If connection is lost between the radio and the Bluetooth device, the radio will try to reconnect
automatically for up to 3 minutes.
Controlling
When streaming music through to the radio via a Bluetooth device, use the  button to start and pause the music. Use the ◄ and ► to move through the tracks.
ADDITIONAL BATTERY SAFETY RULES
WARNING To reduce the risk of fire, personal injury, and product damage due to a short circuit, never immerse your tool, battery pack or charger in fluid or allow a fluid to flow inside them. Corrosive or conductive fluids, such as seawater, certain industrial chemicals, and bleach or bleachcontaining products, etc., can cause a short circuit.
CHARGER OPERATION
WARNING Charge only MILWAUKEE® M18™ Lithium-Ion battery packs in the MILWAUKEE® Li-Ion Battery Charger. Other types of batteries may cause personal injury and damage. Battery pack and charger are not compatible with V™-technology or NiCd systems.
When to Charge MILWAUKEE® Li-Ion Battery Packs
Remove the battery pack from the tool for charging when convenient for you and your job. MILWAUKEE® battery packs do not develop a “memory” when charged after only a partial discharge. It is not necessary to run down the battery pack before placing it on the charger.
- Use the Fuel Gauge to determine when to charge your MILWAUKEE® Li-Ion battery pack.
- You can “Top-Off” your battery pack’s charge before starting a big job or long day of use.
- The only time it is necessary to charge the MILWAUKEE® Lithium-Ion battery pack is when the pack has reached the end of its charge. To signal the end of charge, power to the tool will drop quickly, allowing you just enough power to finish making a cut, drilling a hole, or driving a fastener. Charge the battery pack as needed.
How to Charge the Battery Pack
Plug the Radio Charger into a 120V outlet. The battery packs will not charge if the Radio Charger is not plugged in. Place the battery pack onto the bay by sliding the pack on from the top of the bay. The red light will turn on, either flashing (pack is too hot or cold) or continuous (pack is charging).
- A fully discharged pack with an internal temperature between 32°F and 104°F will charge in 30-Min or 1-Hour, depending on the battery pack.
- Heavily cycled battery packs may take longer to charge completely.
- The Fuel Gauge lights on the battery pack are displayed as the pack is being charged, indicating how fully charged the pack is.
- After charging is complete, the continuous green light will turn on and the fuel gauge will turn off.
- The charger will keep the battery pack fully charged if it is left on the charger.
- the light indicator flashes red and green, check that the battery pack is fully seated into the bay. Remove the pack and reinsert. If the problem persists, contact a MILWAUKEE service facility.
- If the light indicator does not come on, check that the battery pack is fully seated into the bay. Remove the pack and reinsert. If the light indicator still does not come on, contact your local authorised MILWAUKEE® dealer or service centre.
Charging a Hot or Cold Battery Pack
The Red flashing indicator light on the charger indicates that the battery pack temperature is outside the charging range. Once the pack is within the acceptable range, normal charging will take place and the red light will be continuous. Hot or cold battery packs may take longer to charge.

MAINTENANCE
WARNING To reduce the risk of injury, always unplug your tool before performing any maintenance. Never disassemble the tool or try to do any rewiring on the tool’s electrical system. Contact a MILWAUKEE service facility for ALL repair dealer or service centre.
Maintenance and Storage
Store your charger in a cool, dry place. As a general practice, it is best to unplug battery chargers and remove battery packs when not in use. No battery pack damage will occur, however, if the charger and battery pack are left plugged in.
WARNING To reduce the risk of injury, electric shock and damage to the tool, never immerse your tool in liquid or allow a liquid to flow inside the tool.
Cleaning
Clean out dust and debris from charger vents and electrical contacts by blowing with compressed air. Use only mild soap and a damp cloth to clean the battery pack and charger, keeping away from all electrical contacts. Certain cleaning agents and solvents are harmful to plastics and other insulated parts. Some of these include gasoline, turpentine, lacquer thinner, paint thinner, chlorinated cleaning solvents, ammonia and household detergents containing ammonia. Never use flammable or combustible solvents around battery packs, charger, or tools.
Repairs
If your tool is damaged, return the entire tool to the nearest service center.
ACCESSORIES
If the supply cord is damaged, it must be replaced by the manufacturer, its service agent or similarly qualified persons in order to avoid a hazard.
WARNING To reduce the risk of injury, always unplug the tool before attaching or removing accessories. Use only specifically recommended accessories. Others may be hazardous.
For a complete listing of accessories refer to your MILWAUKEE® Electric Tool catalogue or go online to milwaukeetools.com.au or milwaukeetools. co.nz. To obtain a catalogue, contact your your local authorised MILWAUKEE® dealer or service centre.
WARRANTY – AUSTRALIA and NEW ZEALAND
Please refer to Australian and New Zealand warranty supplied with tool. This warranty applies only to product sold in Australia and New Zealand.
SERVICE – AUSTRALIA and NEW ZEALAND
MILWAUKEE®prides itself in producing a premium quality product that is Nothing But Heavy Duty®. Your satisfaction with our products is very important to us! If you encounter any problems with the operation of this tool, please contact your authorised MILWAUKEE® dealer.
For a list of MILWAUKEE® dealers, guarantee or service agents please contact MILWAUKEE®
Customer Service or visit our website.
(Australia Toll Free Telephone Number 1300 645 928)
(New Zealand Toll Free Telephone Number 0800 279 624)
or visit www.milwaukeetools.com.au / www.milwaukeetools.co.nz.
Milwaukee Electric Tool Corporation
13135 West Lisbon Road, Brookfield, Wisconsin U.S.A. 53005
Milwaukee Tool (Australia)
21 Kelletts Road, Rowville, VIC 3178
Melbourne, Australia
Milwaukee Tool (New Zealand)
2 Landing Drive, Mangere
Auckland, 2022, New Zealand
Designed by Milwaukee Electric Tool Corp.
Professionally Made in China for Milwaukee Tool (Australia) / Milwaukee Tool (New Zealand)
Printed in China