
MINN KOTA I-Pilot User Guide
QUICK REFERENCE GUIDE
COMPATIBLE WITH ALL BLUETOOTH® ENABLED i-PILOT SYSTEMS
REMOTE
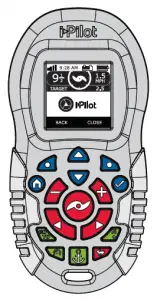
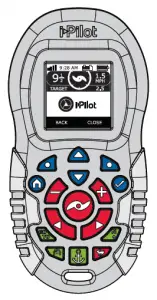
Menu Control Buttons
Home
Pressing this button will always bring up the Home Screen.
Ok
Press to accept selections. Press to power remote on. Press and hold for 3 seconds to power remote off.
Left Softkey & Right Softkey
Buttons change function based on the mode of operation and which screen is presently displayed. Softkey Labels at the bottom of the display screen indicate current function.
Menu Up & Menu Down
Used to navigate Softkey Labels and menus.
Manual Control Buttons
Speed Down
Steer Left
Speed Up
Steer Right
Prop On/Off
High Speed Bypass
Double press to engage.
Scan to view the complete i-Pilot Owner’s Manual online.
Navigation Buttons
GO TO
Opens the list of Spot-Locks and iTracks that are within navigable range.
Cruise Control
Press to enable Cruise Control.
Spot-Lock
Press to enable Spot-Lock.
AutoPilot
Press to enable AutoPilot or Advanced AutoPilot.
©2016 Johnson Outdoors Marine Electronics, Inc.
minnkotamotors.com
HEADER
10:50 A
Time Motor
Battery
GPS Signal Strength
Remote Battery
10:50 A
GPS Signal Strength
Shows the level of GPS signal strength. If no bars appear, no GPS signal is detected.
Motor Battery
Displays the battery level of the motor.
Time
Displays the current time.
Remote Battery
Displays the battery level of the remote.
ICONOGRAPHY
Spot-Lock
Displays when Spot-Lock is engaged.
Spot-Lock Jog
Displays when Spot-Lock is engaged and the motor is communicating with a Heading Sensor.
Legacy AutoPilot
Displays when AutoPilot
is engaged and the AutoPilot Mode is set to Legacy.
Advanced AutoPilot
Displays when AutoPilot is engaged and the AutoPilot Mode is set to Advanced.
Record
Displays when an iTrack is being recorded.
TARGET
iTrack
Displays when an iTrack is being navigated.
Prop Lockout
Displays when the Prop is locked during certain functions.
Trim
Displays when Trim is being adjusted.
Brightness
Displays when screen brightness is being adjusted.
Only available with Ulterra.
Only available with Ultrex.
Prop
Displays when the Prop is enabled. Rotates when the Prop is on. Blinks when a mode of navigation is used that requires the prop to be enabled.
Prop Speed
Displays the current Prop Speed. Can be adjusted in 1/2 speed increments between 0 and 10.
Ground Speed
Displays the current speed over ground.
Cruise Control
Displays the Target Speed when Cruise Control is engaged.
Lock
Displays when the Remote is locked.
Scroll Up & Down
Displays when the softkey labels at the bottom of the display screen have more options available.
i-PILOT®
QUICK REFERENCE GUIDE
COMPATIBLE WITH ALL BLUETOOTH® ENABLED i-PILOT SYSTEMS
SPOT-LOCK
- Press the Spot-Lock button on the remote.
- The information for the temporary Spot-Lock location will show up on the display screen. Use the Menu Up and Menu Down buttons to find the Save softkey label at the bottom of the display screen. To save the Spot-Lock, press the Left Softkey to open the Save menu.
- The Save menu brings up a list of Spot-Locks. Use the Menu Up and Menu Down buttons to select one of the Spot-Lock memory locations. Press the Left Softkey to Save the Spot-Lock into the selected memory location.
DISENGAGING SPOT-LOCK
- When Spot-Lock is engaged, press the Spot-Lock button to disengage Spot-Lock, or use the Menu Up and Menu Down buttons to find the Cancel softkey label at the bottom of the display screen. Use the Right Softkey to select Cancel.
RE-ENGAGE A SAVED SPOT-LOCK
- Manually navigate the boat to within a quarter mile of a saved Spot-Lock location. Due to safety reasons, i-Pilot will not re-engage a saved Spot-Lock location greater than a quarter mile away.
- Press the GOTO button on the remote.
- The Spot-Lock menu will appear on the display screen. Use the Menu Up and Menu Down buttons to scroll to a saved Spot-Lock location in the menu.
- Press the Ok button to select a saved Spot-Lock location.
SPOT-LOCK JOG (Heading Sensor required.)
- To engage Spot-Lock Jog, first engage Spot-Lock. Use the Speed Down (jog backward), Speed Up
(jog forward), Steer Left (jog left), and Steer Right (jog right) buttons to jog the Spot-Lock location 5 feet in the selected direction from the current Spot-Lock location.
CRUISE CONTROL
ENGAGING CRUISE CONTROL
- Press the Cruise Control button on the remote.
- The Target Speed will appear on the display screen. Press the Speed Down or Speed Up buttons
to adjust the Target Speed.
DISENGAGING CRUISE CONTROL
- When Cruise Control is engaged,
press the Cruise Control button on the remote to disengage Cruise Control.
HIGH SPEED BYPASS ENGAGING HIGH SPEED BYPASS
- Double press the High Speed Bypass button.
- The Prop Speed will automatically go to speed 10.
DISENGAGING HIGH SPEED BYPASS
- When High Speed Bypass is engaged, press the High Speed Bypass button on the remote to disengage High Speed Bypass, or press the Speed Down button.
AUTOPILOT
- Press the AutoPilot button on
the remote. - The AutoPilot or Advanced AutoPilot
icon will display on the screen. - To adjust the desired heading,
manually steer the motor to the new heading. i-Pilot will automatically lock onto the new heading.
DISENGAGING AUTOPILOT OR ADVANCED AUTOPILOT
- When either AutoPilot mode is engaged, press the AutoPilot button on the remote to disengage AutoPilot.
iTRACK
RECORDING AN iTRACK
- Use the Menu Up or Menu Down
buttons to find the Record softkey label at the bottom of the display screen. - Press the Left Softkey to select the Record menu.
- The Record menu brings up a listing of iTracks. Use the Menu Up and Menu Down buttons to scroll to one of the iTrack memory locations.
- Press the Ok button to select an iTrack memory location. Once a location is selected, the current location of the boat becomes the To Start location of the iTrack being recorded.
- Navigate the boat along the desired path or course. AutoPilot and/or Cruise Control can be used while recording an iTrack.
- To stop recording an iTrack, use the Menu Up or Menu Down buttons to find the Stop softkey label at the bottom of the display screen.
- Use the Left Softkey to select Stop.
- The recording will end automatically if the two-mile distance limit is reached for the iTrack or if the Spot-Lock or GO TO button is pressed.
NAVIGATING AN iTRACK
- Manually navigate the boat to within a quarter mile of the saved iTrack. Due to safety reasons, i-Pilot will not re-engage a saved iTrack greater than a quarter mile away.
- Press the GO TO button on the remote. The remote default is to first bring up saved Spot-Locks. Press the Right Softkey to bring up saved iTracks.
- Use the Menu Up or Menu Down buttons to select an iTrack to navigate.
- Using the Left Softkey or Right Softkey select the softkey label to either go To Start or To End. The boat will navigate to the closest point on the iTrack and then navigate To Start or To End depending on the selection made until it reaches that point.
REVERSE AN iTRACK
- The direction that the iTrack is
being navigated can be reversed while the GO TO action is taking place. Use the Menu Up or Menu Down buttons to find the Reverse softkey label at the bottom of the display screen. Use the Left Softkey to select Reverse.
FAQS
What’s in the box?
Minn Kota 1866560 i-Pilot Micro Remote for i-Pilot and i-Pilot Link – Bluetooth Systems
Will this work with the Minn Kota Terrova?
Yes it will
Can this be paired on more than one boat?
Yes Pairing is done at the head unit end not the remote. Wouldn’t recommend using when both boats are in range of rack other though.
Does anyone know if this will do the “jog” feature when you’re in “anchor” mode?
Believe you can. Just like you do with the remote that come with the Ultex, by hitting one of the directional arrows while you are in spot lock……
Does this work with the ulterra model ?
Yes
Does this work with the ultrex?
Yes it should. As long it’s bluetooth enabled.
Will this remote float?
Don’t know for sure but it’s pretty light and guessing it will. Keep mine on a lanyard around my neck. Same for Power pole controller. Store it all in a have size tackle tray along with spare batteries.
Is this compatiblw with the ultrxx trolling motor?
This remote is compatible with any iPilot and iPilot Link unit that is Bluetooth enabled – https://minnkotamotors.johnsonoutdoors.com/accessories/trolling-motor/micro-remote-bluetooth – So it should be compatible with the Ulterra. Refer to manufacturers website to verify. Works great with my Riptide Terrova that is GPS and Bluetooth.
Well this work with my V2?
Yes it does
Will this remote work with this trolling motor-minn kota 1358790 powerdrive 45_bt bowmount trolling motor with bluetooth?
My trolling motor is a prowerdrive 70 with Bluetooth,it works on mine
Does this remote need a charging cable and does it come with one if so?
No, no charging required. Operates off a battery, lasted me 2 years before replacing. Batteries are readily available.
What about stow and deploy? Does this remote work with that feature?
No. must use the remote that came with the Ulterra to deploy and stow
Does the remote work with a Turbo Pro 824?
This remote is for a blue tooth equipped trolling motor with i-Pilot fitted, due to the age of the 824 I very much doubt it has blue tooth or the i-Pilot fitted or be upgraded to take it.
Since this unit is so simple, no LED, what is the pairing method from the remote to the motor?
While holding down the pair button on the top of the motor hold the two buttons at the same time at the top of the remote the rabbit and the N with the arrow. It will beep three times when it is paired.
VIDEO

