![]() Instruction Manual
Instruction Manual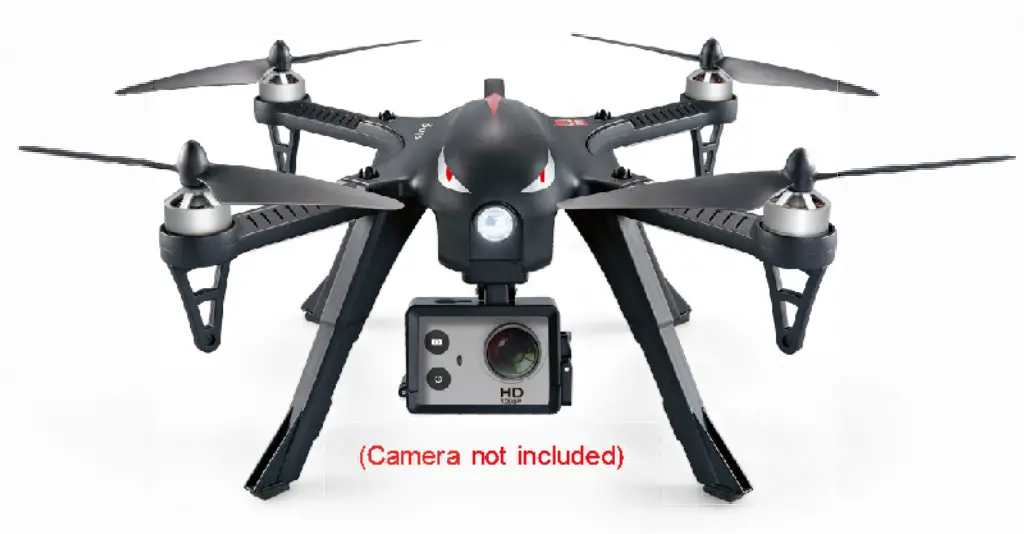

Important statement and safety guidelines
Thank you for purchasing MJX product. Please read this manual carefully before use and retain it for future reference.
Important statement
- This aircraft is not a toy, but a hobby-grade model. It should be assembled and operated properly. The pilot must operate this hobby model in a safe way. Improper operation may cause injury or property damage.
- This aircraft is applicable for pilots aged 14+ who are with skilled flying experience.
- Users are in full charge of properly operating this aircraft. Manufacturers and dealers disclaim any responsibility for damages caused by misuse.
- Keep the small accessories away from kids to avoid an accident.
Flight safety guidelines
Hobby-grade radio control aircraft is somewhat considered to be the highest danger potential article Users should firmly uphold the principle of “safety comes first” Never fly the aircraft near airports, above crowds or in zones storing dangerous goods and understand the responsibility of the accident may cause by improper operations
- Stay away from obstacles, crowds, power lines, trees or waters
Always choose a wide-open area for every flight, well away from people and property. Never fly directly over people or animals Please don’t fly in such bad weather conditions as high temperature, snow, strong wind(level 5), rain or fog. Maintain a 7ft (2m) distance from the aircraft when taking off and landing. - Keep the aircraft in a dry environment
The aircraft is composed of sophisticated electronic components and mechanical parts To avoid damages on the mechanical and electronic components, please keep the aircraft in dry environment and use a clean cloth to wipe the surface and keep it clean. - Practice flying together with skillful pilot
Beginners are suggested to practice flying together with skillful pilot guidance. Do not fly alone. - Bear proper operation and safe flight guidelines in mind
Please take a careful look at the manuals before flights for important information of product functions
and operation tips, and learn how to use the accessory, safe flight always comes first. Stay informed of and abide strictly by relevant local laws and regulations. Keep away from any non-flight zones and respect other people’s privacy. - Safe flying
Please make sure you are in good shape mentally before every flight. Fly the aircraft as per your flying
experience. Never fly under influence of alcohol or drugs. Keep the remote controller at least 20 cm away
from your body when flying the aircraft. - Keep distance from a flying aircraft
Never use your hands to touch a flying aircraft under any circumstance. Don’t approach and touch a landed aircraft before its propellers are completely locked. - Keep away from heat source
The aircraft is made of metal, fiber, plastic, electronic component,s, and other materials Please keep it away from the heat source to avoid deformation or even damage caused by sun exposure and high temperature. - Environmental protection requirements
To protect our blue planet, so please recycle the aircraft as per local laws and regulations.
Product profile
Product configuration
| Product/spare parts included in the box | ||
| B3 fuselage(camera not included) X1 Extra Propellers AB X2 High landing gear x4 Remote controller xT |
Battery xT Charger x1 Screwdriver x |
Protecting guard x4 Propeller changing tool xT Camera holder X1 |
Technical parameter of the aircraft
Diagonal: 310mm
Overall height: 140mm
Brushless motor: 1806
Gross Weight: about 485g (with high landing gear, protecting guard, battery)
Battery: 7.4/1800 mAh
Charging Time: about 5 hours
Maximum flying time: about 18 minutes (without mounting the high landing gear and protecting guard)
Product assemble
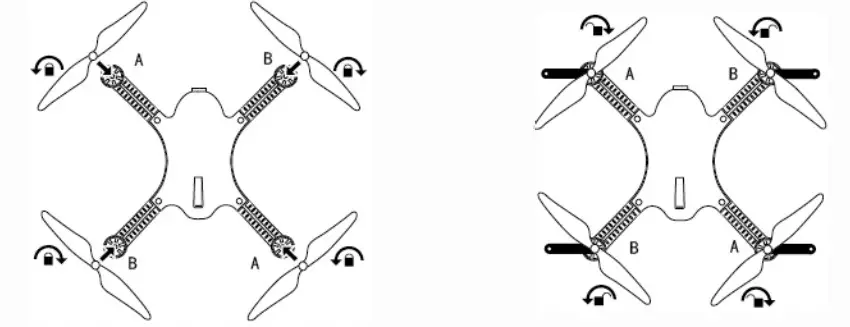
Propellers installation/removal
- Installation
Install propeller A and propeller B on the corresponding motor shaft and fix the rotor propellers tightly by
rotating them as per the “lock” direction shown on the propellers - Removal
Fix the brushless motor by rotor blade changing tool and then rotate and remove the propellers as per
the “unlock” direction showed on the propellers
![]()
- Please make sure that the clockwise and the counter-clockwise propellers are installed on the correct motors because the aircraft will not fly normally for wrong propellers installation.
- Be careful when installing the propellers, as they are a little sharp.
- Please use MJX propellers for this aircraft.
- Extra propellers can be ordered additionally.
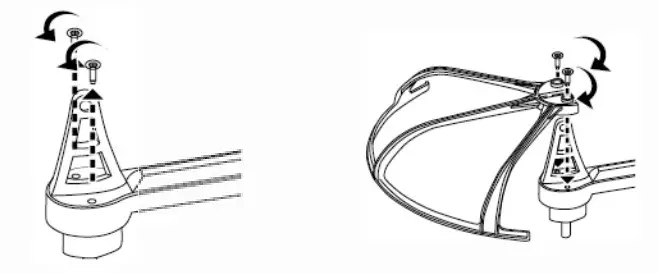
Protecting guard installation
First, release the two screws from the bottom of the motors Then, install the protection guard on the corresponding position, and fix the screws in a clockwise rotation.
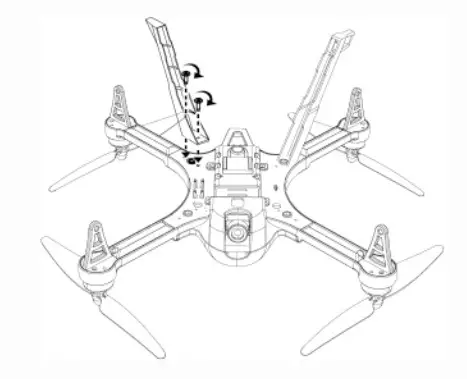
 High landing gear installation
Insert the high landing gear plug into the socket locating at the bottom of the aircraft, align the 2 screws positions, and fix the high landing gear by screwing clockwise.
 Battery installation
Insert the battery into the battery compartment and make sure the battery is installed in place Then, insert the power plug of the battery into the power socket locating at the rear of the aircraft.
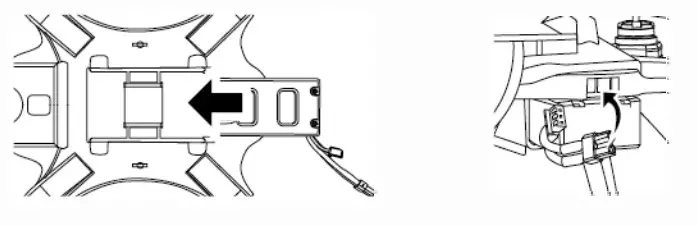
![]() Note: Please connect the power plug as per the indicated positive and negative polarity.
Note: Please connect the power plug as per the indicated positive and negative polarity.
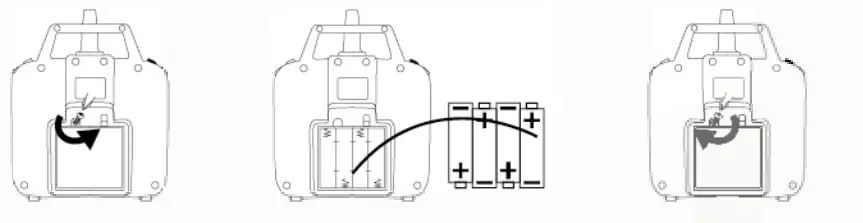
How to install the battery of the remote controller
Unscrew counterclockwise to open the battery compartment cover, install 4x AA batteries into the battery compartment according to the given polarity, screw clockwise to close the battery compartment.
![]()
- Insert batteries with correct polarity
- Non-rechargeable batteries are not to be charged; the transmitter need 4 X AA batteries for work
- Do not mix old and new batteries
- Do not mix alkaline,standard(carbon-zinc),or rechargeable(nickel-cadmium) batteries
- Rechargeable batteries are to be removed from the toy before being charged;
- Rechargeable batteries are only to be charged under adult supervision,
- Exhausted batteries are to be removed from the toy,
- The supply terminals are not to be short-circuited.
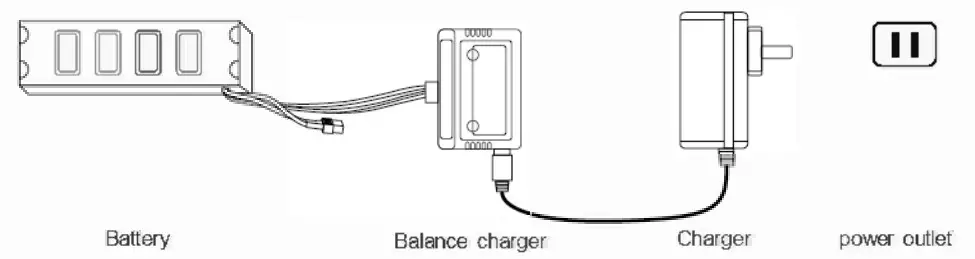
How to charge the battery of aircraft
To cater to different demands from end users, 3 charging devices are designed and optional for charging.
Charging device A: 1 X adaptor only,
Charging device B: 1 X 1SB cable and 1X balance charging controller,
Charging device C: 1 X adaptor and 1 X balance charging controller
The product will be packed with any of the 3 charging devices. Users should check the package to confirm which charging device is included before reading the charging method.
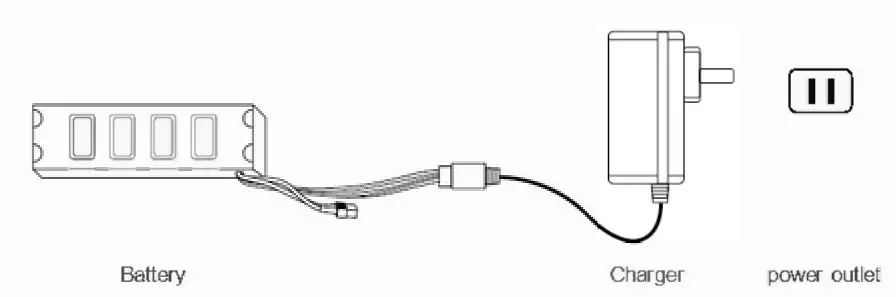
How to charge the battery with charging device A:
- Insert the charger plug to the power outlet, the charger indicator turns green,
- Connect the triple-lines plug of the battery with the charger power line to charge the battery,
- The charger indicator keeps solid red when charging is proceeding and turns green once the battery
is full-charged. Full Charging takes about 5 hours.
How to charge the battery with charging device B:
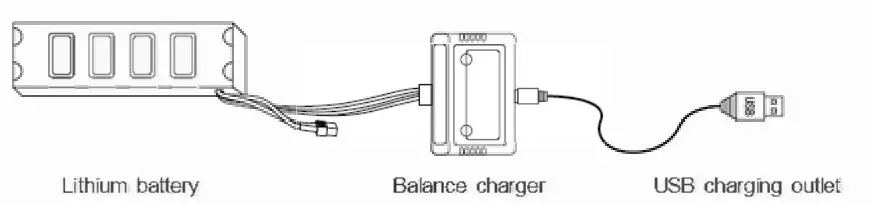
- Connect the balance charger to any USB interface (5V adapter or any device with USB interface) by
the USB cable. At this moment, the red light is solid on and the green light is off - Insert the triplex-wire plug of the battery into the triplex-wire socket of the balance charging controller
and charging is proceeding, - The green light keeps flashing slowly and the red light keeps solid on when the battery is being charged,
when charging is finished, both of the green light and red light keep solid on. Once there is any
malfunction, the red light will be solid on and the green light will keep flashing rapidly. Full Charging takes about 5 hours.
How to charge the battery with charging device C:
- Connect the charger plug with the power outlet, plug the charger wire into the socket located at the night
side of the balance charging controller. At this moment, red light and green light are both solid on, - Insert the triplex-wire plug of the battery into the triplex-wire socket of the balance charging controller
and charging is proceeding, - The green light is off and the red light is on when the battery is being charged. Greenlight and the red light will be both on once the battery is full charged. Full Charging takes about 5 hours
![]() Attention It Is recommended to use the 5V 1-2A adapter for charging If charging by device B.
Attention It Is recommended to use the 5V 1-2A adapter for charging If charging by device B.
- Need adult supervision when this model is being played by children.
- Only batteries of the same or equivalent type as recommended are to be used.
- insert batteries with the correct polarity.
- Non-rechargeable batteries are not to be charged; the transmitter need 4 X AA batteries for Work ·Do
not mix old and new batteries. - Do not mix alkaline, standard(carbon-zinc), or rechargeable(nickel-cadmium) batteries.
- Rechargeable batteries are to be removed from the toy before being charged.
- Rechargeable batteries are only to be charged under adult supervision.
- Exhausted batteries are to be removed from the toy.
- The supply terminals are not to be short-circuited.
- The charing line to be used with the product should be regularly examined for potential hazards, such as damage to the cable or cord, plug, enclosure of other parts, and that in the event of such damage,the product must not be used until that damage had been properly removed.
Major parts of the model

Major parts of the remote controller
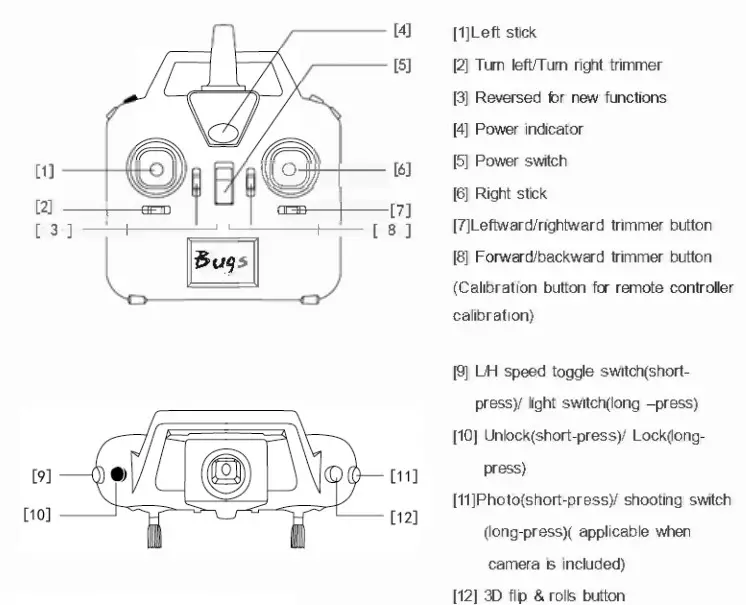
Remote controller
How to connect the signal of the aircraft with the remote controller
- Press the red button on top of the remote controller and turn on the power of the remote controller.The remote controller will send out 2 beep sounds, and the indicator lights keep flashing, the remote controller is under signal connection status.
- Turn on the aircraft. Once the signal connection is done The remote controller will send out a long beep
sound and the indicator light keeps solid green.
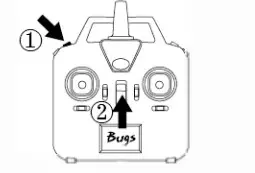
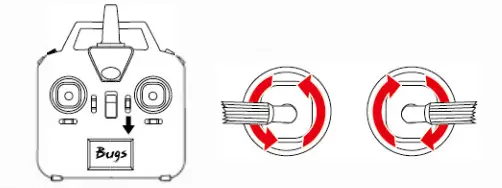
How to lock and unlock the aircraft
Unlock the aircraft
Once the gyro detection of the aircraft is finished, the front lights of the aircraft keep solid. Short-press the red button(indicated as below photo) After a long beep sound from the remote controller, the rear lights of the aircraft keep solid, as well. And the motors rotate slowly, the aircraft is unlocked.
Lock the aircraft
Pull down the throttle stick to the bottom position, long-press the red button (indicated as below photo)
The remote controller sends out an interrupted beep sound Then, the motors stop rotating, and the rear
indicator light is off, which means that the aircraft is locked,
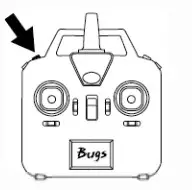
![]() Warnings: The throttle control stick should be pushed to the bottom position when long-press the red button to lock the aircraft. Otherwise, the aircraft could not be locked.
Warnings: The throttle control stick should be pushed to the bottom position when long-press the red button to lock the aircraft. Otherwise, the aircraft could not be locked.
Remote controller calibration
Keep pressing the red button on top of the controller and slide the power switch to the ON position Push down the calibration button and hold on for 3 seconds. The remote controller will send out 3 beep sounds; the indicator light of the aircraft turns from flashing quickly to slowly. Maximum rotate both of the left and night control stick to any direction for 2 circles. Then, again, push down the calibration button and hold on for 3 seconds. The remote controller will send out 3 beep sounds; the indicator light of the model turns from flashing slowly to quickly, which means that remote controller calibration is completed Warm tip:
- All remote controllers have been calibrated when manufacturing
- Remote controller calibration is requested only if pilots find that the remote controller control sticks are not working normally.
- Signal connection is done once for all if it is not connected with other aircraft.
- Set the connection one by one to avoid signal connection error.
Aircraft calibration
Once the gyro detection of the aircraft is finished, push down both of the control sticks to the lower night corner (indicated as below photo). The aircraft front lights turn from solid to flashing. It means that aircraft
calibration is succeeded.
Operate the aircraft
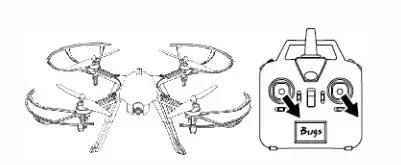
Flips and rolls
Flips & rolls operation
![]() warm tips:
warm tips:
To flip and roll, please press down the 3D rolling button and push the direction control stick at the same time.If not, the aircraft could not perform flips & rolls action normally.
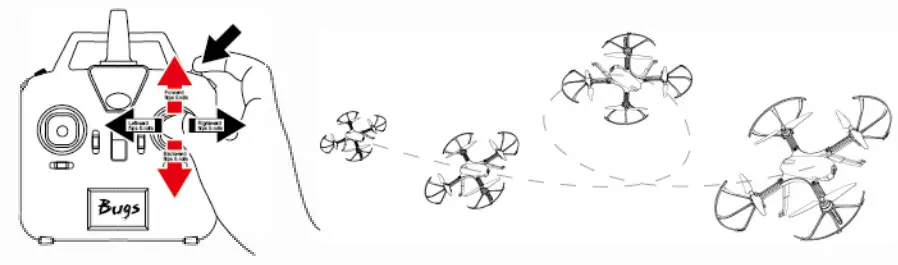
How to fine-tune the aircraft
If the model keeps moving in any direction even this is no control signal given after flying, users may adjust the remote controller’s trimmer button to keep the model balance.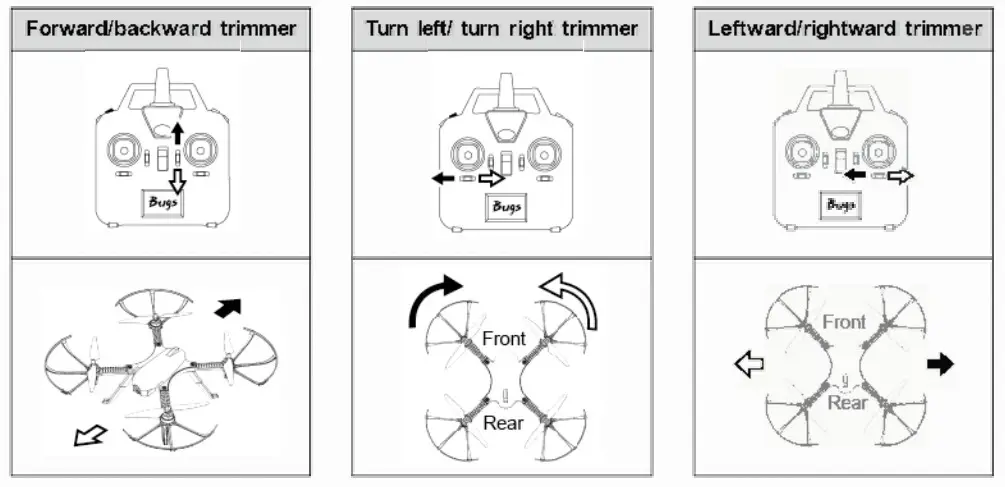
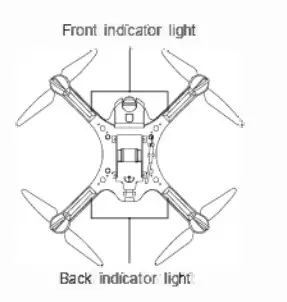
Aircraft indicator light description
| Status | Description |
| Front rot’s flashing quickly. | Gyro d the aircraft is in signal detecting condition. |
| Front light’s flashing on twice and flashing cff two seconds. | The aircraft hasn’t received a signal from the remote controller |
| Front lights flash on once and flashing off for two seconds. | The signal d remote controller is lost after the aircraft received tie signal from tie remote controller |
| The front light is flashing slowly or hart/ backlight ae flashing a the same time. | The aircraft is underpowered and tie remote controller send cut tie sound” beep„ beep,, beep,,, 11_ |
| Front light is al al the lime, bait light is off_ | THe aircraft is under lock status: |
| Front aid rear light ale both solid on | The aircraft is under unlocking or flying status |
Remote controller power indicator light description
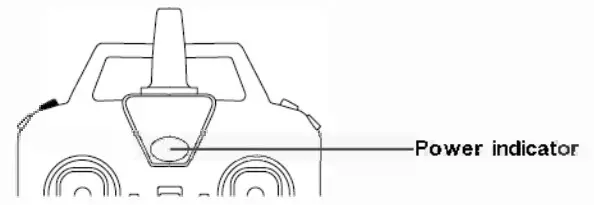
| Remote controller sound
Send rut continuous beep sound quickly |
Power indicator
Cn |
Description
1. The aircraft h too tar away torn tre remote controller that resulted in weak receiving signal. 2.the aircraft is powered off after a successful signal connection. |
||
| Send out continuous beep scald slowly | oft | The aircraft is in low voltage status | ||
| Send an Icing beep sound only | al | The remote controller has connected vith the al craft successfully | ||
| Send a “been beer sound continuously | Flashing slowly | The remote controller s under power | ||
| Send ail °beep° occasionally | Cu | The aircraft receives the very weak signal from the remote controller. | ||
Flight
Before you take off, check and make sure that:
- The aircraft and the remote controller are full charged
- The propellers are installed correctly
- The motors work normally after unlocking.
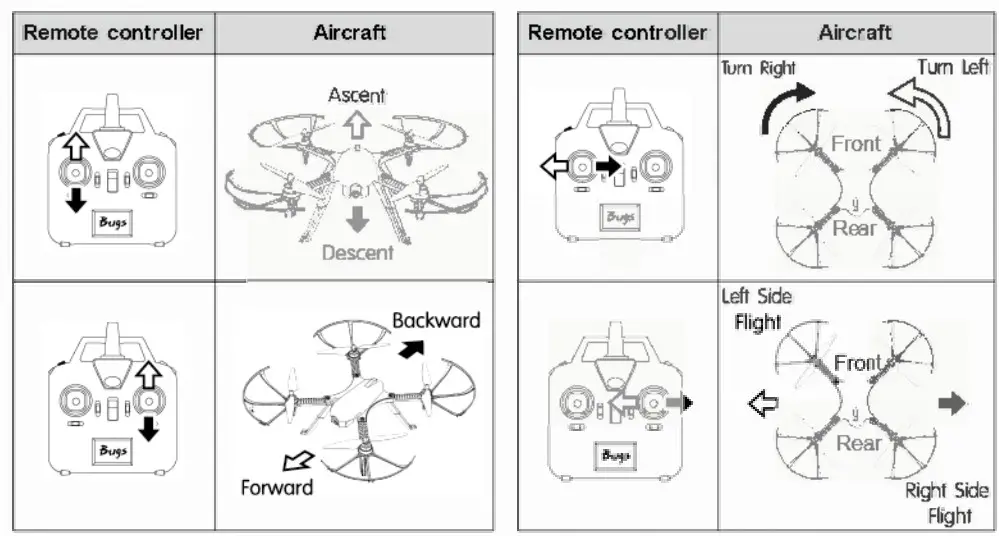
Basic flight operations
Basic flight operations step
- Connect the remote controller with the aircraft
- Unlock the aircraft after the detection of gyro of the aircraft is completed
- Pull up the throttle stick then the aircraft takes off, remote control the flight aircraft by left/right stick
- Push the throttle stick to the bottom, lock the aircraft by press the lock button for a long time
- Take out the battery from the aircraft
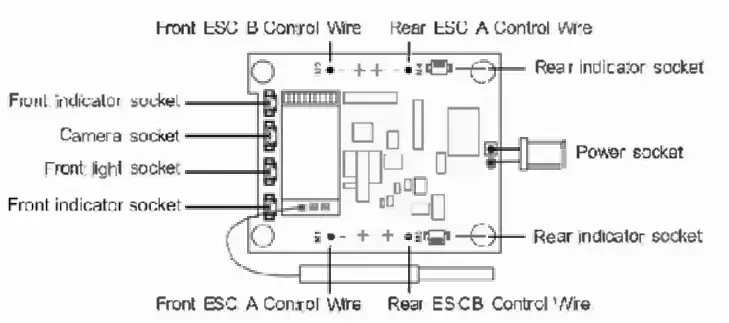
Receiver PCB connecting diagram
To make the model operate normally, the receiver PC’s installation direction and the insertion line’s connecting position must be the same as the below photo showed.
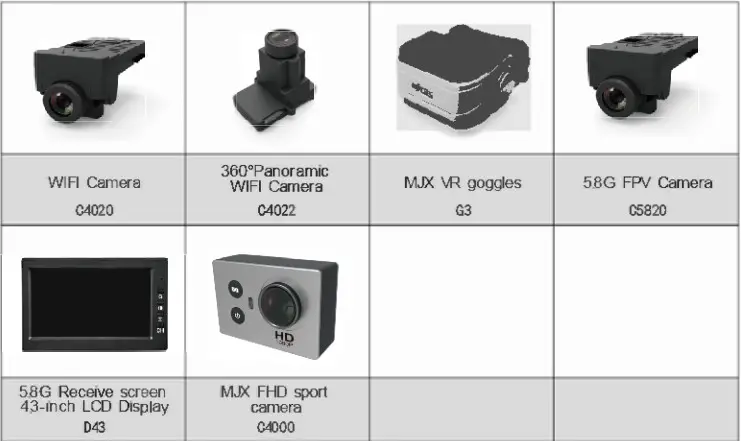
Basic parts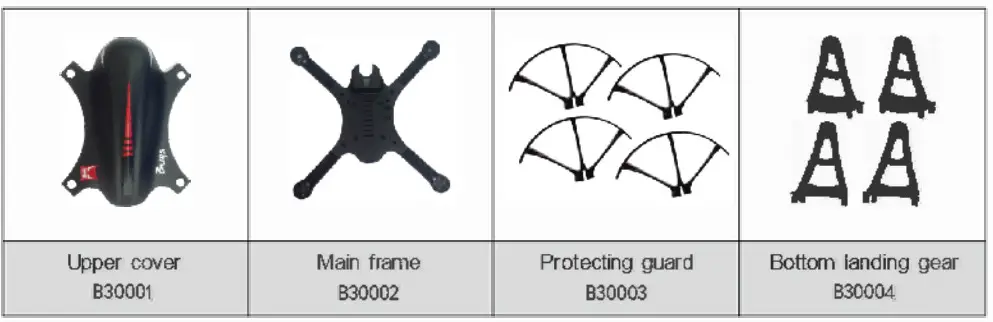
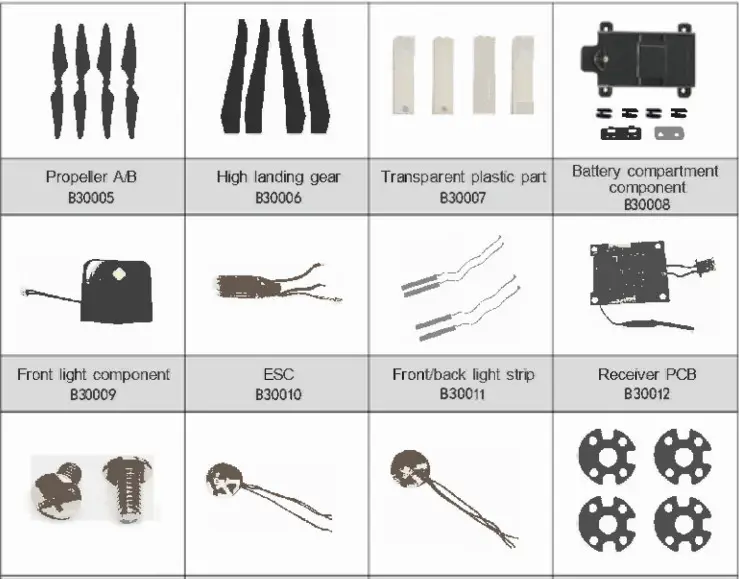
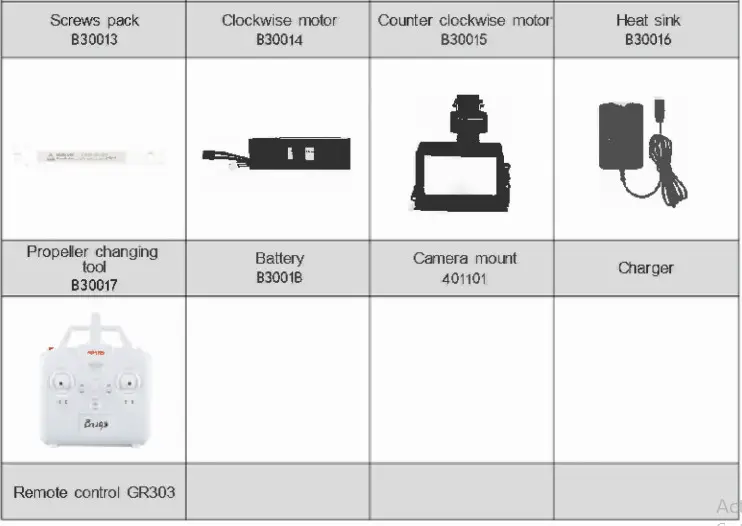
Spare parts available to upgrade B3
Troubleshooting
| No. | Phenomenon | Solution |
| 1. | The lights are flashing quickly | The Gyro of the model is under signal detecting condition, set the model to any flat surface |
| 2. | The model can’t be kept balance after taking 0land lean one side | 1.Adjust all trimmer buttons to the middle value
2)Lay the mode in the fiat surface or flat ground and proofread the gyro of the model again |
| 3. | The model is shaking fiercely | The rotor blade is out of shape, change the propellers |
| 4. | The model can’t be unlocked, the front indicator light flashes slowly | The battery is under low power situation, please charge the battery full |
| 5. | The model can’t be locked | 1)Push the throttle stick to the bottom first, then press the lock button for a long time 2)Proofread the stick of the remote control then push the throttle stick to the bottom, later press the lock button for long time |
Note: a) Changes or modifications not expressly approved by the party responsible for compliance could void the user’s authority to operate the equipment
b) This equipment has been tested and found to comply with the limits for a Class B digital device, pursuant to part 15 of the FCC Rules. These limits are designed to provide reasonable protection against harmful interference in a residential installation_ This equipment generates, uses and can radiate radio frequency energy and,if not installed and used in accordance with the instructions, may cause harmful interference to radio communications. However, there is no guarantee that interference will not occur in a particular installation_ If this equipment does cause harmful interference to radio or television reception, which can be determined by turning the equipment off and on, the user is encouraged to try to correct the interference by one or more of the following measures
-Reorient or relocate the receiving antenna
-Increase the separation between the equipment and receiver
-Connect the equipment into an outlet on a circuit different from that to which the receiver Is connected
-Consult the dealer or an experienced radio/TV technician for help